Odoo Datatrans Payment Provider
Kategorien
Magento
WordPress
SAP Commerce
Odoo
Shopify
Typo3
Shopware
nopCommerce
Pimcore
Hyvä
OXID eShop


1. Introduction
The Datatrans Payment Provider Plugin integrates seamlessly into your Odoo webshop as an additional payment module. As Switzerland’s leading Payment Service Provider, Datatrans supports a broad spectrum of payment methods, including card payments, digital wallets, and other alternative methods. The plugin operates in redirect mode, directing customers to the Datatrans Payment Page, which offers access to all payment methods supported by the configured merchant through a single integration. This approach ensures fast, secure, and straightforward payments, ultimately leading to increased turnover.
2. Features
- Basic Payment Transaction Workflow: Handles standard payment transactions efficiently.
- Payment Method-Specific Configurations: Allows for customization based on different payment methods.
- Customer Customization: Provides options to tailor the payment experience to customer preferences.
- Supported Payment Methods: Includes major cards such as American Express, Diners Club, Discover, Mastercard, Visa, and PostFinance Card.
- Easy Configuration: Facilitates the addition of other payment methods supported by Datatrans.
- Transparent Log History: Maintains a clear and detailed record of all transactions.
- Sale Order Payments: Supports payment processing directly through sale orders.
- Invoice Payments: Enables payment for invoices.
- Multi-Website Compatibility: Functions across multiple websites, making it suitable for businesses with various online presences.
3. Configuration
To configure your payment integration correctly, you need your Datatrans Merchant ID. This ID is available within the Datatrans Webadmin Tool (Backoffice) under the UPP settings section. Follow the steps below to locate it:
- Go to the Datatrans Webadmin Tool: Open your browser and visit https://admin.datatrans.com/
- Log in with your Datatrans credentials.
- Once logged in, navigate to the "UPP Administration" section.
- Under "UPP Administration", click on "UPP Data".
- In the UPP Data screen, you will find the Merchant ID listed. This is a unique identifier required for payment integration and configuration.
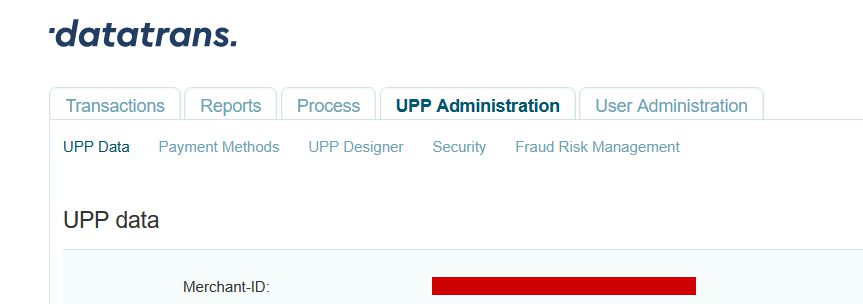
Screenshot 1: Datatrans Webadmin Tool - Merchant ID
The API Password is required to authenticate API requests between your system and Datatrans. It is securely managed within the Datatrans Webadmin Tool. Follow the steps below to access or set your API Password:
- Navigate to UPP Administration > Security menu.
- In the Security section, locate the API Password field. If it's not already set, you can generate a new password here.
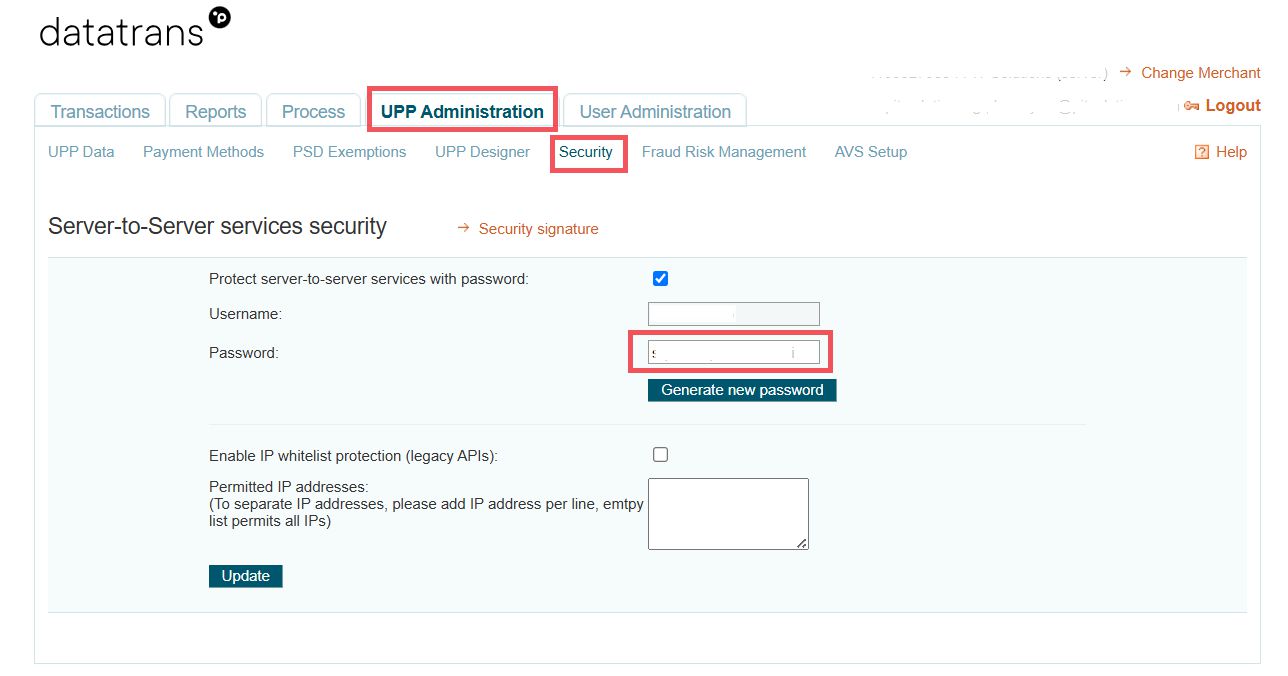
Screenshot 2: Datatrans Webadmin Tool - API Password.
The Security Signature (also known as the HMAC key) is used to ensure secure communication between your system and Datatrans by validating the integrity of API requests. You can find or configure this key in the Security section of the Webadmin Tool.
- In the Datatrans Webadmin Tool, go to UPP Administration > Security.
- Click on the Security Signature section.
- Here, you'll see the existing HMAC key or have the option to generate a new one.If you generate a new key, make sure to save it securely.
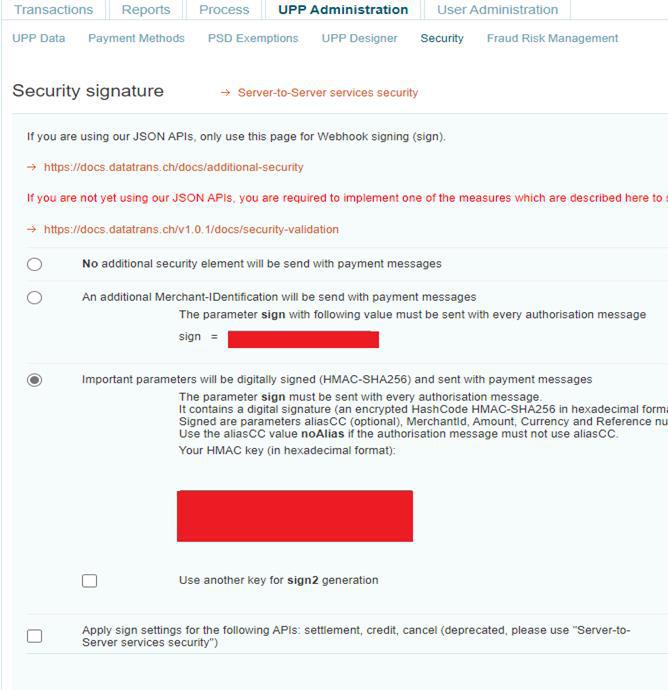
Screenshot 3: Datatrans Webadmin Tool - Security Signature
After collecting the required credentials from the Datatrans Backoffice, configure the payment provider settings in Odoo as follows:
Please make sure that you have completed the following configurations:
- Merchant ID: Found at the top-right corner after logging in, or under UPP Administration → UPP Data.
- API Password: Located in UPP Administration → Security, under the Password field.
- Sign (Security Signature): Available in UPP Administration → Security, under the Security Signature section.
- Password: This is your Datatrans account login password used to access https://admin.datatrans.com.
- Enable Dynamic Signature: Ensure this option is enabled to allow secure, real-time signature validation for transactions.
Once these details are entered into the Odoo backend provider configuration, save the settings to complete the integration.
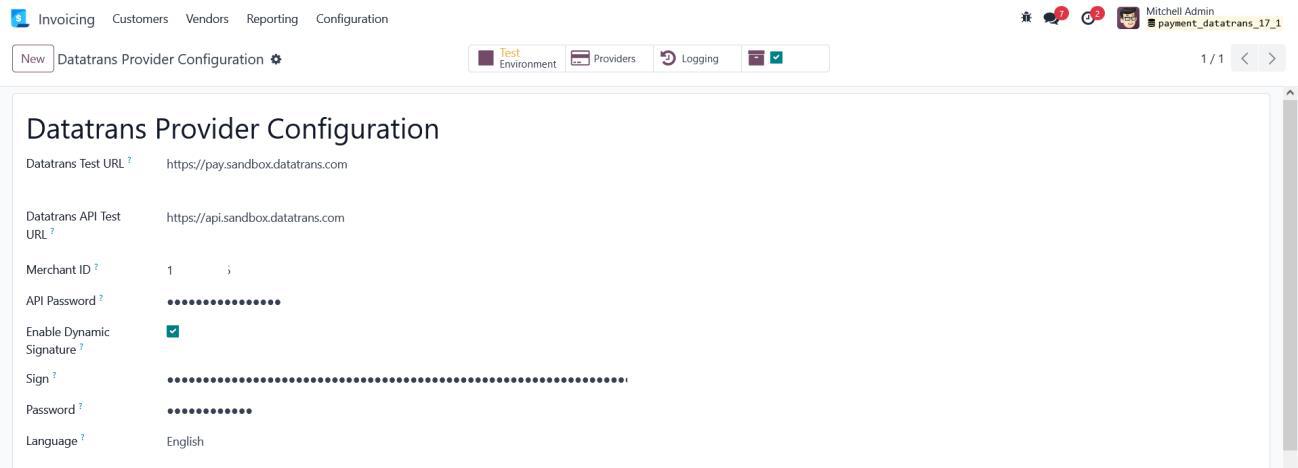
Screenshot 4: Datatrans Provider Configuration: Enable Dynamic Signature
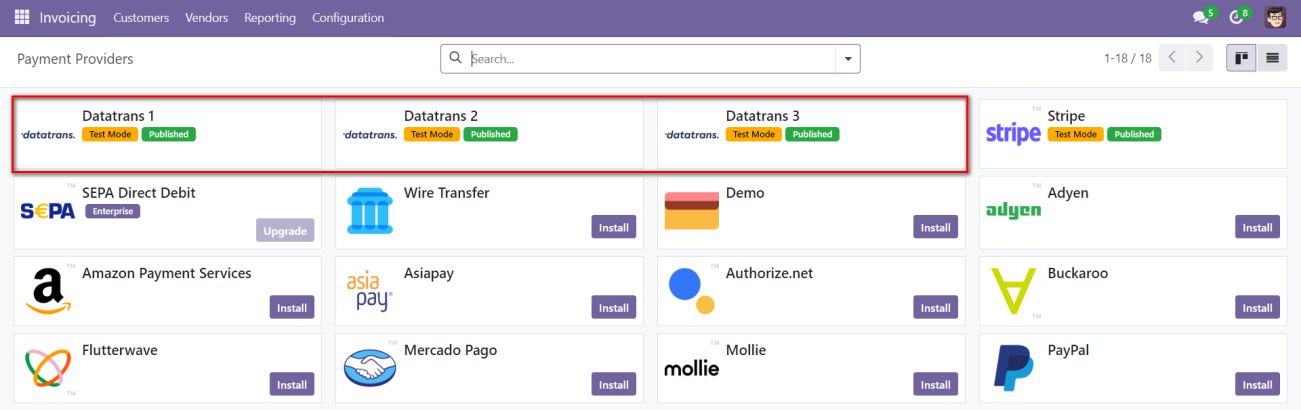
Screenshot 5: Payment Providers Listing.
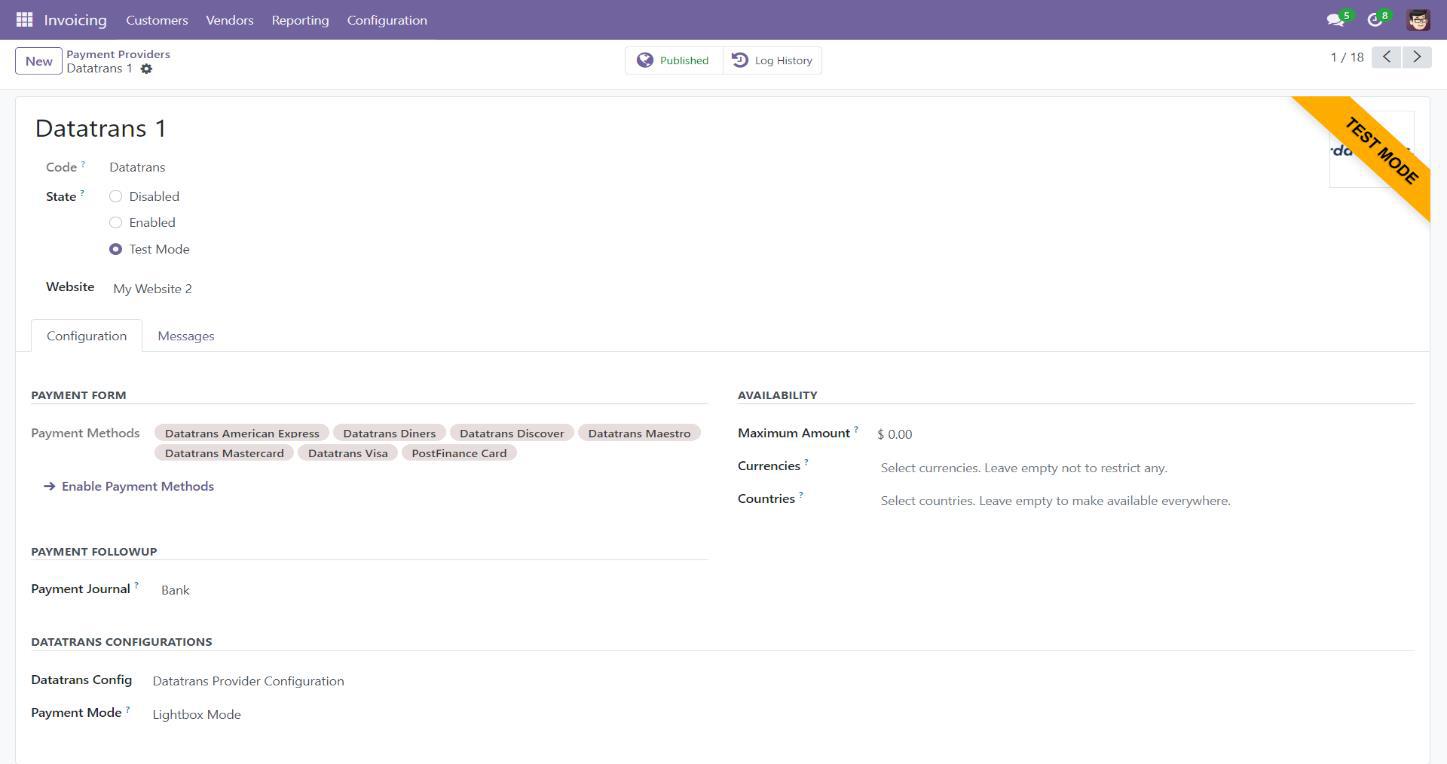
Screenshot 6: Provider Detail Page.
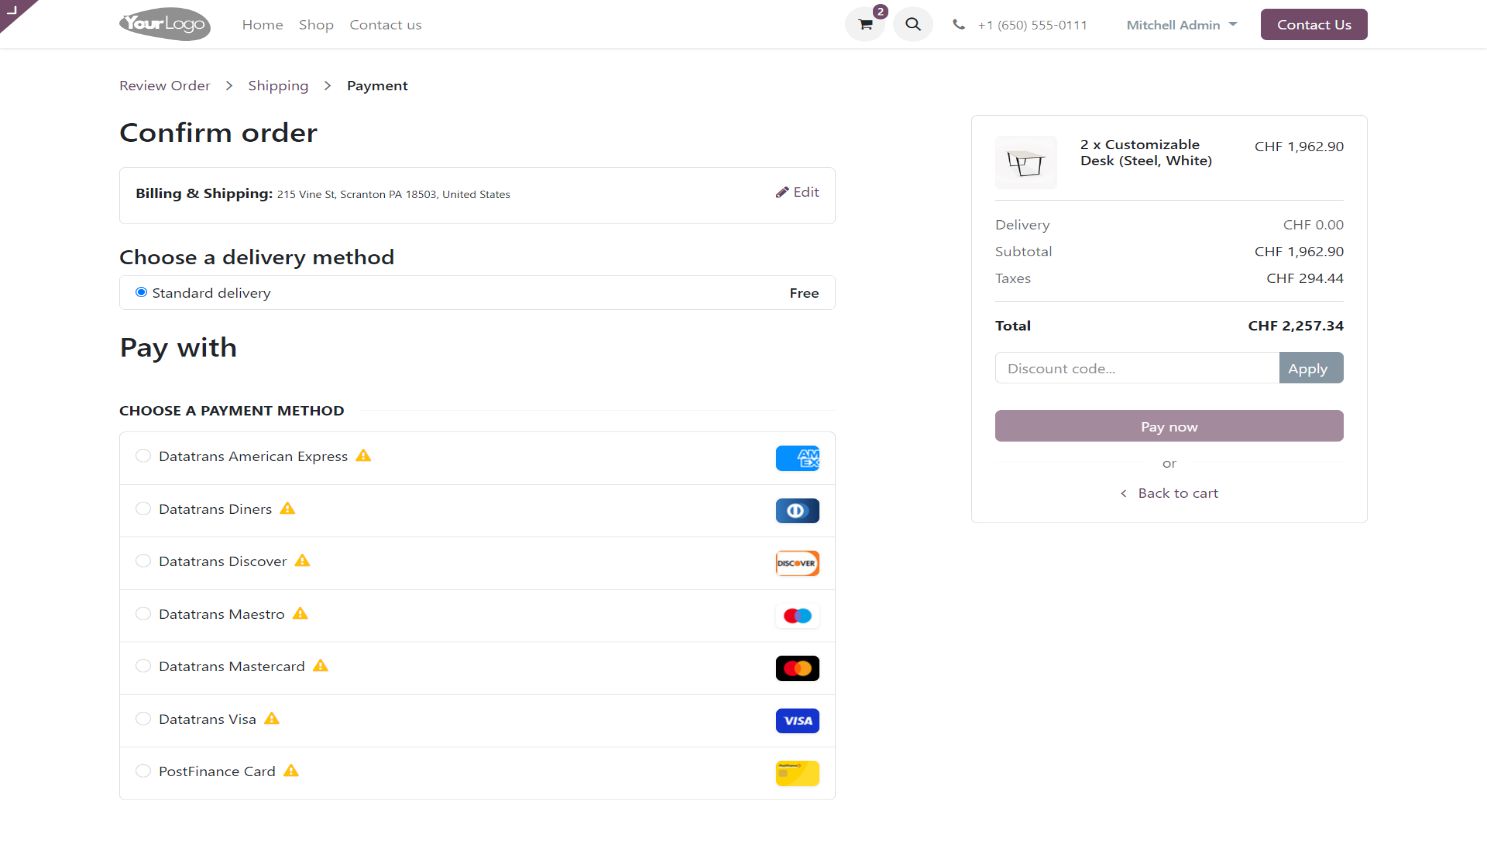
Screenshot 7: Ecommerce Pay Now Page.
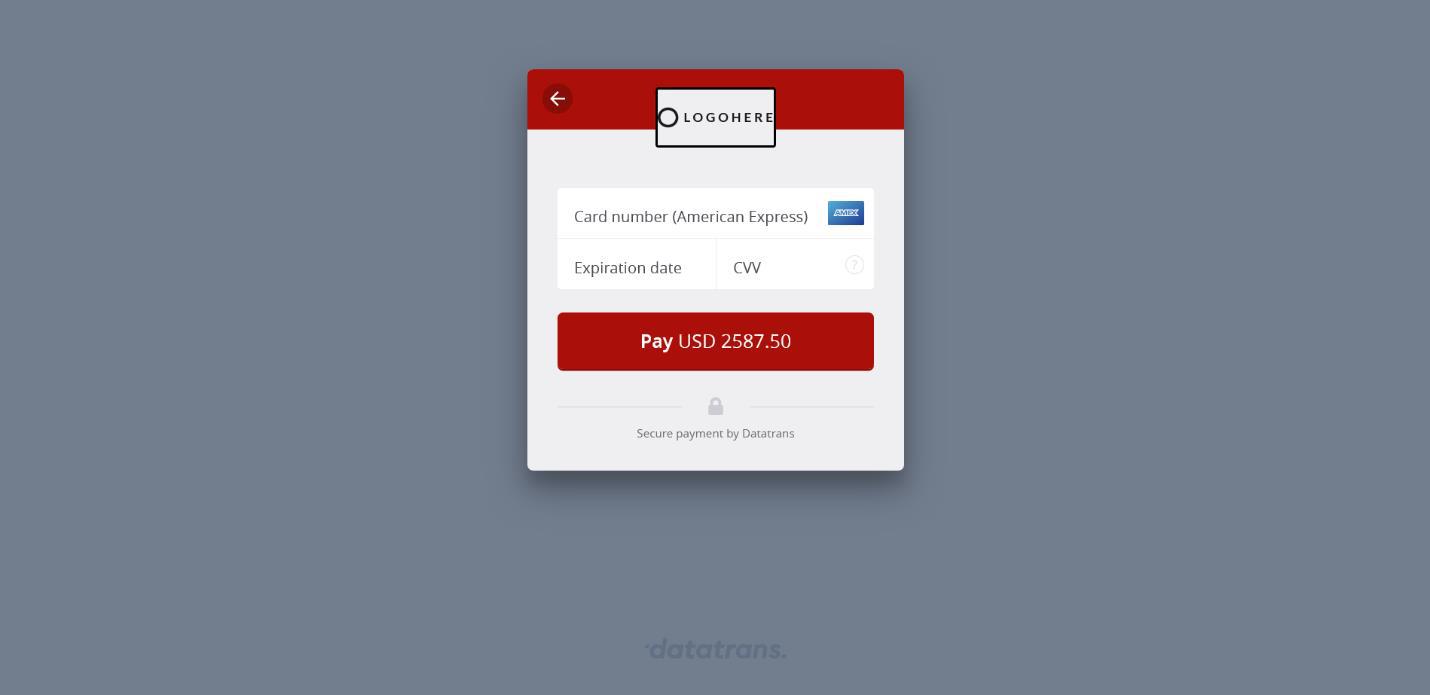
Screenshot 8: Datatrans Payment Detail Page
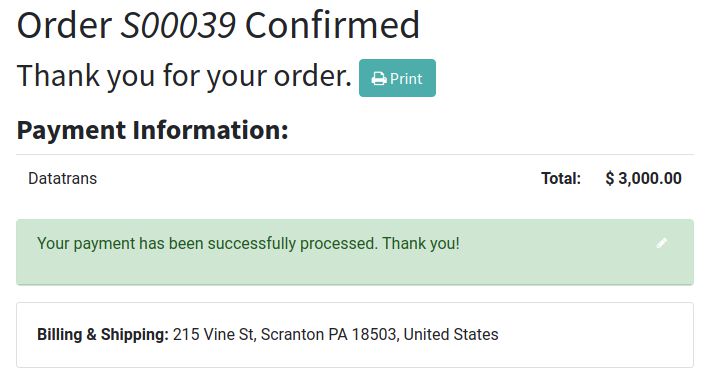
Screenshot 9: Payment Confirmed

Screenshot 10: Payment Failed.
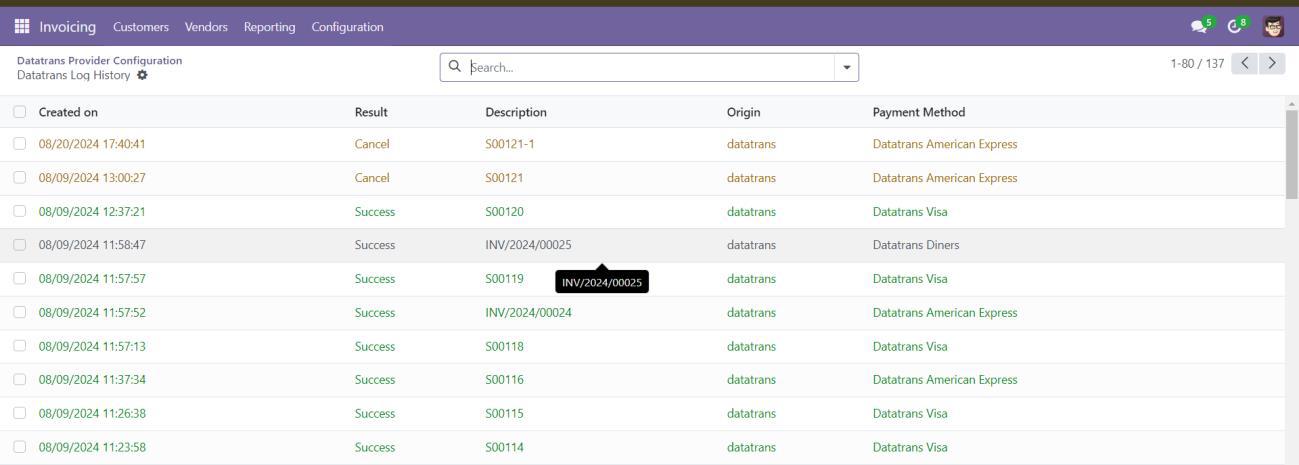
Screenshot 11: Datatrans Log History
4. Datatrans Multi-website Backend Configuration
For multi-website support, you must create separate Datatrans payment providers by duplicating the existing one. Each provider should be mapped to its respective website with the correct Datatrans credentials
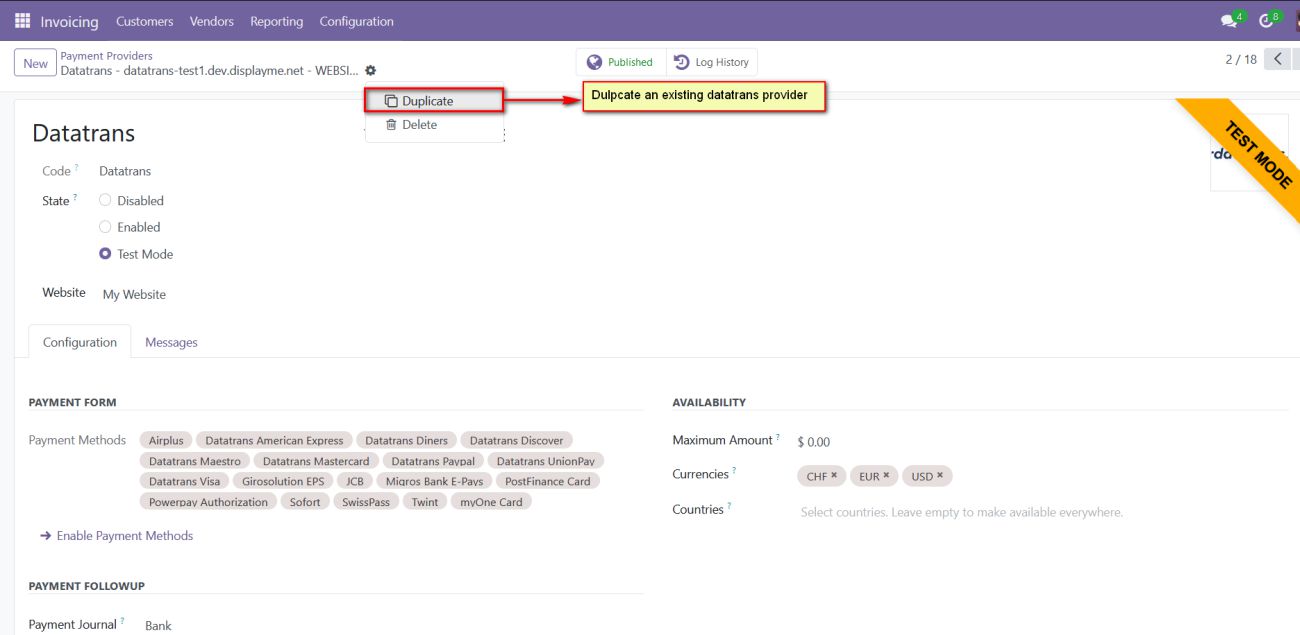
Screenshot 12: Multiple Datatrans payment Provider by duplicating the existing Datatrans payment Provider.
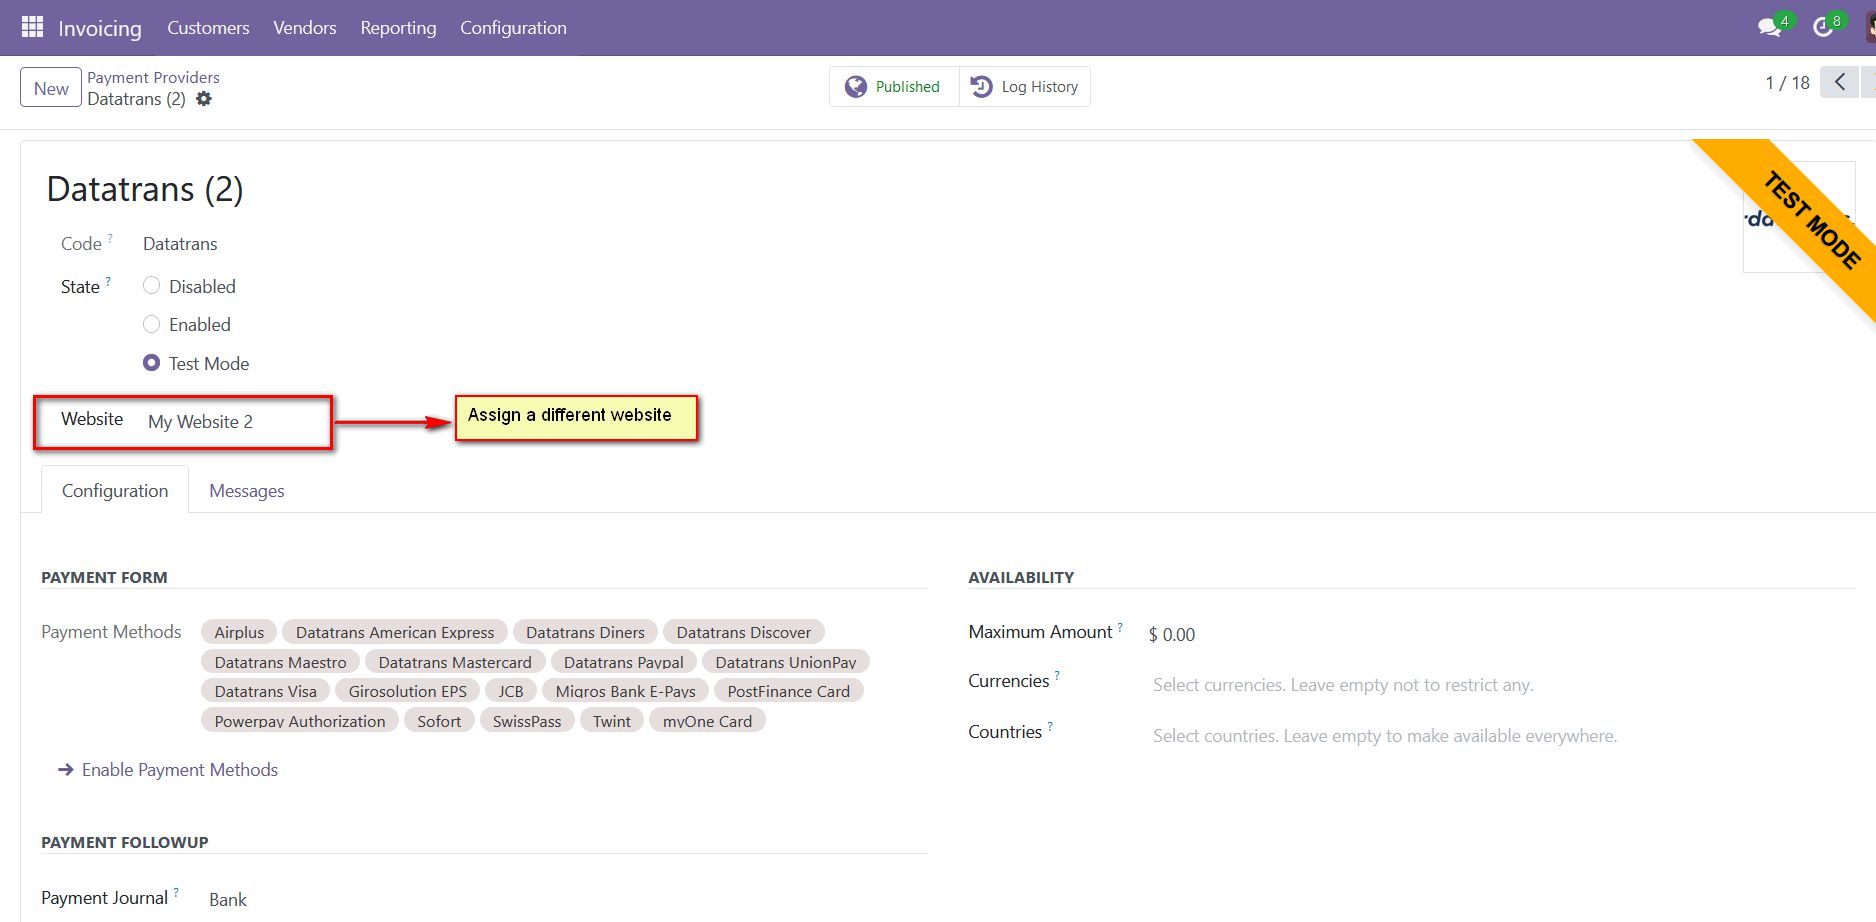
Screenshot 13: Map the respective website and add the Datatrans credentials
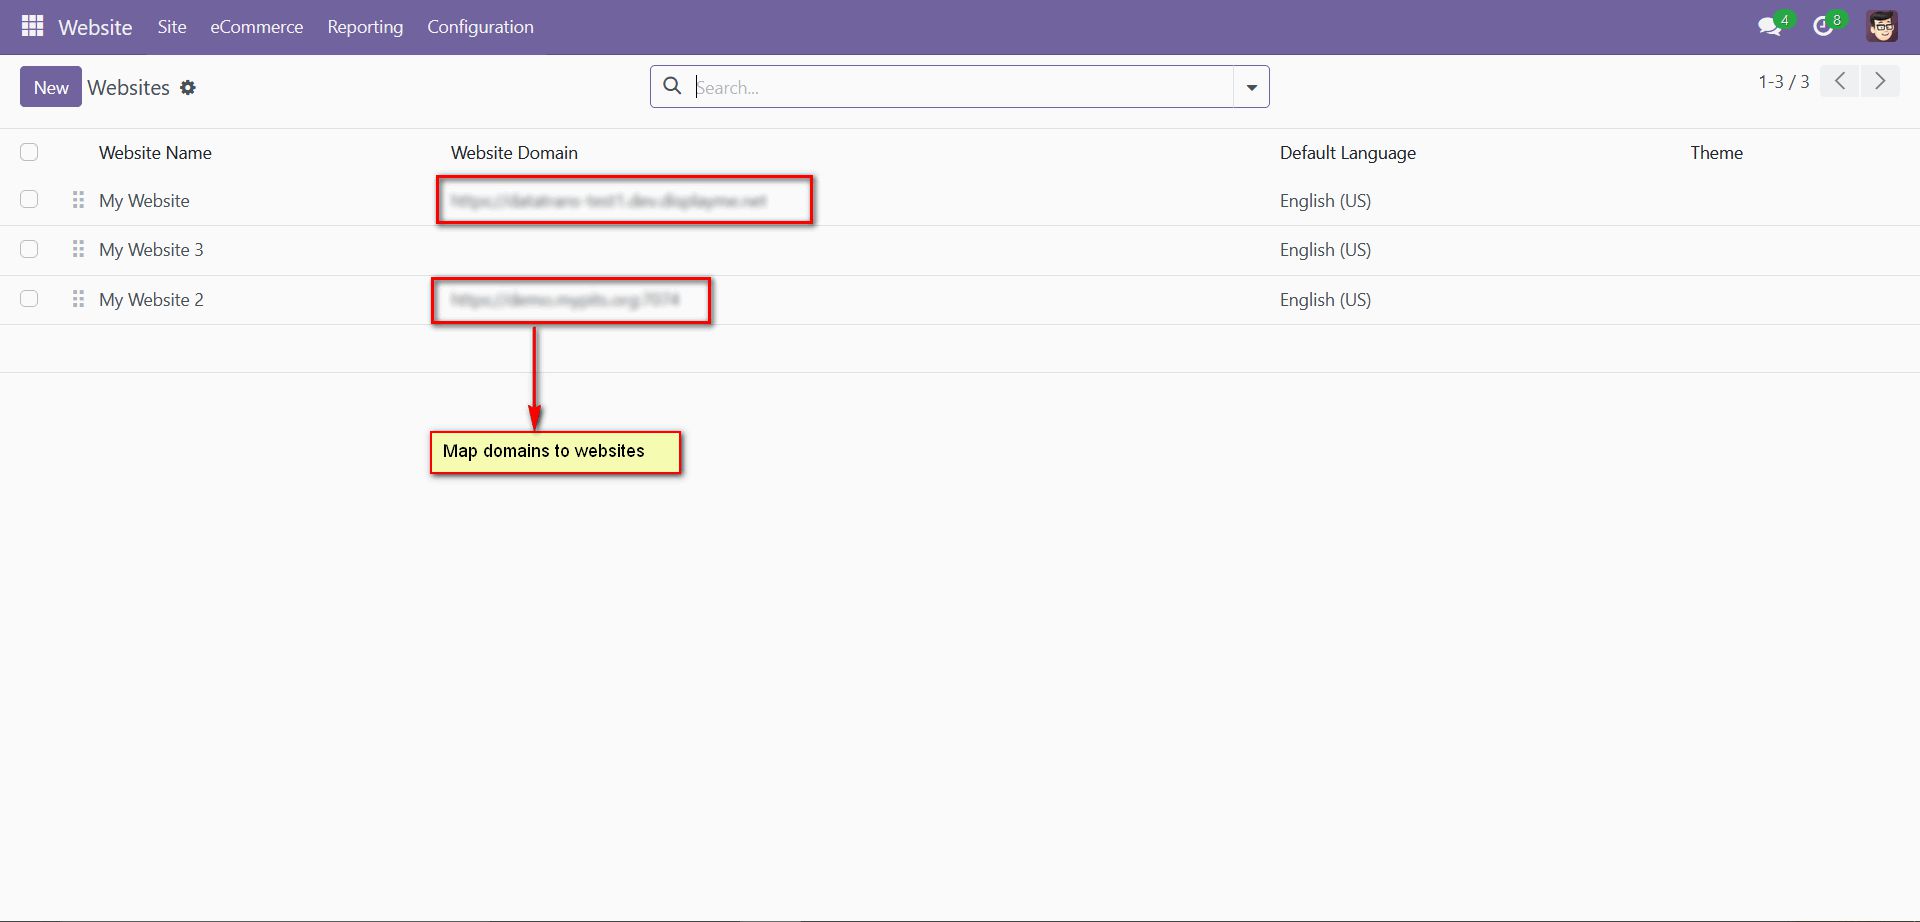
Screenshot 14: For multi-website functioning, it is necessary to set the domain for the websites.
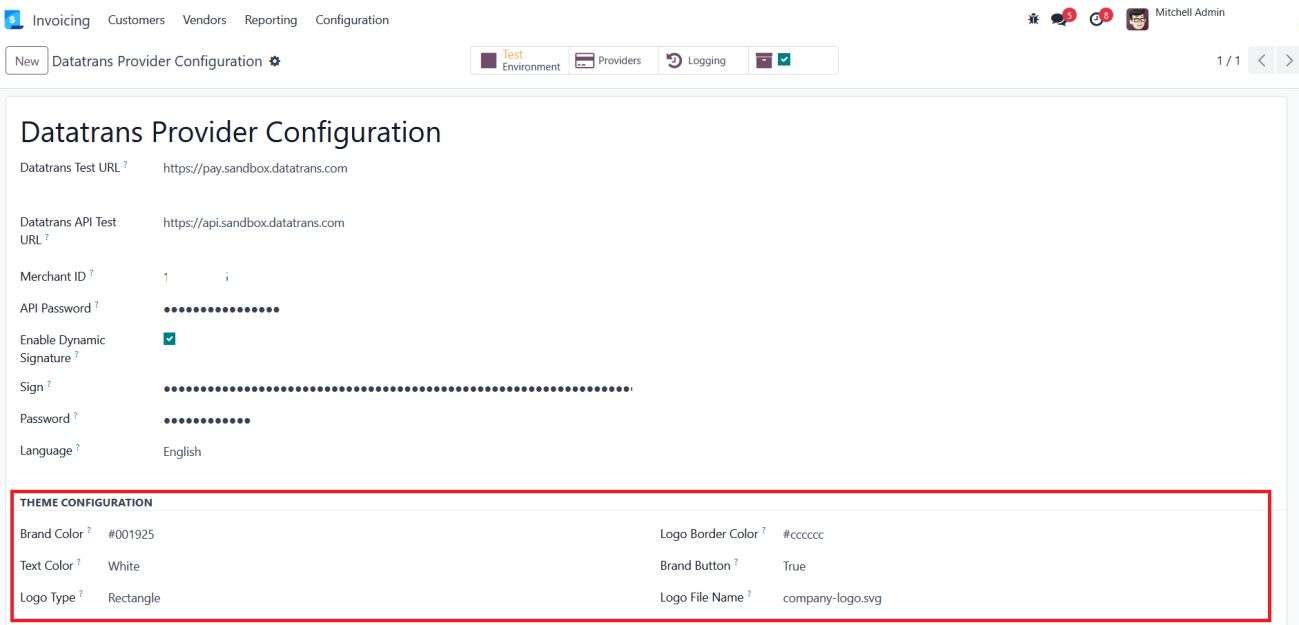
Screenshot 15: Datatrans theme configuration
The Theme Configuration section in the Datatrans Provider configuration allows you to customize the payment page's appearance to align with your brand identity. Below is a description of each field:
- Brand Colour: Specify the primary colour for your brand in hexadecimal format (e.g., #89b70d). This colour will be used to customize the overall theme of the payment interface.
- Text Colour: Define the colour of the text displayed on the payment page. For example, setting it to White ensures high contrast with the background for better readability.
- Logo Type: Choose the display style of your logo on the payment page. Options include Circle and Rectangle, depending on your preference and logo design.
- Logo Border Colour: Input a hexadecimal code to customize the border colour around the logo. For example, #89b70d matches the brand colour and creates a unified visual theme.
- Brand Button: Customize the colour of buttons displayed on the payment page. For instance, #DFBC2F can be used for a vibrant and eye-catching button colour.
- Logo Name: Enter the name of the logo file to be displayed on the payment page (e.g., logo_file.svg). Ensure the file is uploaded to the Datatrans administration panel for it to appear correctly
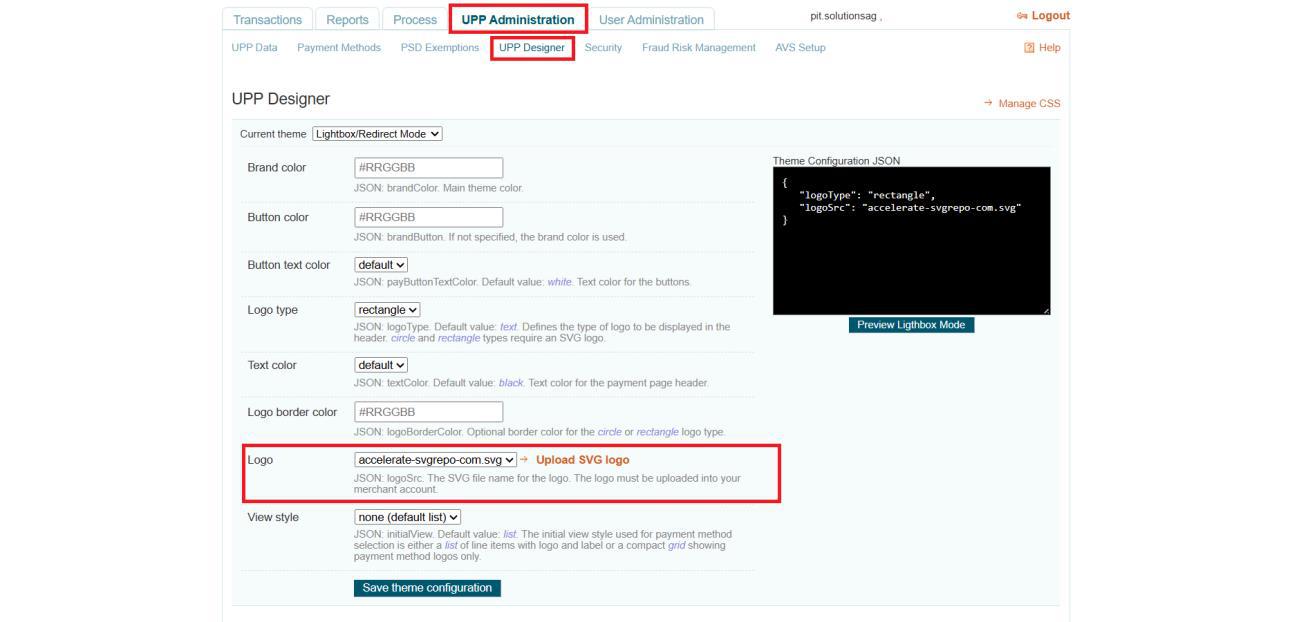
Screenshot 16: Logo configuration in Datatrans back office
5. Brief description
To ensure the Datatrans Payment Provider Plugin functions smoothly, follow these configuration steps:
Initial Setup:
- Configure Datatrans Provider: Begin by entering your Merchant ID, API Password, Login Password and Dynamic Sign from the Datatrans web administration tool into the Odoo backend.
- Activate Provider: Once configured, the Datatrans payment acquirer will be available by default. Activate the provider to make it visible on the shop's payment page
Step-by-Step Configuration:
Prerequisites:
- Ensure you have access to the Datatrans web administration tool to verify and process transactions. You will need the Merchant ID and Dynamic Sign for backend configuration.
Steps:
- Datatrans Configuration:
- Access the Odoo backend and configure the Datatrans Provider with your Merchant ID, API Password, Login Password and Dynamic Sign.
- Activate Datatrans Payment Provider:
- Publish or enable the Datatrans payment provider in your Odoo backend to make it available for use.
- Enter Credentials:
- In the Datatrans Provider Configuration record in Odoo, add the Datatrans credentials: Merchant ID, API Password, Login Password, Dynamic Sign, and enable Dynamic Signature if required.
- Test Checkout Process:
- Navigate to your e-commerce website, add products to the cart, and proceed to checkout.
- Select Payment Method:
- Choose the Datatrans payment method at checkout and proceed with the payment.
- Complete Transaction:
- On the Datatrans Payment Page, enter the required details to complete the transaction.
- Order Confirmation:
- After a successful payment, the order will be placed, and you will be redirected back to your Odoo webshop.
- Multi-Website Configuration:
- To set up Datatrans for multiple websites, duplicate the Datatrans Provider configuration using the Duplicate button.
- Map and Configure Multiple Websites:
- Map the duplicated Datatrans Provider to the respective websites and enter the appropriate credentials for each.
- Set Domain for Websites:
- Ensure each website’s domain is correctly set up in Odoo for proper multiwebsite functionality.
By following these steps, you can effectively configure and utilize the DatatransPayment Provider Plugin within your Odoo webshop.
6. Technical Requirements / Compatible With:
- Technical Requirements: Odoo Sales, Payment, Contact, Invoicing and Website Module.
- Odoo Community and Enterprise Edition: v17.0
7. Datatrans Payment Page Supported Languages:
- German, English, French, Italian, Spanish, Greek, Norwegian, Danish, Polish, Portuguese
8. Changes Log / Release Notes
Version 1.3.0: June 2025
- Improved configuration options for the Datatrans payment page appearance.
Version 1.2.0: April 2025
- Improved transaction status update handling for better accuracy and synchronization.
Version 1.1.0: August 2024
- Multi-website compatibility
Version 1.0.0: April 2022
- Initial version.
9. Support
If you have questions, use our contact form at webshopextension.com or email at support@webshopextension.com.