Magento 1 Faktura Webapp
Kategorien
Magento
WordPress
SAP Commerce
Odoo
Shopify
Typo3
Shopware
nopCommerce
Pimcore
Hyvä
OXID eShop


Prerequisites
Magento 1.9.x
Installation
- Upload the extension files to your store’s root directory using FTP/SSH.
- Login to the backend of your Magento Store.
- Clear the cache in System → Cache Management.
- Log out of the backend, and log back in again
Configuration
After login to Magento Admin Panel, Select Configuration under System. From the left Menu under Configuration, click on WebApp option will open up Web App Configuration page. Refer Fig:1 and Fig:2
Fig: 1
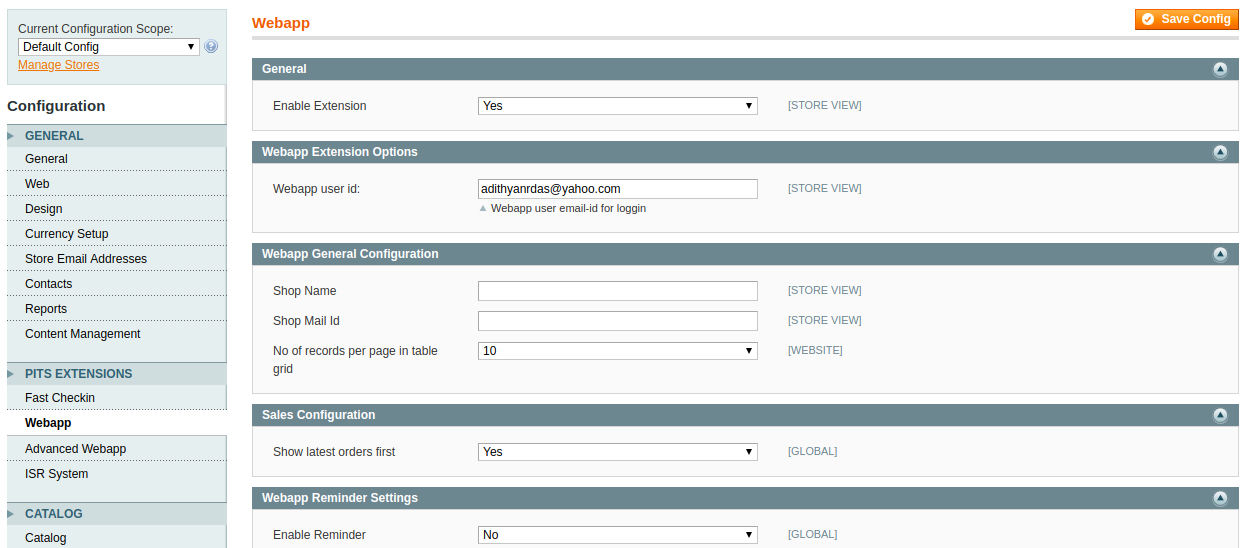
Fig: 2
- Enable Extension : Choose ‘yes’ to enable the extension
- Webapp user Id:- Need to provide email-id of WebApp user to login. Before that, create the same user in ‘Customers’ section and associate the same user with WebApp. For accessing WebApp, user has to use the same password entered in ‘Customers’ section while creation.
- Customer Association to website:- For associating customer to a website, user has to create a website with code ‘webapp’ and name ‘WebApp_themes’. For Customer creation, user needs to select ‘Manage Customers’ under Customers, then click on ‘Add New Customer’ and create new customer.
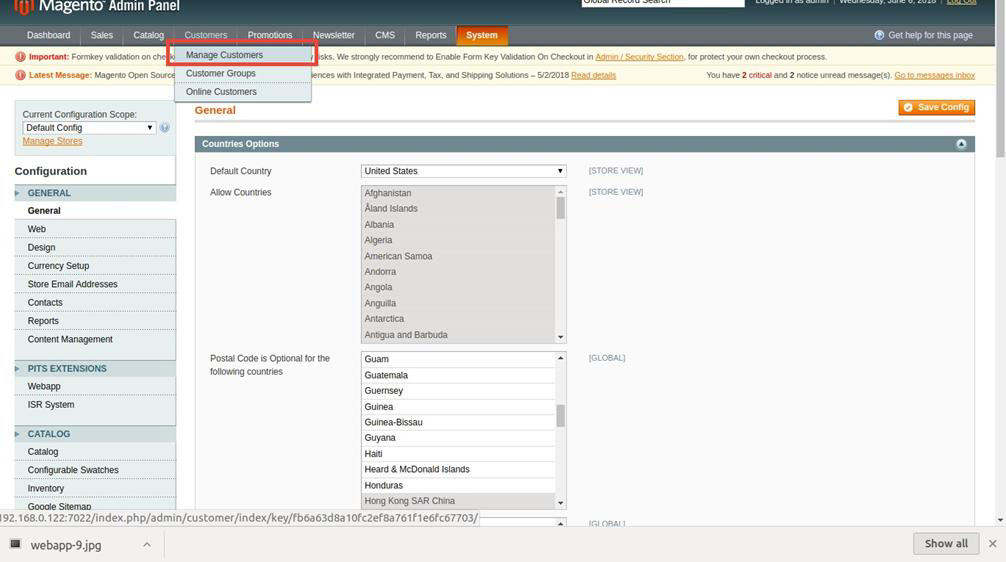
Fig: 3
In ‘Account Information’ from the left menu, select ‘Associate to Website’ option for this user as ‘WebApp ’.
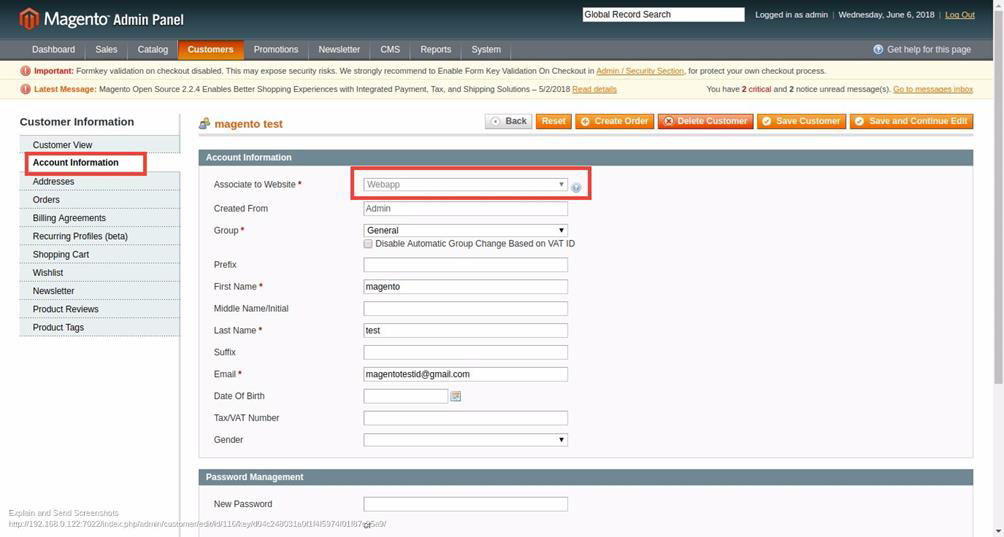
Fig: 4
- Apply webapp Theme
- Apply ‘webapp/default’ theme to ‘Webapp’ website
Using the Extension
WebApp – Login
User need to enter the password which is entered in customer creation.

Fig: 5
Use webapp as website code and store code. Set Share Customer Accounts as Global in Customer configuration section
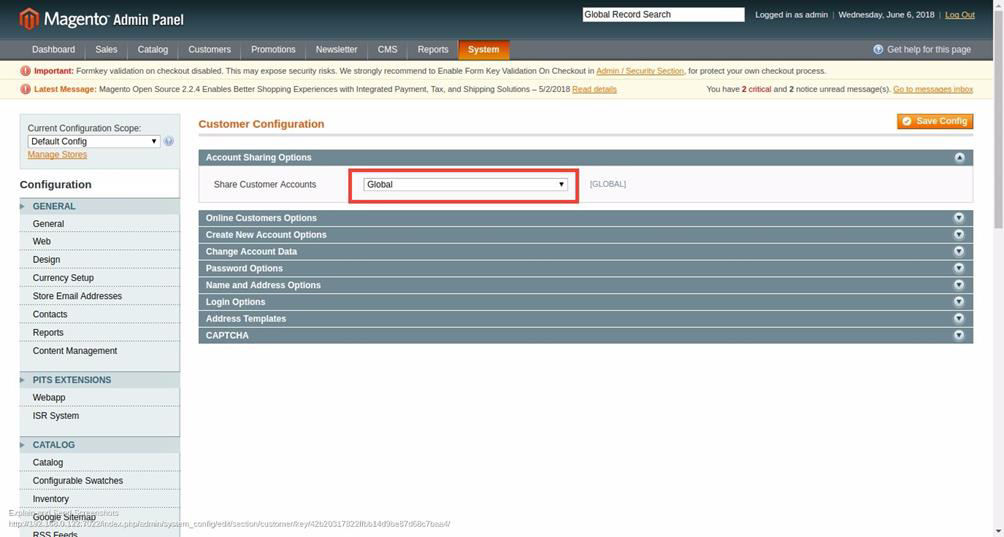
Fig:6
Order Management
On assumption that all webapp configurations are done properly and reached webapp home page. Refer Fig:7.
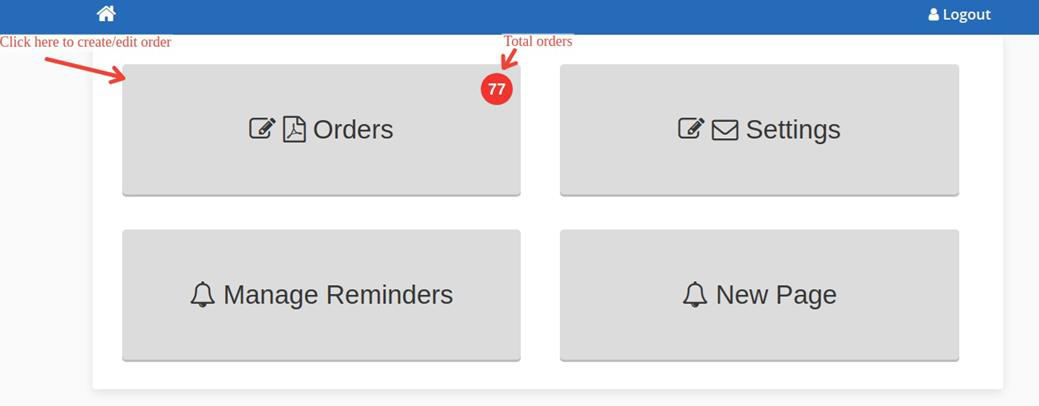
Fig:7
- Click Orders to create new order or edit previous orders.
All orders are listed in the landing page. Here you can search orders with its order number , invoice number and customer name. Refer Fig: 8
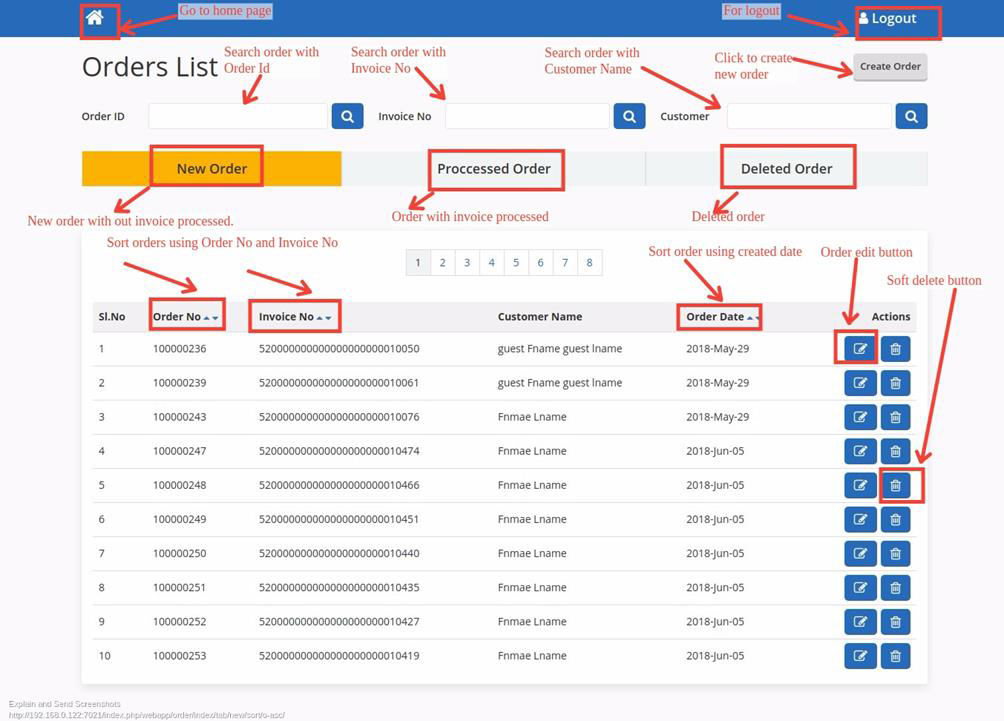
Fig:8
Fig 8 : shows order listing page of webapp. Orders are listed under three categories like
New Order, Processed Order and Deleted Order
- New Order
Newly created orders are listed under this category. It may or may not possess an invoice number.
- Processed Order
All orders under this category having an invoice. It may or may not possess an ISR invoice number.
- Deleted Order
If the further processing of the order is not needed, we can move the order to this category by clicking the soft delete button on the listing page. There is no option to edit the deleted orders. The orders under this category is not actually a deleted order, it is just moved to this category for
listing purpose.
- Create order
-
- Click Create Order Button to create a new order from webapp. Refer Fig:8
- Select store from dropdown.
- Set Order date
- Click invoice generate button to get invoice number.
- Webapp comments can be enter into the remarks section.
- Select a customer from customer dropdown , all other fields will be prefilled on choosing customer.
- To add products , please select an item from the dropdown and click blue button to add listed product. You can enter required quantity in the box under title Qty and set discount percentage to each products by entering percentage to the textbox below the title factor. Then total price will be displayed in the total text box.
- Select shipping method from the dropdown. Default payment method check/moneyorder is used.
- Click the save button to create order.
- Click Create Order Button to create a new order from webapp. Refer Fig:8
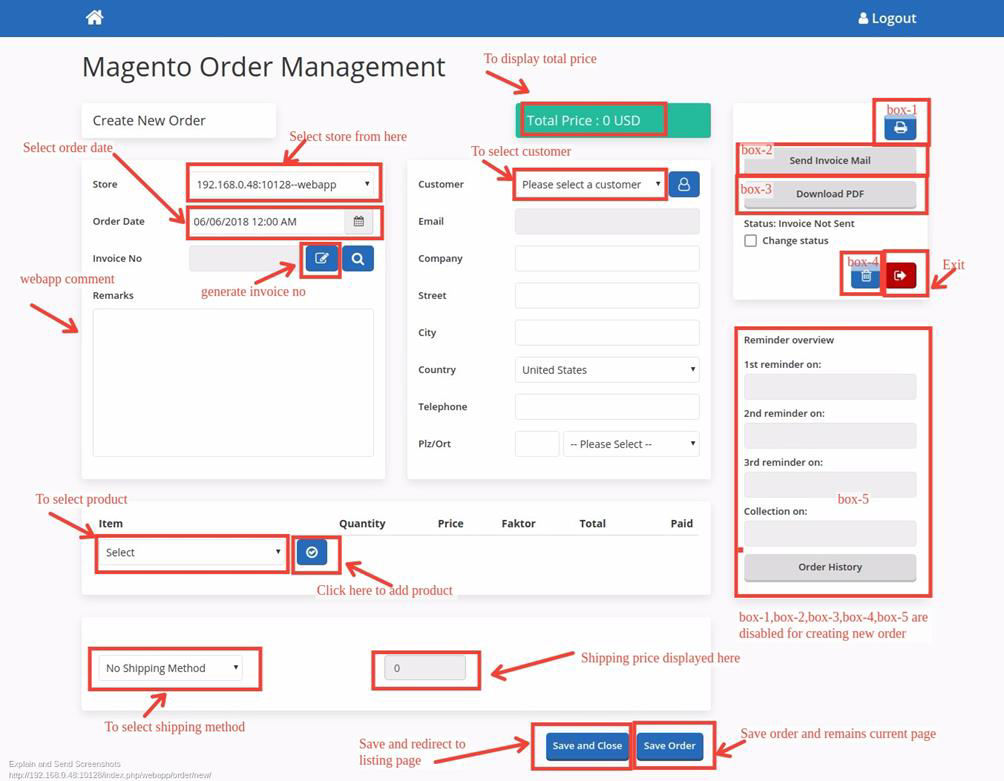
Fig:9
- Edit an order by clicking edit button on order listing page. Refer Fig:9 You can edit order by changing any of its properties
-
- Print preview button - This is to see the print preview of invoice pdf.
- Send invoice mail button - This is used to send invoice email.
- Download PDF button - This is to download invoice pdf and status changed to invoice sent.
- Change status checkbox - To generate invoice and change status to invoice sent
- Remainder Status checkbox - To disable reminder and its status changed to disabled.
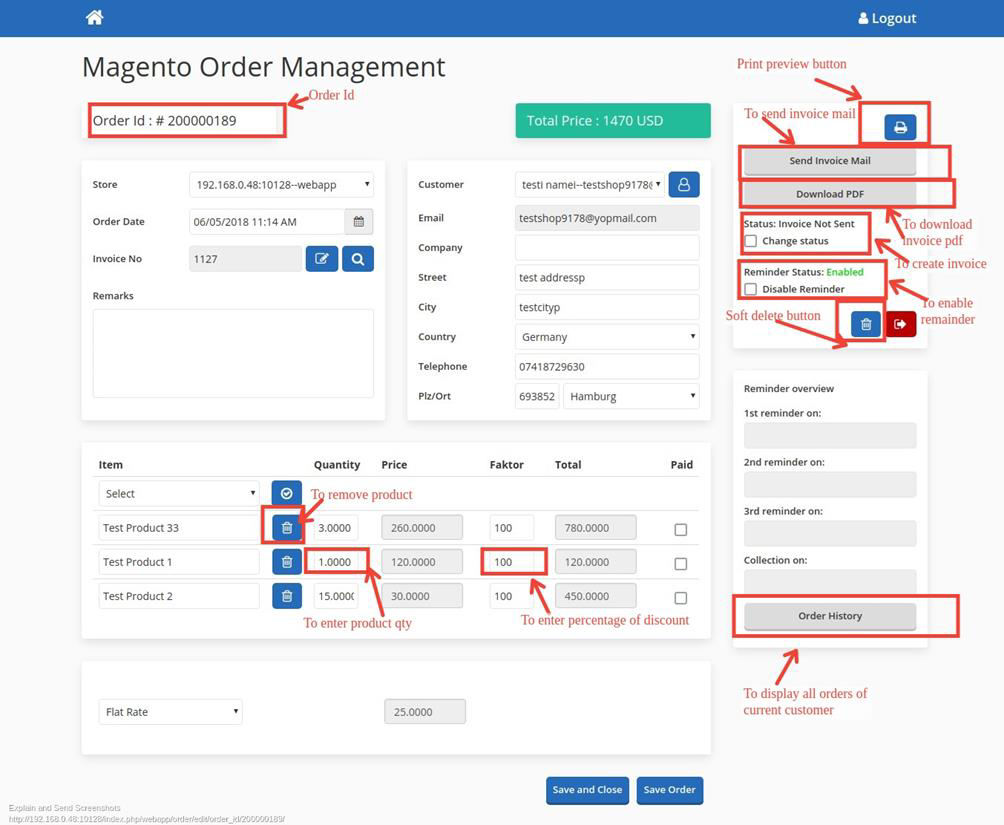
Fig:10
- Soft delete button - To move order to deleted category.
- Order history button - To display all orders of the current customer.
- Paid Button (Mark as Paid button) - This button label will be Mark As Paid if invoice is not paid and for paid order, it’s label will be Paid . It is used to capture invoice. Once the invoice is captured, the order can’t be edited and the save button will be disappeared. There is a check box corresponding to each item and shipment to mark as paid. If all items and shipment are checked, it will automatically capture invoice while saving the order. Refer Fig: 11
- Currency switcher - We can change the currency for creating new order. Once order is created, the currency cannot be changed and all prices will be displayed in that currency. Refer Fig:11
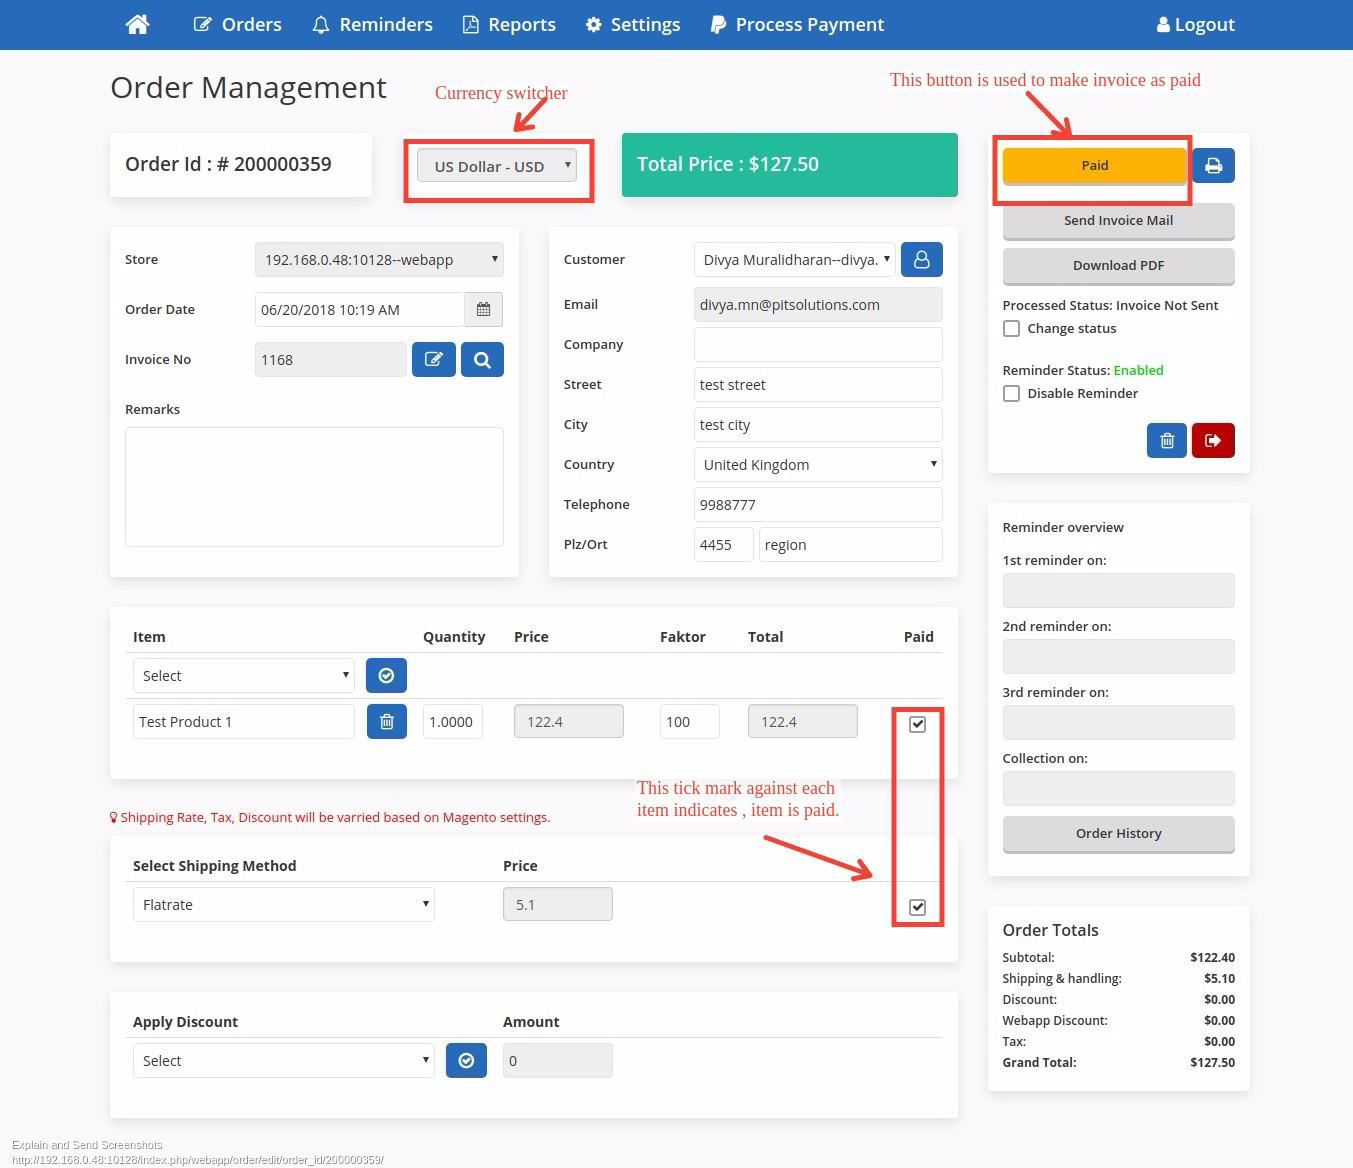
Fig:11
- Create Customer
We can create new customer in order edit/create page. Refer Fig:12and Fig:13 You can enter all details in the customer create form and click the save changes button to create
new customer. This customer will be selected in the customer select field and all fields will be prefilled.
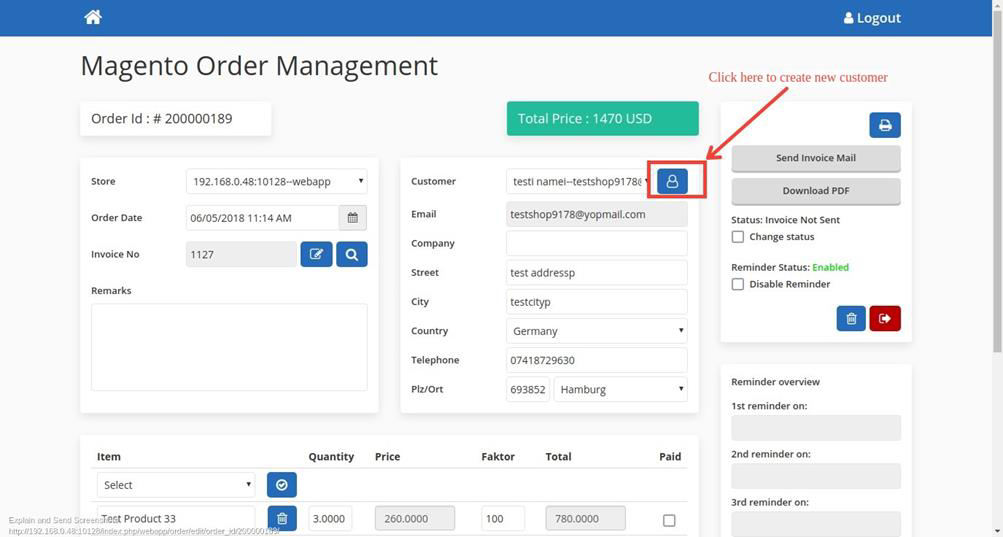
Fig:12
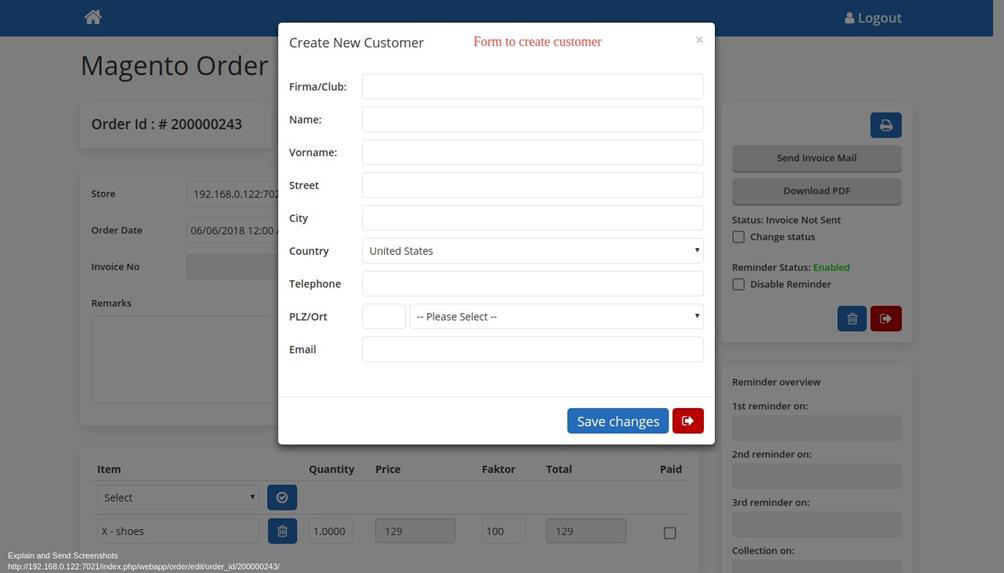
Fig:13
- Invoice List
Last generated 10 invoice numbers are listed here. Refer Fig :14 and Fig :15
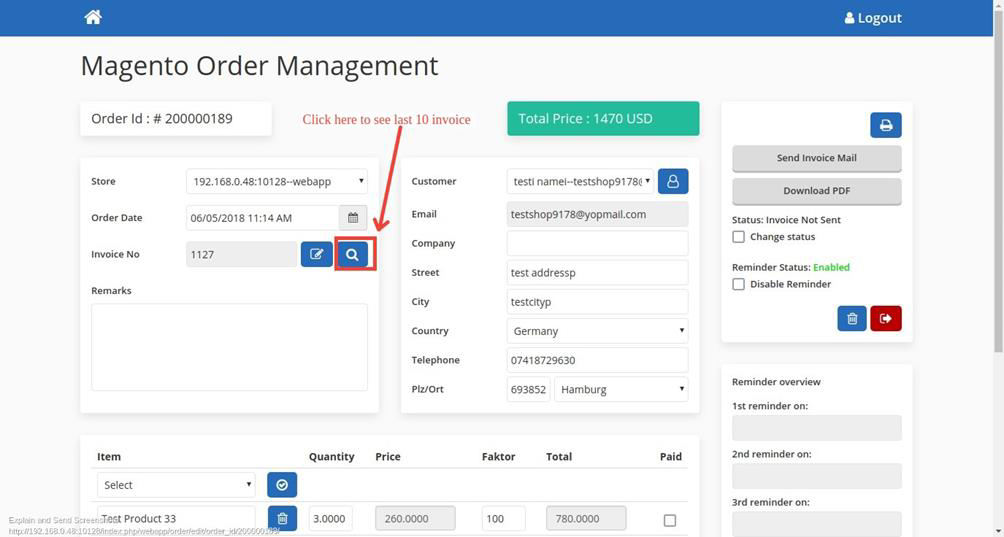
Fig:14
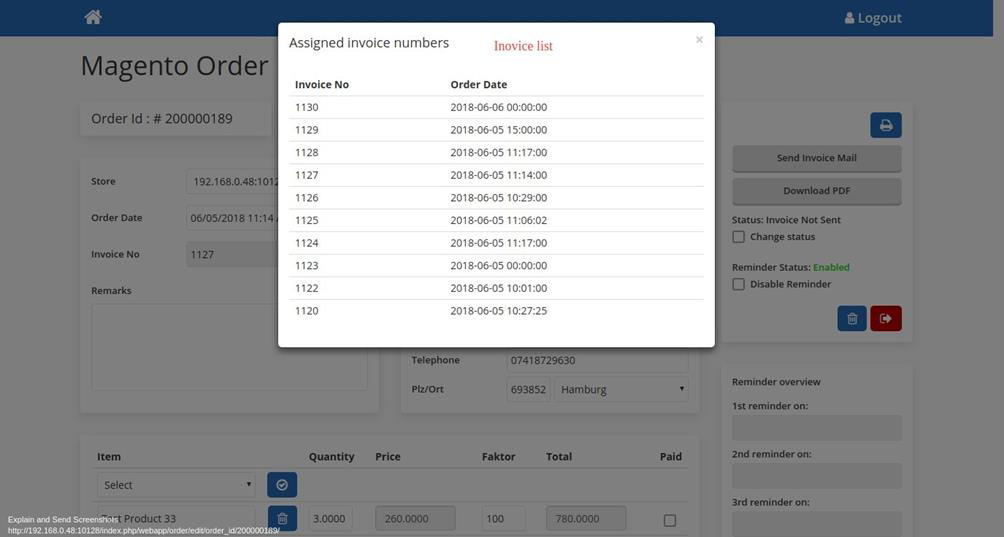
Fig:15
- Discount Management
We can add custom discount in webapp. This discount rule and magneto discount rules does not have any relation. Webapp discount will be displayed in order invoice shipment and email as Webapp Discount Amount. This amount is applied to the whole cart including shipping amount. You can only apply a fixed amount discount to the order total. Refer Fig:16 and Fig:17
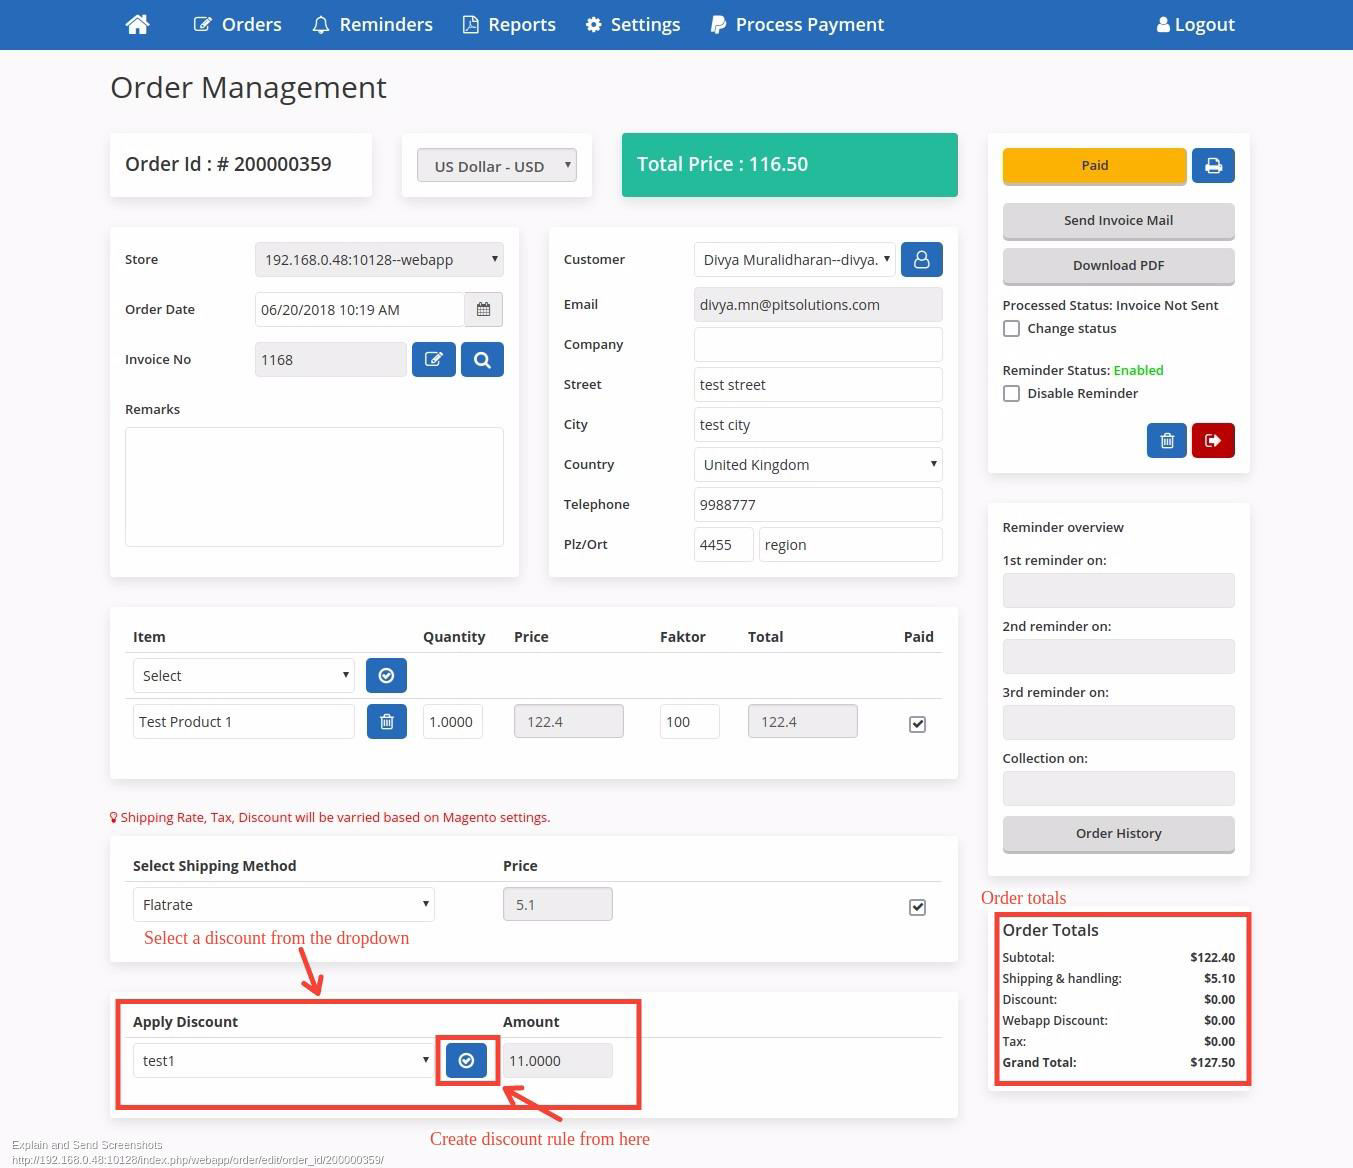
Fig:16
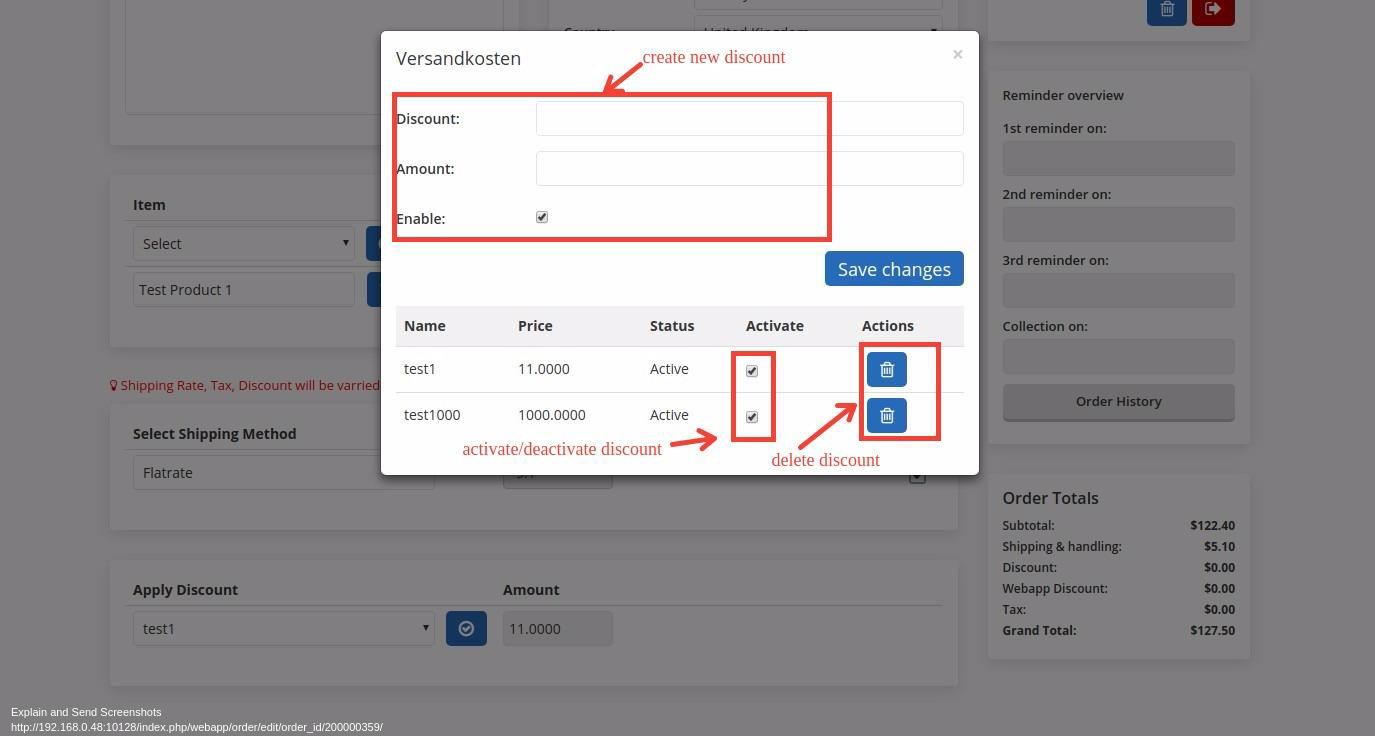
Fig:17
- Order Listing
From webapp home window click on the “Orders” tile and navigate to the order listing page of the webapp.
In this page, all the newly created orders are listed in grid table view. See the screenshot below.
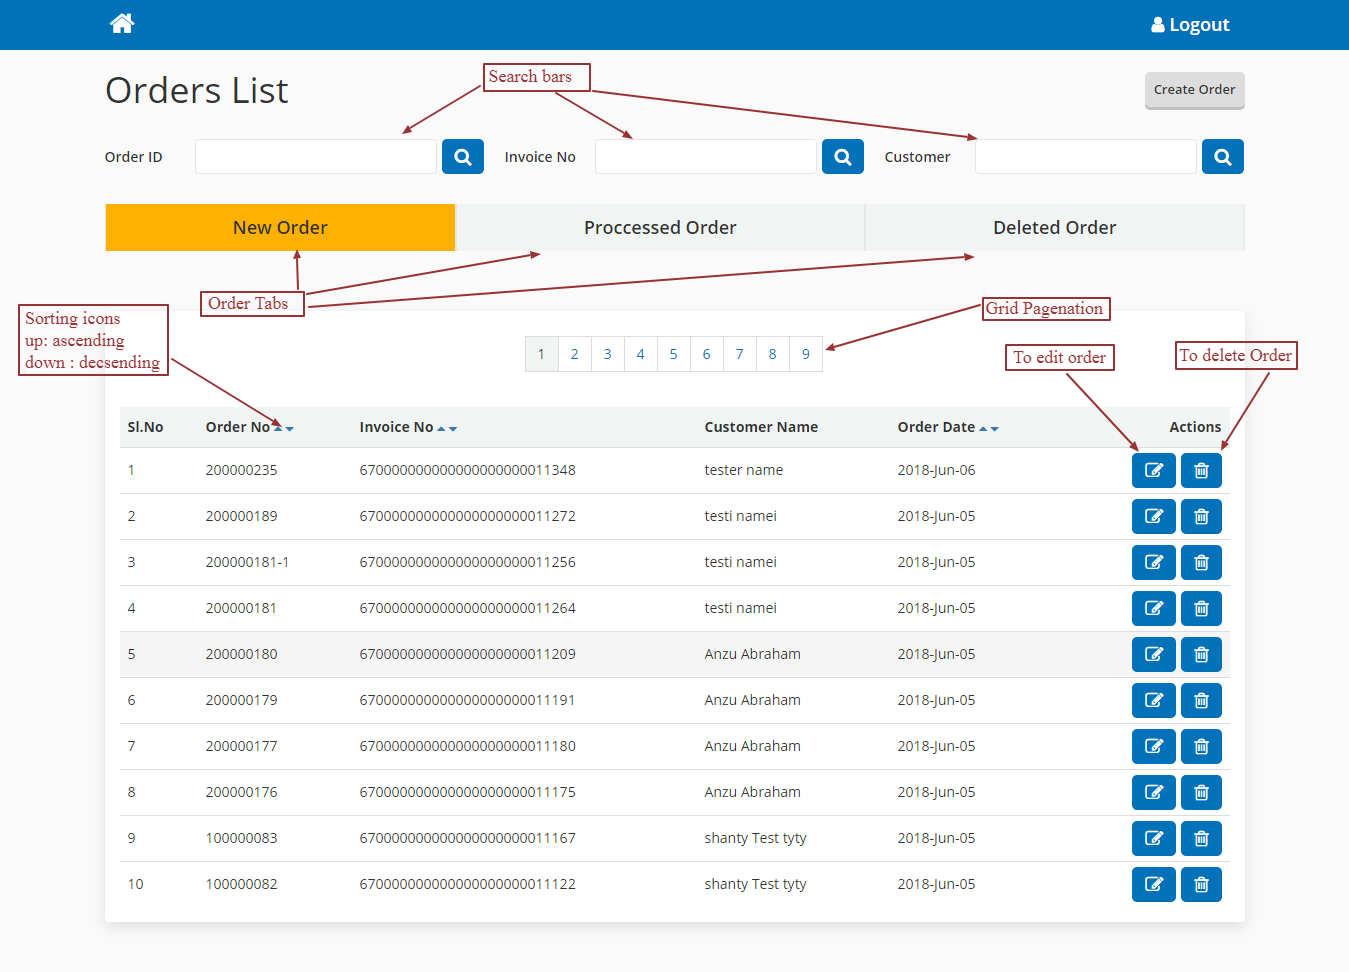
The order listing page contains three tabs New Order, Processed Order and Deleted Order. In New Order tab, all newly created orders are listed. And by default newly created orders are shown. In Processed Order sections all the processed orders are that means the invoice mail of the corresponding order is sent out to the customer. Deleted Order, under this tab all deleted orders are listed or the orders which no further processing is required are listed.
Edit Button:- Clicking this button will navigate to the order edit page of the corresponding order. Where we can make the further changes in the order.
Delete Button:- Click on the icon to delete the order, then the order will moved to the Deleted Order section.
Revert Button:- Click on this button to revert the deleted order back to its initial state, Reverting the order will move to the new order tab.
Search Orders:- Search order with its increment id, invoice reference no or customer name.
Manage Reminders
Reminders are generated when there is a due in pay amount exists in the order. Reminders are send out to the customers to indicate the remaining or pending payments in the order. Here we have four levels of reminders and we have an option to add reminder fee for each reminder when they are generated or send out to the customers. Each reminder generated under certain duration from the date of the invoice of the corresponding order is generated. Each reminder is send out to the customers when a particular duration is reached, containing reminder fee or dunning fee is also charged along with the invoice total. After fourth level is reached, the invoice of the corresponding order will be derecognized.
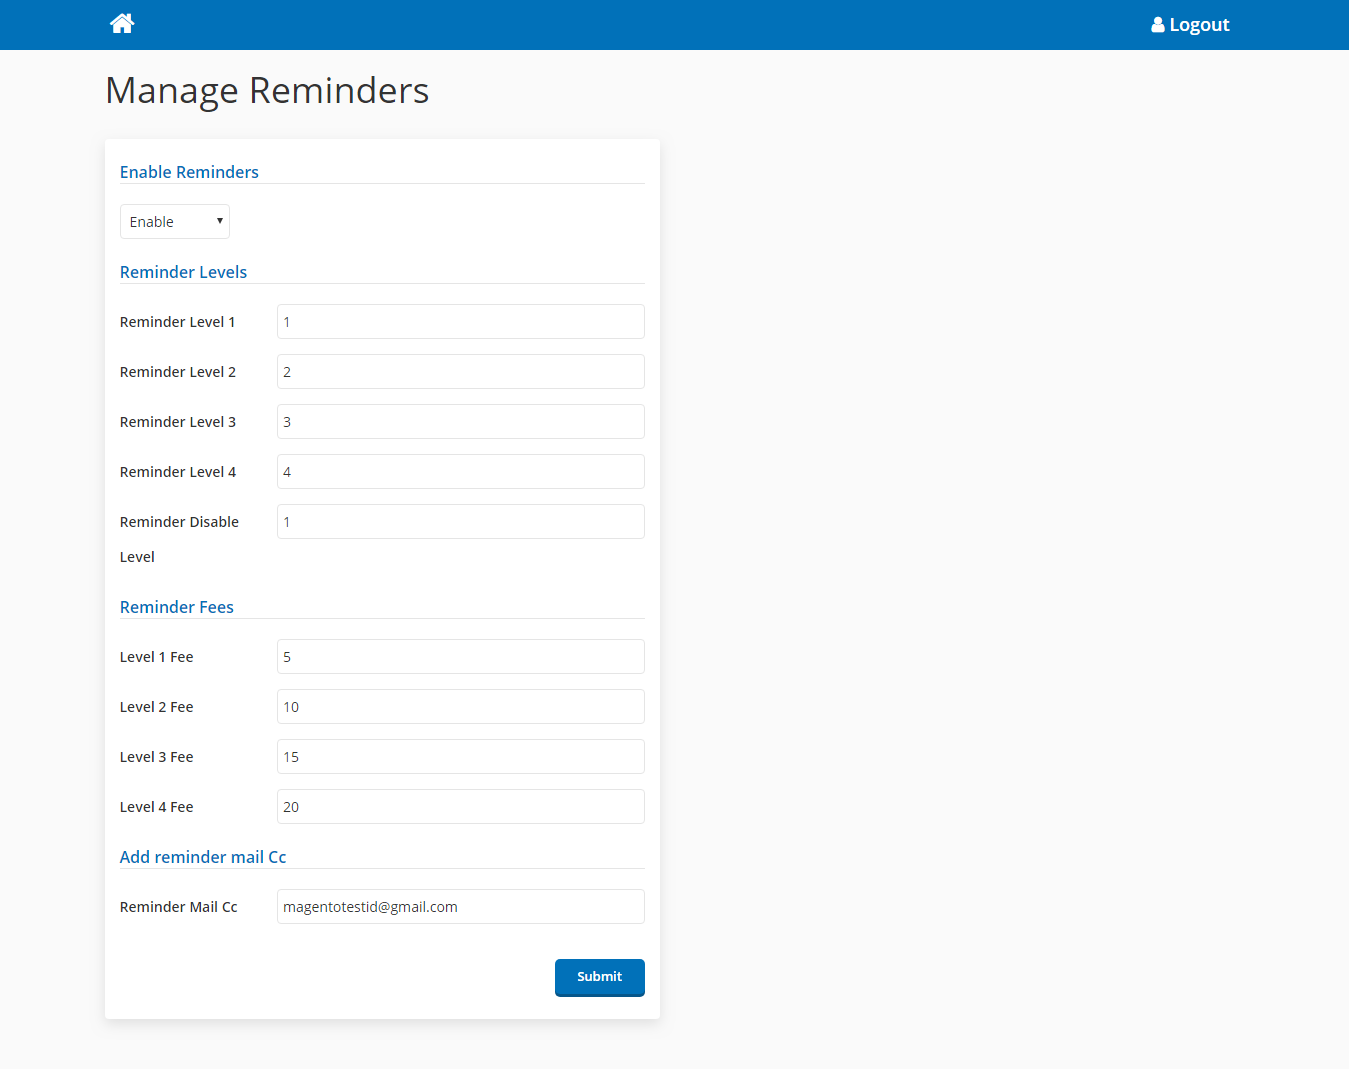
Reminder Settings
From the webapp home page, click on the “Settings” tile, in the settings page click on the “Reminder Settings” tile and it will direct to the reminder settings form.
Enable Reminder:- To enable reminders for the orders.
Reminder Levels:- We can set the duration of each reminders has to be send out to the customers. Each levels are set in no of days.
Reminder Fees:- Fee to be added to the invoice total when each reminder is send out.
Add reminder mail Cc:- We can add reminder mail cc to the admin or and sales mail id. See the screenshot below.
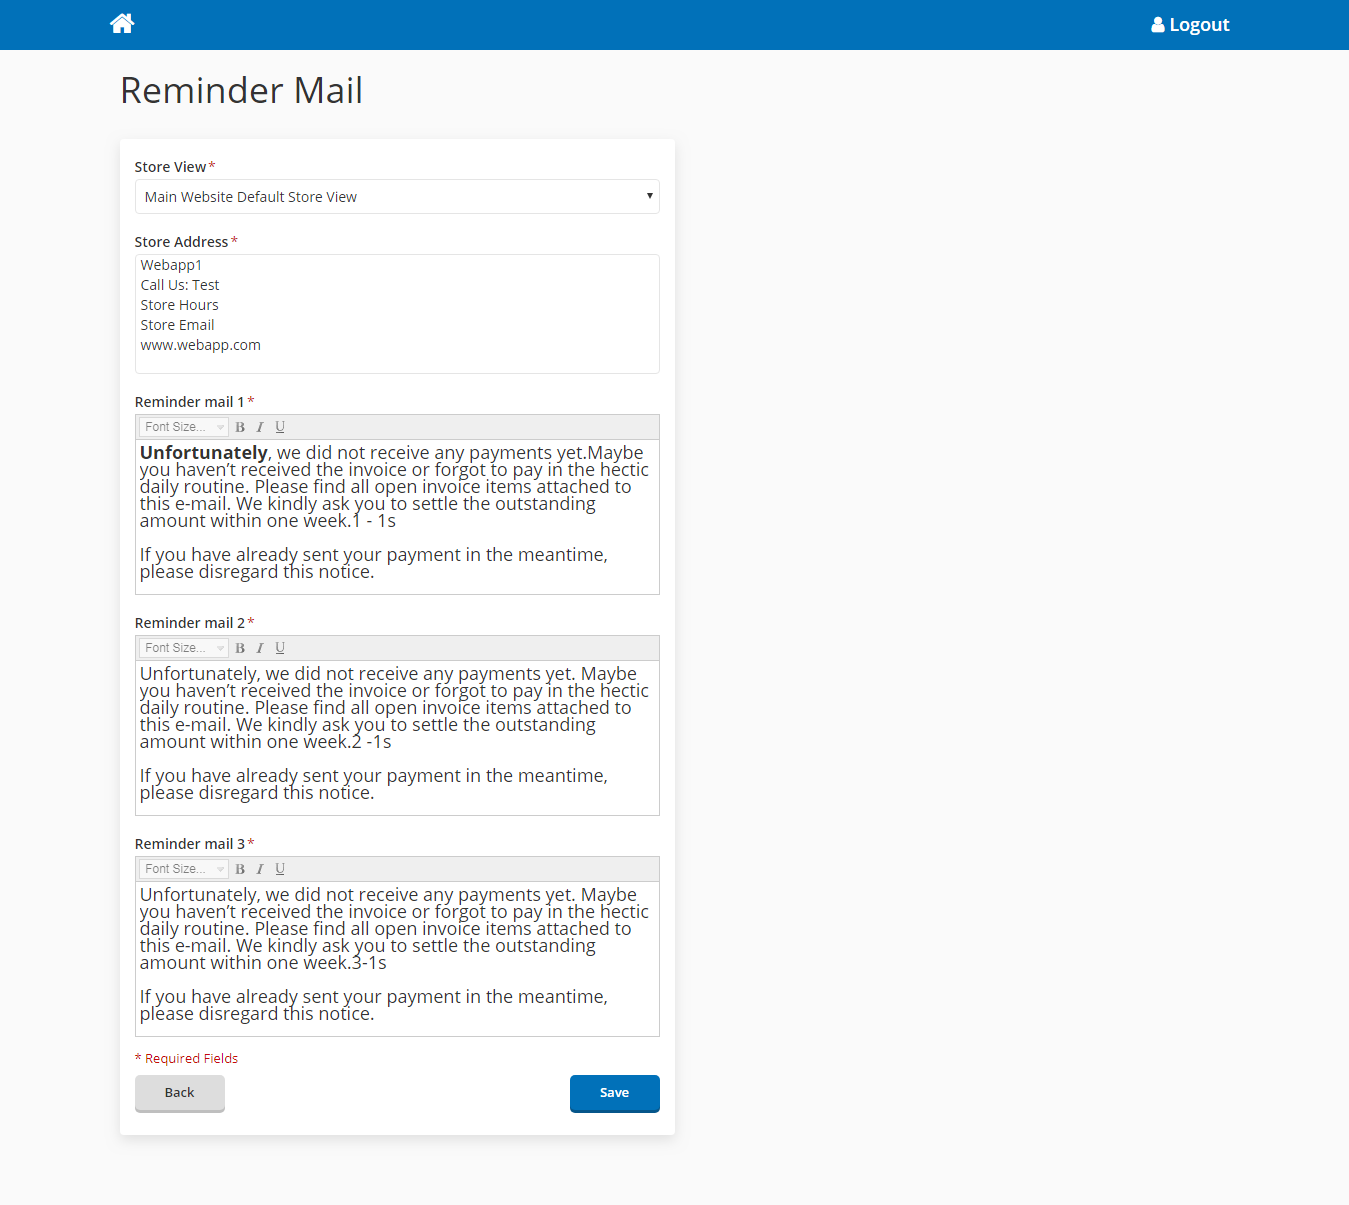
Reminder Mail Settings
The content of the reminder mail can be managed via the webapp. From the Settings page click on the “Reminder Mail” tile and navigate to the reminder mail settings form. After entering the contents click on the “Save” button.
Store View:- Select the store view, which we can manage contents of each stores.
Store Address:- Shop store address is entered here.
Reminder Mail Contents:- Reminder mail contents of each levels are entered here. See the screenshot below.
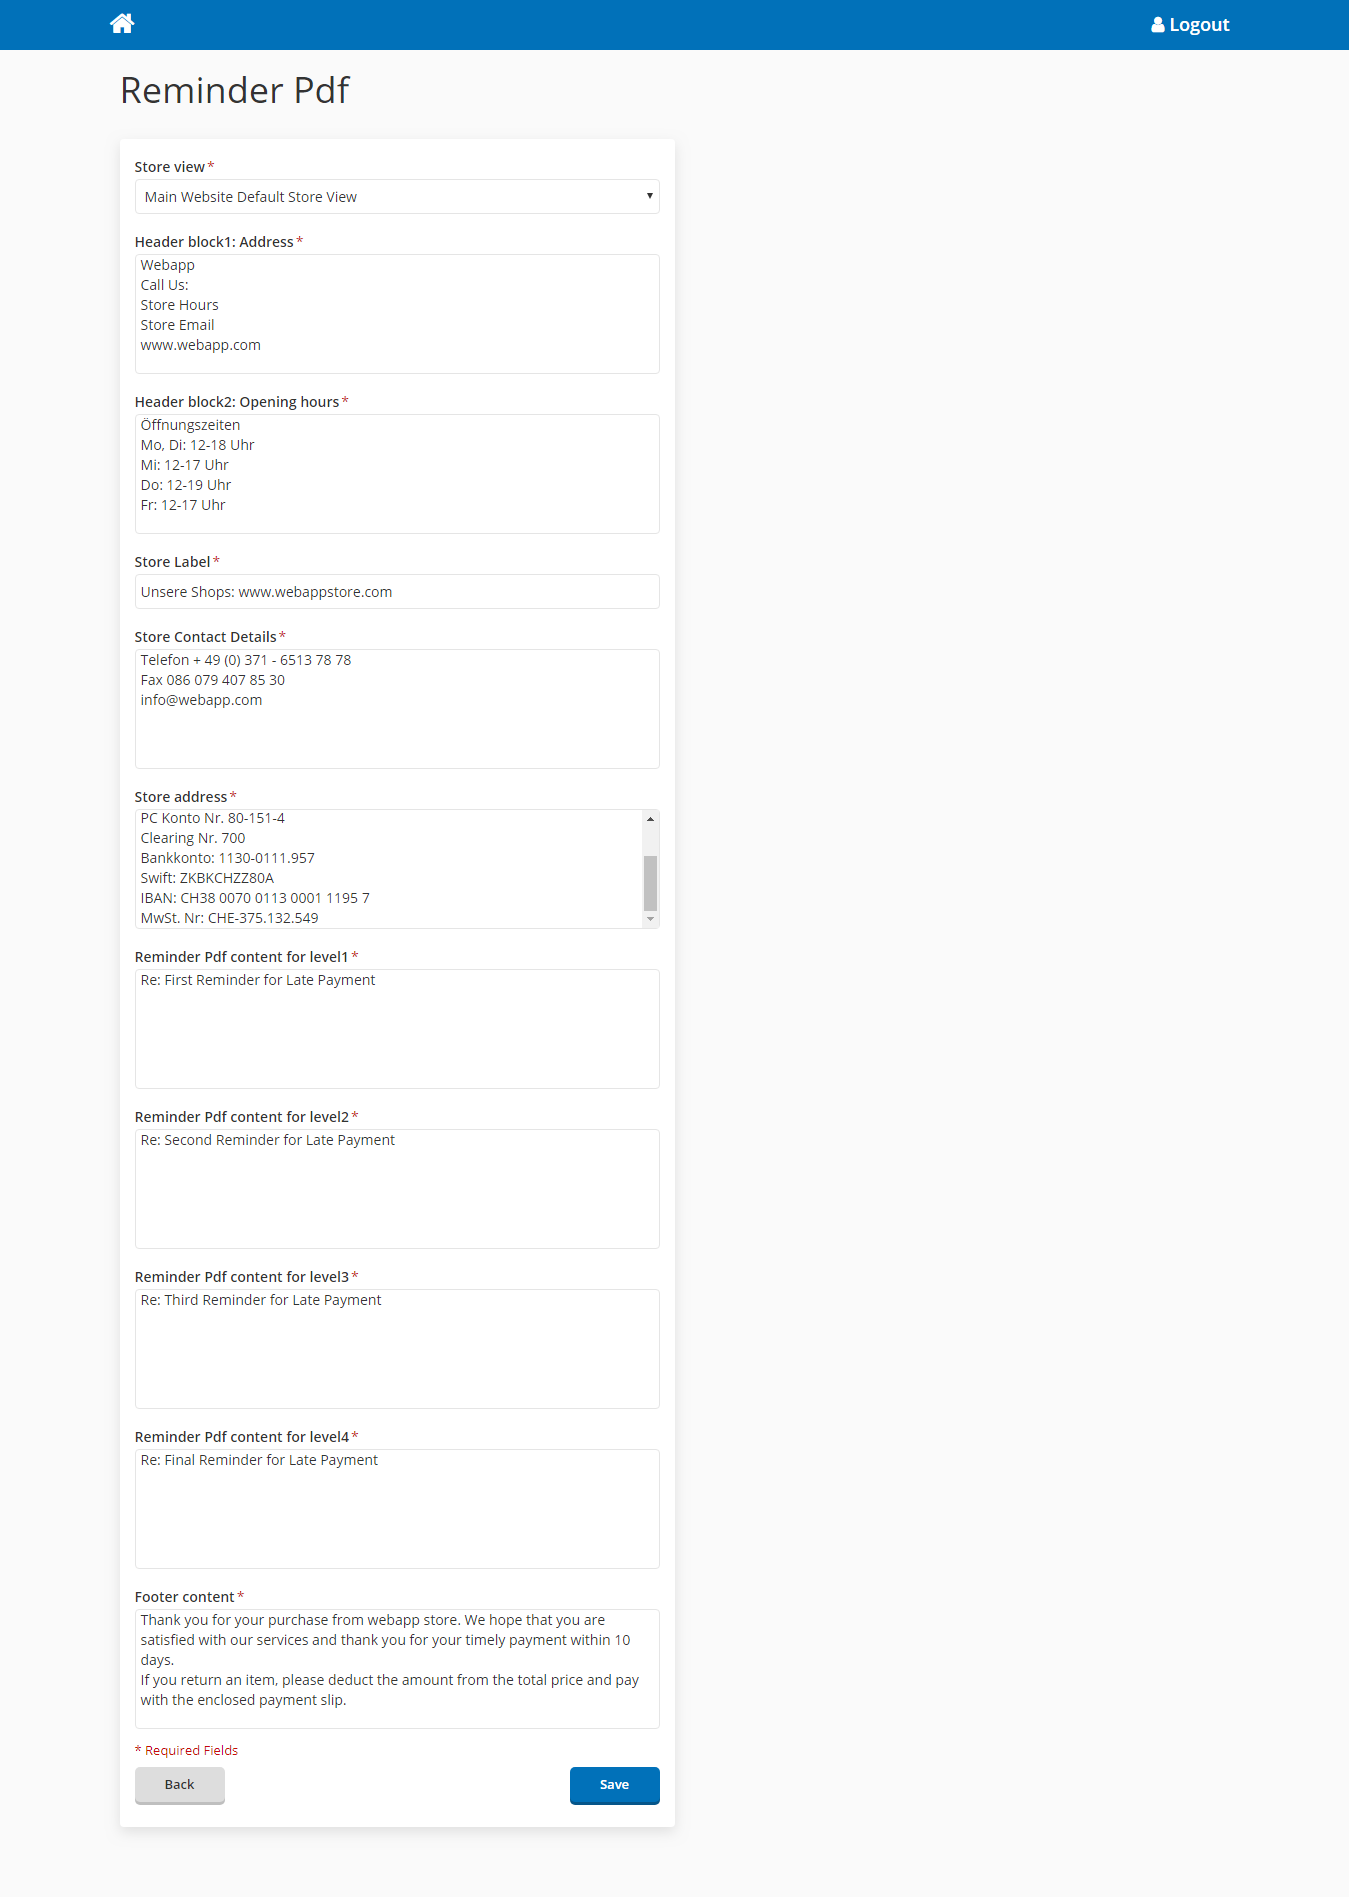
Reminder Pdf Settings
A reminder pdf is attached to each reminder mail, indicating the invoice details along with reminder fee and total due amount to be paid by the customer. Please note that we do not send out fourth reminder as mail, only pdf of the corresponding order is generated. The contents of the reminder. From the Setting page click on the “Reminder Pdf” tile and it will navigate to the reminder pdf settings form.
Store View:- Select the store view, which we can manage contents of each stores.
Header Block Contents:- Header block address of the reminder pdf are managed under here. It is split into two :
- Header block1: Address:- Shop address entered here.
- Header block2: Opening hours:- Shop working hours are entered here.
Store Label:- shop url is mentioned here.
Store Contact Details:- Shop contact details are mentioned here.
Store Address:- Shop address is mentioned here.
Reminder Pdf Content:- The quotation for each reminder level is entered here.
Footer Content:- Footer content of reminder pdf. See screenshot below.
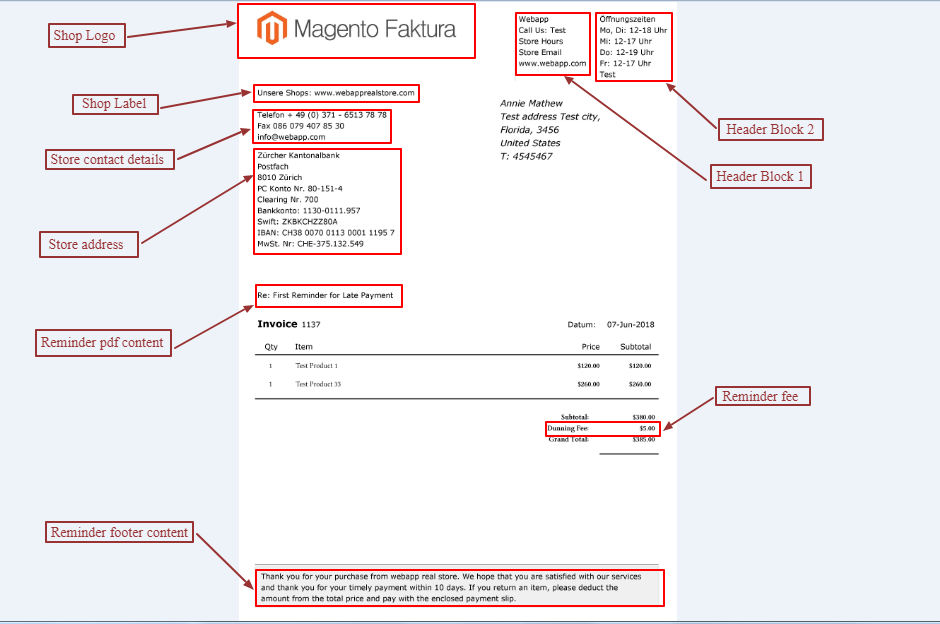
General layout of the reminder pdf.
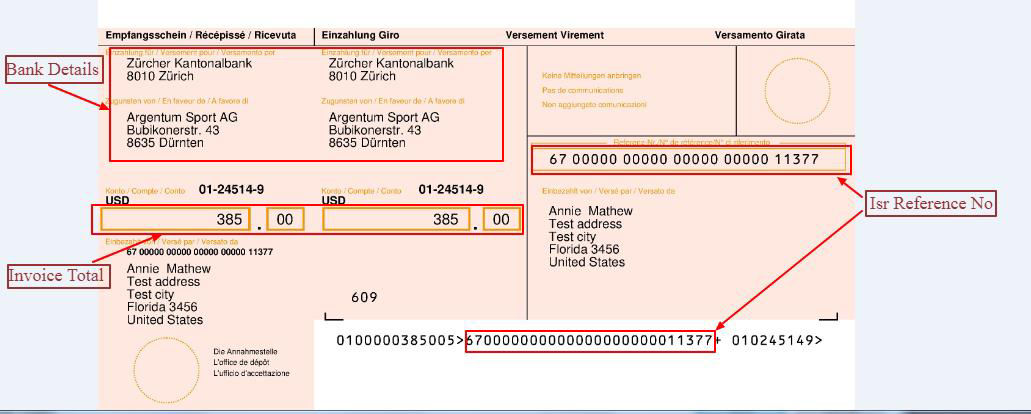
ISR Slip attached to the reminder pdf
Reminders Listing
From the home page click on the “Manage Reminder” tile, it will direct to the reminders listing page. As in the order listing page, here there are two tabs
- Active
In this tab all the active reminders are listed. And by default active reminders are listed. In order to list an ‘order’ in reminder list, its invoice should be generated and
also in processed state.
- Derecognized
Under this tab, all the reminders whose reminders are no longer processed are listed.
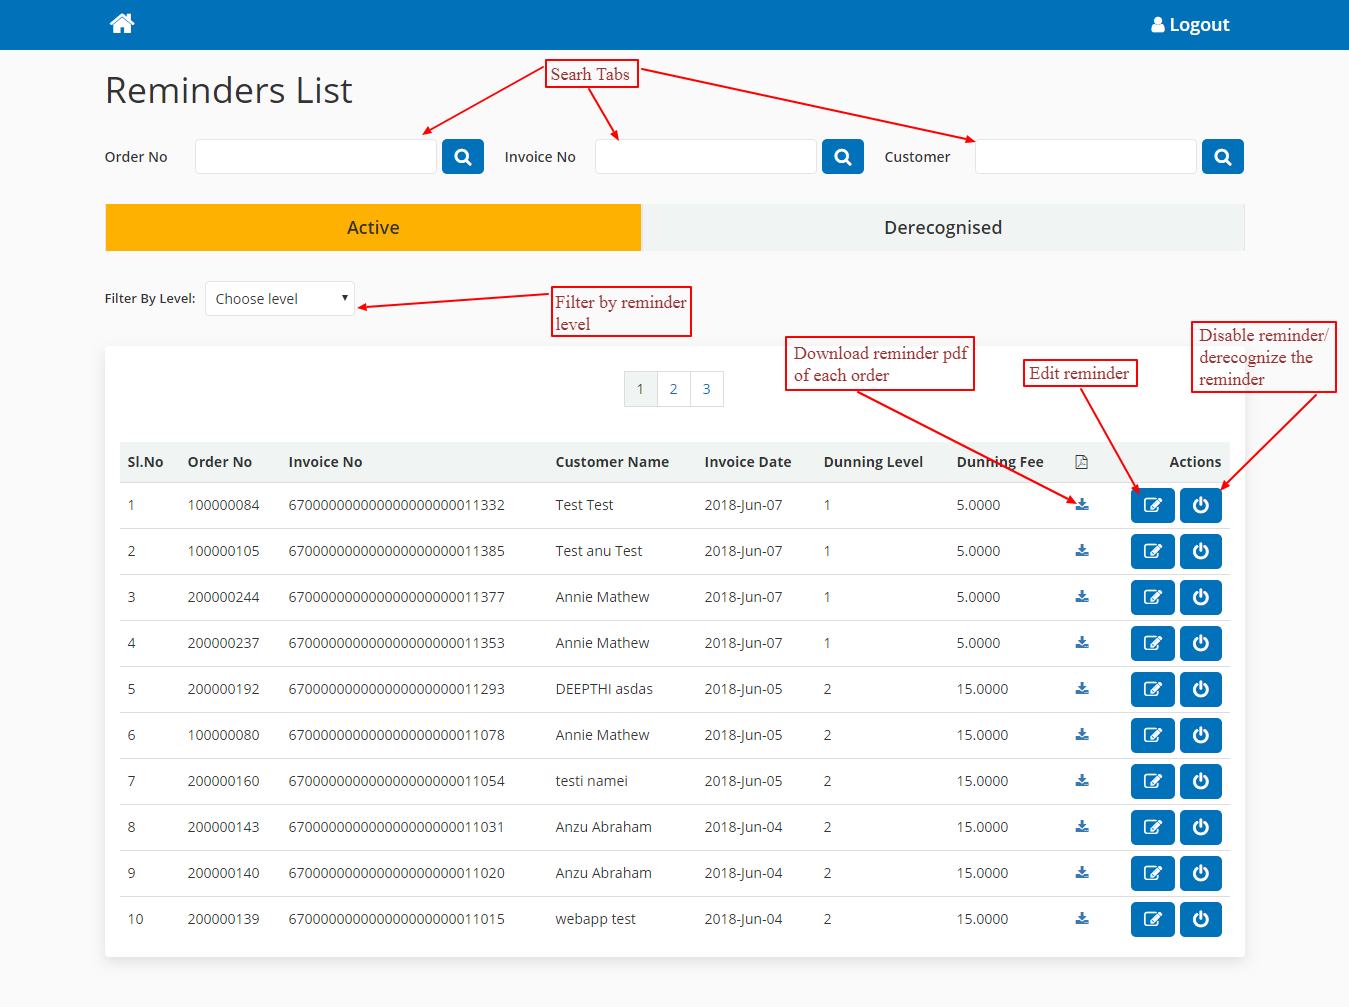
Search Tabs:- Search reminders with its increment id, invoice reference no or customer name.
Filter by Level:- Filter reminders with their reminder level.
Edit Button:- Edit the order of the reminder.
Disable Button :- Disable the reminder, which means no reminder is needed to process the corresponding order.
ISR Settings
ISR settings page is available under settings tab of Faktura. It contains the following fields
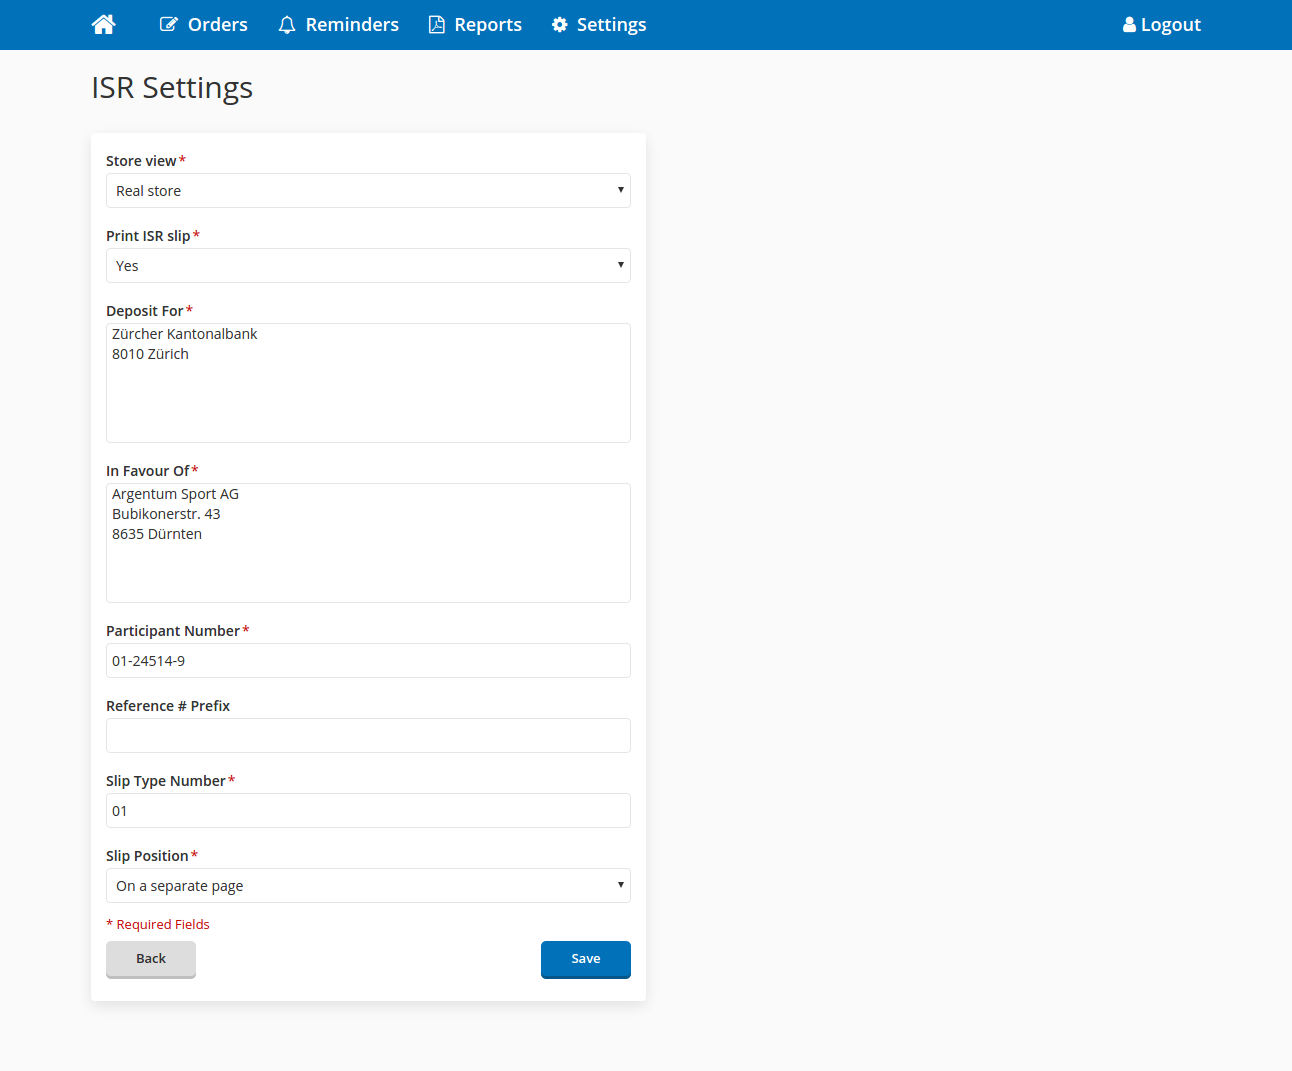
Fig: General layout of ISR settings page.
Print ISR Slip:- Specifies whether to enable printing of ISR slips.
Deposit For:- Enter the address to which the money is sent to. If the money is transfer first to a bank, then enter here the address of the bank.
In Favor of:- In case the money is transferred to a bank, you need to enter here your address. In case you have a Post account, you can leave this field empty.
ISR Participant Number:- Enter here the post account number. (Schema: xx-xxxxx-x; e.g. 01- 24514-9)
Reference # Prefix:- Enter here the prefix of the reference number. Normally a number of the bank.
Slip Type Number:- Enter here the slip type number. Normally it is 01.
ISR Slip Position:- Select where to print the isr slip.
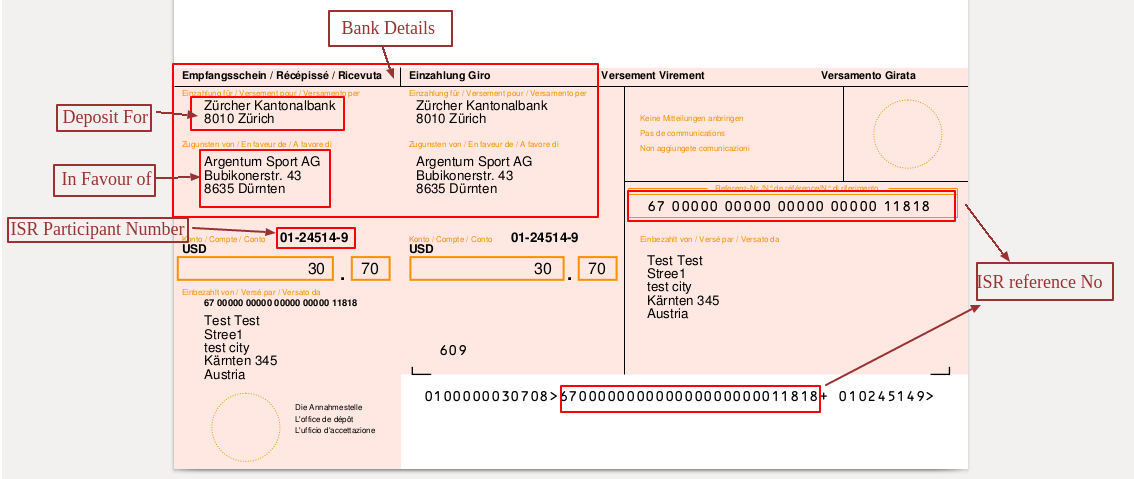
Fig: General layout of ISR slip.
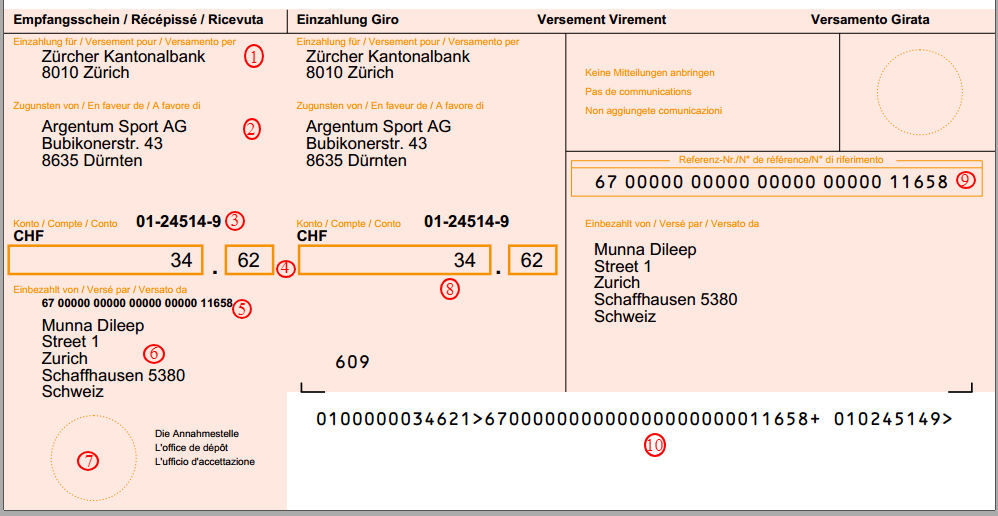
- Deposit for/Payment to:- ESR participant UBS Switzerland AG should appear here as it is the ESR participant in the ESR process. UBS Switzerland AG will assign the exact designation.
- In favor of:- Your address (payee), The description must make it possible to identify the recipient with no possibility of error. The description must therefore comply with the following rules:
- For natural persons: last name, first name and place of residence or business.
- For sole proprietorships, partnerships, legal entities and foundations entered in the Commercial Register: exact wording as published in the Commercial Register.
- For sole proprietorships and companies which are not entered in the Commercial Register: last name and first name of the owner of / partner in the business, and the registered office. The first name and last name should be accompanied by any applicable title.
- For clubs, associations and foundations: must match their statutes, deed of foundation as well as their main business address.
- For administrative bodies, official agencies and governmental authorities: official designation and location.
- Please precede the main place of residence or business domicile with the applicable postcode.
Format
-
- 1st line: Name of beneficiary
- 2nd line: Address of beneficiary
- 3rd line: Address of beneficiary
- 4th line: Address of beneficiary
The last written line must contain the postcode and town.
This should be printed in one block, without empty lines.
- Account:- ESR participant number
UBS’s ESR participant number. Through the use of this number,
UBS Switzerland AG participates in the ESR process.
UBS Switzerland AG coordinates the process.
- Amount:- The amounts in the code line and in the amount fields must match. Format
- Maximum 10-digit amount in francs without spaces; right- aligned. Amounts over CHF 1,000 must be printed in one block. Entries of CHF 0.00 (zero), “blocking stars” and other filler characters are not permitted in the amount field.
- Amount of centimes: should always be entered with two digits, 00 when there are no centimes.
- Reference No.:- The reference number is numeric with 27 digits and is also included in the code line. It is used to refer to payees and payers (the latter via an invoice number).
Format: 1x2 and 5x5 digits in blocks
- Paid by:- Payer (debtor), The payer’s details can be pre-printed on the processing slip and on the receipt stub. A complete postal address is required.
Format
- 1st line: Name of payer
- 2nd line: Address of payer
- 3rd line: Address of payer
- 4th line: Address of payer (if required)
The last written line must contain the postcode and town.
This should be printed in one block, without empty lines.
- Place payment received:- Payer’s receipt.
- Processing slip (as opposed to receipt stub) :- The processing slip is removed and goes into circulation as part of the payment process.
- Reference field:- The reference field is mandatory. It contains the reference number. Format 1x2 and 5x5 digits in blocks, right-aligned.
- Code line:- The code line (in OCR-B font) contains all the information for the processing and reporting of payment slips with reference numbers:
- Amount (UBS BESR+ does not show the amount)
- UBS BESR client identification number In addition to the ESR participant number, you are also assigned a 6-digit client identification number which identifies you as the
beneficiary in the reporting system. This BESR ID number is a component of reference number in the BESR code line. - 20-digit client-specific reference / invoice number
- UBS Switzerland AG ESR participant number (9 digits)
The data described under numbers 1 to 4 and 6 for the receipt stub also apply to the processing slip. The same conditions apply.
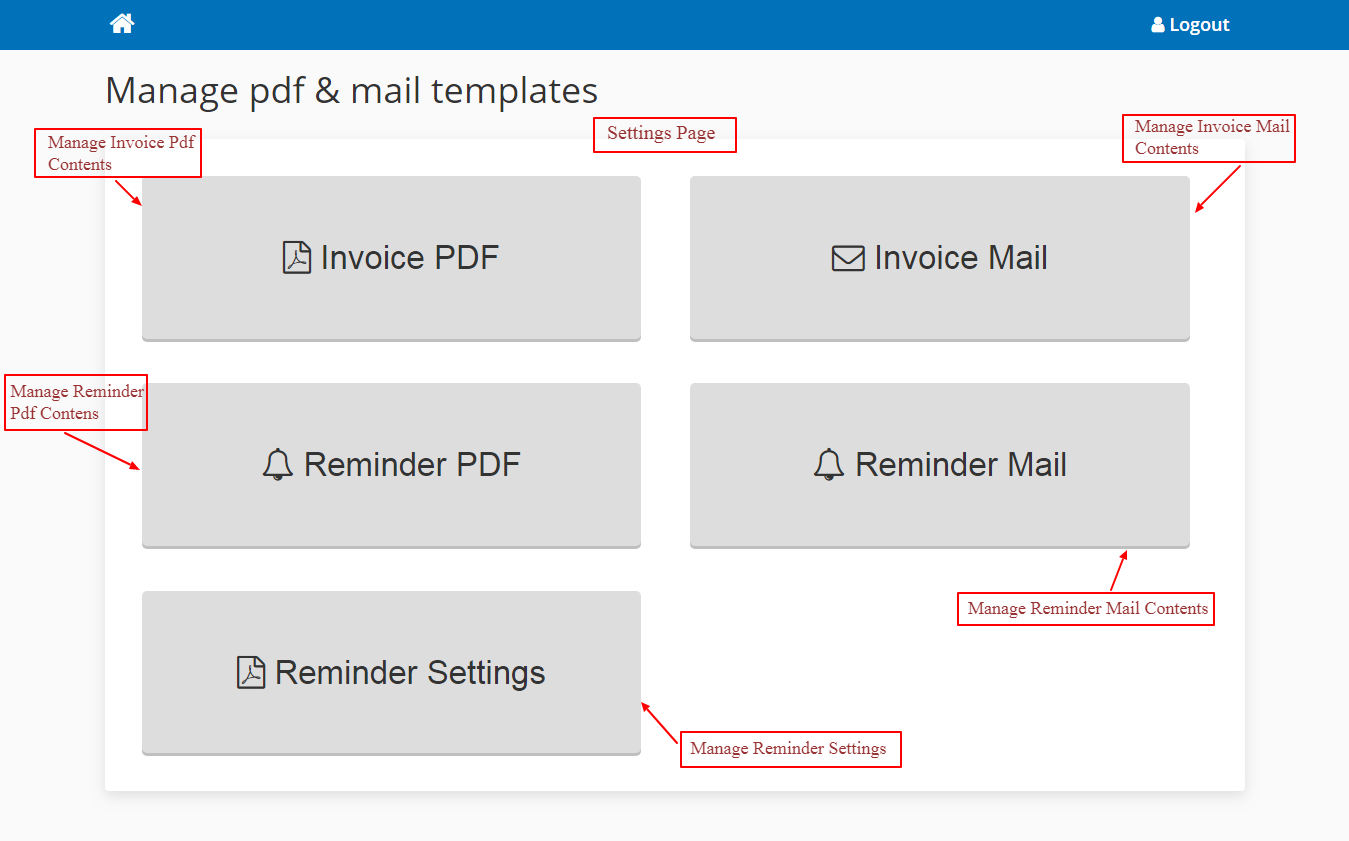
Manage Invoice Pdf and Mail
The contents of invoice pdf and invoice mail can be managed from webapp settings page. It is available under the tabs “Invoice pdf ” and “Invoice Mail”
Invoice Pdf settings
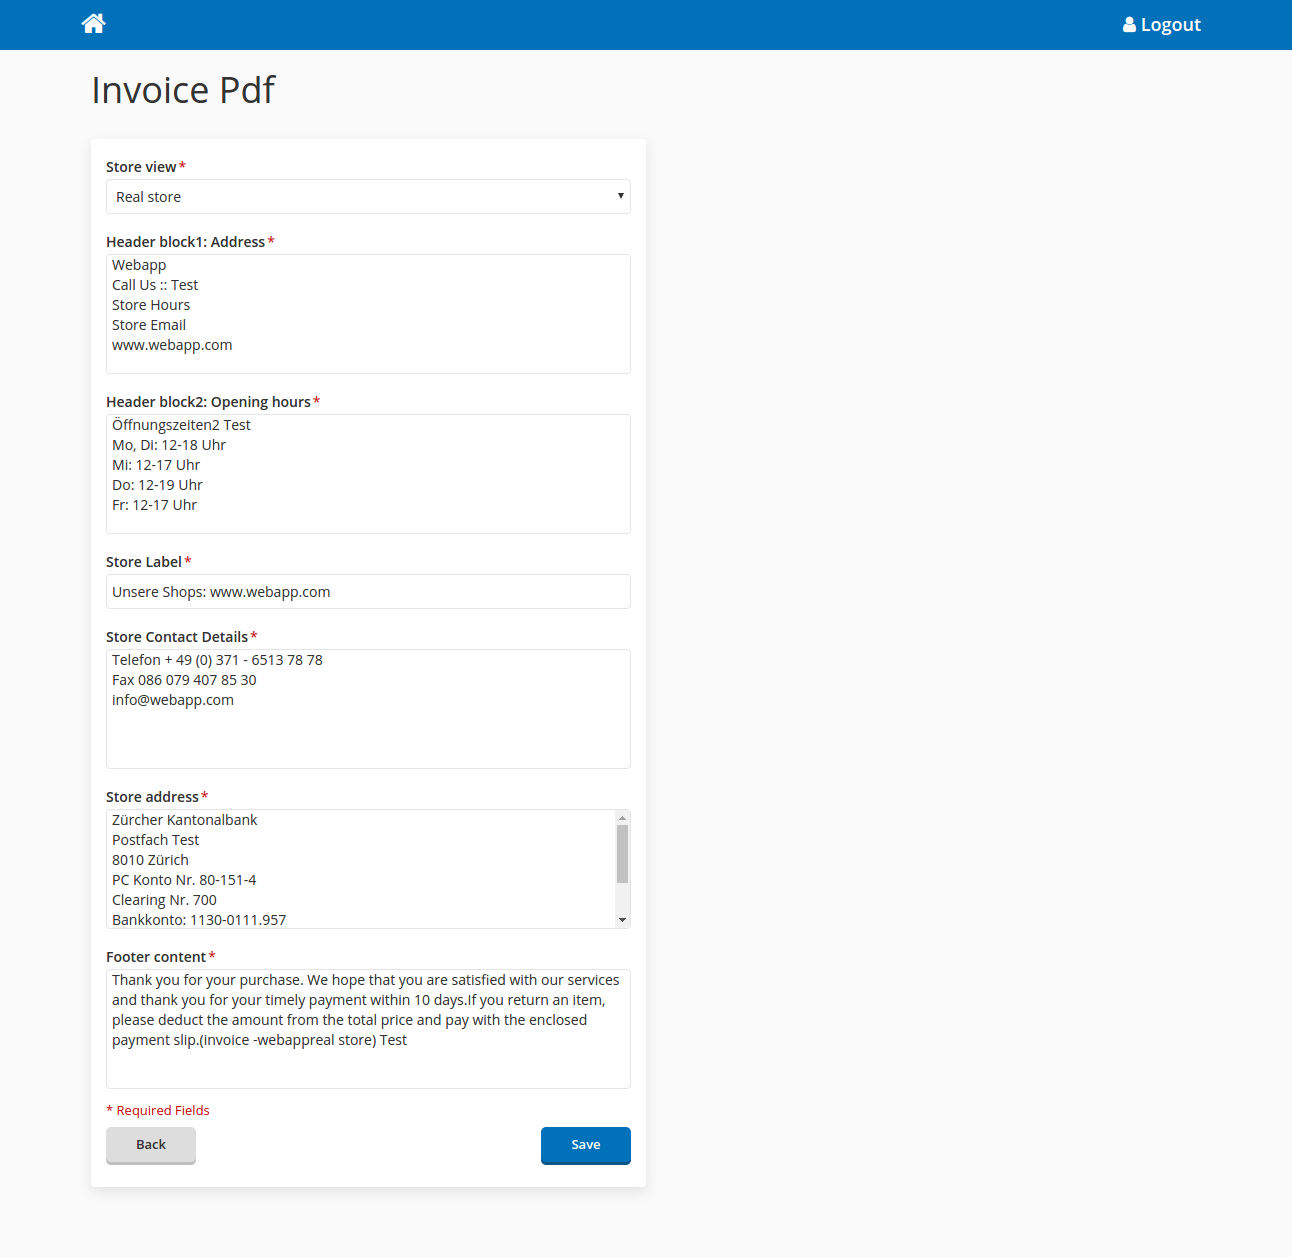
Invoice pdf form contains the following fields,
Store View:- Select the required store view for which contents to be managed.
Header block1:Address:- Enter the shop address which is to be displayed in the header region
Header block2: Opening Hours:- Enter the shop opening hours
Store Label:- Specify your shop name here.
Store Contact Details:- Enter shop contact details such as Telephone, Fax, Mail Id in this region.
Store Address: Enter the store address here. This will be displayed in body region of invoice pdf
Footer content: Enter the contents which is to be displayed in footer region of Pdf.
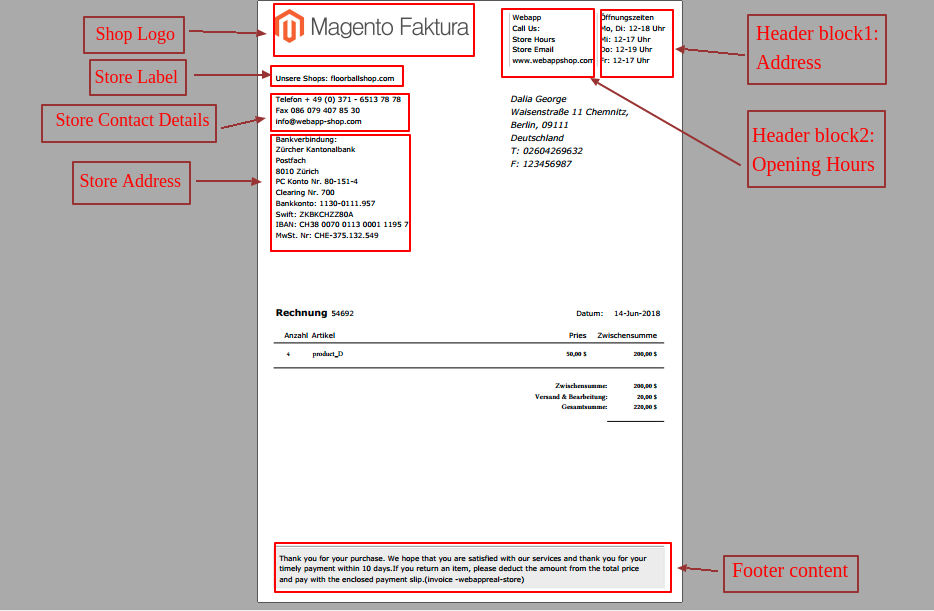
General layout of invoice pdf
Invoice Mail
Invoice mail settings form is used to manage the contents of invoice mail which is sent from the order edit page of Webapp. Invoice pdf is attached along with this mail.
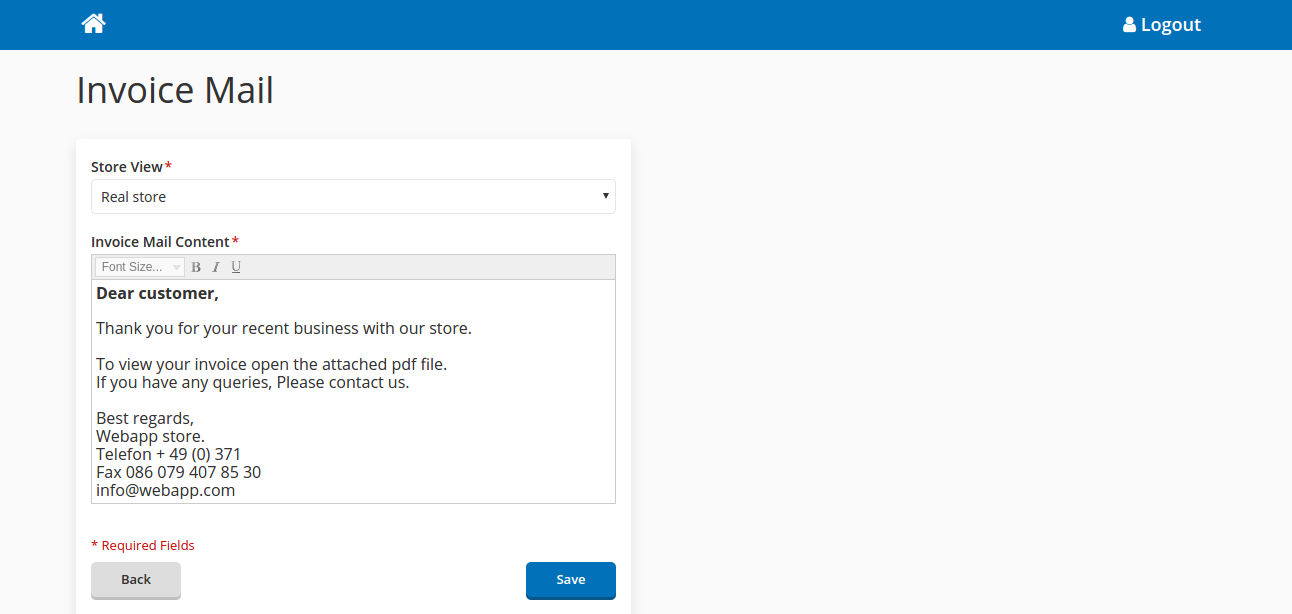
Invoice mail form contains the following fields,
Store View :- Select the required store view for which contents to be managed.
Invoice Mail Content :- This text area comprises of entire invoice mail. You can edit and manage the content using editor available here.
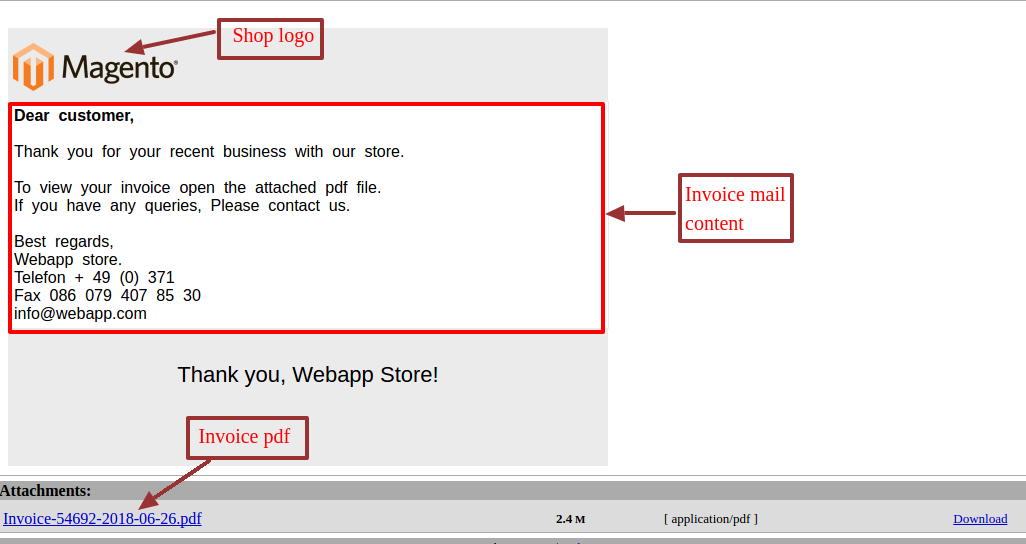
Fig:General layout of invoice mail
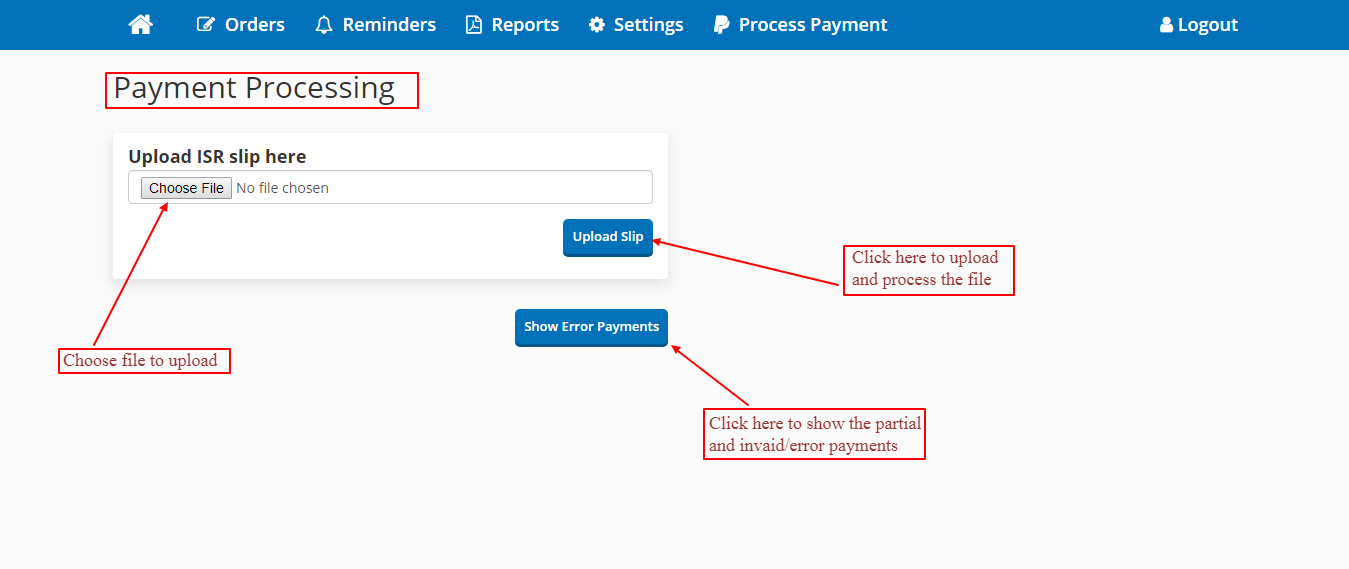
Payment Process
This section describes the payment processing for ISR/invoice payment methods. For the orders that are placed using the payment that are configured in the “ISR Settings “ in the webapp configuration section. Go to Admin->System->Configuration->Pits Extension->Webapp- >ISR Settings. In the multi select menu “Generate Invoice Automatically” select the payment methods that you want to generate invoice on placing order and process payment via webapp.

And to be noted that, for processing an invoice via webapp, it should have both invoice no and isr reference no. To process the payment of the invoices, From the home page click on the “Process Payment” tile. It will direct to the payment processing page. In that page you have to upload the ISR slip, which you will get from the bank itself. It is an xml file that contains the transaction amount that of each customer has made via bank. So we have to read this file to process the payment in our webshop. For that choose file from the system and upload. Then click on the Upload Slip button to upload and process the payment of each invoice from the slip. If the, slip is valid and contain all payment data, webapp will read all the info from the file and mark. payment against each invoices.
From the payment processing page, you can also see the partial payments and invalid/error payments. Click on the “Show Error Payment” button to navigate to the “Error Payment List” page.
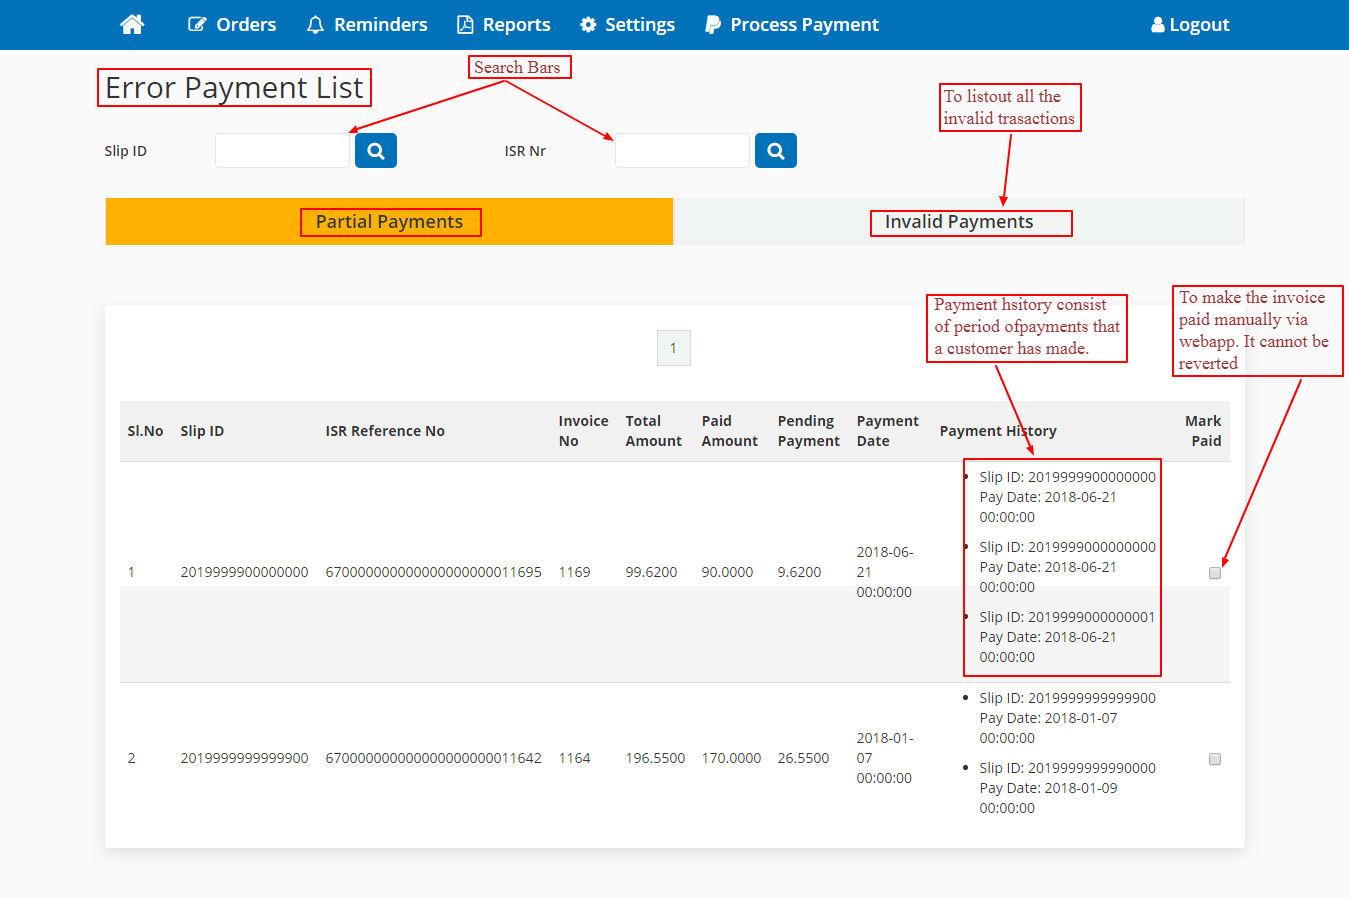
Error payment listing consisting of two tabs.
- Partial Payments
- Invalid Payments
Partial Payments :- In this tab it will list out all the invoices which are partially paid, which mean sonly the fraction of the total payment is made. The listing includes a Slip Id, ISR
Reference No, Invoice No, Total Amount, Paid Amount, Pending Payment, Payment Date, Payment History and Mark Paid.
Slip Id :- Which specifies the Slip Id of the processed ISR file.
ISR Reference No :- Isr reference no of the invoice that you have paid.
Invoice No :- Invoice no of the invoice that customer has paid.
Total Amount :- Invoice grand total.
Paid Amount :- Total payment has been made by the customer.
Pending Payment :- Total Due payment if any.
Payment History :- If a customer maid payment via more than one time, this will list down all the payments that the customer has made. Which includes Slip Id of the processed file and the date of the payment.
Mark Paid :- This checkbox is used to forcibly make the invoice paid, from webapp. If you check the checkbox and accept the terms it will make the invoice to paid state, even though the invoice is partially paid.
Invalid Payments :- In this tab, list down all the invalid payment that are processed via webapp. Which means this will list down all the invalid isr reference no, which the invoices of the corresponding in isr no don’t exist in our shop. Webapp will mark those isr reference no’s as invalid when processing the bank slip.
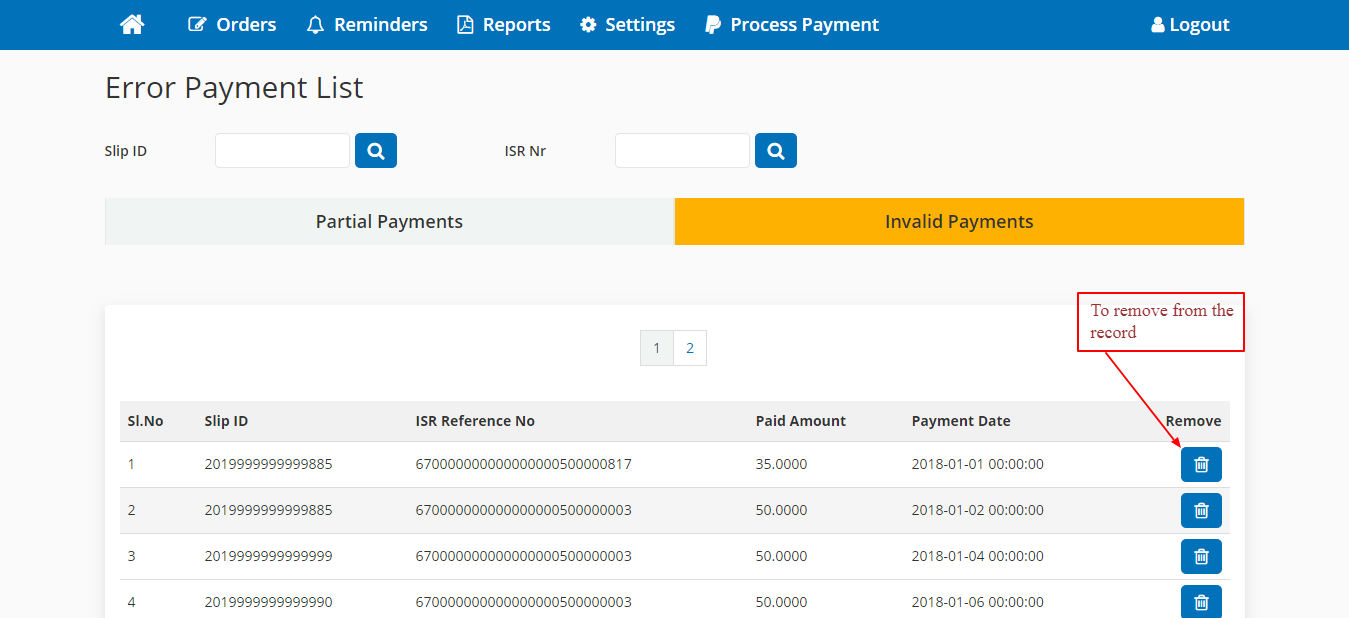
Slip Id :- Which specifies the Slip Id of the processed ISR file.
ISR Reference No :- Invalid isr reference no.
Paid Amount :- Paid amount made through the invalid isr reference no.
Payment Date :- Payment Processed date.
Remove :- To remove the record from webapp.
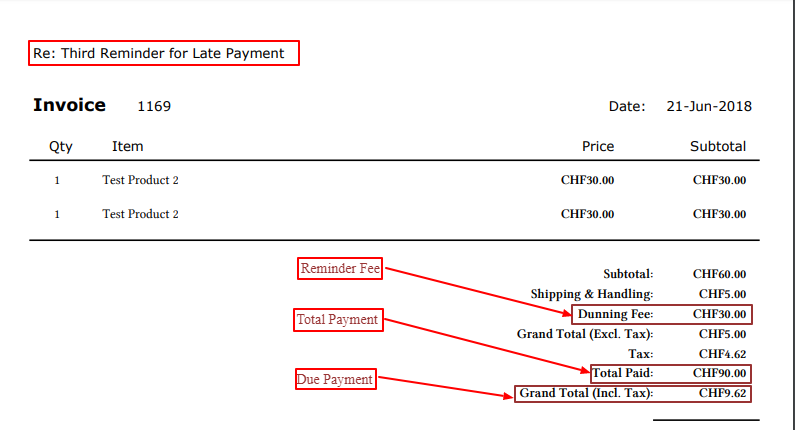
Payment Indication in Reminder Pdf
If a customer has made payment after sending out any reminder. The reminder pdf will indicate the paid amount also among the reminder charges and others. Refer the screenshot below.
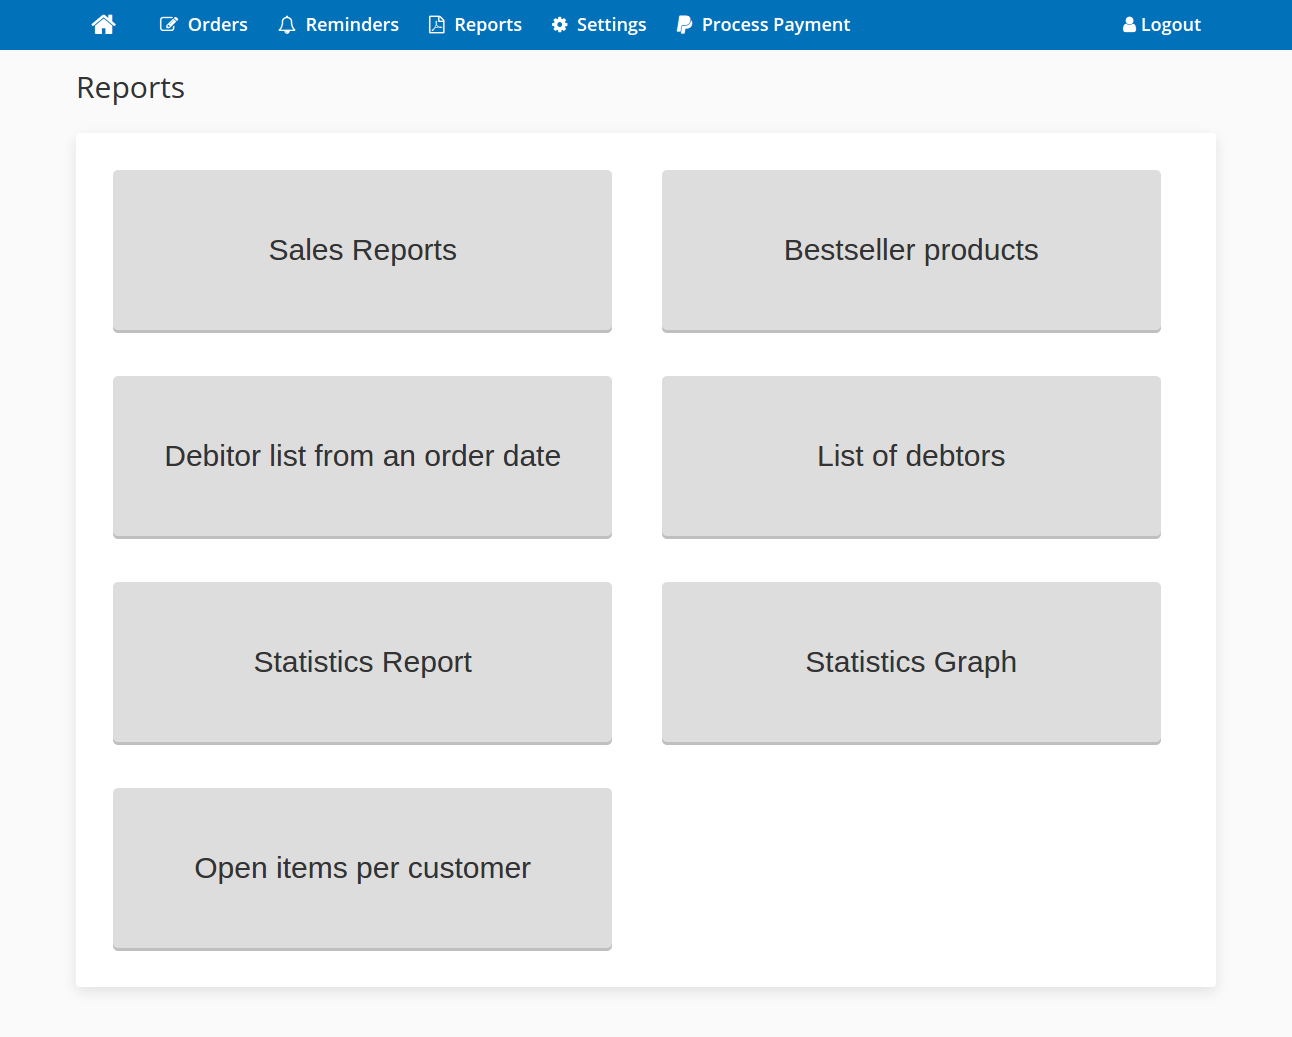
Reports
Sales reports provides a complete overview of sale occurred within a shop. Faktura gives seven distinct sales reports. They are available under the “Reports” tab in home page.
1. Sales Report

Sales report lists orders placed for a particular product in the time duration specified by ‘from date’ and ‘to date’. Either product name or SKU is required.
Product Name: enter full product name or starting letters of product name.
(example : product name of ‘test-product-’ lists all products starts with ‘test-product-’.)
SKU: enter product’s SKU. Order details of product with entered SKU will be listed.
2. Bestseller Product
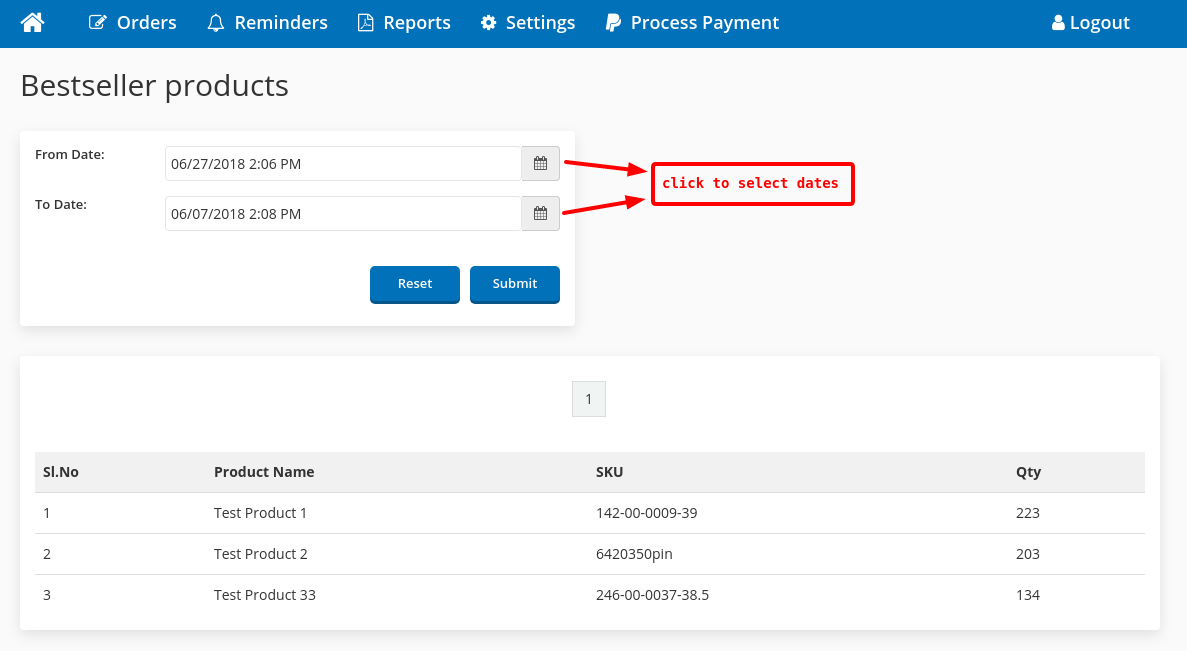
Bestseller Product displays the bestselling products in the time duration specified by ‘from date’ and ‘to date’. Click in the calendar icons to select from date and to date limits. Click on submit button to get list of products along with their SKU and quantity of ordered in the time limit.
3. Debitor list from an order date
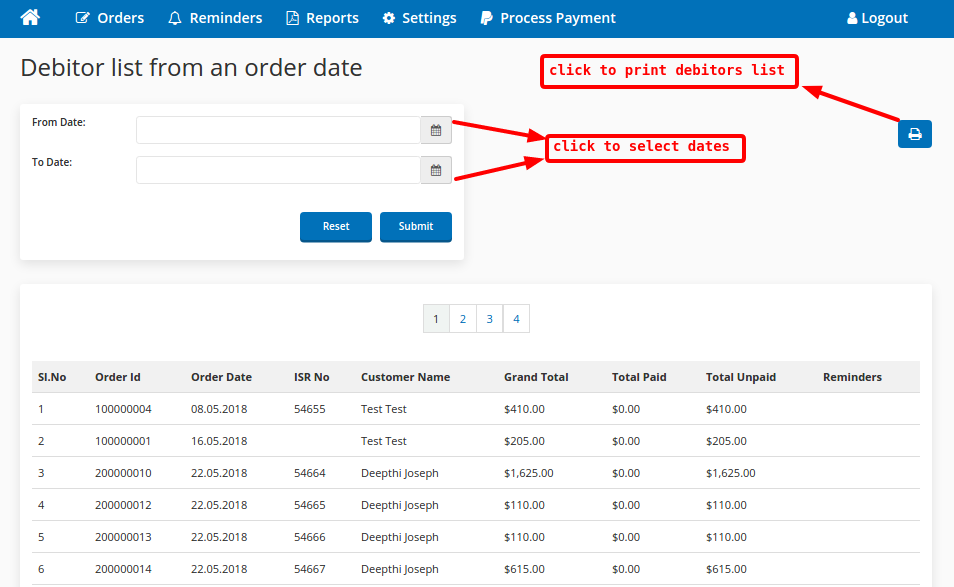
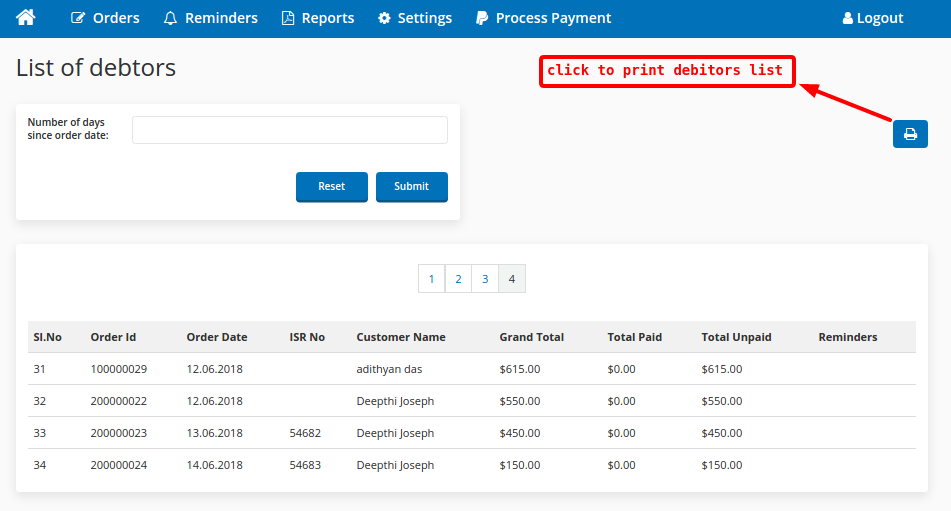
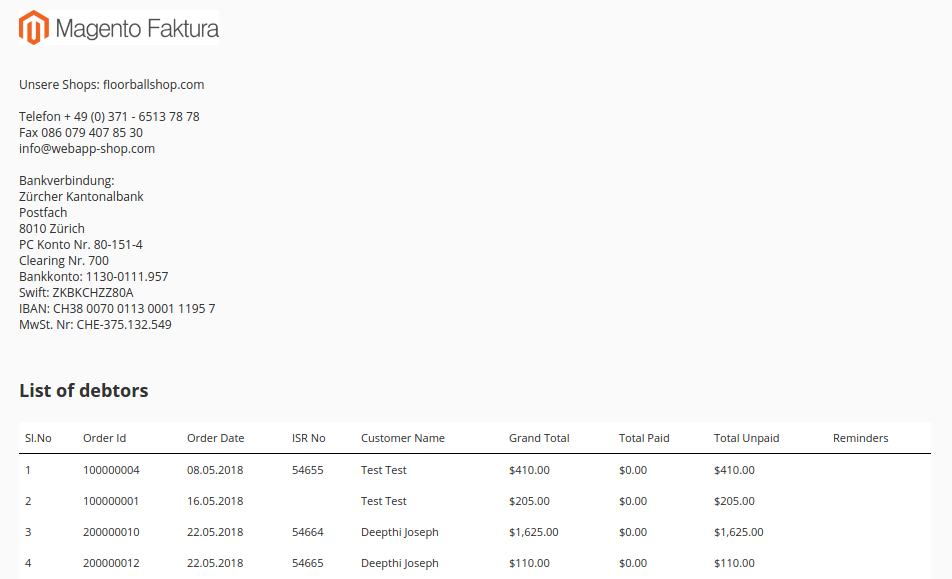
It shows unpaid orders list with in specified time limit. Click on calendar icons to select ‘from date’ and ‘to date’. Click Submit button to get list of orders. Click on printer icon to print the debtors list. Fig. below shows sample print preview of debtor list from order date.

List of debtors
It shows unpaid orders list with in specified time limit if number of days since order date exceeds limit entered. Click Submit button to get list of orders. Click on printer icon to print the debtors list. Fig. below shows sample print preview of debtor list.
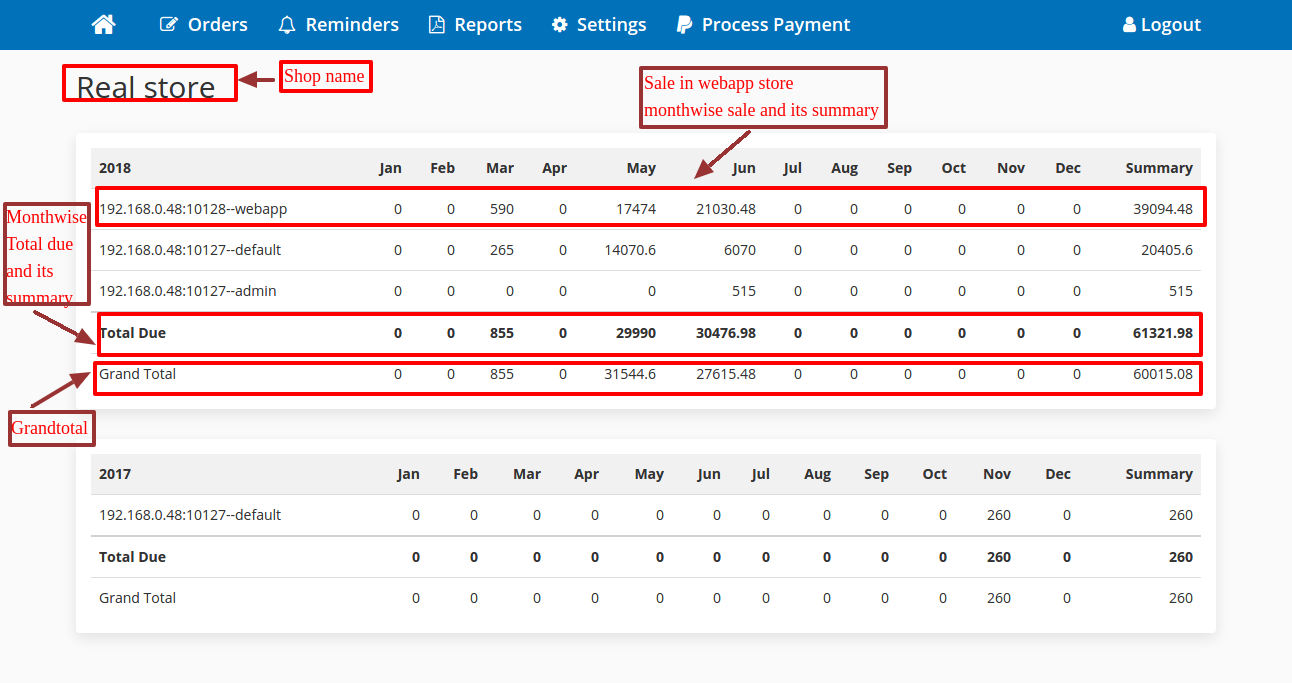
Statistics Report
Statistics report gives a complete overview of sale occurred in store during every year. It shows month wise report of sale, due amount ,grand total and its complete summary. The report is available under the Statistics Report tab.
The shop Name given in Report can be managed from general settings tab under settings page.
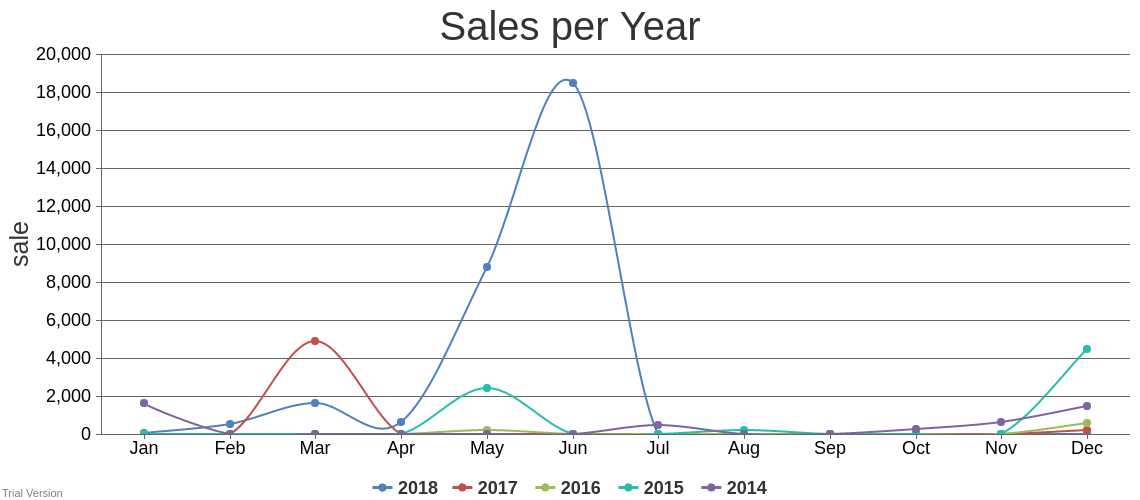
Statistics Graph
It shows graphical representation of whole sale within a store over all the years. It can be generated by clicking the Statistics graph tab in reports page
Open Items per Customer
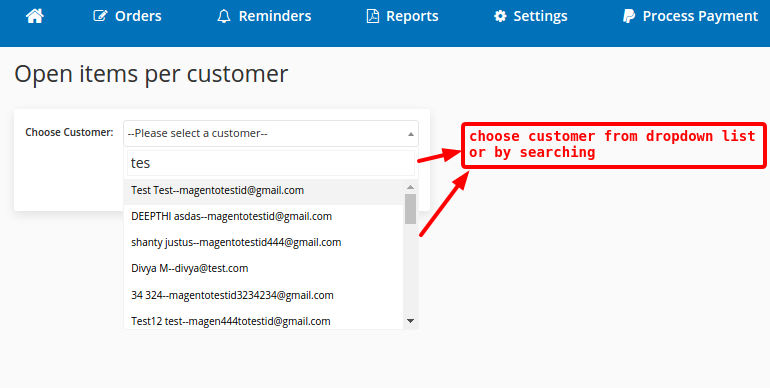
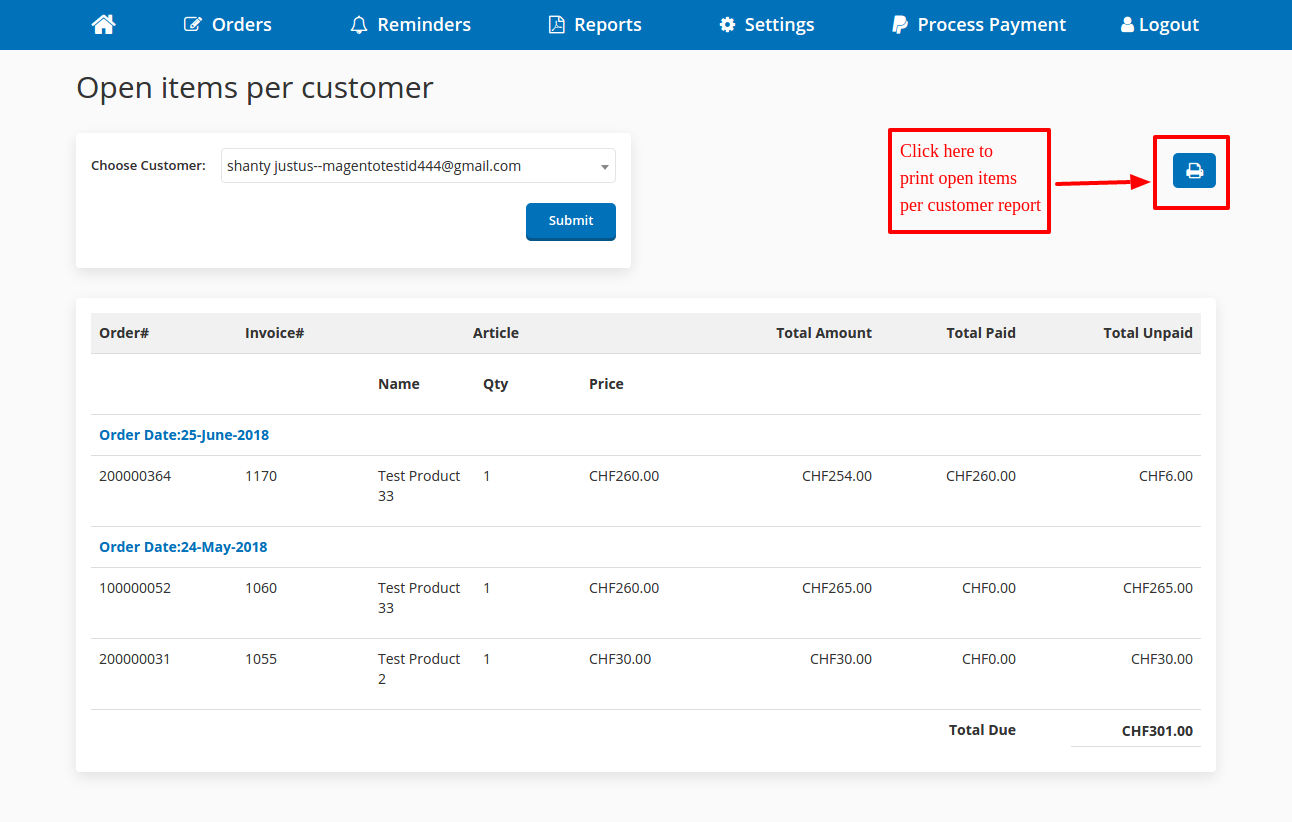
It shows unpaid orders list of a particular customer. Customer can be chosen either by selecting from dropdown or by searching a particular customer and then click on Submit button to get list of unpaid orders. Click on printer icon to print the unpaid order per customer list. Fig. below shows sample print preview of unpaid orders list.
Product Specifications
Magento Faktura Webapp is a Magento extension for managing orders and invoices for Magento. This extension provides an easy means to create orders and thereby reducing the
effort of creating order from Magento admin side. A Magento shop owner can make use of this app to manage the sales from his physical store.
This web app order management module works like Magento admin order management section and having some additional features like edit order items without changing the order id, view and process new orders, option to add manual shipping charge, ISR payment processing and reminders. All the updates from the Magento webshop and webapp make use of the same inventory so the shop owner will not have the overhead of managing the stocks separately
Features
- Creation of invoices with/without attached orange ISR payment slip
- Automatic ESR generation with sequential invoice number
- Invoice dispatch via your e-mail software.
- Manual entry of invoices if you want to bill for services that were not entered in your Magento Shop
- Temporary deletion of an order
- Automatic import and processing of payments files that you download from your bank
- Automated dunning with 4 temporally configurable dunning levels
- Customizable transaction mails, invoice and reminder
- Accounts receivable overview, sales statistics per store view and total, annual sales comparison, sales statistics for individual articles
Demo
Htaccess:
- username :- pitsuser
- password :- pitsgmbh
Demo Webapp Page :- demo.mypits.org:10128
- username : magentotestid@gmail.com
- Password : pass@123
Frontend Url :- demo.mypits.org:10127
Admin Url :- demo.mypits.org:10127/admin
Username : admin
Password : admin123
Supported Languages
English, German
Change Log / Release Notes
Version: 1.0.2: November 25, 2018
- order creation and its management
- payment processing via bank ISR slip
- reminders and receipts
- order and sales reports
Support
If you have questions, use our contact form in webshopextension.com