Kategorien
Magento
WordPress
SAP Commerce
Odoo
Shopify
Typo3
Shopware
nopCommerce
Pimcore
Hyvä
OXID eShop


Product Specification
The Product Designer Extension for Magento 2 is a versatile solution that enables customers to easily personalize their selected products. This extension can help the store to improve the customer interaction greatly by enabling easy personalization of the product. The Product Designer Extension for Magento 2 is Compatible with both simple and configurable products, it offers a wide range of customization options. Users can add multiple text elements with different font faces, adjust font sizes, and experiment with various creative elements like color, shadows, and rotations. They can also upload images and choose from a selection of clipart to further enhance their designs. With seamless integration into the shopping experience, customers can preview and align their customizations before adding products to their cart. Administrators have control over designated customization areas and can curate font faces and clipart options for users. In essence, the extension empowers customers to transform their creative ideas into unique, personalized products, fostering a sense of individuality.
Features
Here is a comprehensive list of the features included in the Product Designer extension:
- Compatibility with Simple and Configurable Products: The extension seamlessly supports both simple and configurable products, ensuring a versatile customization experience.
- Text Customization with Property Modification: Users can easily add and modify text properties, including alignment, rotation, font, color, shadow, and outline. This comprehensive set of options provides users with fine-tuned control over the appearance of text elements.
- Alignment and Rotation Features: The extension offers advanced functionality by allowing users to meticulously align and rotate clipart, images, and text elements.
- Image Upload Capability: Users enjoy the convenience of seamlessly uploading their images. This feature opens a realm of creative possibilities, enabling users to integrate personal graphics, logos, or unique images into their product designs, fostering a truly individualized product.
- Flexible Price Structures for Customization: Administrators wield the ability to set diverse price types for customization, providing a flexible approach to pricing strategies. The available options include:
-
- Free Price: No additional cost is incurred for customization.
- Fixed Price: A predetermined and fixed cost is assigned for customization.
- Price per Object: This results in individualized pricing for each object, such as text, image, and clipart. The cost dynamically adjusts based on the quantity of each addition made during the customization process.
- Scheduled Image Cleanup by Cron: This functionality ensures the automatic removal of saved customizable images in quote media folders after a designated period.
- Custom Fonts and Clipart Images: Admins can easily enhance the customization options for customers. They can add different fonts and clipart in the backend, making them available in the customization popup on the frontend.
Admin Panel Configuration
Stores -> Configuration -> Pits Configuration -> Product Designer
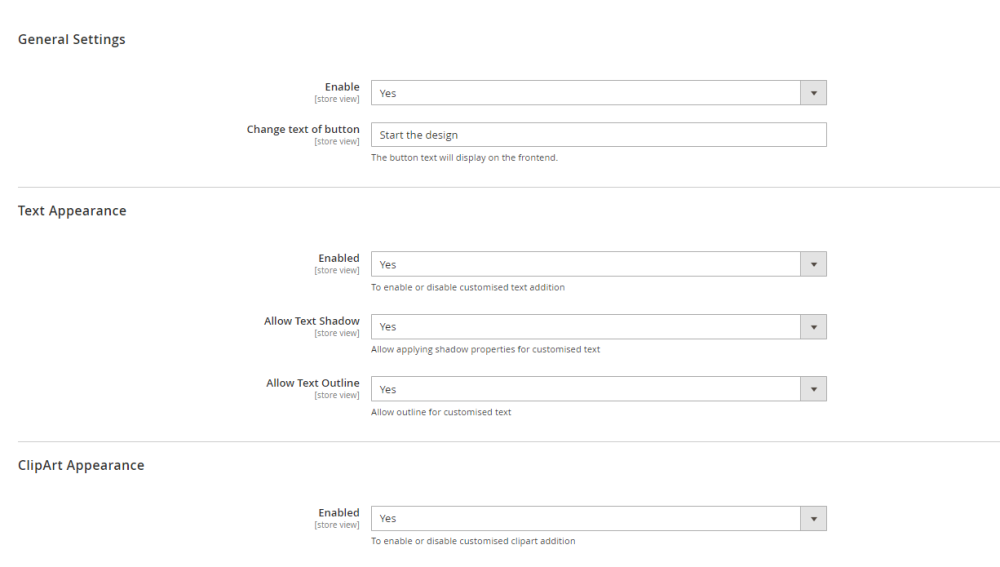
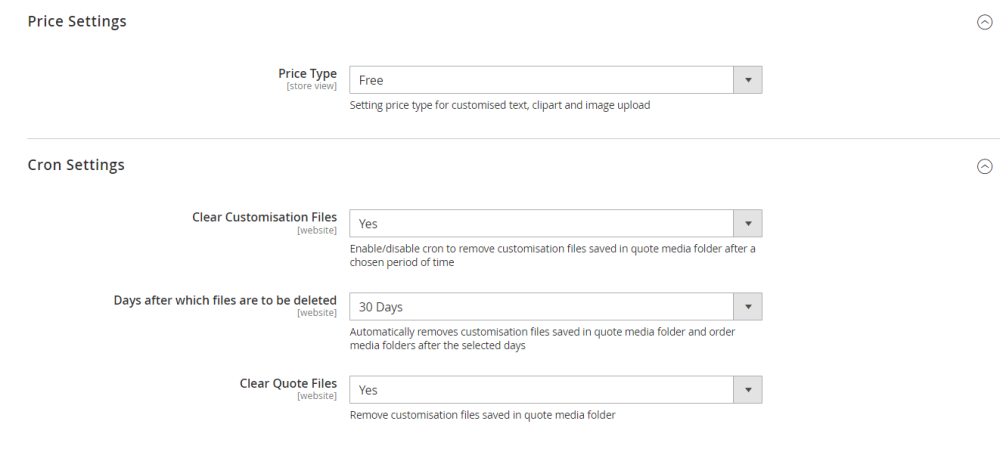
Figure 1: Admin panel configuration
Figure 1. displays the admin configurations of the extension, which specifies location or placement of the Product Designer feature. The fields are:
General Settings
- Enable – Enable / Disable module.
- Change text of button – The text of the button which starts the customisation on the frontend can be changed here.
Text Appearance
- Enabled - To enable/disable text addition functionality in frontend
- Allow Text Shadow – To enable/disable text shadow properties in customized text in frontend
- Allow Text Outline – To enable/disable text outline properties in customized text in frontend
ClipArt Appearance
- Enabled – To enable clipart addition functionality in frontend
Price Settings
- Price Type – Setting price type for customization
-
- There are three options
-
-
- Free
- Fixed
- Per object
-

Figure 2: Price Type – Free
When price type is set as free, zero cost is incurred as design fee (Figure 2).

Figure 3: Price Type –Fixed
When the price type is set as fixed, the admin can set a fixed price regardless of the type of object (text, clipart, image) added (Figure 3).
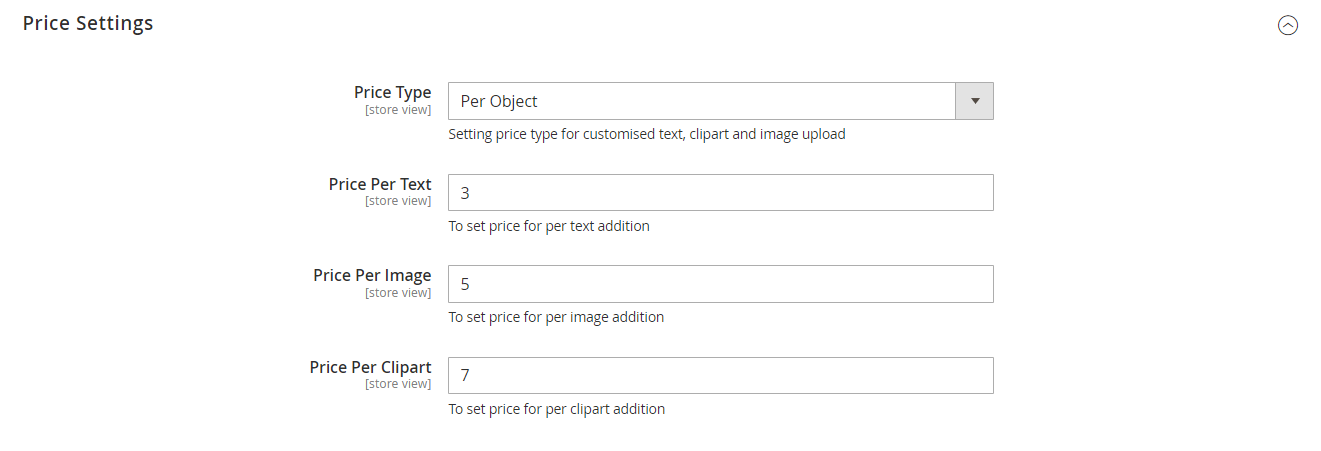
Figure 4: Price Type - Price per Object
When price type is set as Per Object, the admin can set individual price for per text, per image and per clipart addition and design fee is cumulative of these prices (Figure 4).
Cron Settings
Admins can set up a scheduled task called a cron job to automatically clear out customization files stored in the quote media folders. This is particularly useful when customers save customized images without placing an order, preventing unnecessary storage consumption in the pub/media directory. It's a straightforward way for administrators to manage storage efficiently and keep the media storage area in Magento running smoothly. There are three fields under Cron Settings tab (Figure 5).
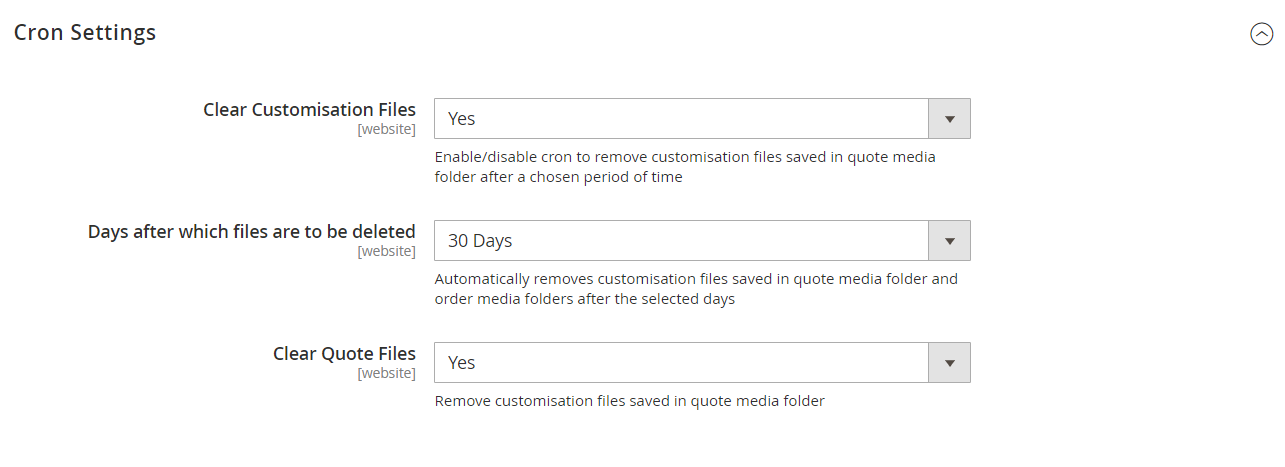
Figure 5: Cron Settings
- Clear Customisation Files: Enable/disable cron to remove customization files saved in quote media folders after a particular period.
- Days after which files are to be deleted: If clear customization files field is enabled, the number of days can be selected after which files are to be deleted through cron job. Three options are set. 30 days, 60 days, 90 days
- Clear Quote Files: If clear customization files field and this field is enabled, admin can remove customization files in quote media folder.
How It Works in Backend
Administrators can set the font faces and clipart through the Catalog menu in the admin panel (Figure 6). Within this menu, a dedicated submenu for the Product Designer is available. This submenu includes distinct links for Font, Clipart Images, and Clipart Categories.
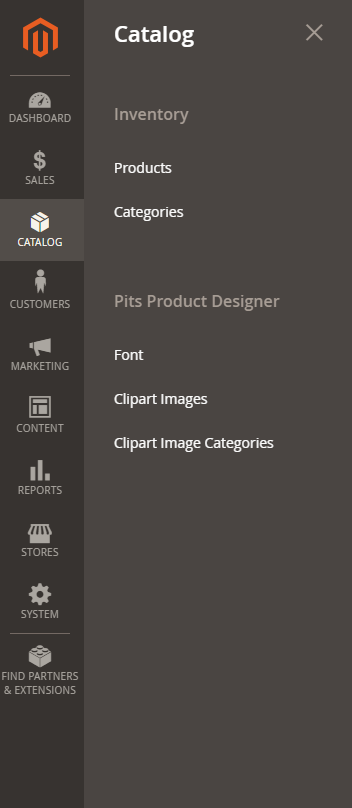
Figure 6: Product Designer Menu
When administrators select the Font link, they are redirected to the Font Details page, where specific details and configurations related to fonts can be managed. Similarly, selecting Clipart leads administrators to the Clipart Details page, offering a centralized space for clipart-related settings. Additionally, administrators can explore the Clipart Categories link to navigate to the Clipart Categories page, where categories associated with clipart are organized and can be modified as needed. This structured navigation within the Catalog menu streamlines the administration of font and clipart elements, providing a user-friendly experience for managing product design aspects.
Font
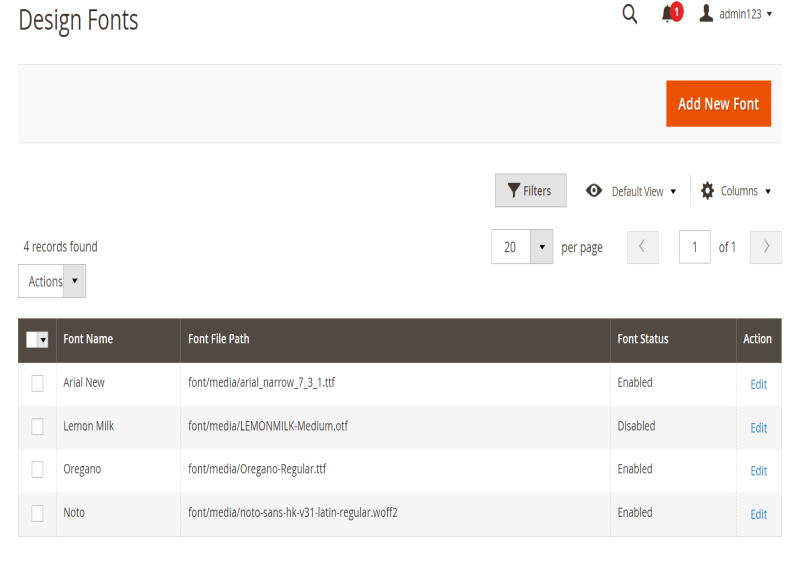
Figure 7: Design Fonts Page
The admin can see the added fonts in this page. The font name and the file path of font face added, and the status of the font is shown. The action in Figure 7 can be set as Delete to multi delete the fonts. The admin can also edit the font by clicking the action ’Edit’. And selecting “Add New Font” above will redirect to an UI form which is for adding new fonts. The admin can set a new font by setting its name and its status, upload a font file with supported font extensions of ttf, woff, woff2, otf and saving the font by clicking Save Font (Figure 8). The fonts with status enabled are shown in frontend. If the fonts are not added or all fonts are disabled, ‘Arial’ Font is set as default font on frontend.
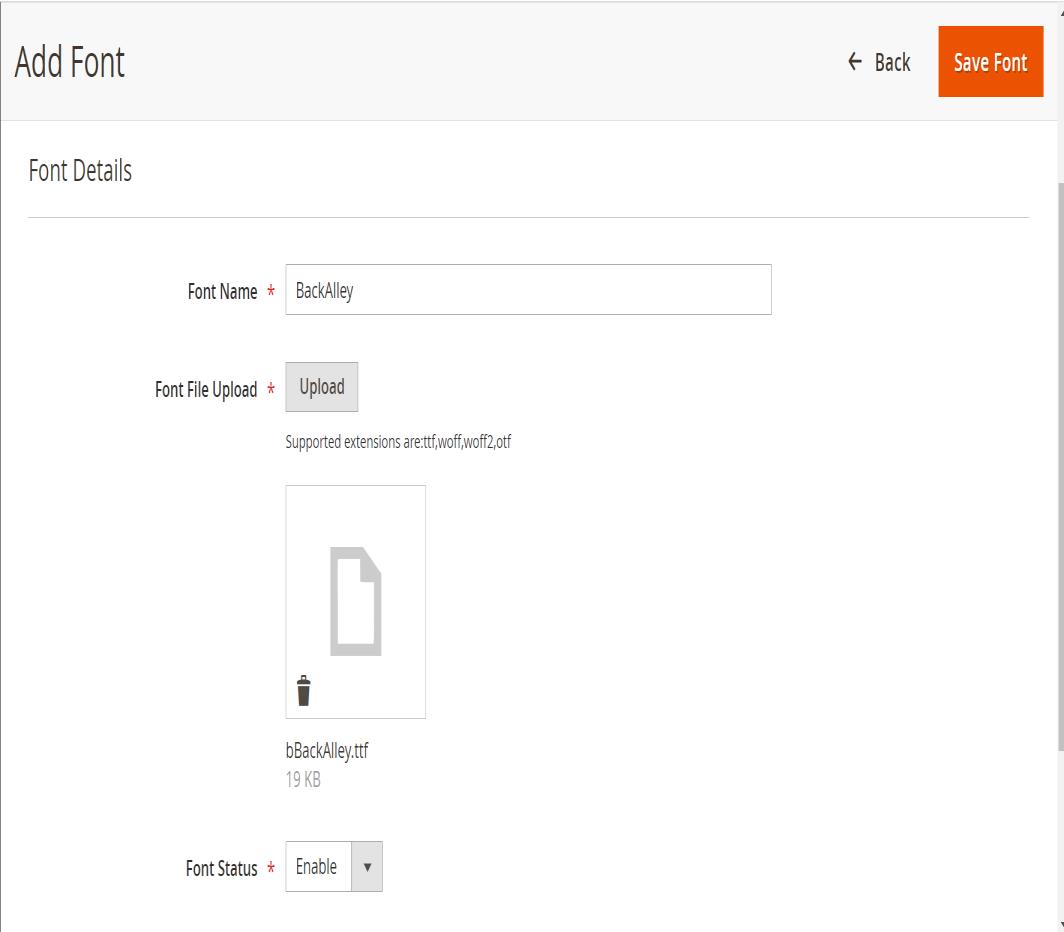
Figure 8: Add Font
Clipart Image Categories
Similarily, admin can direct to clipart image category details page (Figure 9) from Product Designer submenu in Catalog menu.
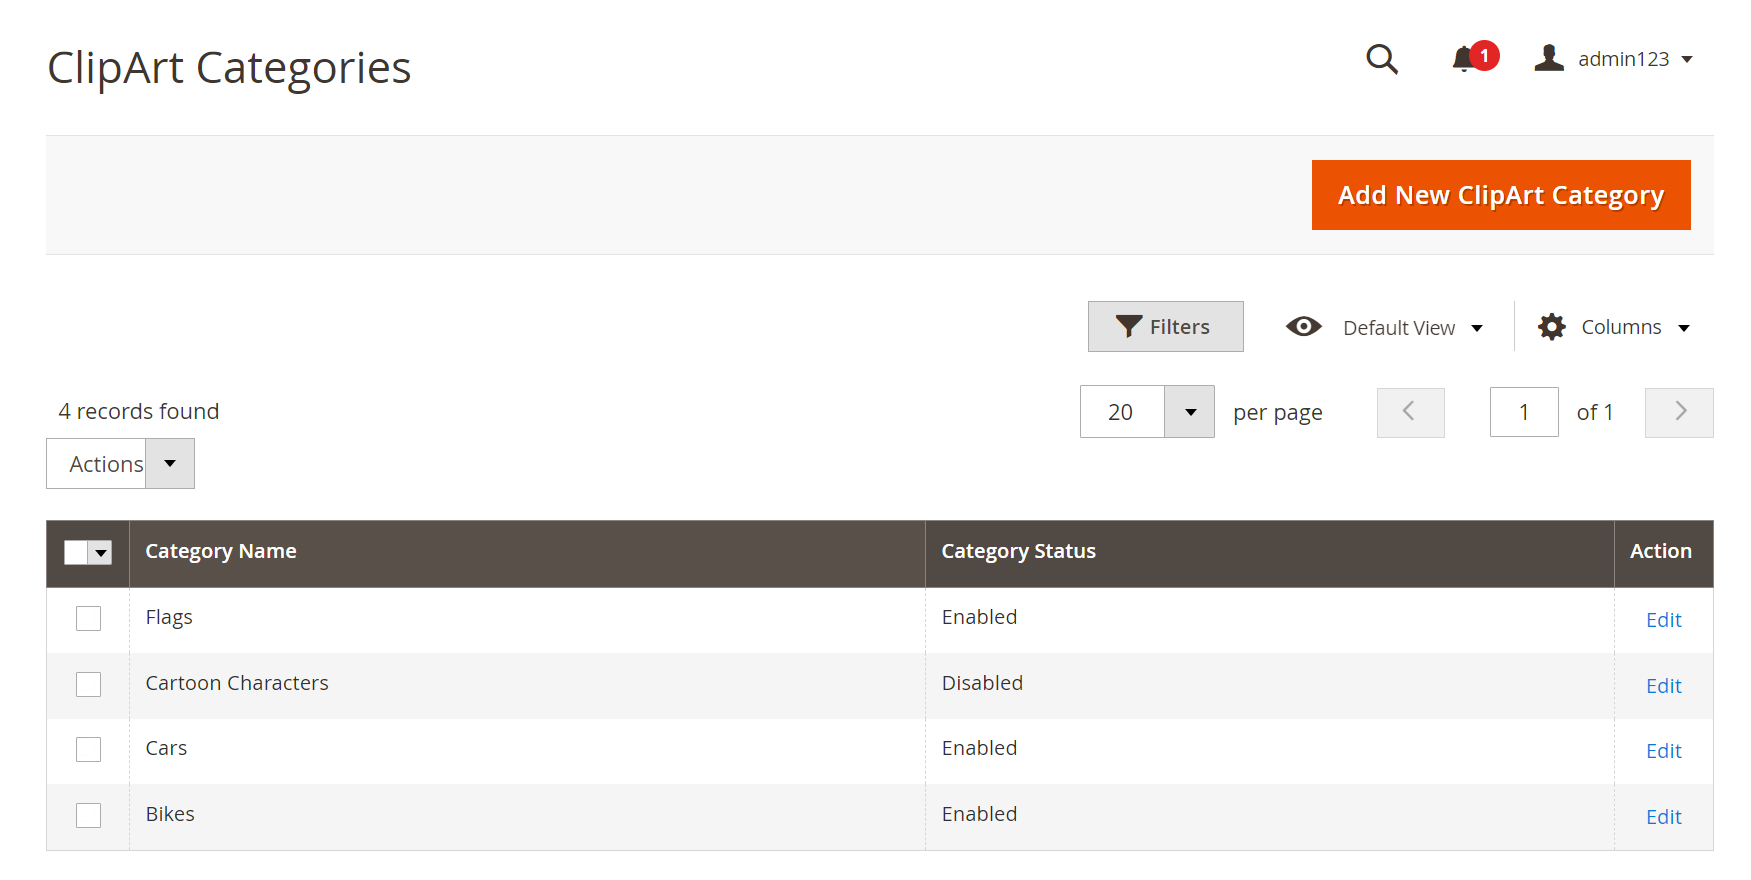
Figure 9: ClipArt Categories
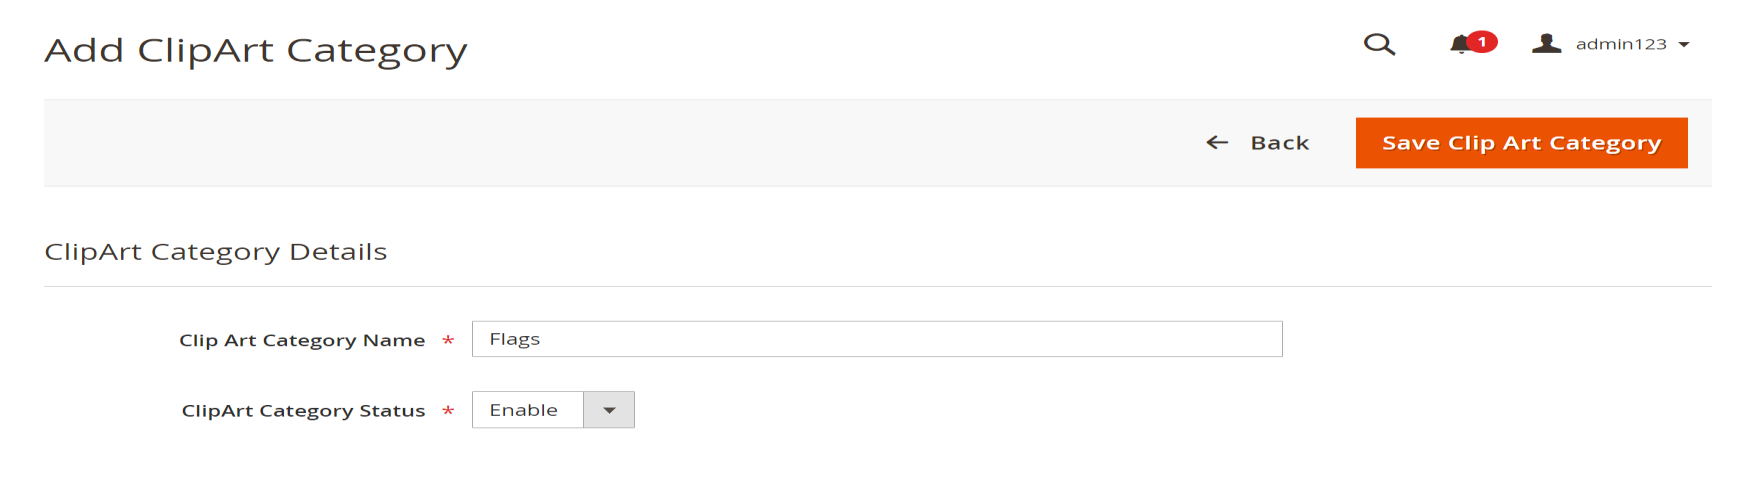
Figure 10: Add ClipArt Category
And selecting “Add New ClipArt Category” above will redirect to an UI form which is for adding new clip art category. The admin can set a new clip art category by setting its name and its status and saving the font by clicking Save Clip Art Category (Figure 10).The clipart categories with status enabled are shown in frontend.
ClipArt
The admin has the capability to associate clip art with each predefined clipart category. The admin can direct to design cliparts page (Figure 11) from Product Designer submenu in Catalog menu
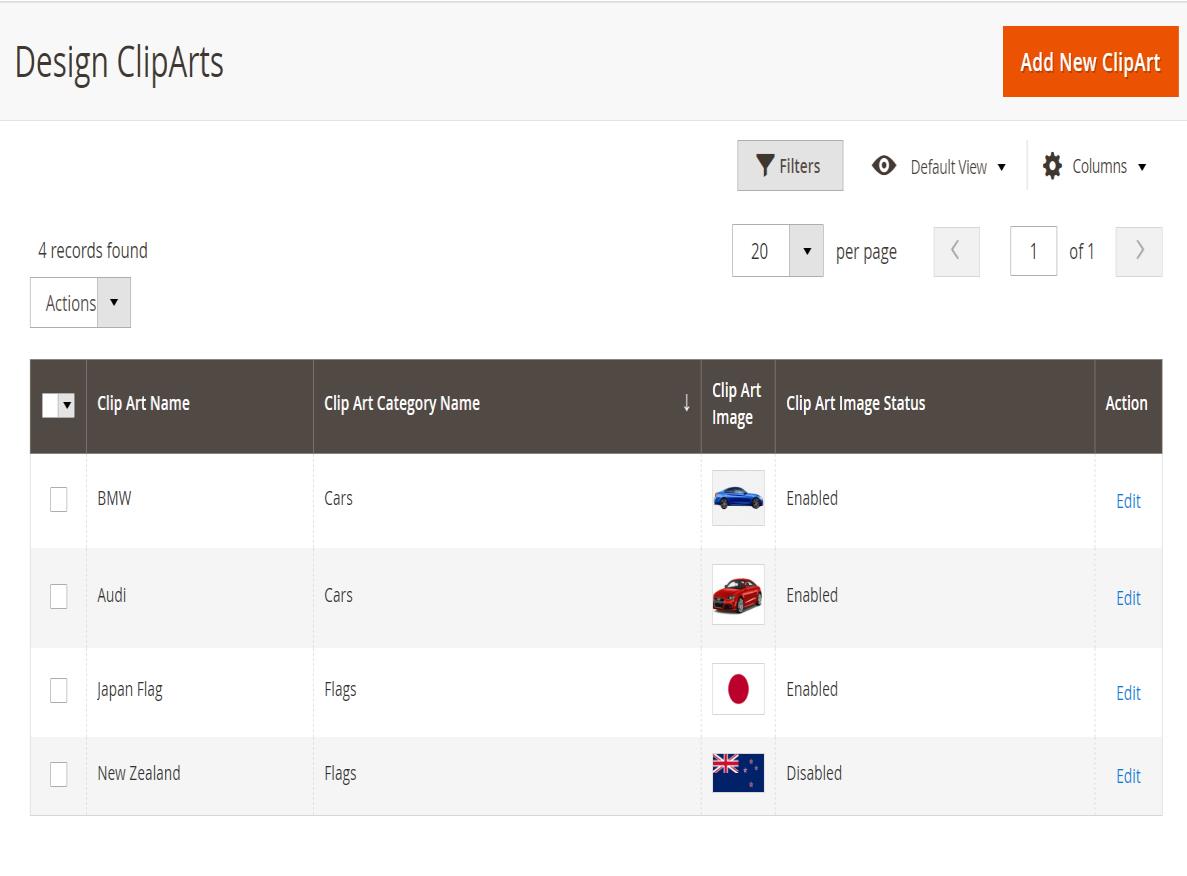
Figure 11: Design ClipArts
And selecting “Add New ClipArt” above will redirect to an UI form which is for adding new clip art. The admin can set a new one by setting its name and its status, upload an image with supported font extensions of png , jpg, jpeg and saving the clipart by clicking Save ClipArt (Figure 12). The cliparts with status enabled are shown in frontend.
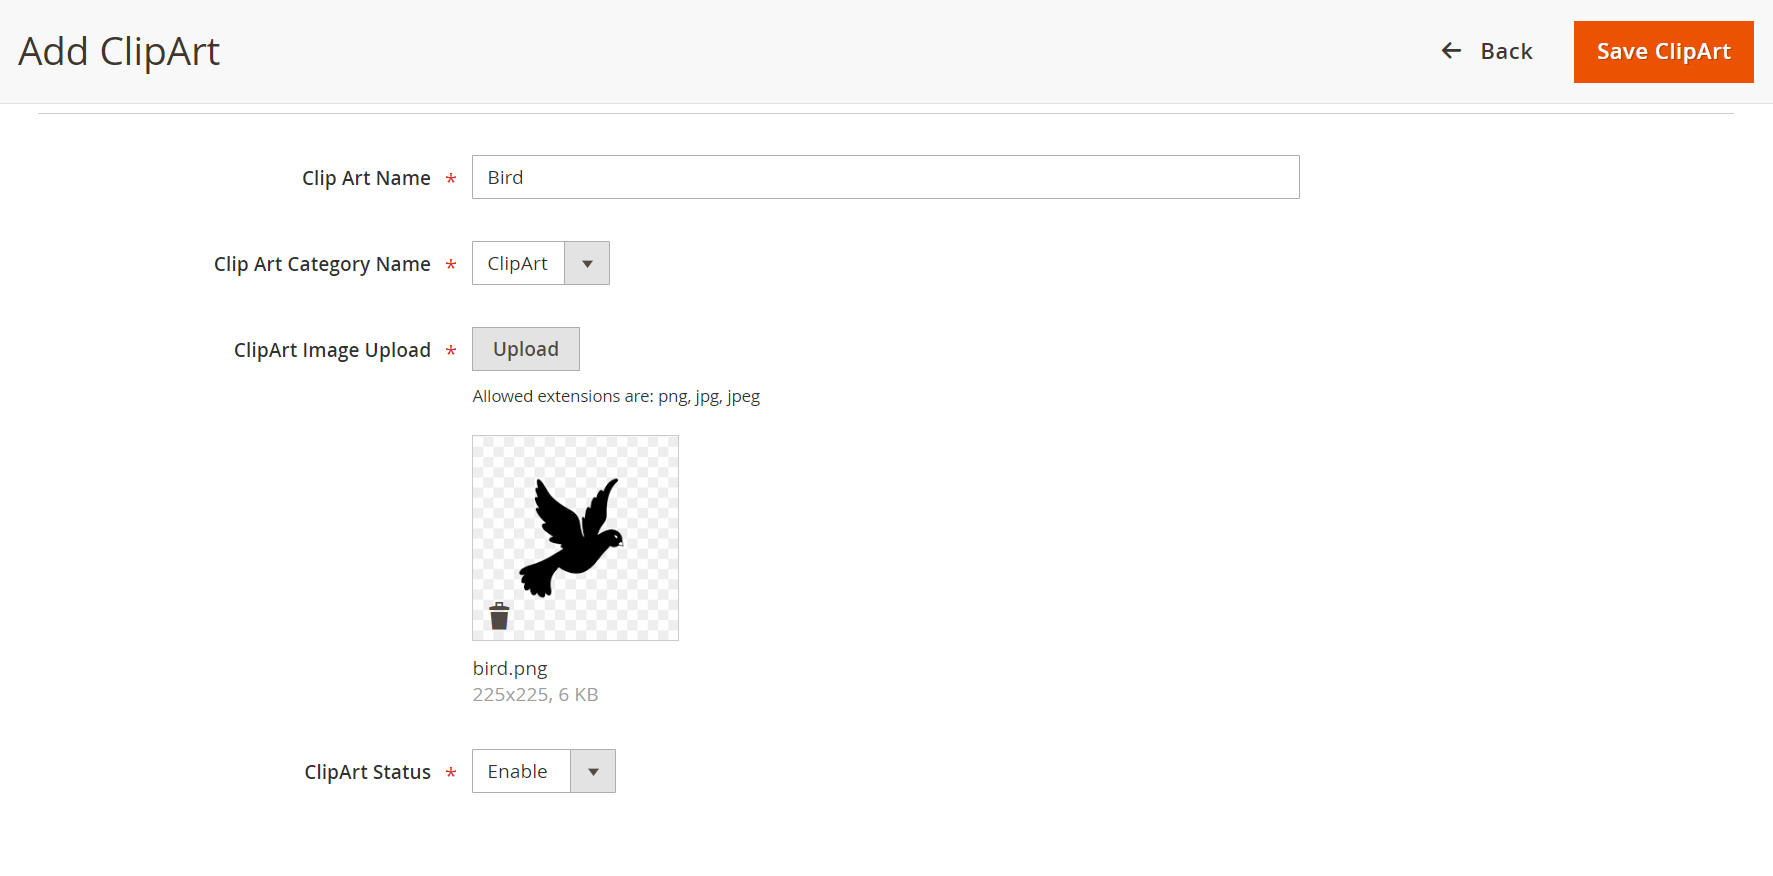
Figure 12: Add New ClipArt
Product Edit Page
Catalog -> Products
Clicking on the "Edit" button of a product will navigate the administrator to the product edit page. On this page, there exists a section named 'Product Designer Options.' Within this section, an attribute named 'Allow Product Design' is provided, allowing administrators to enable or disable the product design feature in Magento 2. This attribute serves as a toggle, giving administrators the flexibility to control whether the product is open for customization through the product design functionality. (Figure 13).
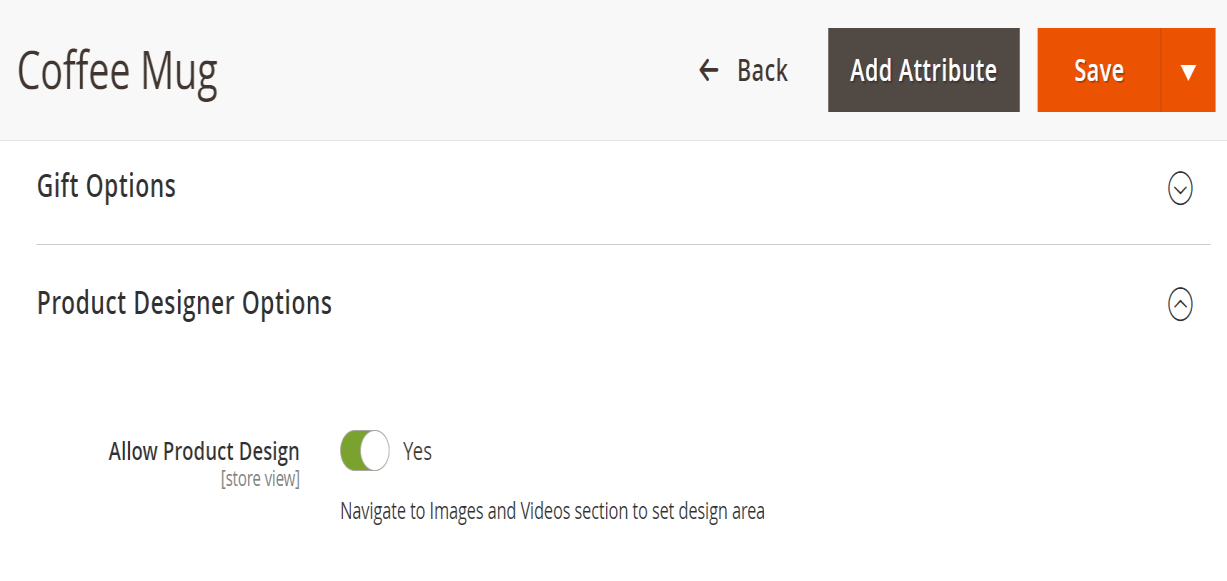
Figure 13 – Product Edit Page with Product Designer Options enabled
Then, the administrator is required to navigate to the "Images and Videos section (Figure 14) to define the prescribed area within the product images (Figure 15).
Note: It's crucial to note that this prescribed area is configured outside the boundaries of the product image.
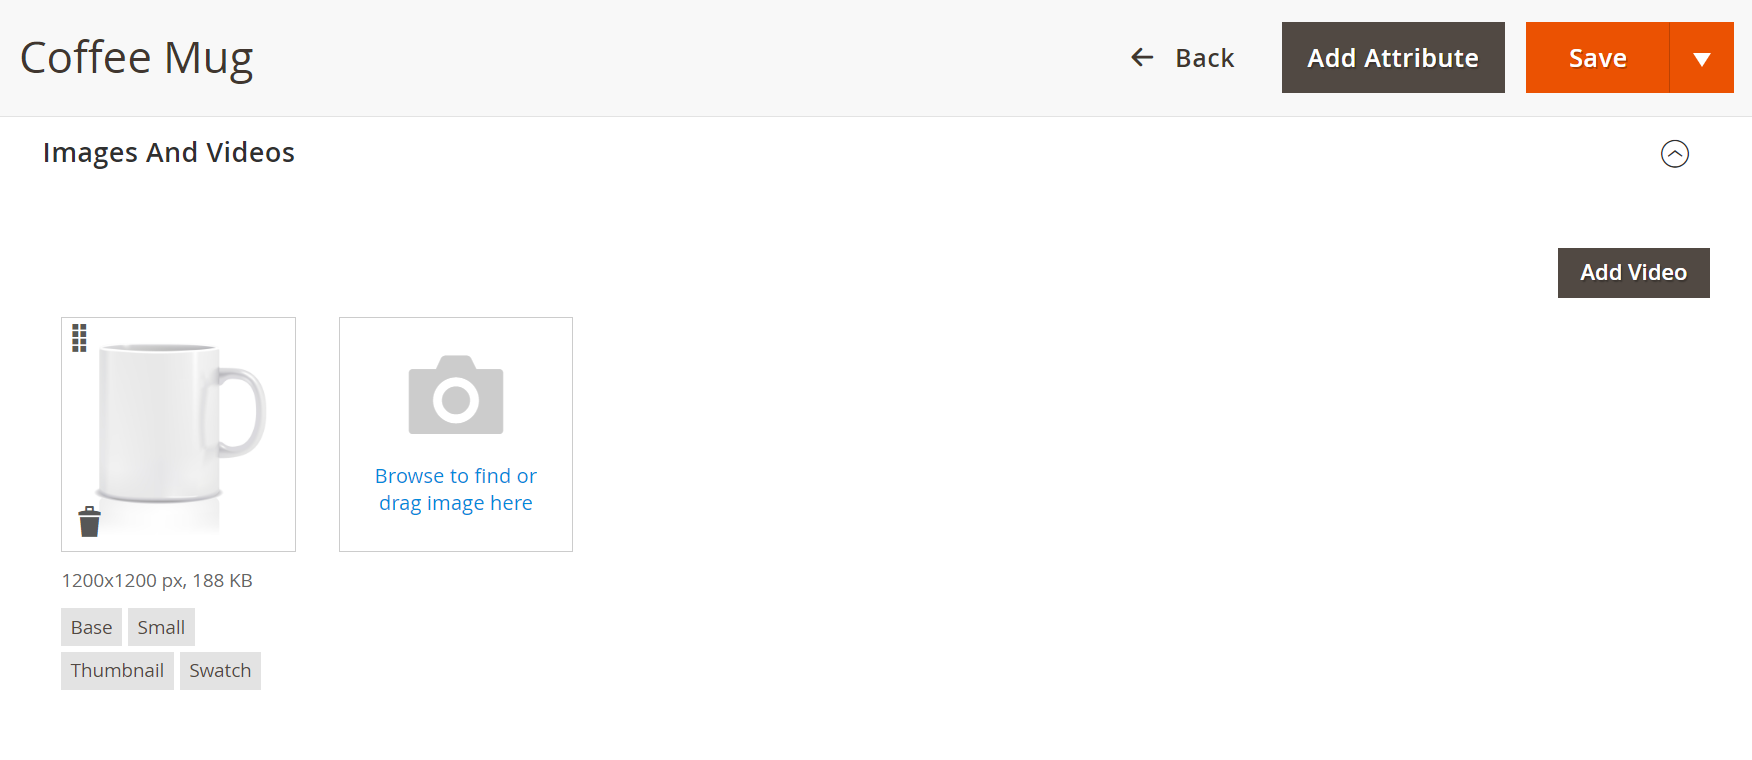
Figure 14: Image and Videos Section
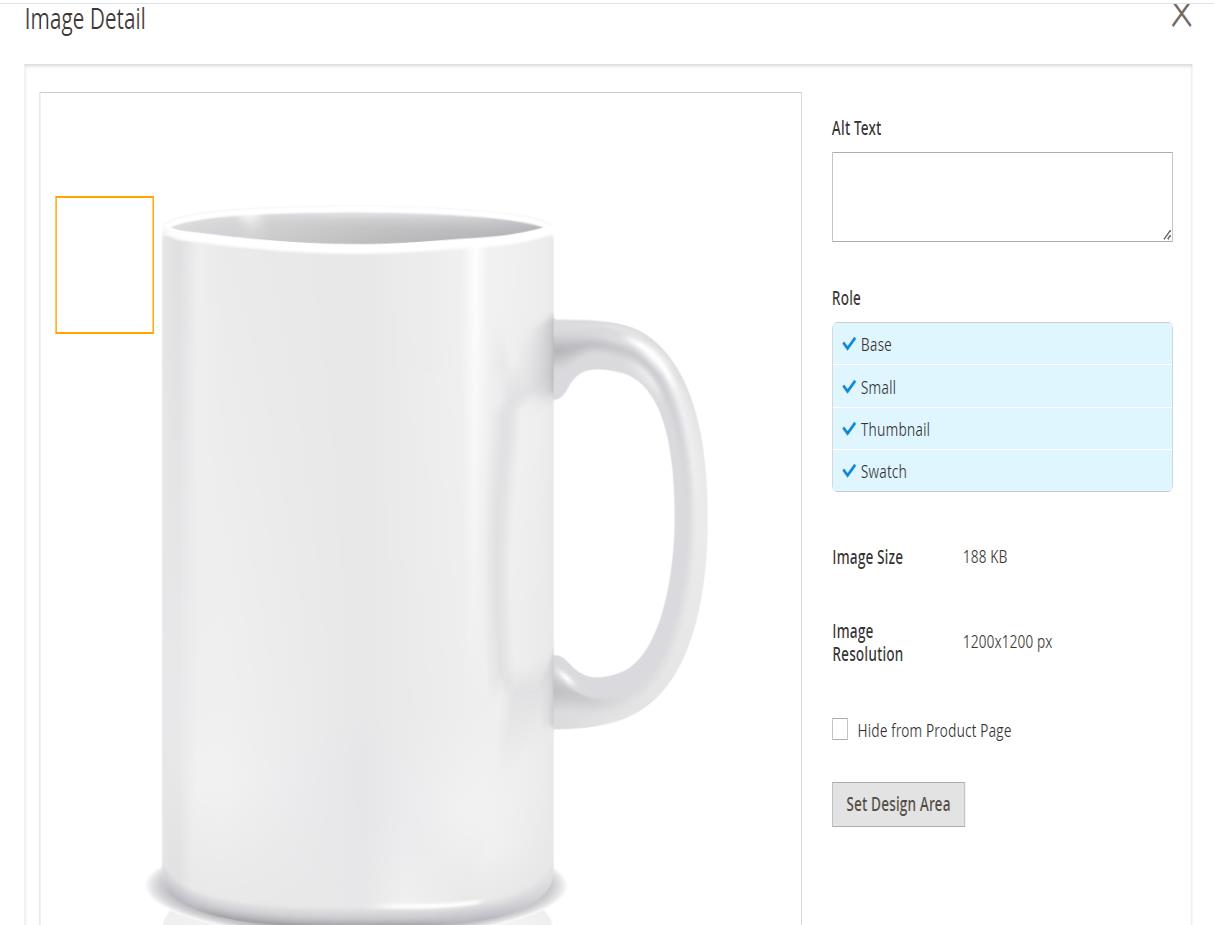
Figure 15: Image Area Before Setting Up for Customization
To visualize and manage this configuration, administrators must click on the button labelled ‘Set Design Area’ as shown in Figure 15 at which point the prescribed area becomes visible. Administrators can accurately define and fine-tune the prescribed area within which customers can customize their chosen products and save the Product by clicking on ‘Save’ (Figure 16).
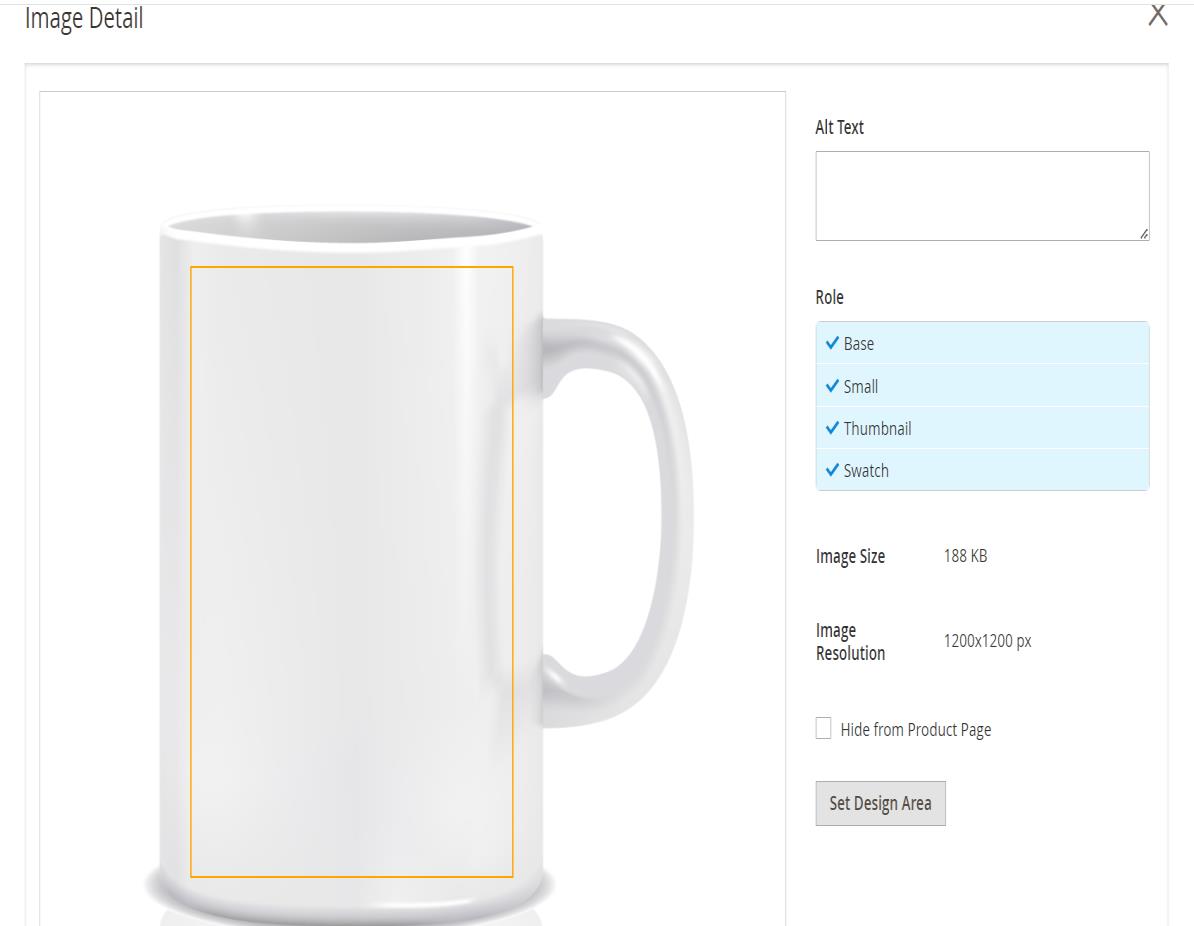
Figure 16: Image Area After Setting Up for Customization
Note: For configurable products, the administrator must follow a two-step process to enable product design. Initially, the product design feature needs to be enabled for the parent configurable product. Then, for each child simple product where customization is required, the administrator should individually enable the product design feature and set the customisation area in images.
After Order Placement
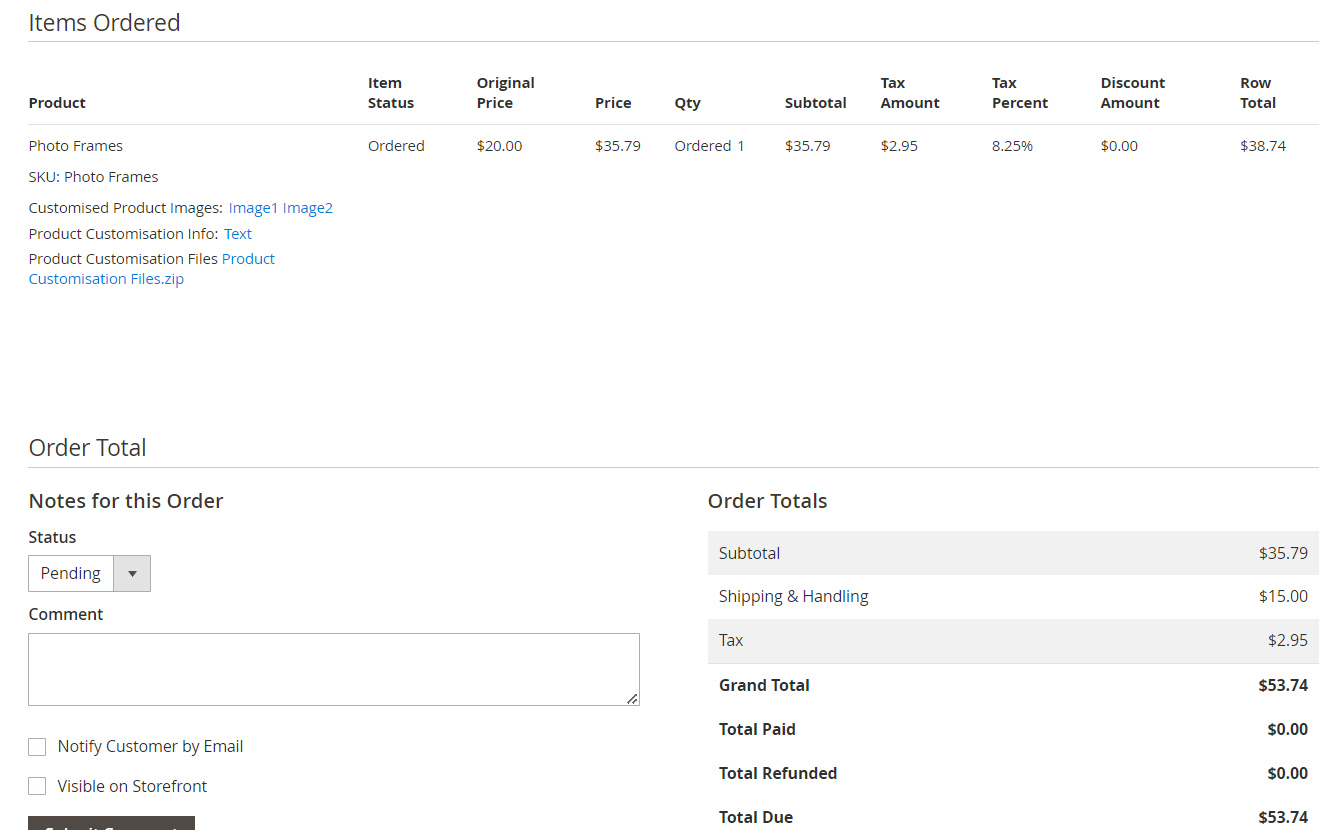
Figure 17: Admin Sales Order View Page with Customization Details
After the placement of an order, all customization files, relevant information, and uploaded images of the item are compiled and compressed into a zip file (Product Customisation Files). This zip file is then made accessible and viewable on the admin sales order view page (Figure 17).
How It Works in Frontend
When customers visit a product page with product design enabled, they will see a button (Figure 18). Clicking this button opens a popup (Figure 19) where customers can personalize and customize the product to their preferences.
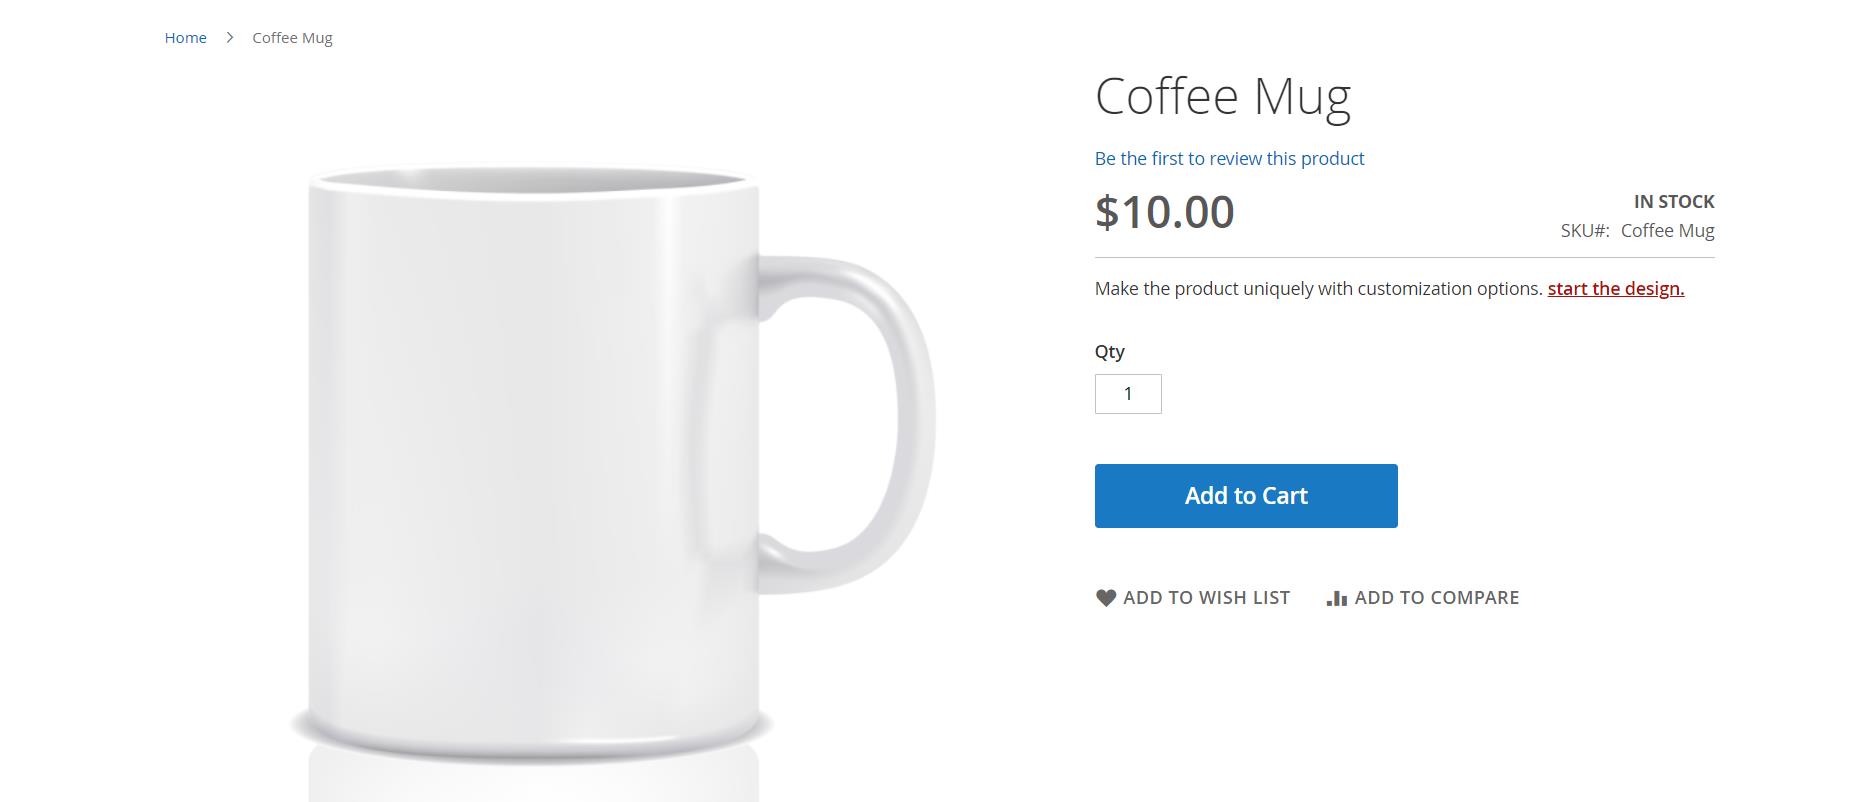
Figure 18: Product Design feature is enabled in the frontend
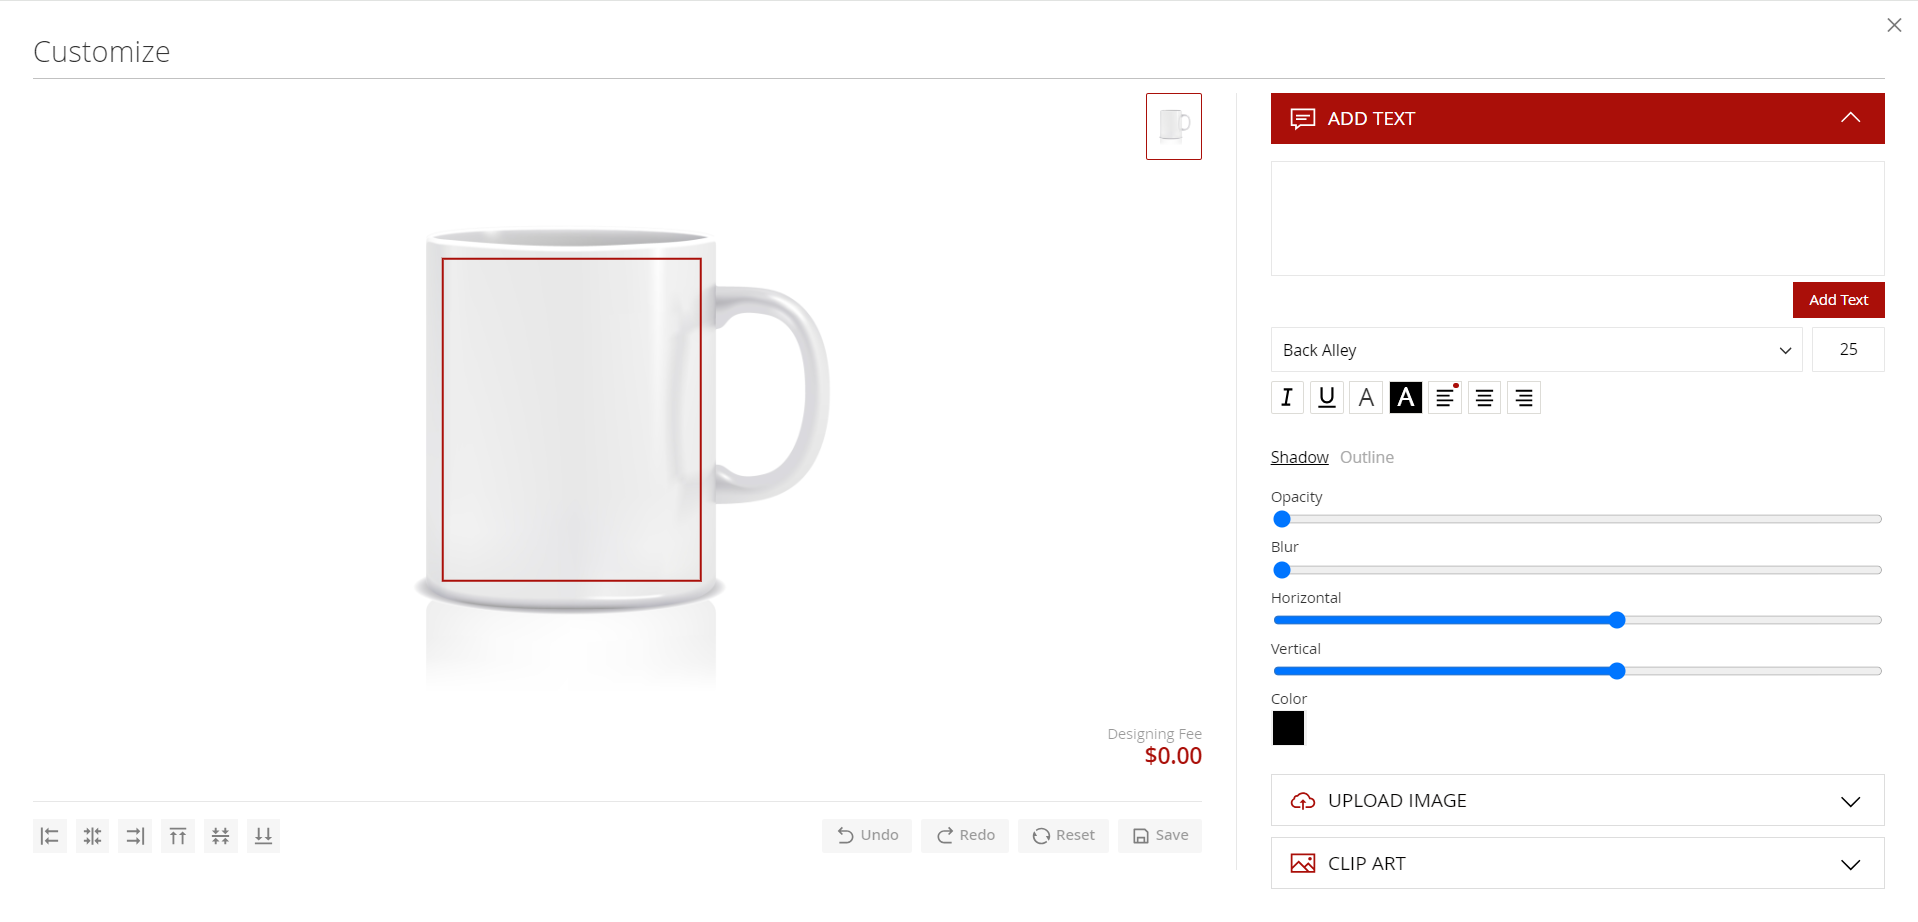
Figure 19: Popup for Product Customization
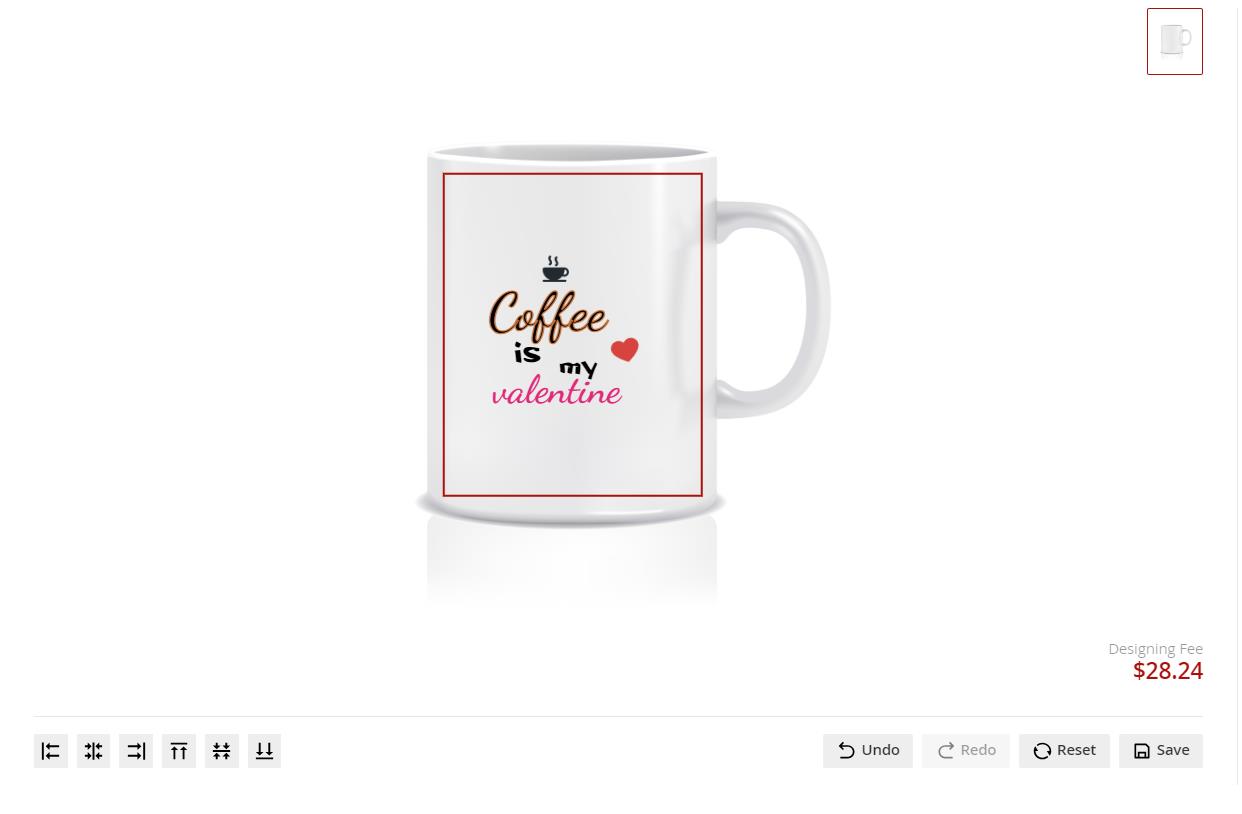
Figure 20: Customizing product by adding text and clipart, uploading image
The designing fee is an extra charge for customization, and its amount is based on how it is set up in the backend price settings. And it could be free or fixed pricing and pricing per object addition.
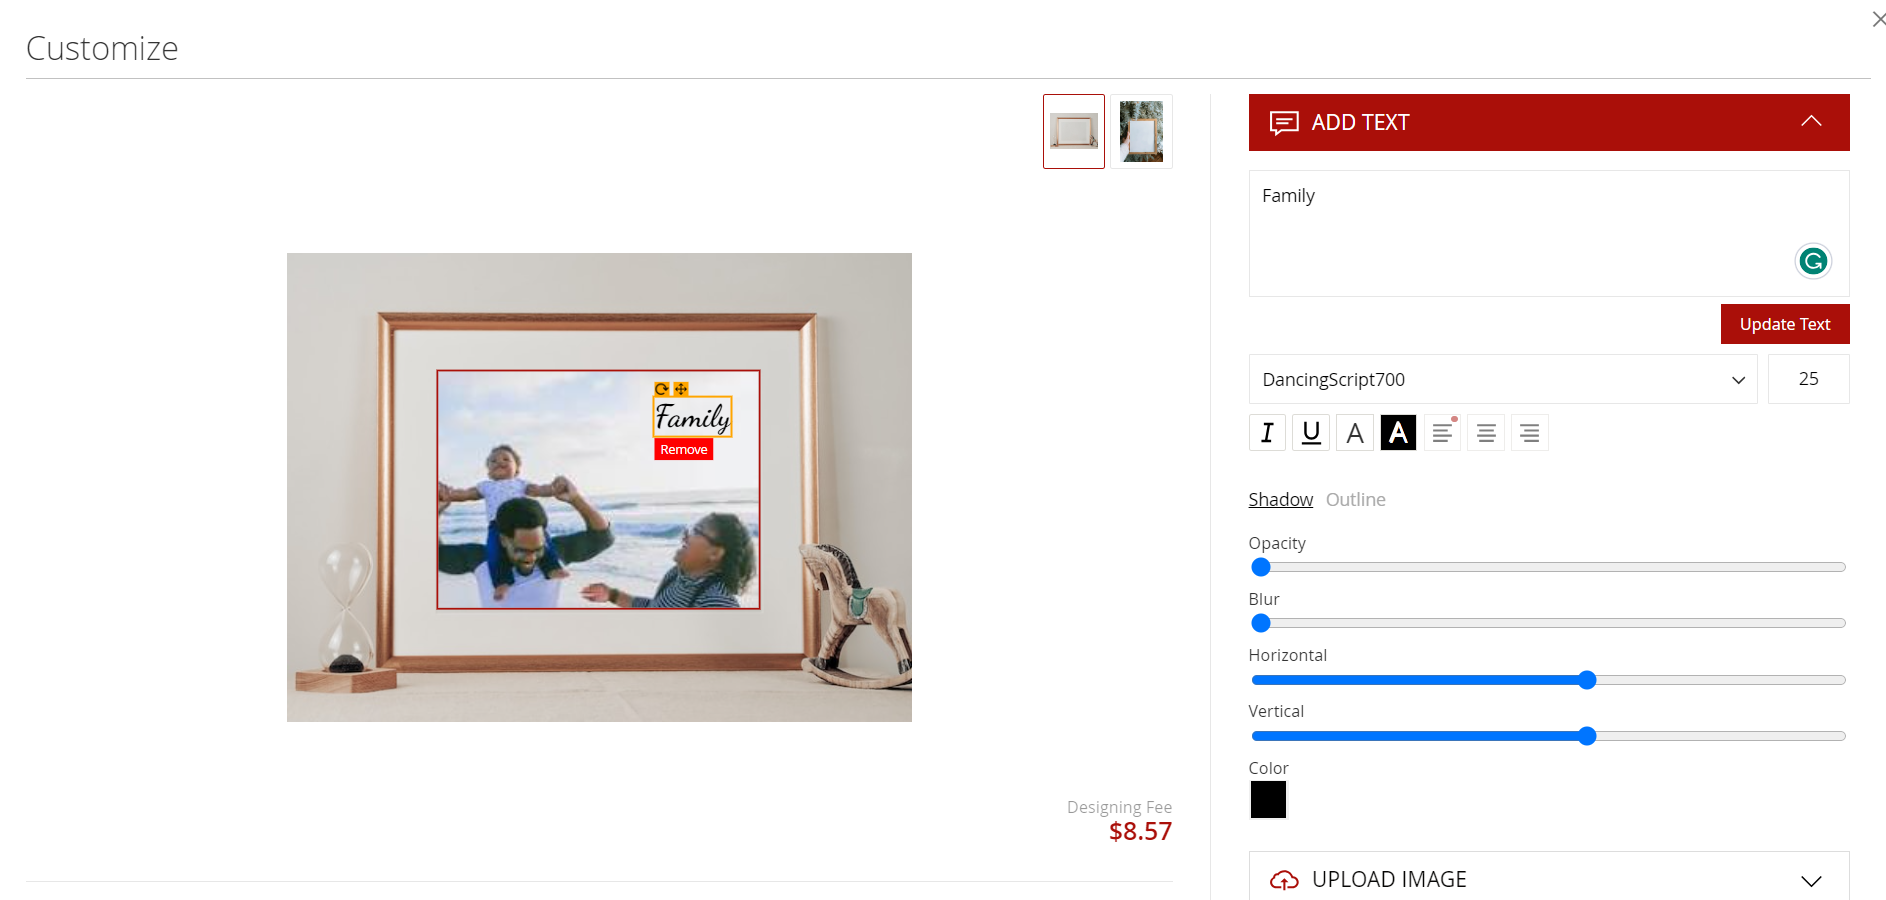
Figure 21: Adding Text
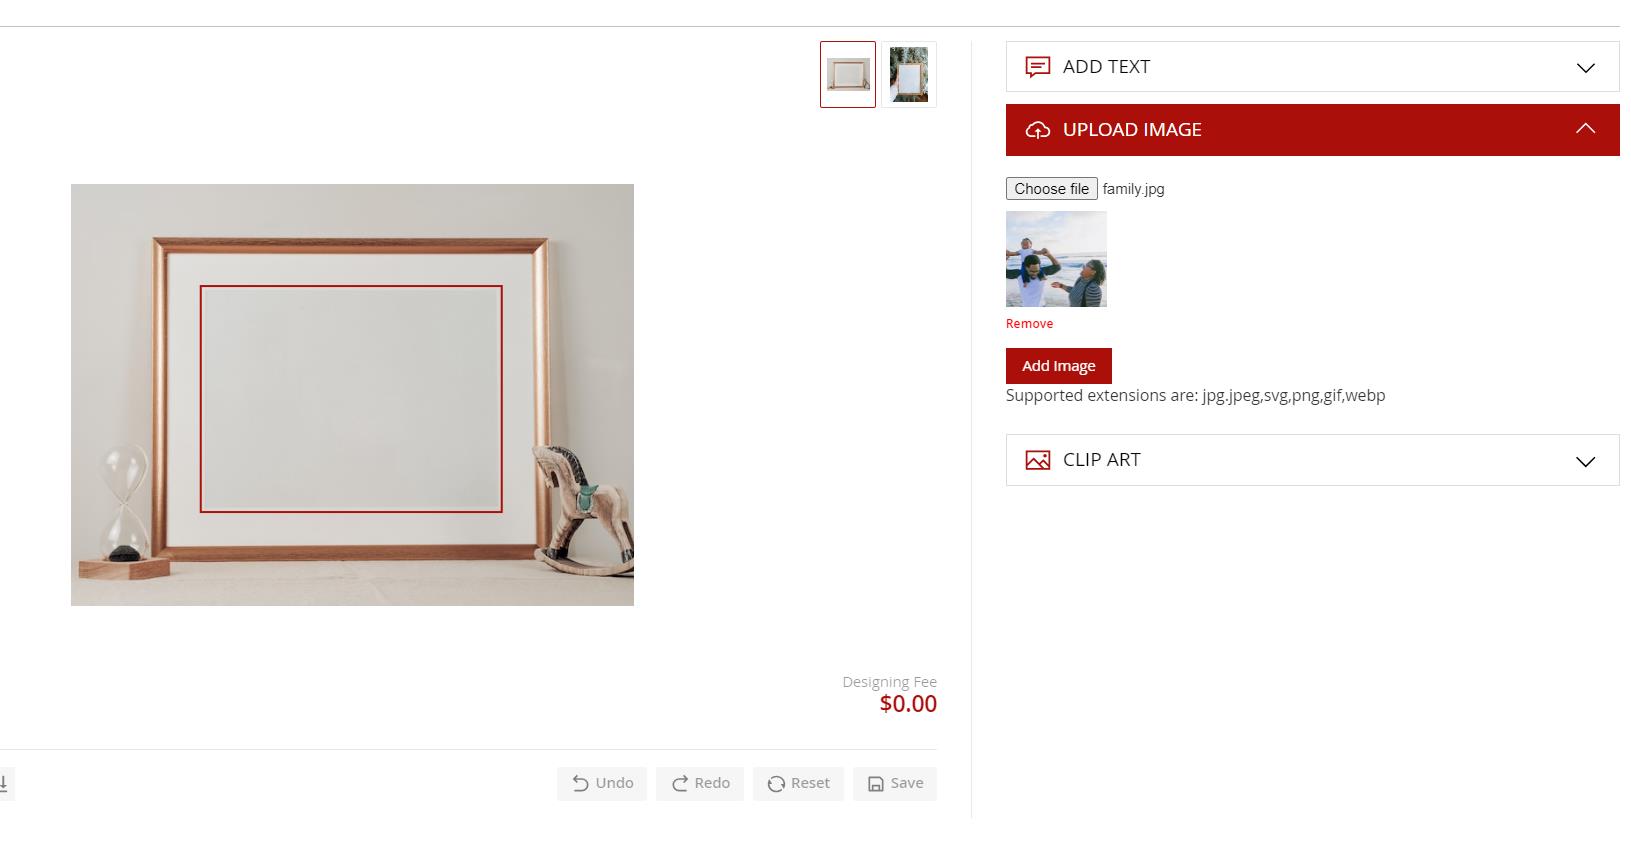
Figure 22: Uploading image
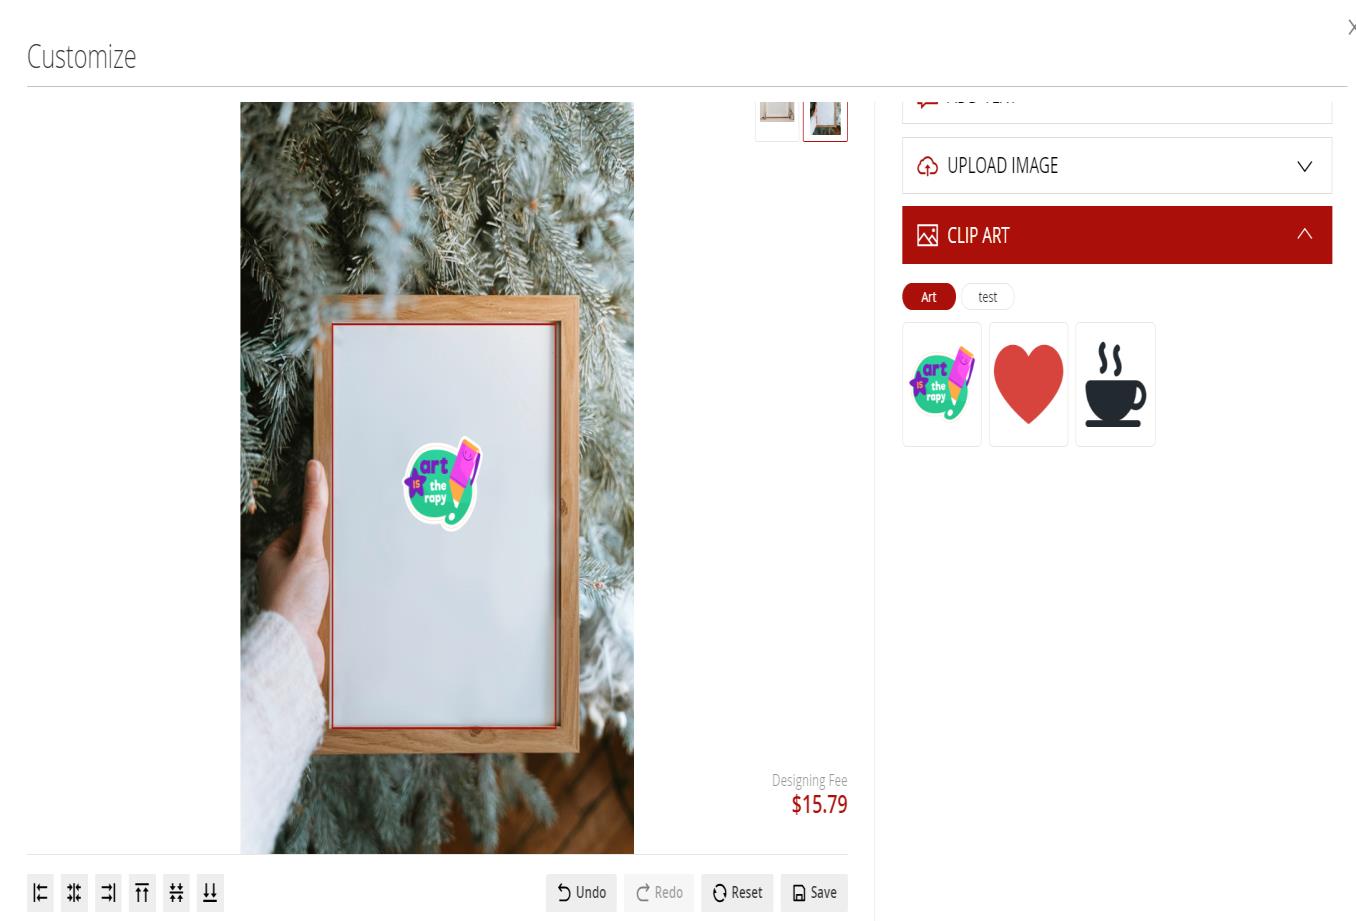
Figure 23: Adding clip art
Within the popup, customers encounter a designated text area (Figure 21) where they can input their desired text. Customers can utilize the design fonts enabled in the backend for customization. This feature is accompanied by a range of customizable properties, allowing customers to fine-tune the appearance of the text to meet their preferences (Figure 25).
- Font Selection: Choose from a variety of fonts.
- Size Adjustment: Customize the size of the text.
- Color Specification: Select the desired color for the text and background color.
- Shadow Effects: Add shadow effects to enhance the text appearance (Opacity, Blur, Horizontal, Vertical and Color)
- Outline Configurations: Define the outline style for the text.
- Text Rotation: Rotate the text to achieve a preferred orientation.
- Text Alignment: Align multiline text to left, right or center.

Figure 24 : Text Alignment
Note: Text Alignment can only be set for text elements which have multiline text.
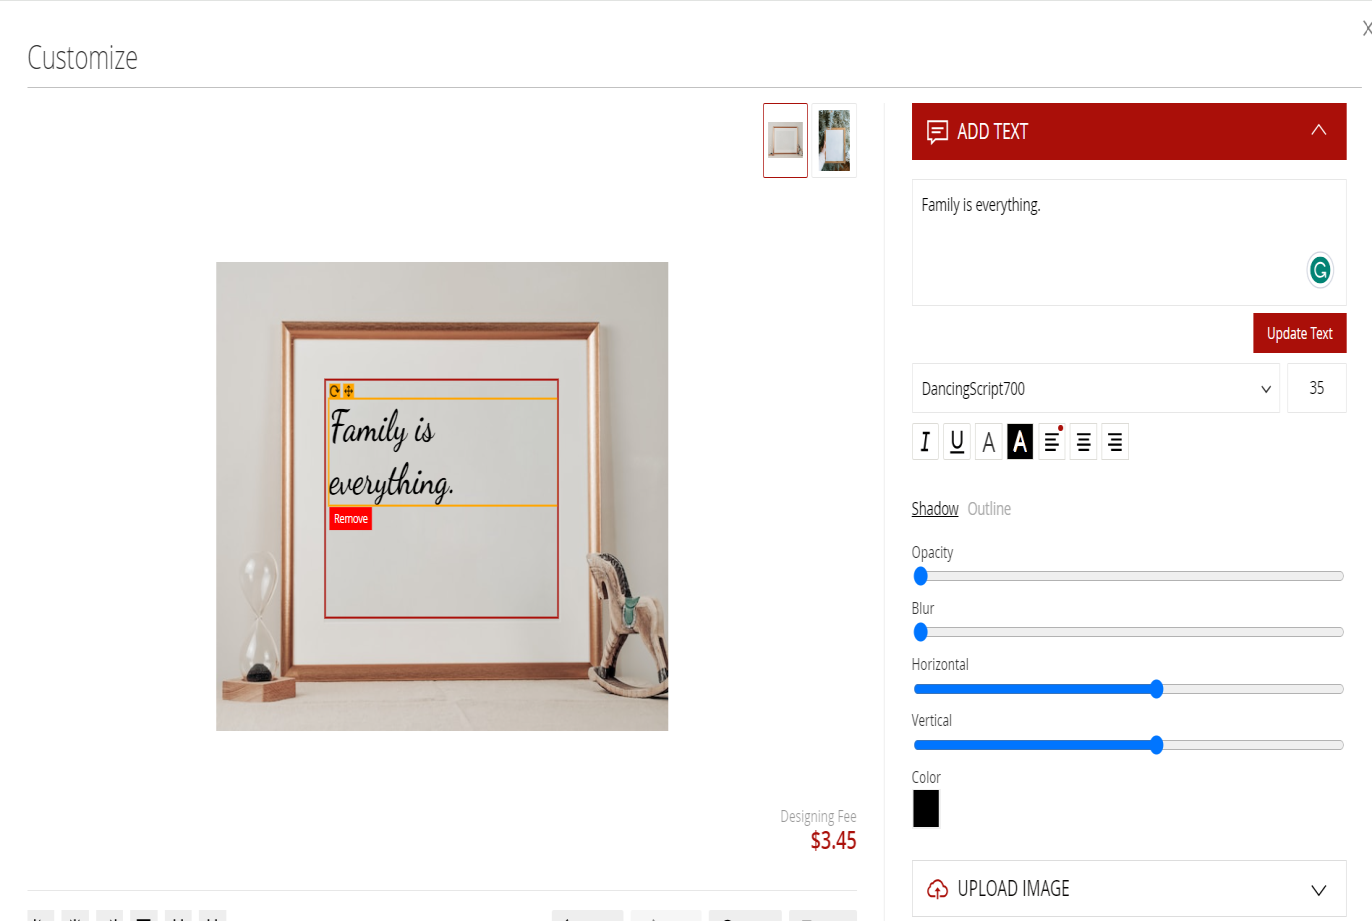
Figure 25: Text Properties
In Figure 22, the customers have the flexibility to upload their own images with supported file extensions such as jpg, jpeg, png, svg , gif and webp. The customers can also add design clipart images which are enabled in the backend for customization (Figure 23).
In the customization interface, customers can easily choose and modify elements like text, images, or clipart. Each element has a handy "Remove" button for quick deletion.
Figure 26: Element Alignment
Each element can be aligned within the customised area using alignment options as shown in Figure 26. Also, customers can also undo or redo their actions
Additionally, there's a reset button to undo any price adjustments and all customizations made.
- Save Customized Image:
-
- Click on the "Save" button to store the personalized image.
- Switch Between Images:
-
- If there are multiple images for a product:
-
-
- Utilize the thumbnail icon to switch between different images available for customization.
- Click on the thumbnail icon to view and customize each image individually.
-
After saving the customized images, customers are presented with a preview on the frontend (Figure 27). This allows them to confirm their design choices before proceeding to add the product to the cart.
Note : Customers retain the flexibility to continue editing customised products until the final confirmation before adding to cart.
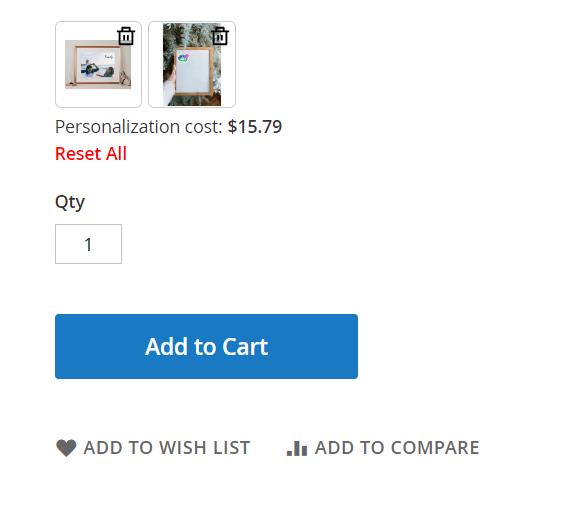
Figure 27: Preview
Minicart
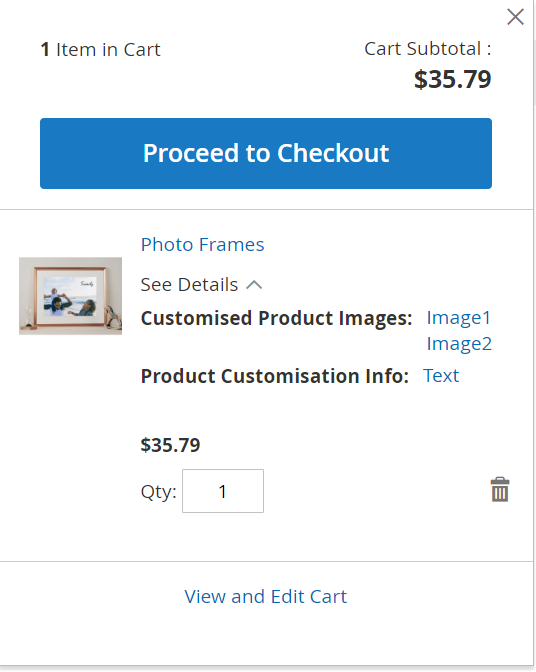
Figure 28: Minicart
Customized Product Images show the two images customized and the product customization information section offers a detailed description of any modified text which is in pdf format, specifics about selected clipart and uploaded image in both customized images (Figure 29). The price gets updated from $20.00 to $35.79 with the addition of design fee $15.79. The minicart image has been changed to customized image (Figure 28).

Figure 29: Product Customisation Info
In Figure 29, these are CSS style properties defining the visual attributes of a text element in the first customized image with content ‘Family’:
- font-size: Sets the size of the text to 25 pixels.
- font-weight: Specifies the thickness of the characters; here, it is set to 400.
- font-style: Defines the style of the font as normal.
- color: Determines the text color using RGB values (black in this case).
- text-decoration: Controls any additional decoration to the text; here, it is set to none.
- background-color: Sets the background color of the text to transparent.
- text-shadow: Adds a shadow effect to the text with specified color and position.
- font-family: Specifies the font family (DancingScript700 in this case).
- transform: Applies a rotation transformation to the text; here, it is set to no rotation (0 degrees).
- left: Positions the text horizontally at approximately 178.6 pixels from the customized area of the product image.
- top: Positions the text vertically at approximately 18.6 pixels from the customized area of the product image
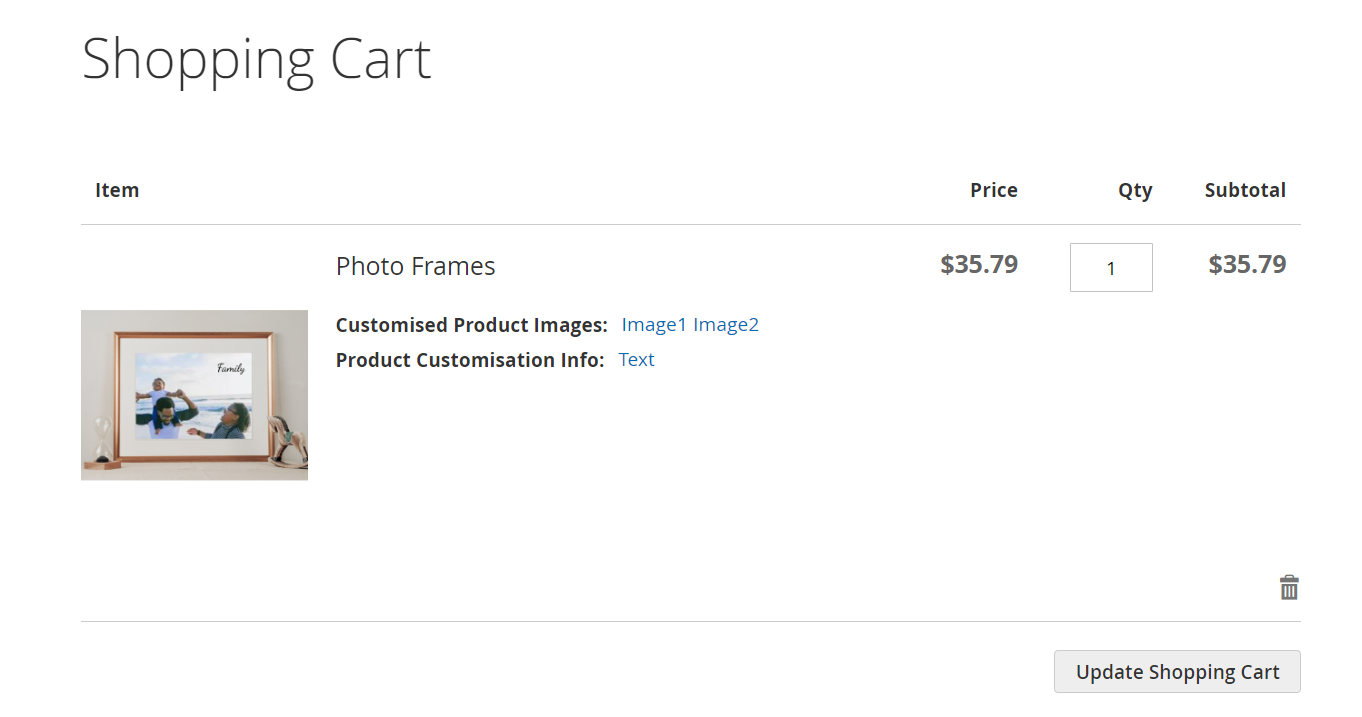
Figure 30: Cart page
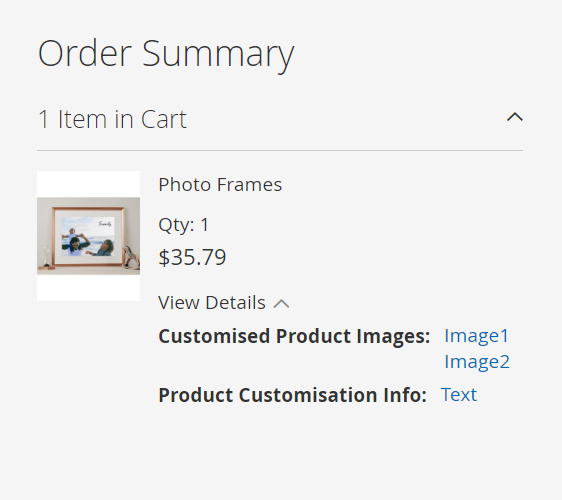
Figure 31: Order Summary in Checkout Page

Figure 32: Customer Order View Page
Customized product images and info is shown in cart page, order summary in checkout page and customer order view page (Figure 30, Figure 31 and Figure 32 respectively).
For configurable products:
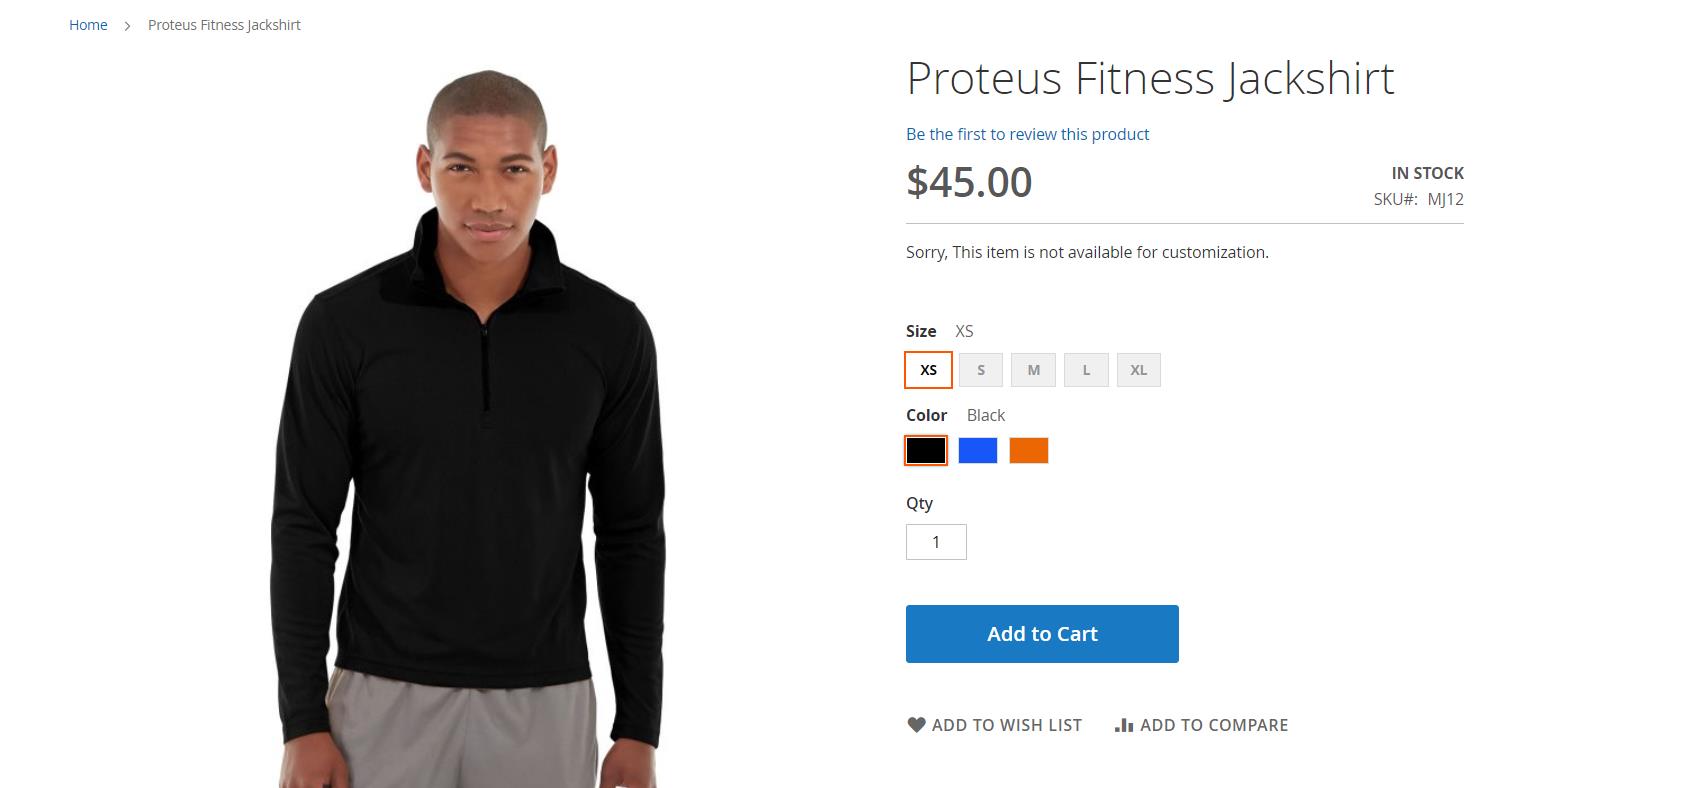
Figure 33: Product Customization Based on Configurations
For configurable products, customization is limited to the specific set of configurations for which product design is enabled and image coordinates are set. Customers can only customize the product within the predefined configurations that have been designated for product design. (Figure 33).
Note: This extension supports only simple and configurable products and its child products.
Limitation
- Multi-shipping is not supported.
- Reorder is not supported.
Installation Requirements
- Magento Open Source (CE) 2.4.4 to 2.4.8
Installation Steps
To install the Product Designer module, follow the steps below.
- Download the module.
- Access your web server directories and unzip and upload the content of the zip file to app/code directory.
- Run the below commands on terminal.
-
- php bin/magento setup:di:compile
- php bin/magento setup:upgrade
- php bin/magento setup:static-content:deploy -f
- php bin/magento cache:clean
Supported Languages
English, German, Italian
Change Log / Release Notes
Version: 1.0.1: January 2026
- Compatible with Magento Open Source for version 2.4.4-2.4.8p3.
Version: 1.0.0 : March, 2024
- Initial version
Support
If you have questions, use our contact form in https://www.webshopextension.com/ or email to support@webshopextension.com