Kategorien
Magento
WordPress
SAP Commerce
Odoo
Shopify
Typo3
Shopware
nopCommerce
Pimcore
Hyvä
OXID eShop


1.0 INTRODUCTION
1.1 About Datatrans
Datatrans AG is a Swiss payment provider used by many online stores. It is built to handle online payments while following standard security requirements. It supports different payment methods and currencies, so stores can process payments in different regions without changing their setup too much.
The Magento 2 Datatrans Payment extension from PIT Solutions is used to connect this payment service with a Magento 2 store. Once set up, the store can use Datatrans for handling payments instead of relying only on default options. It is commonly used by merchants who already work with Datatrans and want the same system in Magento.
With this extension, customers can complete payments using the methods supported by Datatrans. The checkout itself does not change much. Only the payment part is handled through Datatrans. It also supports different currencies and languages as part of the same setup.
The Magento 2 Datatrans Payment Extension is mainly there to link Magento with Datatrans so payments can be processed through it without changing how orders are created in the store.
From the admin side, the payment option can be enabled and configured based on the store setup. There is no need to switch between multiple systems during order processing. Payment details stay connected to the order, and both can be checked when required. It follows the same general process that Magento uses for other payment methods.
This guide is designed to help merchants install, configure, and manage the Datatrans Payment Module in their Magento 2 store.
Using the Datatrans plugin, merchants can:
- Offer a wide range of secure payment methods to their customers
- Ensure smooth integration between backend configuration and frontend checkout experience
- Customize payment behavior through flexible settings tailored to business needs
This manual will walk you through:
- System requirements and installation steps
- Configuration of key module settings and their impact on the customer experience
- Functional details of payment methods and how each setting affects order handling and transaction flow
1.2 About Magento Module
This module is implemented to integrate Datatrans Payment methods in Magento. It supports the following payment methods of Datatrans to work with default Magento 2 checkout. The supported payment methods are
- Datatrans Credit/Debit Cards
Brands- MasterCard
- Visa
- American Express
- China Union Pay
- Diners Club
- Discover
- JCB
- Maestro
- Dankort
- Datatrans GooglePay
- Datatrans PostFinancePay
- Datatrans Sepa Elv
- Datatrans Samsung Pay
1.3 Supported Languages
The module provides translation for German (Germany) (de_DE), English (United States) (en_US) and (it_IT) Italian (Italy) locale
1.4 Supported Currencies
The Datatrans Magento 2 module supports multiple currencies depending on the payment method and the merchant’s Datatrans account configuration. The currencies listed below have been tested and verified for each respective payment method. If your Datatrans merchant account supports additional currencies not listed here, PIT Solutions can provide support to extend the currency list accordingly.
| Payment Method | Tested Currencies |
| Credit/Debit Cards |
Swiss Franc (CHF),Danish Krone (DKK), Euro (EUR), British Pound (GBP), Norwegian Krone (NOK), Swedish Krona (SEK), US Dollar (USD) |
| Google Pay |
Swiss Franc (CHF), Danish Krone (DKK), Euro (EUR), British Pound (GBP), Norwegian Krone (NOK), Swedish Krona (SEK), US Dollar (USD) |
| PostFinance Pay |
Swiss Franc (CHF), |
| SEPA ELV | Swiss Franc (CHF), Danish Krone (DKK), Euro (EUR), |
| Samsung Pay |
Swiss Franc (CHF), Danish Krone (DKK), Euro (EUR), British Pound (GBP), Norwegian Krone (NOK), Swedish Krona (SEK), US Dollar (USD) |
2.0 INSTALLATION
This chapter explains how to install the Datatrans Payment Module for Magento 2.
System Requirements:
Please ensure the following requirements are met before installing the plugin:
- Magento Version: Magento 2.4.5 – 2.4.8-p2 (tested and supported)
- PHP Version: 8.1 – 8.4
- Composer: Composer 2
Note: Datatrans requires a secure HTTPS environment to function correctly.
2.1 New Installation
The steps below explain how to install and activate the Datatrans payment
Step 1: Download the Plugin
If you’re installing the extension from the Magento Marketplace, follow the installation instructions provided there to install the module using composer. If the module is downloaded as a ZIP, extract the content of the module to the path rootFolder/
Step 2: Enable the Module
Run the following commands from your Magento root directory:
bin/magento module:enable Pits_DatatransPayment
bin/magento module:enable Pits_ DatatransPaymentHyva
NB: Disable the module Pits_ DatatransPaymentHyva, if the shop does not use Hyva
theme and Hyva Checkout
bin/magento setup:upgrade
Step 3: Deploy Static Content
Deploy static files for the supported store locales:
bin/magento setup:static-content:deploy -f
Step 4: Clear Cache
bin/magento cache:flush
Step 5: Verify Installation
Log in to the Magento Admin panel and navigate to:
Magento Admin Panel → Stores → Configuration → Pits Configuration → Datatrans
You should now see the Datatrans configuration sections available
Additional : Install and Build Custom Checkout Style using Tailwind (Hyvä)
To apply custom styles for the checkout area (if using Hyvä Checkout), follow these additional steps. Log in to your server via SSH, navigate to your Magento root folder, and execute the following commands
Hyvä Theme Tailwind Build Commands
npm --prefix vendor/hyva-themes/magento2-default-theme/web/tailwind/ ci
npm --prefix vendor/hyva-themes/magento2-default-theme/web/tailwind/ run build
Generate Hyvä configuration
php bin/magento hyva:config:generate
Install Node.js dependencies (Tailwind) and build production CSS
cd vendor/hyva-themes/magento2-default-theme/web/tailwind
npm install
npm run build
Ensure npm is installed on your system. If not, install it using your system's package manager or from https://nodejs.org/
2.2 Cron Setup
The Datatrans Payment Module uses Magento’s cron system to perform background tasks such as cancelling abandoned orders and to process the payment on hold due to API outage. For these tasks to run automatically, a cron job must be configured on your server.
Step 1: Verify Magento Cron Installation
Magento requires its own cron jobs to be active. If cron is not yet configured for your Magento project, set it up using the following command: bin/magento cron:install
3.0 CONFIGURATION
The Datatrans module configuration in Magento 2 includes two sections:
- General Configuration
- Payment Method-Specific Configuration
All configuration options are available in the Magento Admin panel under:
Magento Admin Panel → Stores → Configuration → Pits Configuration → Datatrans. These settings control both the backend logic and the frontend checkout experience. Each field directly affects how payments are processed, displayed to customers, and logged for transaction tracking.
3.1 General Configuration
General configuration of the Datatrans module can be found under:
Magento Admin Panel → Stores → Configuration → Pits Configuration→ Datatrans → General Settings. These settings determine how the module operates globally, and they directly affect both the backend (transaction handling, logging) and the frontend (checkout flow, order mails). Please see Figure 1
Figure 1
3.1.1 Enable Datatrans Module
Type: Yes/No (Select)
- Description: Turns the Datatrans payment module on or off.
- Frontend Impact: If set to “No”, none of the Datatrans payment methods will be visible during checkout.
3.1.2 Environment
Type: Select (Test Mode/ Live Mode)
- Description: Defines which environment to use for transaction processing.
- Test Mode– For development and sandbox testing with test credentials.
- Live Mode– For production payments with real customer transactions.
- Impact: Controls which API credentials and endpoints are used. Must be set to Live before going live.
3.1.3 Live/Test Merchant ID
Type: Text
- Description: Merchant identifier provided by Datatrans for your live/test account.
- Where to find it: Available in the Datatrans Backoffice. Please login to the Datatrans Backoffice, and from the landing page choose the ‘Change Merchant’ option to web. Please see Figure 2.
- Once Merchant is changed, choose UPP Administration option and select the Security option to see the Merchant ID.
- Impact: Used to authenticate transactions in the live environment.
Figure 2
Figure 3
3.1.4 Live/Test API Password
Type: Text
- Description: API password associated with your live/test Merchant ID.
- Where to find it: Available in the Datatrans Backoffice. Please login to the Datatrans Backoffice, and from the landing page choose the ‘Change Merchant’ option to web. Please see Figure 2.
- Once Merchant is changed, choose UPP Administration option and select the Security option to generate the password.
3.1.5 Enable Card Saving (Alias Registration)
Type: Yes/No (Select)
- Description: Allows customers to securely save their card details (tokenized as an alias) for future purchases.
- Frontend Impact:
- A Saved Cards section appears in the customer’s “My Account” area.
- During checkout, customers can select from saved cards or add a new one.
- Security: Card details are never stored in Magento; they are securely handled by Datatrans.
3.1.6 Display Transaction ID in Storefront and Order Email
Type: Yes/No (Select)
- Description: Defines whether the unique Datatrans transaction ID should be displayed to the customer.
- Frontend Impact:
- If enabled, the transaction ID is shown on the Order Success Page, My Accounts-Sales Order View page and included in the Order Confirmation email.
- Benefit: Provides transparency for customers and simplifies transaction tracking for support teams.
3.2 Log Settings
The Datatrans module provides logging options to help merchants and developers to monitor, troubleshoot, and validate transactions. Logs can be managed under: Magento Admin Panel → Stores → Configuration → Pits Configuration → Datatrans → Log Settings. These settings control how API errors and debug information are recorded, and they provide direct access to view log files from the Magento Admin.
3.2.1 Enable API Error Log
Type: Yes/No (Select)
- Description: Enables or disables logging of all API errors encountered during communication with Datatrans.
- Impact:
- Yes – All failed API calls, invalid responses, and error messages are recorded.
- No – Errors will not be logged.
- Recommendation: Keep this enabled in both Test and Live environments to simplify issue tracking.
3.2.2 View API Error Log
Type: Button (Admin Action)
- Description: Provides a direct link in the Magento Admin to view the API error log file.
- Impact:
- Opens a list of logged errors, including timestamp, request details, and error message.
- Helps merchants quickly identify and resolve issues without accessing the server directly.
- File Location: Errors are stored in var/log/datatrans_error.log.
3.2.3 Enable API Debug Log
Type: Yes/No (Select)
- Description: Enables or disables detailed logging of API communication with Datatrans (including request and response payloads).
- Impact:
- Yes – All the request/response API calls are logged in detail.
- No – No debug-level logs are written. Recommended for production to avoid large log files.
3.2.4 View API Debug Log
Type: Button (Admin Action)
- Description: Provides a direct link in the Magento Admin to view the debug log file.
- Impact:
- Shows full API request/response data for troubleshooting.
- Useful for verifying whether data is being sent correctly to Datatrans.
- File Location: Debug logs are stored in var/log/datatrans_debug.log.
3.3 Payment Method-Specific Configuration
Each payment method available through Datatrans can be configured separately in the Magento Admin under: Magento Admin Panel → Stores → Configuration → Sales → Payment Methods → Datatrans [Payment Method]. Not all payment methods may be included in your Datatrans contract. Please ensure you only enable those that are contractually available to you. Below is an example configuration for Datatrans Credit & Debit Cards. Other payment methods share the same structure and options. Please see Figure 4.
Figure 4
3.3.1 Enabled
Type: Yes/No (Select)
- Description: Activates or deactivates the payment method.
- Frontend Impact: If set to No, the method will not appear during checkout.
3.3.2 Title
Type: Text
- Description: Defines the label shown to customers at checkout (e.g., “Google Pay”).
- Frontend Impact: Displayed on the payment method selection screen.
3.3.3 Description
Type: Textarea
- Description: Custom description shown below the title at checkout.
- Frontend Impact: Helps customers understand the payment method (e.g., “Pay quickly using your Credit/Debit card”).
3.3.4 Payment from Applicable Countries
Type: Select (All Allowed Countries / Specific Countries)
- Description: Controls whether this method is available worldwide or restricted to specific countries.
3.3.5 Payment from Specific Countries
Type: Multi-select (Country List)
- Description: If “Specific Countries” is selected above, choose which countries are allowed.
3.3.6 Accepted Currencies
Type: Multi-select
- Description: Defines which currencies are supported for this payment method.
- Note: Ensure that your Datatrans terminal supports these currencies.
3.3.7 Authorisation Method
Type: Select
- Options:
- Redirect – Customer is redirected to a secure Datatrans-hosted payment page.
- Lightbox – Payment form is shown directly within Magento checkout.
- Frontend Impact: Defines how the customer experiences the payment flow.
3.3.8 Capture Type
Type: Select
- Options: Auto Capture / Delayed Capture
Auto Capture – Funds are captured immediately after authorization. The payment is finalized, and an invoice can be automatically generated.
- Backend Impact: Magento creates and marks the invoice as paid automatically.
Delayed Capture – The payment is only authorized (amount reserved on the customer’s card). The merchant must manually capture funds later from the Magento Admin.
- Frontend Impact: Customer sees the order as placed, but funds are only reserved.
- Backend Impact: Merchant must trigger the “Capture” action in the Magento Admin to finalize payment and generate the invoice.
3.3.9 Send Invoice Email
Type: Yes/No (Select)
- Description: Automatically sends the Magento invoice email after auto-capture.
- Dependency: Visible only if Capture Type = Auto.
3.3.10 Invoice Generation
Type: Manual/Automatic (Select)
- Description: Automatically generate invoice after order placement.
- Dependency: Visible only if Capture Type = Delayed.
3.3.11 Send Customer Address
Type: Select
- Options: No/Billing Address /Shipping Address /Both Billing and Shipping
- Description: Controls what address details are sent to Datatrans for transaction records
3.3.12 Payment Brands
Type: Brands (Multiselect)
- Description: Select the credit/debit card brands that should be available to customers in the payment interface.
3.3.13 Show Payment Icon
Type: Yes/No (Select)
- Description: Displays the Credit/Debit card logo/icon next to the payment option at checkout.
3.3.14 Minimum / Maximum Order Total
Type: Numeric
- Description: Restrict availability of the payment method based on order total.
- Frontend Impact: Payment method is hidden if the order total is outside the defined range.
3.3.15 Sort Order
Type: Numeric
- Description: Determines the position of this payment method in the checkout list (lower numbers appear first).
3.4 Payment Method Specifics
Datatrans supports a wide range of international and local payment methods. Not all methods may be included in your merchant contract agreement. Please verify your contract with Datatrans before enabling them in Magento. Below are the official integration and documentation links for commonly used payment methods:
Datatrans Payment Methods Documentation
3.4.1 Test Cards
To test payments in your Magento environment, Datatrans provides sandbox credentials and test cards. These credentials are only supported in the sandbox environment. For production testing, real transactions are required. For detailed information on testing credentials and test cards, please refer to the official Datatrans documentation:
Datatrans Testing Credentials Documentation
4.0 ORDER MANAGEMENT
Once payment is completed and authorized through Datatrans, order-level management actions can be performed from Magento Admin Panel → Sales → Orders. Select an order to view detailed Datatrans transaction data from the custom Datatrans Payment tab and to perform sale operations
4.1 Transaction Status
The current transaction status (e.g., AUTHORIZED, CAPTURED) is displayed in the Datatrans Payment tab.
Initialized
- When? Right after the customer clicks the Place Order button and is being redirected to the payment page.
- Details: A transaction entry is created, but the payment has not yet been completed. This may happen if the customer abandons the payment or an error occurs.
- Magento Internal Status: Pending Payment
Authorized
- When? The payment has been approved by the customer’s bank, but funds are not yet transferred.
- Details: Requires manual or automatic capture based on the capture and liability settings.
- Magento Internal Status: Processing
Settled
- When? The funds have been confirmed for transfer from the customer’s account
- Details: Transaction has been successfully captured after authorization.
- Magento Internal Status: Processing
Settled - Transmitted
- When? Datatrans has transmitted the settlement (capture) request to the acquirer for processing
- Details: This combined status means the transaction has been settled and the settlement data has been transmitted to the acquirer or payment processor for final processing.
- Magento Internal Status: Processing
Credited
- When? The transaction has been successfully refunded.
- Details: The customer has received their money back.
- Magento Internal Status: Closed
Credited - Transmitted
- When? When a refund (credit) has been initiated and Datatrans has transmitted the refund request to the acquirer
- Details: This status refers to a refund (credit) that has been successfully processed and transmitted to the acquirer. It confirms that the refund request has been
accepted and forwarded for execution. - Magento Internal Status: Closed
Settled - Credited
- When? After the transaction has been fully processed and Datatrans has confirmed that the amount has been credited back to the customer
- Details: This indicates that the original transaction was settled, and a refund (credit) has subsequently been issued. It reflects both the initial capture and the transfer of funds back.
- Magento Internal Status: Closed
Transmitted
- This status alone typically means that the transaction data has been sent to the acquirer but may not yet be confirmed as settled or credited. It’s part of the finalization process
4.2 Actions Available
Capture Payment refers to the process of collecting funds from an authorized transaction. The behavior depends on your Capture Type configuration, invoice settings in Magento, and the payment method used.
4.2.1 Capture
Automatic Capture
- When the Capture Type is set to Automatic, funds are captured immediately after the payment is authorized.
- If invoice generation is also set to automatic, Magento will create a paid invoice for the order once the capture is completed.
- No manual action is required in the Magento backend.
Delayed Capture
- When the Capture Type is Delayed, the transaction remains authorized but funds are not yet collected.
- To capture the payment:
- Manual Invoice Generation
- If invoice generation is configured as manual, the merchant must create the invoice manually from the Magento Admin. Please see Figure 5
- Creating the invoice triggers an online capture of the authorized amount through Datatrans.
- Automatic Invoice Generation
- If invoice generation is automatic but the capture type is configured as manual (delayed), Magento will still generate the invoice automatically; however, the invoice will remain in a Pending state.
- In this scenario, the merchant must manually click Capture Payment under the Order Invoice window to finalize the capture process. Please see Figure 6.
- Manual Invoice Generation
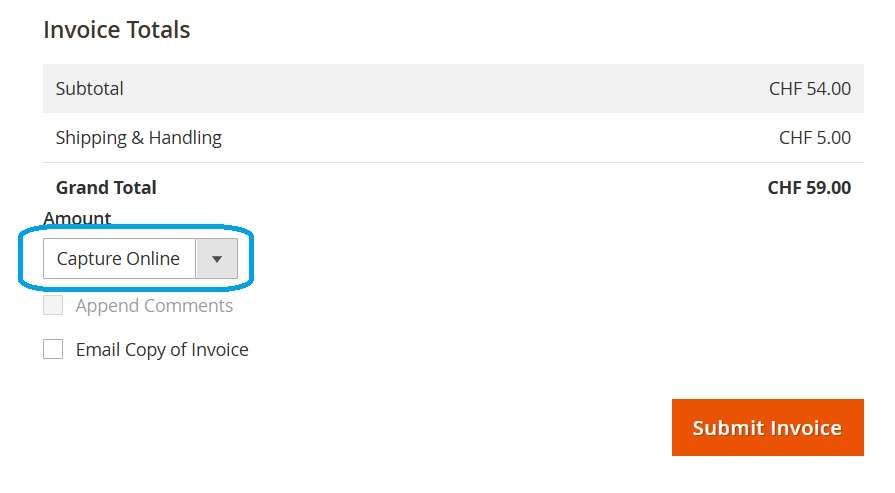
Figure 5
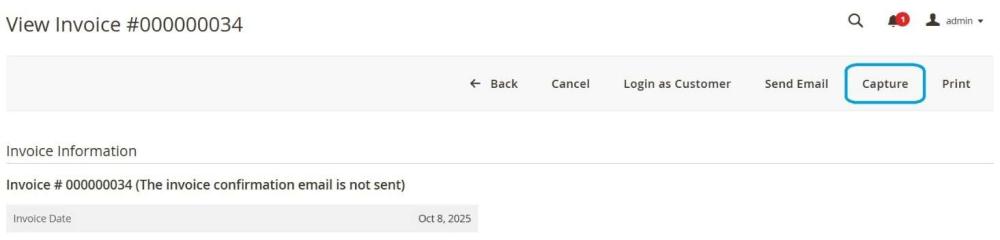
Figure 6
Note on Multi-Capture:
- Datatrans supports multi-capture feature only for Cards
- Multi-capture allows merchants to capture funds separately for different items or partial quantities within a single order. Please see Fig 7
- Each capture action will generate a corresponding invoice (manual or automatic) in Magento, reflecting the captured amount.
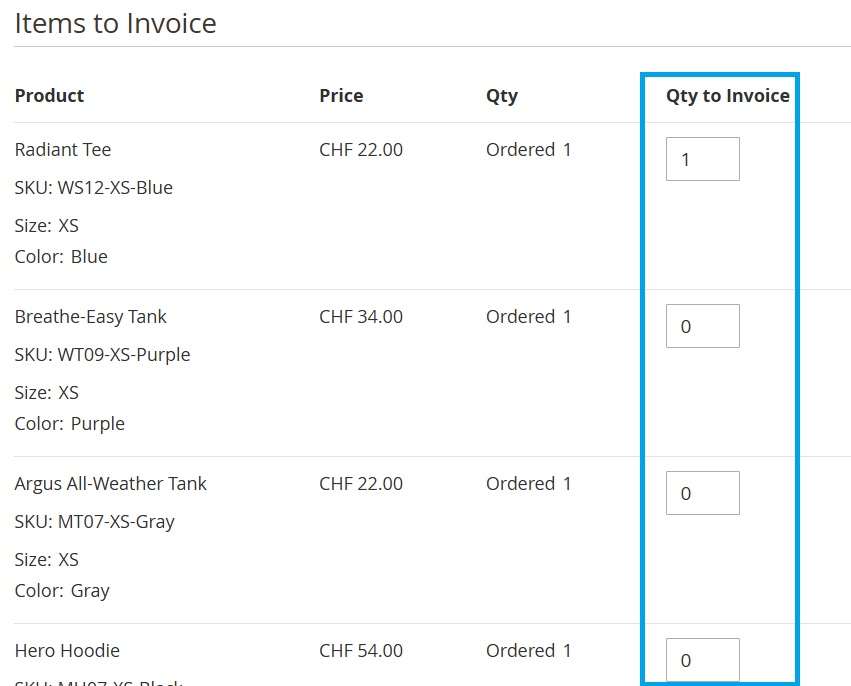
Figure 7
Key Points:
- The Magento invoice status is directly linked to the capture action: a captured payment generates a paid invoice.
- After capture, the payment status is updated in both Magento and the Datatrans Backoffice.
4.2.2 Refund Payment
Refund Payment allows merchants to return funds to the customer for captured transactions. Refund behaviour depends on the payment method, invoice status, and whether the order has multiple invoices. Please see Figure 8
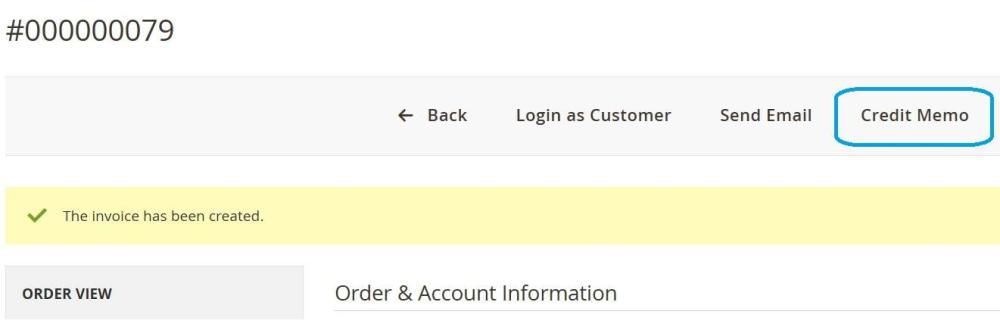
Figure 8
Full or Partial Refund
- Refunds can be processed fully (entire order amount) or partially (specific products or amounts).
- The refund is performed online through Datatrans and reflected in Magento.
Handling Multiple Paid Invoices
- If an order has multiple paid invoices (e.g., due to multi-capture or split shipments), each invoice can be refunded separately.
- Partial refunds can be applied to one or more invoices, and the refunded amount will be updated for each invoice.
- The Magento order status will reflect the cumulative refund:
- Fully refunded: All invoices for the order are refunded.
- Partially refunded: Some invoices or amounts have been refunded, while others remain paid.
Key Points:
- Refunds are only possible for captured transactions.
- Ensure that the refund amount matches the intended invoice(s) to avoid discrepancies.
- Each refund action generates a corresponding entry in the Datatrans Backoffice for audit and tracking.
4.2.3 Void / Cancel Authorization
Void Payment allows merchants to cancel an authorized transaction before the funds are captured. This ensures that no money is taken from the customer for orders that are canceled or not fulfilled. Please refer Figure 9.

Figure 9
Void Payment (Authorized, Not Captured)
- When? The transaction is authorized, but the payment has not yet been captured.
- Details:
- The authorization is canceled in Datatrans.
- No funds are collected from the customer.
- The Magento order status is updated to Canceled.
Cancel Payment (Before Capture)
- When? The customer or merchant cancels the order before the capture is performed. Please see Figure 6.
- Details:
- The transaction is canceled in Datatrans.
- Magento updates the order status to Canceled automatically.
Key Points:
- Voids can only be performed on authorized but uncaptured transactions.
- Once a transaction has been captured, a refund must be used instead of a void.
- Voids ensure that no invoice is marked as paid in Magento, keeping financial records consistent.
- The Datatrans Backoffice reflects all void actions for auditing purposes.
Magento Core Patch Recommendation
If you encounter issues when capturing or cancelling an invoice (for example, a 404 error when clicking Capture or Cancel in the Magento Admin), it may be due to known Magento core bugs.
These issues are addressed in the following patches:
Capture Fix: 39297.patch — resolves the “Offline invoice capture (404)” issue by correcting the HTTP request method used in the Capture controller.
Cancel Fix: 39314.patch — resolves the “Cancel Invoice (Not Capture)” 404 issue via the Quality Patches Tool (QPT).
To ensure smooth operation of Capture and Cancel actions within the Datatrans payment workflow, it is strongly recommended to apply these patches if your Magento version does not yet include them.
4.3 Transaction Overview
The Transaction Overview section in the Datatrans Payment tab provides a detailed summary of each payment transaction processed through Datatrans. Please see Figure 10. This information is retrieved directly from the stored transaction data and helps merchants verify payment flow and transaction states without leaving the Magento Admin Panel.
Figure 10
Below are the key data fields displayed for each transaction:
| Field | Description |
| Merchant ID | Displays the Datatrans merchant identifier linked to your account. |
| Transaction ID | The unique transaction identifier generated by Datatrans for each payment |
| Datatrans Reference Number | Internal reference number assigned by Datatrans for tracking purposes |
| Transaction Type | Indicates the type of transaction — e.g., Authorization, Capture, or Refund. |
| Transaction Mode | Shows whether the transaction was processed in Test or Live mode. |
| Transaction Status | Reflects the current payment state — e.g., Authorized, Settled, Credited, Cancelled, Failed and Transmitted |
| Authorized | Displays whether the transaction has been successfully authorized |
| Authorization Method | Indicates the method used for authorization (e.g., Redirect , Lightbox). |
| Authorization Amount | Shows the authorized transaction amount and currency. Only displayed if authorization was successful. |
| Paid | Indicates whether the transaction has been captured (funds collected) |
| Settled Amount | Displays the total amount that has been captured and settled for the order. |
| Currency | The transaction currency used during payment. |
| Alias Registered | Shows whether an alias (tokenized card reference) was registered for future use. |
| Card Brand | Indicates the card brand used for payment (e.g., Visa, Mastercard). |
| Masked Card | Displays the masked version of the card number (e.g., 411111xxxxxx1111) for security reference |
| 3DS Status | Indicates the result of 3-D Secure authentication |
| Cancelled | Displays whether the transaction was cancelled before capture. |
| Refunded | Displays whether the transaction has been refunded. |
4.3.1 Transaction History Log
Below the transaction summary, Magento displays a Transaction History Log that records all payment-related events for the order. Please see Figure 11. This log provides a timestamped sequence of actions performed through Datatrans — including initialization, authorization, capture (settlement), refund, and cancellation events.
Each entry includes:
- Timestamp: The exact date and time when the event occurred.
- Event Type: Indicates the payment stage, such as initialized, authorize, settle, refund, or cancel.
- Transaction Reference: The Datatrans transaction ID related to the event.
- Details/Comments: A brief message describing the result or amount processed for the event.
Figure 11
5.0 DATATRANS SAVED CARDS
Datatrans allows customers to securely save their payment cards for future purchases using Datatrans’ Tokenization feature. When enabled, customers can register their cards directly from the Magento storefront. The Saved Card feature can be enabled in the store frontend by setting Enable Card Saving (Alias Registration) to Yes under the general settings in the Magento backend.
Saved cards are stored as tokenized aliases on Datatrans’ secure servers — ensuring that no sensitive card data is ever stored on the Magento system. This functionality improves the checkout experience by reducing repeated data entry while maintaining PCI compliance.
5.1 Saved Cards Registration
Customers can register their cards under the “Datatrans Saved Payment Info” section of their My Account page. Please see Figure 12.
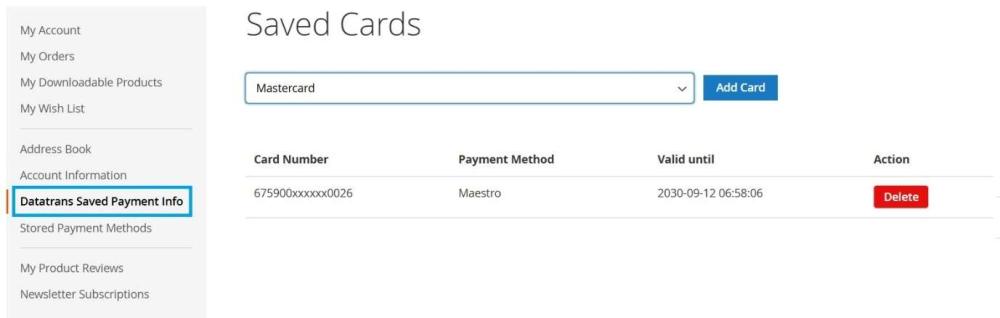
Figure 12
The registration interface includes:
- A dropdown listing available tokenizable payment methods (e.g., Visa, Mastercard, American Express).
- An “Add Card” button, which becomes active once a valid payment method is selected.
When the user initiates the registration:
- The Datatrans SDK loads dynamically depending on the configured environment (Test or Live).
- The selected payment method is processed securely via Datatrans.
- Upon successful registration, an alias (token) is created and stored for the customer in Magento.
The alias represents the card reference (e.g., a masked card number like 411111xxxxxx1111) that can be used for future transactions.
Note:
- The alias is linked to the customer’s Magento account and can be used only by that customer.
- Tokenization methods available depend on your Datatrans contract and configuration.
5.2 Managing Saved Cards
The Saved Cards table displays all registered cards for the logged-in customer.
Each entry shows the following details:
- Card Number: Masked card number (e.g., 411111xxxxxx1111).
- Payment Method: Type of payment method used (e.g., Visa, Mastercard, Google Pay).
- Valid Until: Expiry date of the alias as returned by Datatrans.
- Action: A Delete button to remove the saved card.
Customers can delete any stored alias at any time by clicking the Delete button. Please see Figure 12. This action triggers an API call to Datatrans to remove the corresponding alias from their system, ensuring it cannot be used in future payments. If no saved cards exist, the system displays a message: “You have no Saved Cards.”
5.3 Technical Context
- The saved card registration form utilizes the Datatrans Tokenization SDK loaded via the registerAlias JavaScript module.
- The process is fully PCI-DSS compliant, as card data is transmitted directly to Datatrans without passing through Magento servers.
- Saved card details in Magento are stored only as reference tokens, along with masked display information and expiry metadata.
- Supported payment methods for alias registration depend on Datatrans configuration — for example, credit/debit cards support alias creation.
5.4 Frontend and Checkout Behavior with Saved Cards
When the Alias Registration feature is enabled from the general configuration and the customer has at least one active alias registered, Datatrans allows them to conveniently use those saved cards during checkout.
5.4.1 Saved Card Selection at Checkout
During checkout, under the Payment Method section, customers will see their saved cards listed along with the payment method label and masked card number (for example, Visa 411111xxxxxx1111). Please see Figure 13.

Figure 13
Customers can select a saved card instead of re-entering their payment details. Once selected, the payment authorization will use the associated Datatrans Alias ID, enabling a faster and more seamless checkout experience.
5.4.2 Adding a New Card During Checkout
If a customer wants to use a new card, they can:
- Choose the ‘Save Card Details’ checkbox.
- Enter their card details, which are processed securely through Datatrans.
When this option is selected, Datatrans automatically registers a new alias during the transaction, which will then appear in the customer’s Saved Cards list in their account. Please see Figure 14.
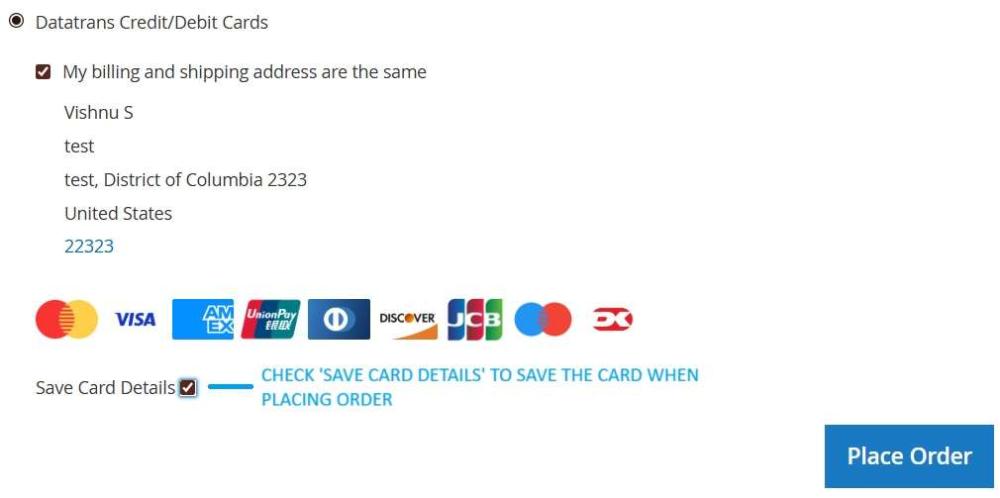
Figure 14
5.4.3 Security and Data Privacy
All saved card operations, including display and usage during checkout, are fully PCI-DSS compliant. Sensitive payment information such as card numbers or CVV is never stored or processed by Magento. Only Datatrans handles the secure card data exchange through tokenized aliases, ensuring compliance and security at every transaction stage.
5.4.4 Multi-Alias Support
In cases where customers have multiple saved cards, the checkout automatically lists all available aliases. The customer can freely switch between them or remove unwanted cards from their account dashboard. This ensures flexibility for customers managing multiple payment methods while maintaining security and ease of use.
6.0 LOGGING AND DEBUGGING
The Datatrans Magento extension provides two dedicated logging mechanisms to help merchants and developers monitor system activity and troubleshoot issues efficiently.
Both log types are accessible from the Magento Admin Panel under:
Pits → Error Log
Pits → Debug Log
These logs record distinct categories of events and messages generated during payment operations, API communications, and system actions.
6.1 Error Log
The Error Log records exceptions and critical issues encountered during Datatrans operations. Please see Figure 15
Figure 15
Typical examples include failed API requests, alias deletion errors, authorization failures, or unexpected runtime exceptions. When an exception is caught, the message is stored in the Error Log, providing a timestamp, the source class, and a detailed error message. These entries are essential for identifying failed operations and diagnosing backend-level issues.
6.2 Debug Log
The Debug Log provides detailed insights into the Datatrans communication flow. It is primarily used for development and troubleshooting during API integrations and payment testing. Please see Figure 16.
Figure 16
Debug logs record the full sequence of actions and data exchanged between Magento and Datatrans, including:
- API request and response parameters
- Callback and redirect handling results
- Payment state transitions (e.g., initialize, authorize, capture, refund)
- System context (order ID, transaction ID, environment)
This helps developers verify that the integration is functioning correctly and that expected parameters (like transactionId, refno, or status) are received.
6.3 Log Configuration in Magento Admin
The Datatrans Magento module includes dedicated configuration options that allow merchants to enable or disable logging and directly access logs from the admin panel. These settings are located under General Datatrans Settings.
7.0 SUPPORT
If you have questions, use our contact form at webshopextension.com or email at support@webshopextension.com