Kategorien
Magento
WordPress
SAP Commerce
Odoo
Shopify
Typo3
Shopware
nopCommerce
Pimcore
Hyvä
OXID eShop


1. Magento & Odoo Integration: Seamless Data Synchronization
The integration between Magento and Odoo enables smooth synchronization of products, categories, attributes, customers, orders, shipments, invoices and Credit memos between Magento (eCommerce) and Odoo (ERP), ensuring consistent and up-to-date data across both platforms.
2. Features and Advantages
2.1. Features:
- Product Synchronization:
- Automatically sync product data (name, descriptions, images, prices, etc.) from Odoo to Magento
- Support for configurable, simple, bundle products etc.
- Category Synchronization:
- Sync product categories from Odoo to Magento.
- Ensure consistency by seamlessly transferring product categories from Odoo to Magento.
- Stock Level Sync:
- Real-time inventory updates between Odoo and Magento to prevent stock discrepancies.
- Attribute Sync:
- Sync product attributes from Odoo to Magento for uniform attribute details.
Note: Radio buttons and multi-checkboxes are considered custom options in Magento, not attributes.
- Order Status Sync:
- Keep order statuses updated, including fulfilment, payment, and shipping details.
- Order Invoice and Credit Memo Synchronization:
- Import Magento orders into Odoo in real-time.
- Sync order status updates from Odoo to Magento.
- Maintain order history and transaction details.
- Synchronize invoices and credit memos.
- Customer Data Sync:
- Sync customer details (name, email, shipping address) from Magento to Odoo.
- Maintain customer address information.
- Prevent duplicate customer records with unique identifiers.
- Payment Method Synchronization
- Sync payment methods from Magento to Odoo.
- Map payment transactions and reconcile financial records.
- Shipping Method Synchronization
- Sync shipping methods and carriers from Magento to Odoo.
- Maintain tracking details and shipping rates.
- Synchronization Logs
- Maintain detailed logs of all synchronization activities.
- Track successful and failed synchronization attempts.
- Error logging with descriptive failure messages.
- Timestamped records for tracking sync history.
- Filter logs by entity type (products, categories, orders…).
- In Magento, even if a sync log fails, the cron runs every minute and will retry the synchronization based on the configured retry count.
- Seamless Integration:
- User-friendly interface for easy integration without requiring advanced technical skills.
- Real-Time Sync:
- Instant updates across both platforms to maintain accurate and consistent data.
- Automated Updates:
- Changes to products, categories, or attributes in Odoo are automatically pushed to Magento, reducing manual effort.
2.2. Advantages:
- Improved Efficiency:
- Automates manual processes, reducing errors and increasing operational efficiency.
- Consistent Data Across Systems:
- Ensures product, stock, customer, and order data remain uniform across Odoo and Magento.
- Better Inventory Management:
- Real-time stock updates prevent overselling and display accurate inventory levels.
- Time and Cost Savings:
- Eliminates manual data entry, saving time and labour costs.
- Enhanced Customer Experience:
- Accurate product and order details lead to a smoother shopping experience.
- Centralized Management:
- Odoo serves as a central hub for managing products, orders, stock, and customers.
- Faster Order Processing:
- Orders from Magento sync directly to Odoo, streamlining fulfilment and processing.
- Minimized Risk of Data Inconsistencies:
- Reduces errors from manual data entry, ensuring data is always up to date.
- Easy Integration and Maintenance:
- Simple setup and minimal maintenance make it accessible for non-technical users.
- Better Reporting and Analytics:
- Synchronization of order and customer data enables improved insights and reporting.
3. Installation
3.1. Magento Installation
3.1.1. Prerequisites
- Magento 2.4.7
- No third-party modules required.
3.1.2. Installation Steps
- The Odoo – Magento Connector Plugin is distributed as a package containing two separate modules: one for Magento and one for Odoo.
- Unzip the downloaded file. You will find two folders inside: Magento and Odoo.
- Open the Odoo folder, copy all its contents (folders and files), and paste them into your Odoo custom add-ons directory.
- Open the Magento folder, copy all its contents (folders and files), and paste them into the app/code directory of your Magento installation on the web server.
- Run the following commands from the SSH terminal of the Magento server to complete the installation.
- Enable the module - php bin/magento module:enable Pits_OdooConnector
- Update the database schema - php bin/magento setup:upgrade
- Generate and pre-compile classes - php bin/magento setup:di:compile
- Deploy static files - php bin/magento setup:static-content:deploy
- Clear the cache – php bin/magento cache:flush
- Configure API access and credentials in Magento Admin under Stores > Configuration > PITS Odoo Connector.
3.2. Odoo Installation
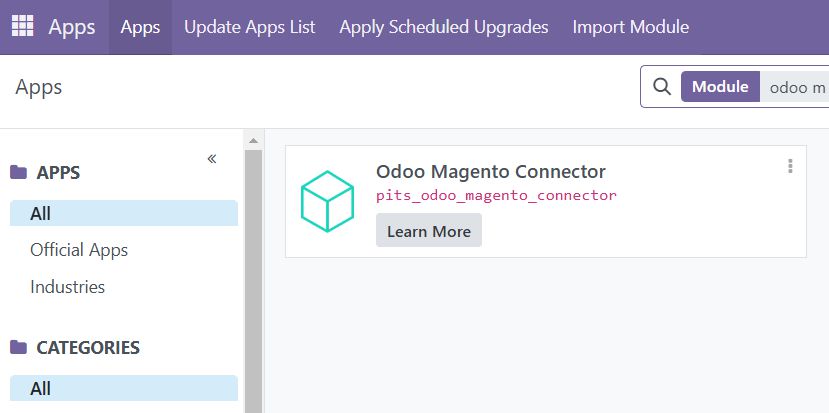
Figure 1: Odoo App Store interface showing Odoo Magento Connector module and install options.
Follow these steps to install the Odoo Magento Connector in Odoo:
3.2.1. Open the Apps Menu
- Navigate to the Apps section in Odoo.
- Use the search bar to look for "Odoo Magento Connector".
3.2.2. Activate the Connector
- Click the "Activate" button on the search result to enable the connector.
4. System Understanding
4.1. Magento Configuration
In the Magento admin panel, navigate to Stores → Configuration → PITS Configuration → Odoo connector, where you will find all the required settings for the Odoo Connector. Detailed description of each section in the configuration given below.
4.1.1. General Settings
The General section in the Magento Odoo Connector configuration contains the essential settings required to establish a connection between Magento and Odoo.
- Enable Odoo Connector – This option allows the administrator to enable or disable the Odoo Connector. When enabled, Magento can communicate with Odoo for data synchronization.
- Odoo URL – This field is used to specify the base URL of the Odoo instance. The connector will use this URL to send and receive data from Odoo.
- API Username - Enter the Odoo API username for authentication.
- API Password - Enter the Odoo API password. This will be used to obtain a bearer token required for secure communication with Odoo.
- Database Name - Enter the name of the Odoo database used for login.
- Test Connection (Button) - A Test Connection button is now available to verify if the provided credentials can successfully connect to the Odoo instance. After entering the URL, username, password, and database name, click Test Connection to ensure connectivity after saving the configuration.
- Maximum Allowed Cron Failures – The setting is used to manage real-time synchronization tasks. When a Cron job fails consecutively during real-time synchronization, it will attempt to rerun after reaching the specified threshold of allowed failures.
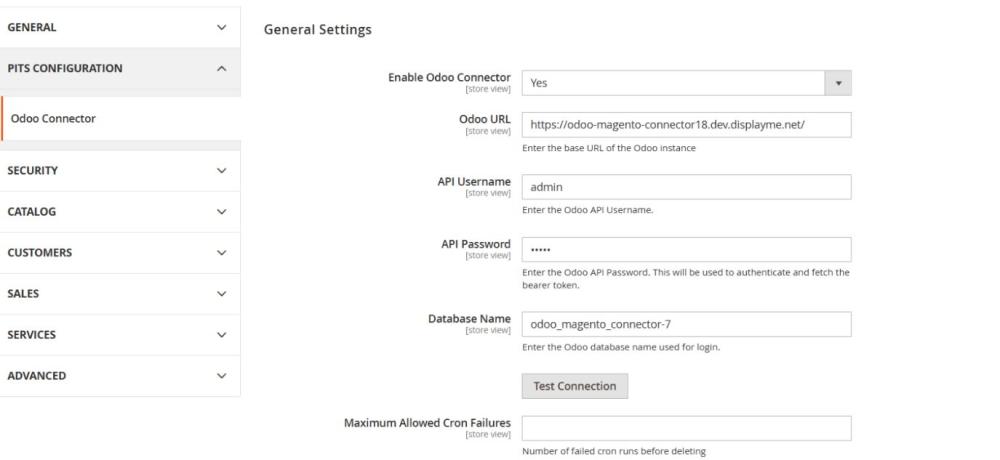
Figure 2: Magento Odoo connector general settings
Note: The connector includes an automatic retry mechanism for failed sync attempts.
A Cron job runs every minute to retry failed requests. These failed requests are saved in a dedicated log table and reprocessed automatically. The system will retry until the Maximum Allowed Cron Failures, configured in the General Settings, is reached.
After exceeding the retry limit, the entry will be cleared from the table and no further attempts will be made
4.2. Odoo Configuration
4.2.1. Access Role Configuration
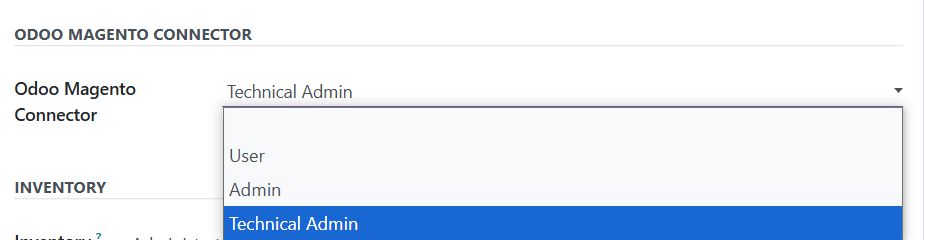
Figure 3: Role configuration for Odoo Magento Connector in Odoo settings
4.2.2. Access Roles
- User: Can only view data available from the Magento sync.
- Admin: Can configure Magento settings and manage data synchronization.
- Technical Admin: Has all Admin permissions plus access to view synchronization logs.
4.2.3. Configuration Steps
- Navigate to Settings
- Enable developer mode by clicking on the ‘Activate the developer mode’.
- Navigate to User & Companies menu -> Select Users.
- Open the desired User -> Select the role in the Odoo Magento Connector.
4.2.4. Magento Configuration in Odoo

Figure 4: Magento Configuration page in Odoo
Configure Magento Details (URL, Credentials)
To establish a secure connection between Odoo and Magento, you need to configure the Magento system details in Odoo. This includes providing the Magento Store URL and API authentication credentials to enable seamless data synchronization.
4.2.5. Configuration Steps:
- Access the Magento Connector Menu
- In Odoo, navigate to the Magento Connector from the main menu.
- Enter Magento Store Details
- In the Magento Connector interface, enter your Magento Store URL, API Username and API password to authorize API access.
- Establish Secure Communication
- Once the correct Magento URL, API Username and API password are provided, Odoo will securely communicate with your Magento store, allowing synchronization of products, orders, and customer data.
- Click on the Test Connection button to check the connection to Magento.
4.2.6. Default Values
In Odoo when setting up the Magento connector, it’s essential to configure default values to ensure consistent behaviour during synchronization, especially for products.
- Default Attribute Set
- Specify the Magento Attribute Set to be used when syncing products from Odoo that do not have a specific attribute set assigned.
- Default Attribute Group
- Define the default Attribute Group under which attributes will be organized in Magento during sync.
- Default Warehouse
- To sync product stock levels from Odoo to Magento, you must specify the default warehouse in Odoo. The quantities available in this warehouse will be used to update stock levels in Magento.
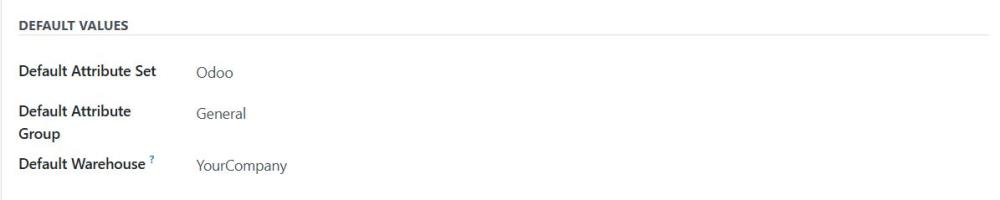
Figure 5: Default values settings in Magento Configuration in Odoo
4.2.7. Realtime Synchronization
The Real-Time Synchronization feature in Odoo enables automatic, instant data updates to Magento as changes occur in Odoo. Real-time sync can be enabled for Products, Categories, Attributes, and Stock Transfer, ensuring your Magento store is always aligned with the latest Odoo data. This eliminates manual syncing and provides a seamless, up-to-date experience for both users.
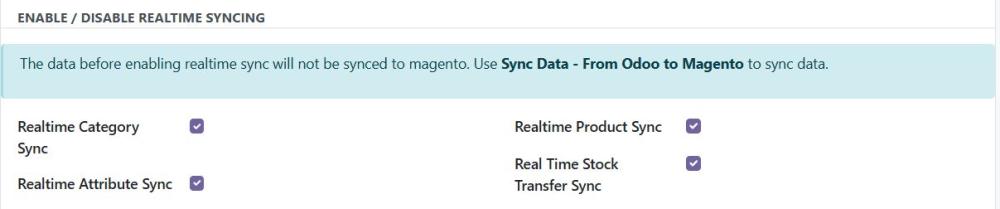
Figure 6: Enable/Disable Realtime syncing settings in Magento configuration page in Odoo
Note: Records that were created while real-time sync was disabled will not be synced when the records are updated after re-enabling real-time sync.
4.2.8. Configuring Data Synchronization in Magento
In this step, you will define the synchronization settings between Magento and Odoo. These configurations determine what data is synced between Magento and Odoo.
Key Synchronization Options:
- Product Sync – Sync product details, images, and pricing.
- Category Sync – Ensure category consistency across both platforms.
- Stock Level Sync – Keep inventory updated in real time.
- Order, Invoice and credit memo Sync – Transfer customer orders, invoices and credit memos from Magento to Odoo.
- Customer Sync – Maintain updated customer records.
- Order Status Sync – Keep fulfillment, payment, and shipping status aligned.
By configuring these provisions, you ensure seamless data flow between the two platforms.
4.2.9. Syncing Magento websites and stores data
This section enables the synchronization of Websites and stores data from Magento to Odoo. The Website, Store, Store views should be synced in order first before syncing other data from Magento to Odoo.
- Navigate to the Magento connector app in Odoo
- Click the Sync Store data
- To Sync all the Store Data such as Websites, Stores and Store Views, click the sync Store Data button
- Navigate to Magento Sync > Magento Website
All Magento Website data will be stored and visible in this section - Navigate to Magento Sync > Magento Stores
All Magento Stores data will be stored and visible in this section - Navigate to Magento Sync > Magento Store view
All Magento Store view data will be stored and visible in this section.
- Navigate to Magento Sync > Magento Website

Figure 7: Sync Magento Website & Stores Data tab in Magento configuration page in Odoo
4.2.10.Syncing from Magento to Odoo
This section enables the synchronization of various Magento data into Odoo, ensuring data consistency across both platforms.
Available Options:
- Sync Attribute Set – Import product attribute sets from Magento to Odoo for uniform product specifications.
- Sync Tax Rates – Transfer tax rates from Magento to Odoo for accurate tax calculations.
- Sync Customers – Sync customer details (name, email, address, etc.) from Magento to Odoo for streamlined order management.
- Sync Payment Methods – Import payment methods configured in Magento to Odoo, ensuring payment options align when processing orders.
- Sync Shipping Methods – Transfer available shipping methods and carriers from Magento to Odoo for efficient shipment management.
- Sync Order Status – Keep order statuses updated in Odoo to ensure consistency in tracking order progress.
- Sync Categories – Import and sync product categories from Magento to Odoo to maintain a consistent category tree.
- Sync Attribute Group – Import attribute groups from Magento to Odoo to maintain proper attribute organization.
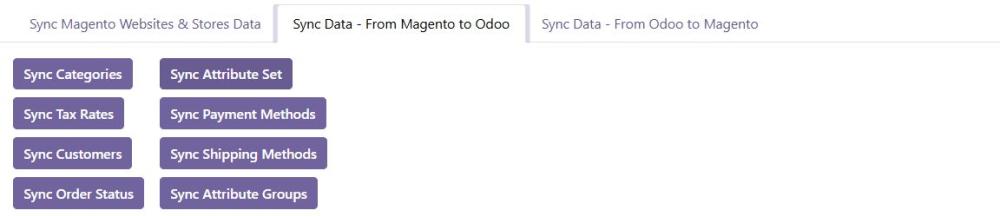
Figure 8: Sync Data- From Magento to Odoo tab in Magento configuration page in Odoo
4.2.11.Syncing from Odoo to Magento
This section allows data synchronization from Odoo to Magento, ensuring product and inventory details remain up to date on your Magento store. Updates from Odoo to Magento occur in real-time.
Available Options:
- Sync Products – Transfer product information (name, description, price, etc.) from Odoo to Magento, keeping your online store updated.
- Sync Categories – Sync product categories from Odoo to Magento to maintain a consistent category structure.
- Sync Attributes – Transfer product attributes (such as size, color, etc.) from Odoo to Magento for uniform product specifications.
- Sync Stock Transfers– Transfer shipment and delivery information from Odoo to Magento, ensuring accurate order status and tracking updates

Figure 9: Sync Data- From Odoo to Magento tab in Magento configuration page in Odoo
4.3. Attribute Set Synchronization from Magento to Odoo
The Attribute Set Synchronization feature allows attribute sets from Magento to be imported into Odoo. In Magento, an attribute set is a collection of attributes grouped together, but Odoo does not have a direct equivalent. To bridge this gap, the integration fetches attribute sets from Magento and maps them to a default attribute set in Odoo, ensuring smooth workflow and consistency between both platforms.
4.3.1. Steps to Sync Attribute Sets from Magento to Odoo:
- Access the Magento Connector
- In Odoo, navigate to the Magento Connector menu.
- Go to Configuration Settings
- Open the Odoo Magento Configuration section.
- Initiate Attribute Set Sync
- Under Sync Data from Magento to Odoo, click the Sync Attribute Set button.
- Fetch Attribute Sets from Magento
- The system will retrieve attribute sets from Magento and sync them to Odoo.
- View Synced Attribute Sets in Odoo
- After syncing, all the Attribute Sets will be listed in the Default Attribute Set dropdown in Magento Configuration
- Mapping to a Default Attribute Set
- Since Odoo does not have an exact equivalent of Magento’s attribute sets, the integration will map them to a default attribute set in Odoo, ensuring a smooth and structured synchronization.
- Give the default attribute set in the Magento Configuration Default value.
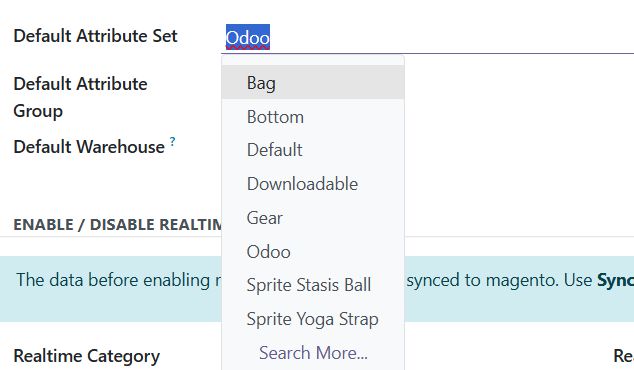
Figure 10: Configuring Default attribute set in Magento configuration page in Odoo
4.4. Attribute Group Synchronization from Magento to Odoo
The Attribute Group Synchronization feature imports Magento attribute groups into Odoo to maintain structured attribute organization and enable proper mapping during product sync.
4.4.1. Steps to Sync Attribute Groups:
- Access the Magento Connector
- In Odoo, go to the Magento Connector menu.
- Navigate to Configuration
- Open the Magento Configuration section.
- Initiate Attribute Group Sync
- Under Sync Data from Magento to Odoo, click the Sync Attribute Group button.
- Fetch Attribute Groups from Magento
- The system will fetch all available attribute groups linked to attribute sets in Magento.
- View Synced Attribute Groups in Odoo
- After syncing, all the Attribute Groups will be listed in the Default Attribute Group dropdown in Magento Configuration
- Mapping for Structured Sync
- Synced attribute groups help organize attributes during product sync. Odoo uses this structure internally for mapping Magento's product specifications
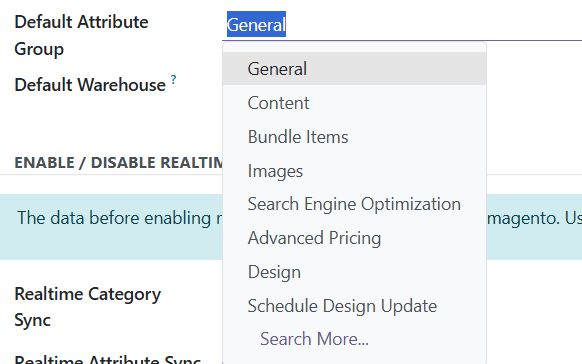
Figure 11: Configuring Default attribute group in Magento configuration page in Odoo
4.5. Category Synchronization between Magento and Odoo
The Category Synchronization feature ensures seamless data transfer between Odoo and Magento. Any new categories, updates, or deletions made in Odoo are automatically reflected in Magento, maintaining a consistent and well-organized product catalog across both platforms. This eliminates manual effort and improves operational efficiency.
4.5.1. Steps to Sync Categories from Odoo to Magento:
- Access the Website Module
- In Odoo, navigate to the Website module.
- Go to eCommerce Categories
- Click on eCommerce from the top menu.
- Select eCommerce Categories from the available options.
- Add a New Category
- Click on the Create button.
- Enter the category name, description, and other relevant details.
- Update an Existing Category
- Select the category you want to modify.
- Edit the name, description, or other fields as needed.
- Save and Sync
- Click Save to store the changes in Odoo.
- The updates will be automatically synchronized to Magento via the connector.
- Verify in Magento
- After synchronization, check your Magento store to confirm the updated category details.
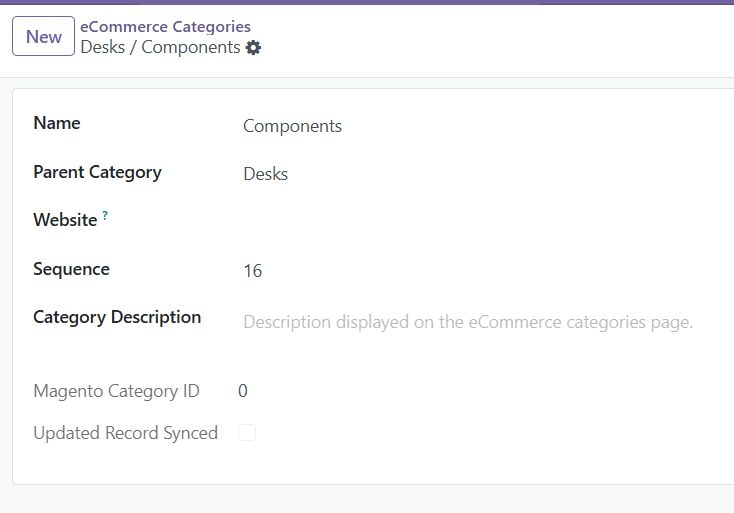
Figure 12: eCommerce Categories page in Odoo
Note: Category images from Odoo cannot be synced to Magento due to API limitations.
4.5.2. Steps to trigger Category Sync from Magento to Odoo:
In Magento configuration, located under Odoo Connector > Category Synchronization manages the categories sync between Odoo and Magento.
- Enable Category Synchronization – Allows category data to be synced from Odoo to Magento.
- Reset All Magento Categories and Sync from Odoo – Deletes all existing categories in Magento and fetches a fresh category structure from Odoo.
- Sync Category from Odoo (Button) – Triggers manual synchronization of categories from Odoo to Magento.
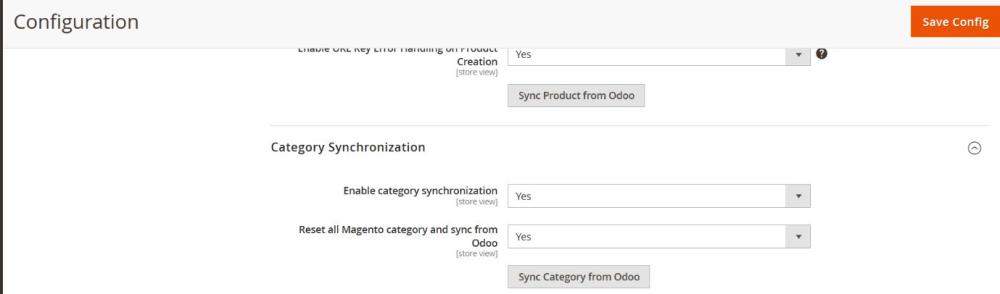
Figure 13: Customer Synchronization settings in Magento admin panel for managing customer data syncing with Odoo
4.6. Attribute Synchronization between Magento and Odoo
The Attribute Synchronization feature ensures that product attributes remain consistent between Odoo and Magento. In Magento, selection, pills, and color options are treated as attributes, while radio buttons and multi-select fields are configured as custom options. These distinctions are maintained when synced from Odoo, ensuring attributes like color or selection pills are properly displayed while custom options are handled accordingly.
4.6.1. Steps to Sync Attributes from Odoo to Magento:
- Access the Sales Module
- In Odoo, navigate to the Sales module from the main dashboard.
- Go to Product Attributes
- Click on Configuration in the Sales module.
- Under Configuration, select Products.
- Click on Attributes to manage product attributes.
- Create a New Attribute
- Click the Create button.
- Enter the attribute name and type (e.g., selection, pills, color).
- Configure Attribute Type
- For selection, pills, or color options, configure them as attributes.
- For radio buttons and multi-select fields, configure them as custom options (instead of attributes) in Magento.
- Save and Sync
- Click Save to store the changes in Odoo.
- When data is synced from Odoo to Magento, attribute distinctions are maintained:
- Attributes (selection, pills, color) will appear as standard attributes in Magento
- Custom options (radio buttons, multi-select fields) will betransferred as custom options in Magento when mapped to a product.
- Verify in Magento
- After synchronization, check your Magento store to ensure attributes and custom options are displayed correctly.
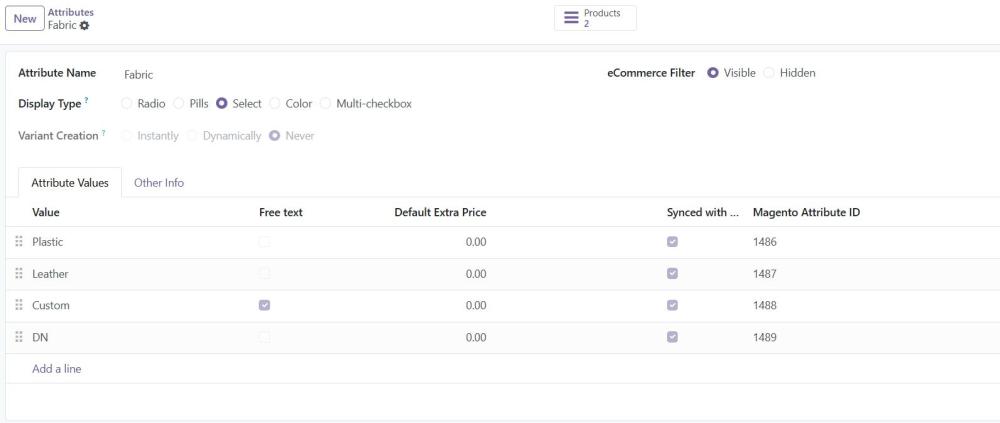
Figure 14: Attributes page in Odoo
4.6.2. Steps to trigger Attributes sync from Magento to Odoo:
The Attribute Synchronization section manages the synchronization of product attributes between Odoo and Magento.
- Enable Attribute Synchronization – This option allows the administrator to enable or disable the automatic synchronization of product attributes from Odoo to Magento. When enabled, Magento will fetch attribute data from Odoo as needed.
- Sync Attributes from Odoo – This button triggers a manual synchronization process, fetching all product attributes from Odoo and updating them in Magento. This is useful mass sync all attributes from Odoo.
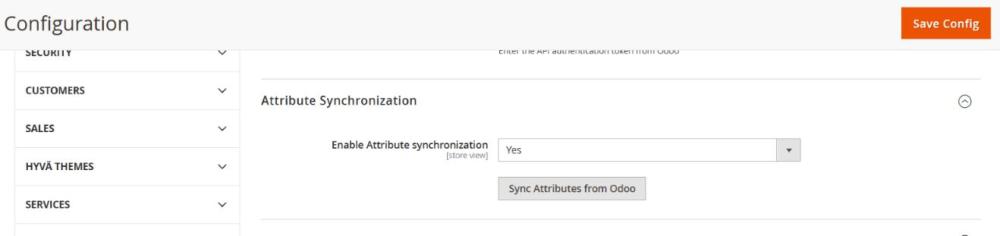
Figure 15: Attribute Synchronization settings in Magento admin panel for managing attribute data syncing with Odoo
4.7. Product Synchronization from Odoo to Magento
The Product Synchronization feature ensures seamless syncing of product data between Odoo and Magento. It keeps product details such as titles, descriptions, prices, stock levels, images and videos consistently updated across both platforms. Any modifications in Odoo—whether adding new products, updating existing ones, or adjusting stocks—are automatically reflected in Magento. This automation streamlines product management, enhances data accuracy, and eliminates the need for manual updates.
In Odoo, the product template is treated as a configurable product, while each variant (e.g., different sizes or colors) is synced as a simple product in Magento.
4.7.1. Steps to Sync Products from Odoo to Magento:
- Access the Sales Module
- In Odoo, navigate to the Sales module from the main dashboard.
- Go to Products
- Click on Products under the Sales menu.
- Create a New Product
- Click the Create button.
- Enter the product name, description, price, and other relevant details.
- Configure Product Attributes
- Select Attributes and configure them as required.
- Save and Sync
- Click Save to store the product details in Odoo.
- Once saved, the product is automatically treated as a configurable product in Magento.
- Each product variant (e.g., different sizes or colors) will be synced as a simple product in Magento.
- Automatic Updates
- Any updates made to the product name, description, price, or stock levels in Odoo will be automatically reflected in Magento.
- Verify in Magento
- After synchronization, check the Magento store to confirm that the product and its variants are correctly displayed.
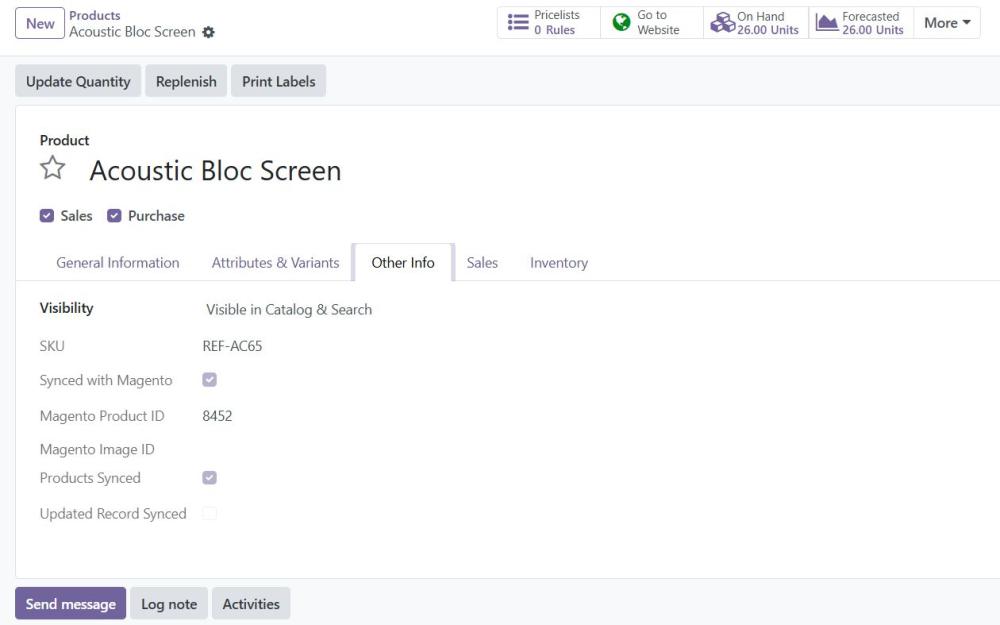
Figure 16: Products page in Odoo
4.7.2. Steps to trigger Products from Magento to Odoo:
The Product Synchronization section handles the import and management of product data from Odoo to Magento.
- Enable Product Synchronization – This option enables or disables automatic product synchronization from Odoo. When enabled, Magento will receive product data updates from Odoo, ensuring consistency between the two platforms.
- Enable URL Key Error Handling on Product Creation – This setting manages URL key generation during product creation via the REST API. If enabled, Magento will handle potential URL key conflicts to prevent errors when importing products from Odoo.
- Sync Product from Odoo – This button triggers product mass synchronization from Odoo, where products will be sent from Odoo to Magento.
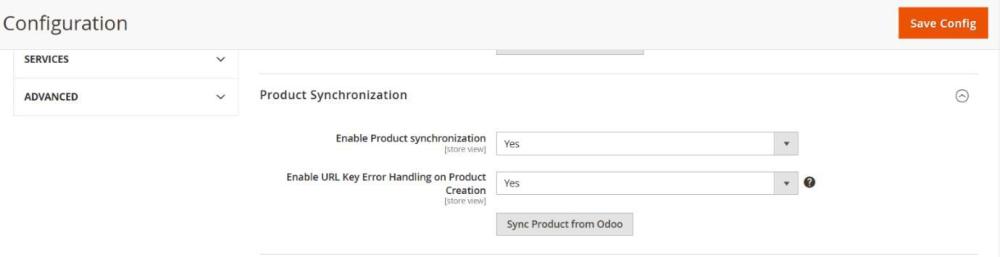
Figure 17: Product Synchronization settings in Magento admin panel for managing product data syncing with Odoo.
4.8. Tax Rate Synchronization from Magento to Odoo
The Tax Rate Synchronization feature ensures that tax rates defined in Magento are automatically fetched and added to Odoo, maintaining consistency in tax calculations for sales and invoicing. Any updates or new tax rules in Magento are reflected in Odoo, preventing discrepancies and ensuring accurate tax handling across both platforms.
4.8.1. Steps to trigger Tax Rates Sync from Odoo to Magento
- Access the Magento Connector
- In Odoo, navigate to the Magento Connector menu.
- Initiate Tax Rate Sync
- Click Sync Data from Magento to Odoo.
- Fetch Tax Rates
- In the Sync Data section, select Sync Tax Rates.
- Navigate to Invoicing > Configuration > Taxes to check the synced tax rate
- Synchronization Process
- The system retrieves tax rates from Magento and adds them to the Tax Rates section in Odoo.
- Automatic Updates
- Any modifications to tax rates in Magento are automatically updated in Odoo.
- Verification
- After synchronization, review the tax rates in Odoo to ensure they match those from Magento and are correctly applied to sales and invoicing.
This automation eliminates manual tax adjustments and ensures compliance with tax regulations across both platforms.
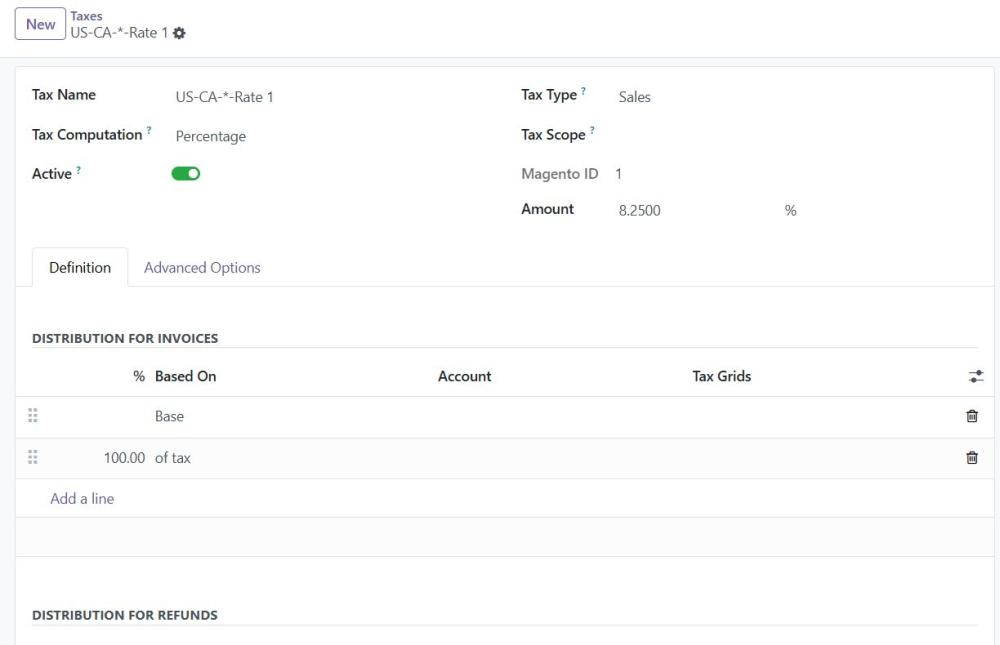
Figure 18: Tax Rates Synced from Magento to Odoo
4.8.2. Steps to Sync Tax Rates from Magento to Odoo
The Tax Synchronization section manages the tax-related data sync from Magento to Odoo.
- Enable Tax Synchronization – When enabled, the option to manually sync tax data becomes available, but enabling this does not trigger automatic synchronization.
- Map Tax to Odoo (Button) – This button appears only when tax synchronization is enabled. Clicking it manually triggers the synchronization of tax rules and tax regions from Magento to Odoo, ensuring that the tax settings are updated as needed.

Figure 19: Tax Synchronization settings in Magento admin panel for managing tax rate syncing with Odoo.
4.9. Customer Synchronization from Magento to Odoo
The Customer Synchronization feature ensures that customer details from Magento are automatically synced to Odoo. This includes essential information such as customer name, email, and contact details. Additionally, multiple shipping and billing addresses are transferred, ensuring accurate order processing and efficient customer management in Odoo.
4.9.1. Steps to trigger Customers Sync from Magento to Odoo
- Access Customer Management in Odoo
- Navigate to the Sales module from the Odoo dashboard.
- Under the Sales menu, go to Orders and click on Customers.
- Initiate Customer Sync
- Open the Magento Connector menu.
- Click Sync Data from Magento to Odoo.
- Fetch Customer Data
- In the Sync Data section, select Sync Customers.
- Synchronization Process
- The system retrieves customer details from Magento and creates corresponding customer records under Contacts in Odoo.
- Multiple Address Sync
- The integration ensures that multiple shipping and billing addresses for each customer are added to Odoo, maintaining consistency and improving order fulfillment.
- Verification
- After synchronization, review the customer records in Odoo to confirm that all details, including addresses, have been correctly imported.
This automation enhances customer data accuracy and streamlines order management across both platforms.
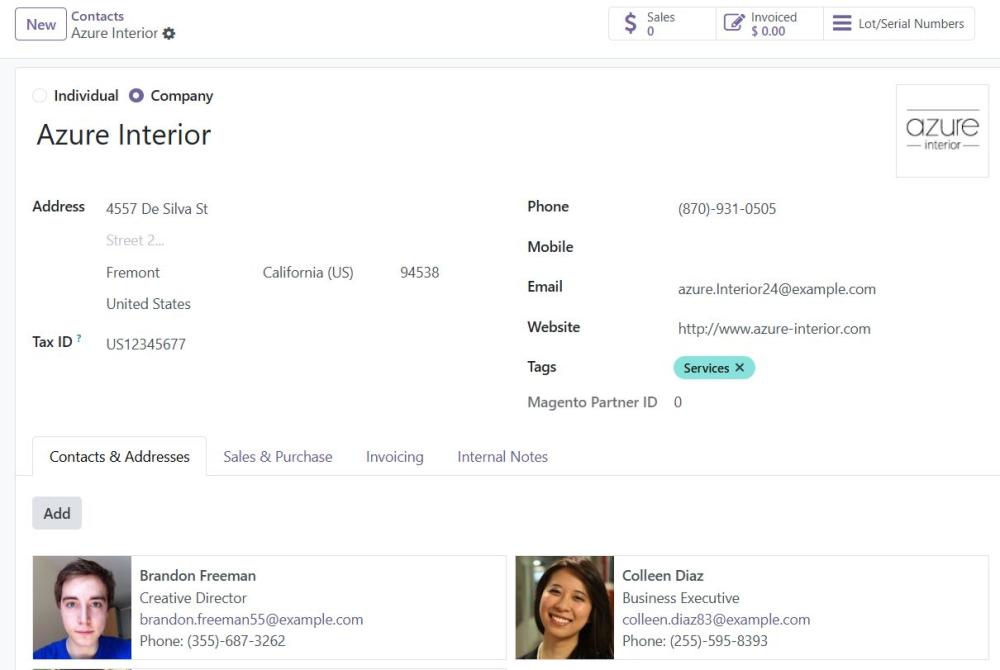
Figure 20: Customer page in Odoo
4.9.2. Steps to Sync Customers from Magento to Odoo
Customer Synchronization handles the customer data sync from Magento to Odoo.
- Enable Customer Synchronization – When enabled, customer data will be automatically synced from Magento to Odoo.
- Sync Customer to Odoo (Button) – Manually triggers the synchronization of all customer data from Magento to Odoo.
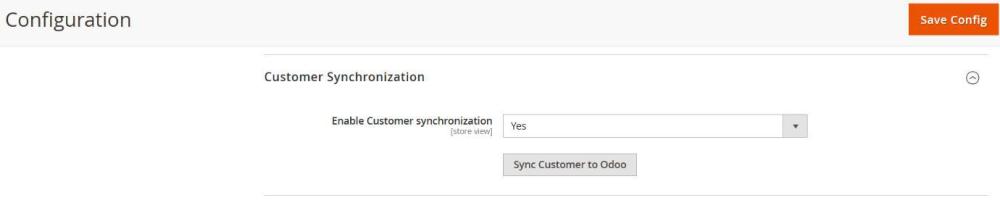
Figure 21: Customer Synchronization settings in Magento admin panel for managing customer data syncing with Odoo
4.10. Order, Invoice, and Credit Memo Synchronization Between Magento and Odoo
The Odoo-Magento Connector ensures smooth, automated synchronization of orders, invoices, and credit memos, maintaining real-time consistency across both platforms. From order placement to payment and post-sale refunds, all key sales operations are seamlessly integrated to reduce manual effort and improve accuracy.
4.10.1.Order Synchronization
- Orders placed in Magento are automatically synced to Odoo.
- Status updates in Magento (e.g., payment confirmation) trigger corresponding changes in Odoo.
- In Odoo, synced orders can be found under Sales > Orders > Orders.
- Once confirmed in Odoo, a shipment is created. Upon validation, shipping status and tracking details are sent back to Magento.
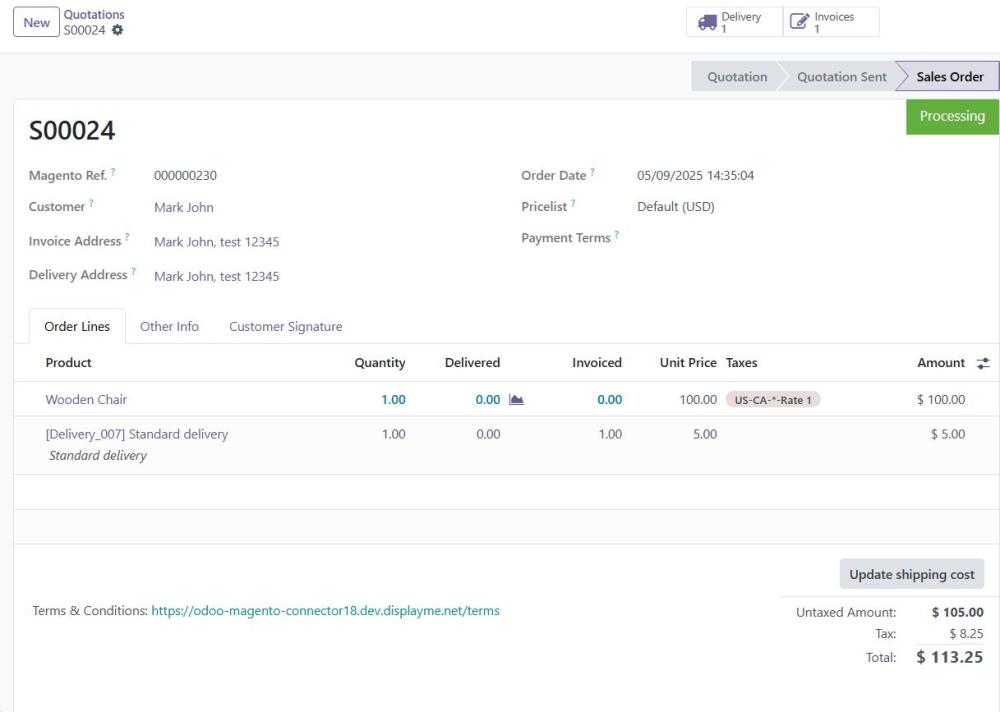
Figure 22: Magento orders synced and listed in Odoo Sales Orders with status mapping
4.10.2. Steps to Sync Orders from Magento to Odoo
- Enable Order Method Synchronization – When enabled, orders from Magento will be synced to Odoo.
- Enable Synchronization of Order Statuses with Odoo from the Order Status Grid – When enabled, any status changes in the Magento order status grid will be updated in Odoo.
- Enable Real-Time Order Method Synchronization – When enabled, orders will be instantly sent to Odoo upon creation or update.
4.10.3.Invoice Synchronization
- When an order is marked as "Completed" in Magento after successful payment, Odoo automatically creates a corresponding invoice, marked as "Paid".
- This ensures accurate financial tracking without manual intervention.
- To view the invoice in Odoo:
- Navigate to Sales > Orders > Orders
- Select the desired order
- Click the Invoices button
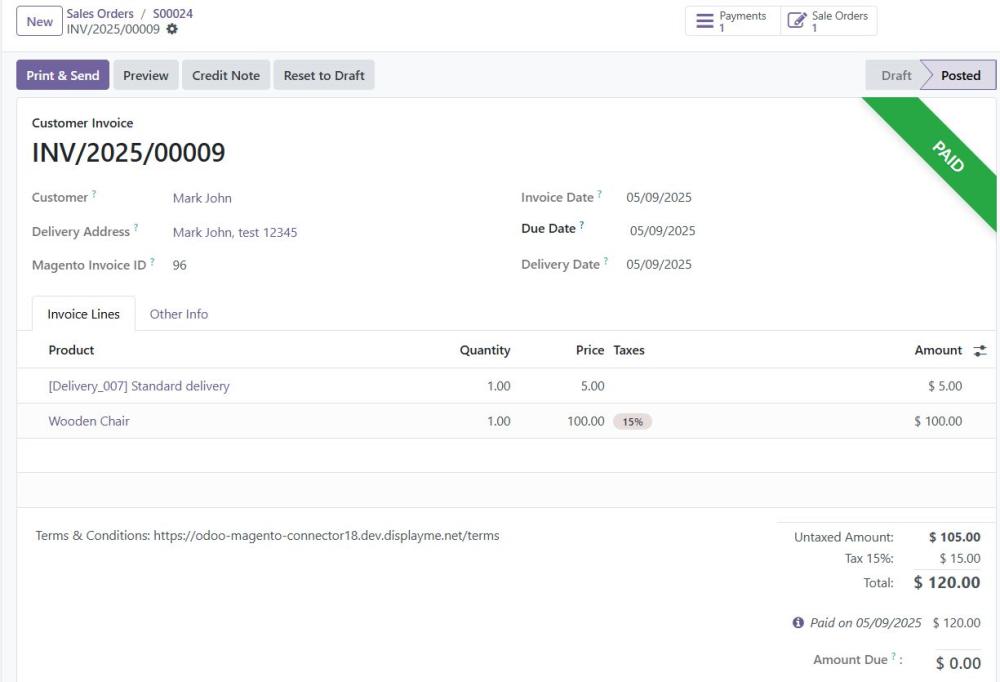
Figure 23: Invoices generated in Magento are synced and displayed in Odoo's customer invoices.
4.10.4.Steps to Sync Invoices from Magento to Odoo
- Enable Invoice Synchronization – When enabled, invoices generated in Magento will be synced with Odoo.
- Enable Real-Time Invoice Synchronization – When enabled, invoices will be sent to Odoo as soon as they are created.
- Sync Orders & Invoice Data to Odoo (Button) – Manually triggers the synchronization of orders and invoices from Magento to Odoo.
4.10.5.Credit Memo Synchronization
- When a credit memo is issued in Magento (due to refund or return), the order is marked "Closed".
- This triggers automatic creation of a credit notes in Odoo, reflecting the refunded amount and any returned product quantities.
- This process ensures accurate after-sales management and keeps financial records aligned.
- To view the credit note in Odoo:
- Go to Sales > Orders > Orders
- Select the relevant order
- Click the Invoices button to see associated credit notes
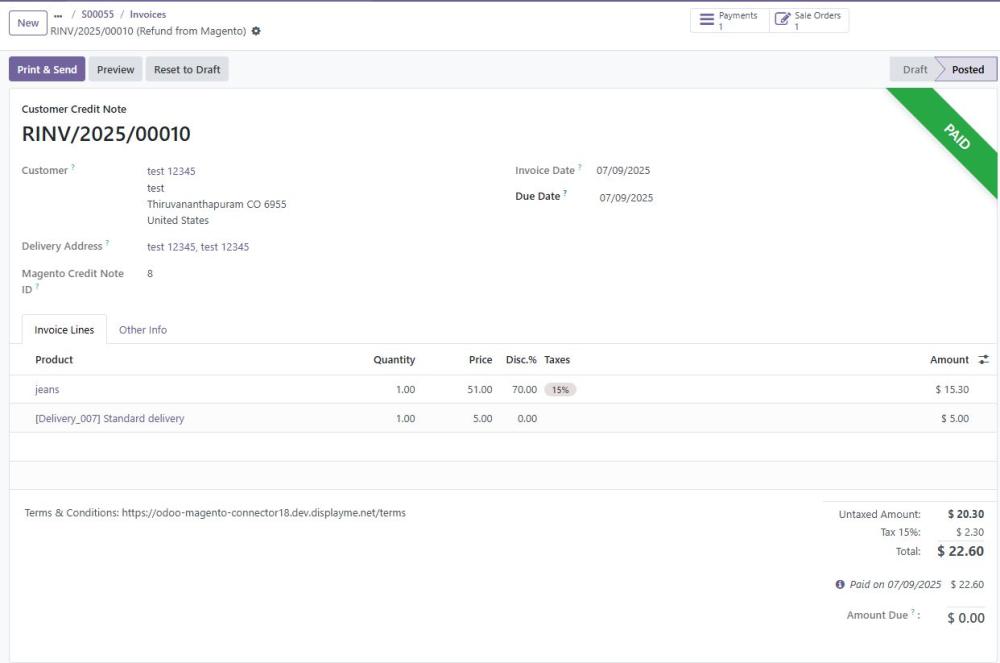
Figure 24: Magento credit memos reflected as refund records in Odoo.
Note: Odoo only supports "Tax After Discount". Configure Magento the same way to ensure accurate tax syncing
4.10.6.Steps to Sync Credit Memos from Magento to Odoo
- Enable Credit Memo Synchronization – When enabled, credit memos will be synced from Magento to Odoo.
- Enable Real-Time Credit Memo Synchronization – Sends credit memos to Odoo instantly upon creation.
- Sync Credit Memos to Odoo (Button) – Manually triggers synchronization of invoices first, followed by their associated credit memos.
Note: When syncing credit memos from Magento to Odoo, offline refunds arematched using the Order ID, not the Invoice ID. Ensure your Odoo setup accounts for this behaviour to avoid mismatched or missing refund entries.
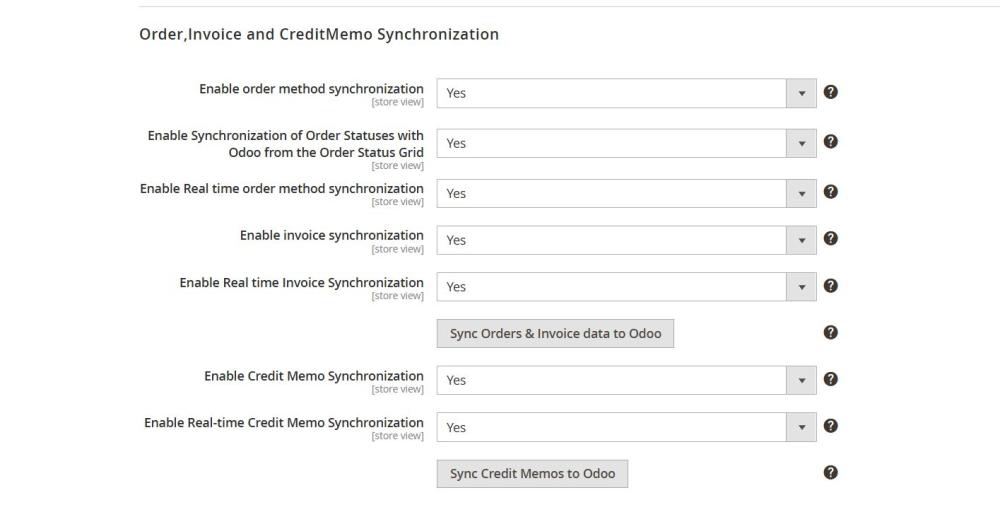
Figure 25: Order, Invoice & credit memo Synchronization settings in Magento admin panel for managing order syncing with Odoo
4.11. Shipment Synchronization from Odoo to Magento
The Magento-Odoo integration enables seamless synchronization of order and shipment data. Once an order is confirmed in Magento, the corresponding shipment details are automatically transferred to Odoo for processing, shipping, and tracking.
This automation ensures efficient order fulfilment and accurate shipment management across both platforms.
4.11.1.Steps to Sync Shipment
- Navigate to Sales > Orders > Orders in Odoo.
- Open the Quotation and select the order.
- Click on the delivery button and validate.
- Once the validation is done, the shipment will be automatically synced to Magento if real-time sync is enabled.
- If real-time sync is disabled, then Navigate to Magento connector module in Odoo and then Sync Data - From Odoo to Magento.
- Click the Sync Shipment button, the shipment will be synced to Magento.
Note: Shipment created in Magento will not be synced to Odoo
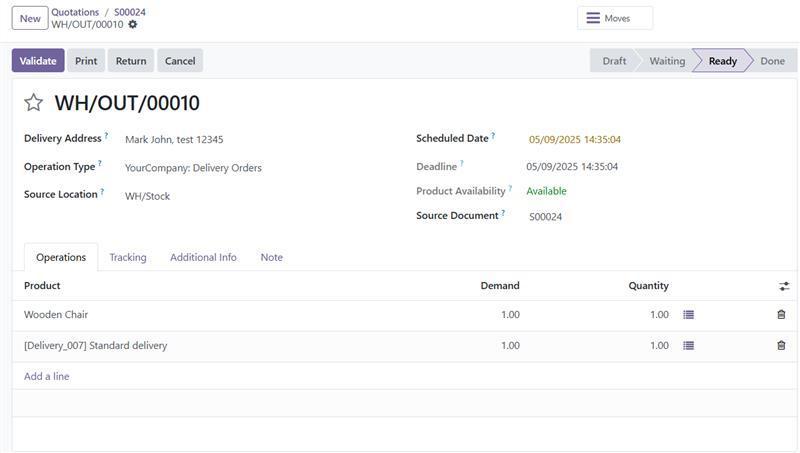
Figure 26: Delivery orders in Odoo synced to Magento shipments
4.12. Shipping Method Synchronization from Magento to Odoo
Shipping method synchronization ensures that carriers and shipping options from Magento are accurately reflected in Odoo, facilitating seamless order fulfilment.
4.12.1.Steps to trigger Shipping Methods Sync from Odoo:
- In Odoo, navigate to Magento Connector.
- Click Sync Data from Magento to Odoo.
- In the Sync Data section, select Sync Shipping Methods.
- The system retrieves and imports shipping methods and carriers from Magento to Odoo.
- After synchronization, go to Magento Sync > Magento Shipping Carriers to map Magento Carriers to their Odoo Shipping Method.
- Once mapped, the shipping methods are available in Odoo for order processing.
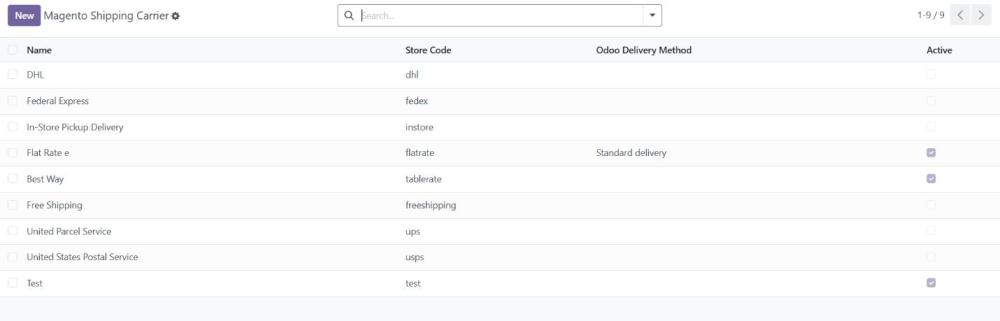
Figure 27: Tree View of Magento Shipping Carriers Synced in Odoo

Figure 28: Tree View of Magento Shipping Methods Synced into Odoo
4.12.2.Steps to Sync Shipping Methods from Magento to Odoo:
Shipping Method Synchronization manages shipping methods sync from Magento to Odoo.
- Enable Shipping Method Synchronization – When enabled, shipping methods from Magento will be synced to Odoo.
- Enable Real-Time Shipping Method Synchronization – When enabled, any changes to shipping methods in Magento will be instantly updated in Odoo.
- Sync Shipping Method to Odoo (Button) – Manually triggers the synchronization of shipping methods from Magento to Odoo.
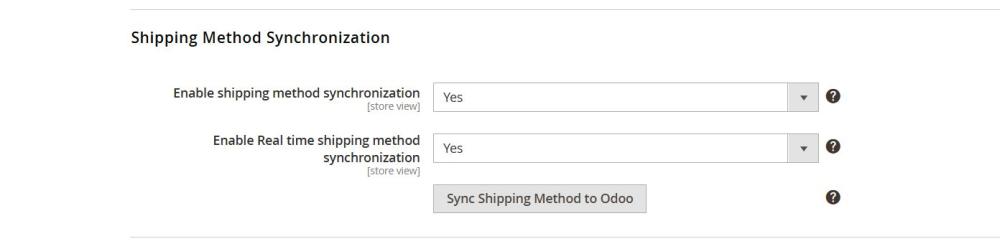
Figure 29: Shipping Method Synchronization Configuration settings in Magento admin panel for managing tax synchronization with Odoo.
4.13. Payment Method Synchronization from Magento to Odoo
Magento payment methods, including credit cards, PayPal, and other gateways, are automatically synchronized with Odoo to ensure consistency in payment processing.
4.13.1.Steps to trigger Payment Methods Sync from Odoo
- In Odoo, navigate to Magento Connector.
- Click Sync Data from Magento to Odoo.
- In the Sync Data section, select Sync Payment Methods.
- The system retrieves and adds Magento payment methods to Odoo.
- To verify, go to Invoicing > Configuration > Online Payments > Payment Methods in Odoo.
- The synced payment methods are now available for management in Odoo.
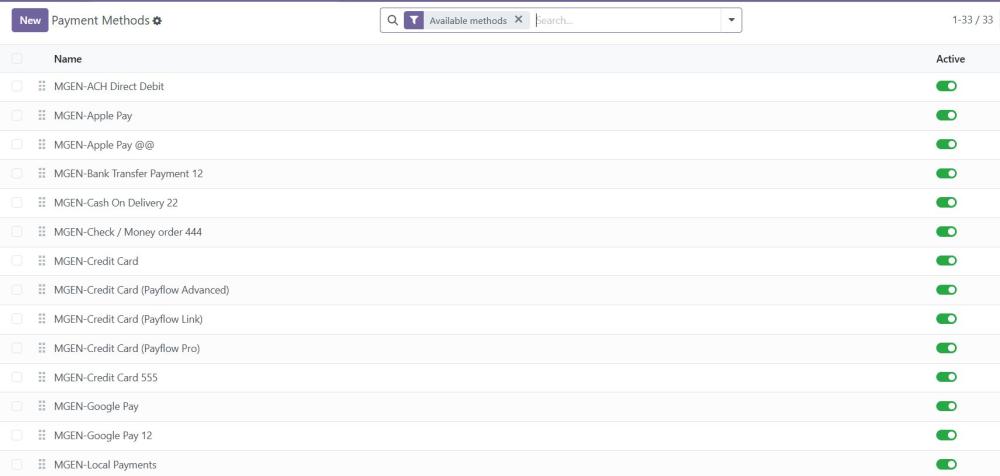
Figure 30: Tree View of Magento Payment Methods Synced into Odoo
4.13.2.Steps to Sync Payment Methods from Magento
Payment Method Synchronization manages the payment method sync from Magento to Odoo.
- Enable Payment Method Synchronization – Activates the payment method synchronization feature.
- Enable Real-Time Payment Method Synchronization – When enabled, any changes to payment methods in Magento will be instantly updated in Odoo.
- Sync Payment Method to Odoo (Button) – Manually triggers the synchronization of payment methods from Magento to Odoo. This action is required unless real-time synchronization is enabled.

Figure 31: Payment Method Synchronization settings in Magento admin panel
4.14. Synchronization Log
The Synchronization Log captures all sync activities between Odoo and Magento with detailed tracking. Each entry includes the log ID, sync type, trigger type, status andtimestamp. The Request section shows the payload sent to Magento and the Response section displays Magento’s response. It helps users monitor, audit, and troubleshoot sync operations by displaying comprehensive information about each sync attempt.
4.14.1.Steps to navigate to the Synchronization Log in Odoo
- Go to the Magento Connector module.
- Navigate to Synchronization Log in the top menu.
- All the sync entries will be listed, click on any log to view its full details (including request, response, status, and timestamps).
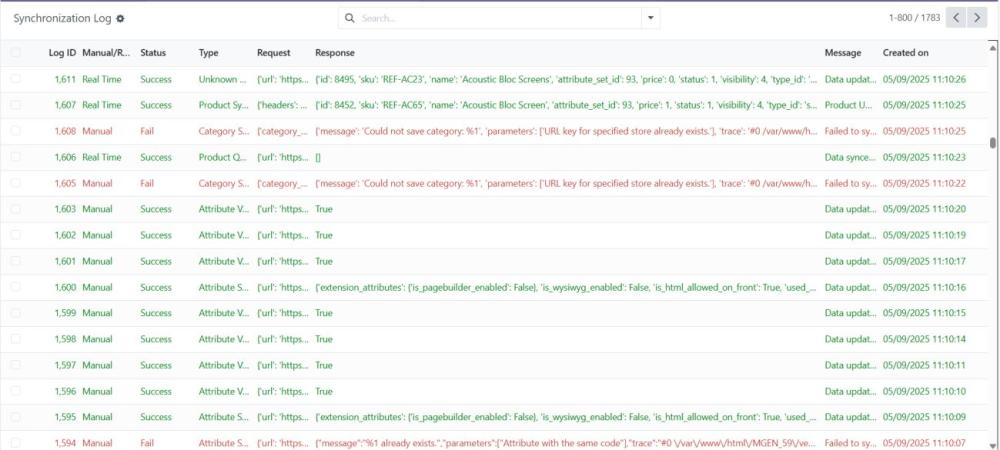
Figure 32: Log entries showing the status of various Magento to Odoo sync operations
4.14.2.Steps to navigate to the Synchronization Log in Magento
Synchronization Log manages the logging of synchronization activities from Magento to Odoo.
- Enable Synchronization Logging – When enabled, all synchronization activities will be logged for tracking and debugging purposes.
- Enable Delete Log Using Cron – When enabled, logs will be automatically deleted at scheduled intervals using Magento’s Cron job system.
- Log Delete Cron Time – Specifies how often the Cron job should run to delete logs. Options include hourly, daily, etc.
- Select a Cron Time Interval – Allows selection of a specific interval for log deletion, ensuring automated cleanup at regular intervals.
- Day Interval for Clearing Logs – Defines the number of days after which logs should be deleted, starting from their creation date (e.g., setting 7 will remove logs older than a week).
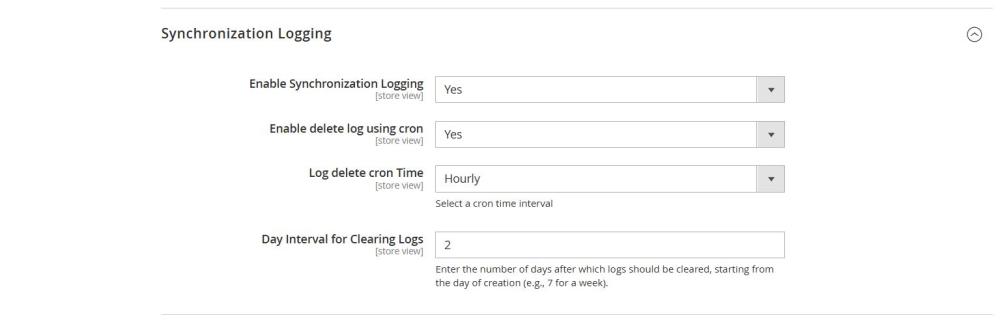
Figure 33: Synchronization Log configuration settings in Magento admin.
4.14.3.Accessing Synchronization Logs
- Navigate to Admin > ODOO CONNECTOR >Synchronization Logs in the Magento admin panel.
- The log grid displays all synchronization events with timestamps, statuses, and error messages (if any).
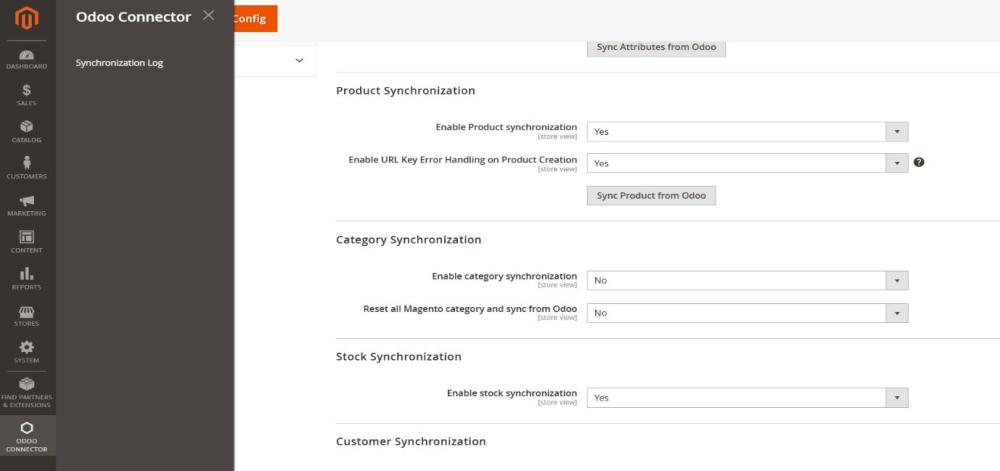
Figure 34: Navigate to Admin>ODOO CONNECTOR > Synchronization Logs to access the log records.
4.14.4.Managing Logs in the Grid
- Clear All Synchronization Logs: Clicking this button opens a confirmation popup. Selecting OK deletes all logs permanently.
- Delete Individual Logs: Use the Delete option in the Actions column to remove logs one by one.
- View Detailed Logs: Click the View link in the Action column to open a detailed synchronization log page
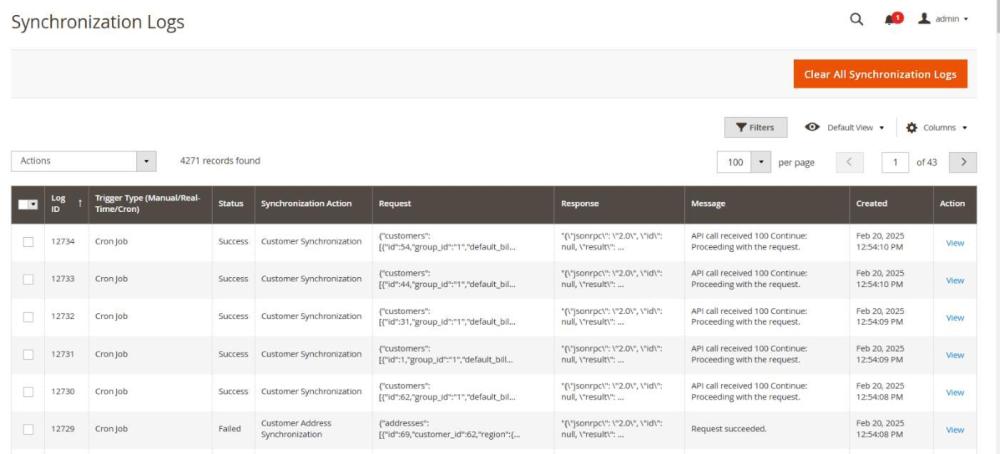
Figure 35: The Synchronization Log grid displays all recorded synchronization events, including timestamps, statuses, and error messages.
5. Important Notes
- Deletion sync retries are not supported – If a delete operation fails during synchronization, it must be handled manually.
- Mass Sync for Deletions Not Supported – Deleted records in Odoo or Magento cannot be manually re-synced; deletions must be handled directly in both systems.
- During mass synchronization, customers, orders, invoices, and credit memos are added to a queue and processed in batches using cron job. The cron processes 10 records at a time, ensuring efficient and controlled data transfer from Magento to Odoo.
- Ensure that locale settings such as time zone, language, currency, and number/date formats are consistent between Magento and Odoo. Mismatched locale settings may lead to data discrepancies during synchronization.
- MSI (Multi-Source Inventory) and multi-warehouse setups are not supported in the current integration. Only the default source and single-warehouse configuration are supported for product and inventory synchronization between Magento and Odoo.
6. Technical Requirements / Compatible with:
- Compatible with Odoo Community Edition v18.0
- Compatible with Magento Open Source v2.4.7
7. Supported Languages
- English
- German
- French
- Italian
- Other Magento and Odoo supported languages can be added.
8. Change Log / Release Notes
- Version: 1.1.0: December 2025
- Multi-Warehouse Stock Synchronization: Added support for synchronizing combined stock quantities from multiple Odoo warehouses to Magento’s default stock source.
- Retry Handling for Deleted Records: Deleted products, categories, and attributes are now automatically retried via CRON when real-time sync is disabled. The same retry logic is also applied during Mass Sync.
- Customer Group Synchronization: Enabled automatic synchronization of customer groups from Magento to Odoo, supporting real-time sync with fallback handling via CRON and Mass Sync initiated from Odoo.
- Tier Pricing Synchronization: Implemented tier price creation in Magento based on Odoo Pricelists.
- Manual Synchronization Enhancements: Added support for manual synchronization by selecting multiple products, categories, and attributes.
- Version: 1.0.0: July 2025
- Initial release.
9. Support
If you have questions, use our contact form at webshopextension.com or email at support@webshopextension.com.