Odoo Saferpay Payment Provider Plugin
Categories
Magento
WordPress
SAP Commerce
Odoo
Shopify
Typo3
Shopware
nopCommerce
Pimcore
Hyvä
OXID eShop


1. Introduction
The purpose of this document is to present a detailed description of Saferpay. It will explain the purpose and features of the system, the interfaces of the system, what the system will do, the constraints under which it must operate, and how the system will react to external stimuli. This document is intended for both system stakeholders and developers and will serve as the foundation for software development.
2. Saferpay
Easy, flexible, secure - The comprehensive e-payment solution from Worldline for easier and more secure payment in your online shop.
Saferpay is a comprehensive e-payment solution for easy and secure payment in your online shop. Saferpay allows you to process all common national and international payment methods in your online shop– via just one single interface. With just a few clicks, the solution can be quickly and flexibly integrated into most shop systems.
This Odoo module is compatible to work with Saferpay payment methods. This supports the following payment methods and workflows of Saferpay.
- VISA
- MASTERCARD
- MAESTRO
- AMERICAN EXPRESS
- BANCONTACT
- DINERS
- JCB
- EPS
- KLARNA
- UNIONPAY
- PAYPAL
- TWINT
- IDEAL
- EPRZELEWY
- ALIPAY
- GOOGLEPAY
- APPLEPAY
- POST FINANCE PAY
- ACCOUNT-TO-ACCOUNT
- SEPA ELV
- WECHAT PAY
- SAFERPAY CREDIT/DEBIT
Support all Saferpay features, including the payment page, transaction interface, Saferpay fields, saved card functionality, refund, and cancellation. Additionally, ensure multi website compatibility.
3. Configurations and Requirements
- ODOO working environment.
- License for Saferpay module.
- Before the installation, you must have a valid account on the Saferpay terminal.
- API credentials for Saferpay (Terminal ID, Customer ID, API Username and API Password) for Live and Test environment.
- A Valid Acceptance Agreement for payment Methods and credit cards.
4. General Configurations in Backend
We can set the Saferpay configurations data by navigating to Invoicing → Configuration → Saferpay Provider Configuration.
- Production Url: We can set the production URL.
- Test Url: We can set the Test URL of Saferpay, this is used to switch the Test/production environment.
- Customer ID: Set the Customer Id of the Saferpay account.
- Terminal ID: Set the Terminal Id of the Saferpay account.
We can get the payment means and terminals from the menu Settings → Payment Means / Terminals in Saferpay Backoffice.
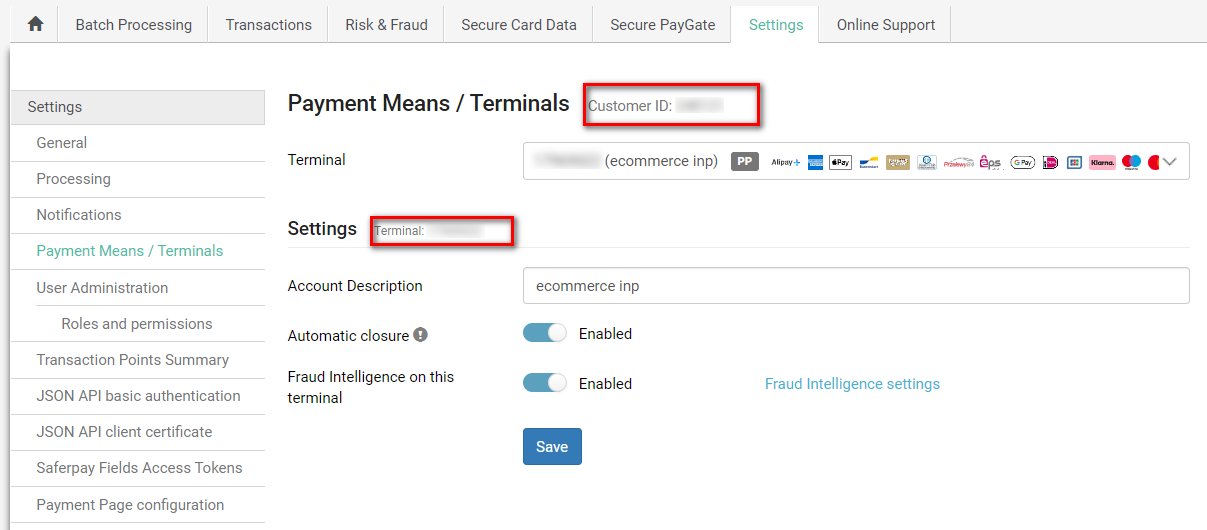
Figure1 -General Configuration
- API UserName: Set the API username
- API Password: Set the API Password, we can create new API login from Saferpay backoffice, Settings → JSON API basic authentication → Create new JSON API login.
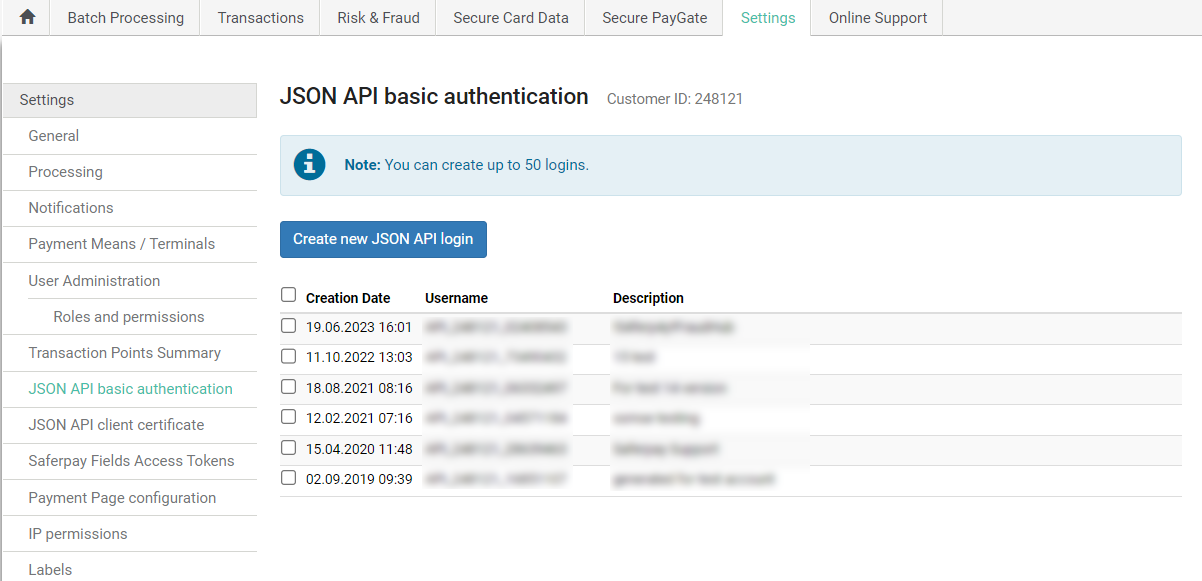
Figure 2 – Retrieving JSON API Keys
- API Key: Set the API key, that is used for SaferpayFields. We can create new API Tokens in the Saferpay backffice, from menu Settings → Saferpay Fields Access Tokens.
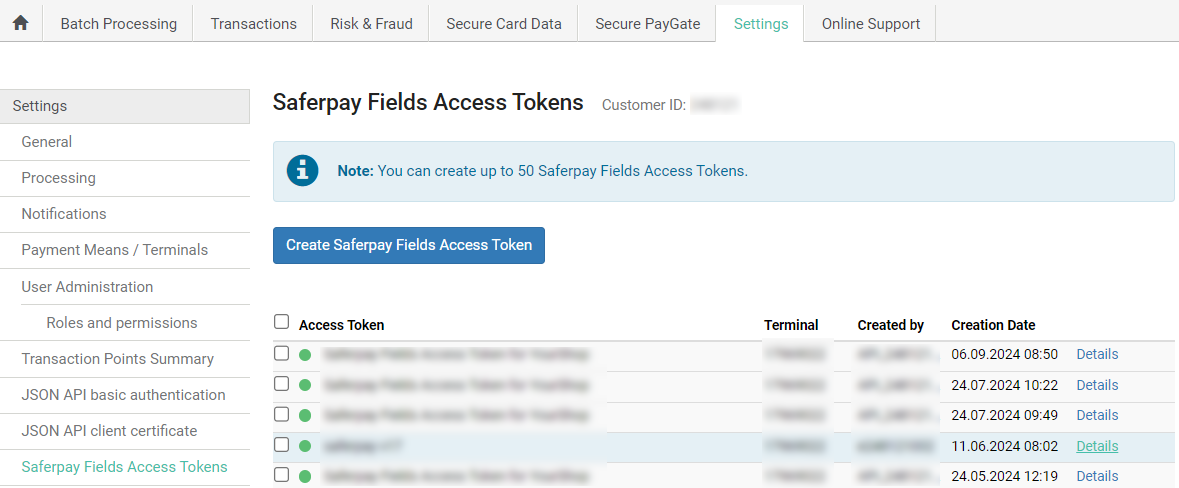
Figure 3 – Retrieving Saferpay field access token
- Liability Shift Behaviour: If the liability shifts (liability shift is used to check this transaction is done by any fraud user) of the card get fail then the workflow is proceeding with this setting, there are two liability shift behaviors, they are
- Hold
- Cancel
- Force 3D secure authentication during transactions: If enabled, Saferpay will ensure a Forced 3ds authentication. The 3ds authentication type is also displayed in Transaction overview section.
- Need Extra Security: Recommended for high risk businesses (Jewellery, Electronics, etc.) to stick to the highest level of security.
- Payment Method Synchronization: Automatically retrieves and configure all available payment methods from the Saferpay account.
- Customer License: Fetches license package and features details from Saferpay and adds them under Invoicing-> Configuration -> Saferpay Provider Configuration -> Customer License.
- Create API Key: Generates the API key required for Saferpay field functionality.
- Send Status Email: Sends status update emails to customer.
- Update Payment Method Logo From Saferpay(svg): If this field is enabled, the system will automatically run a weekly cron job to update the payment provider's logo. If disabled, a static image will be used instead.
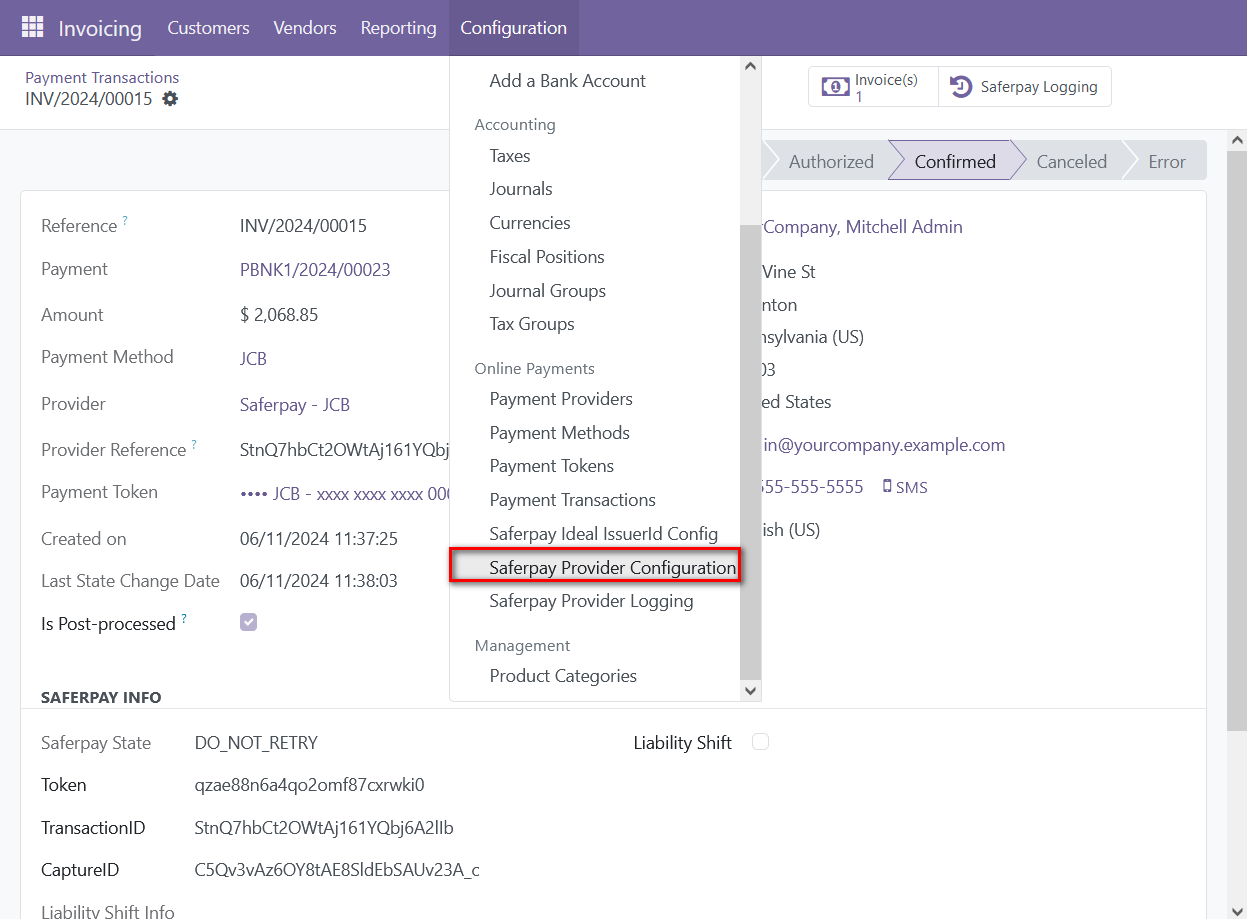
Figure 4 – Configuration List View
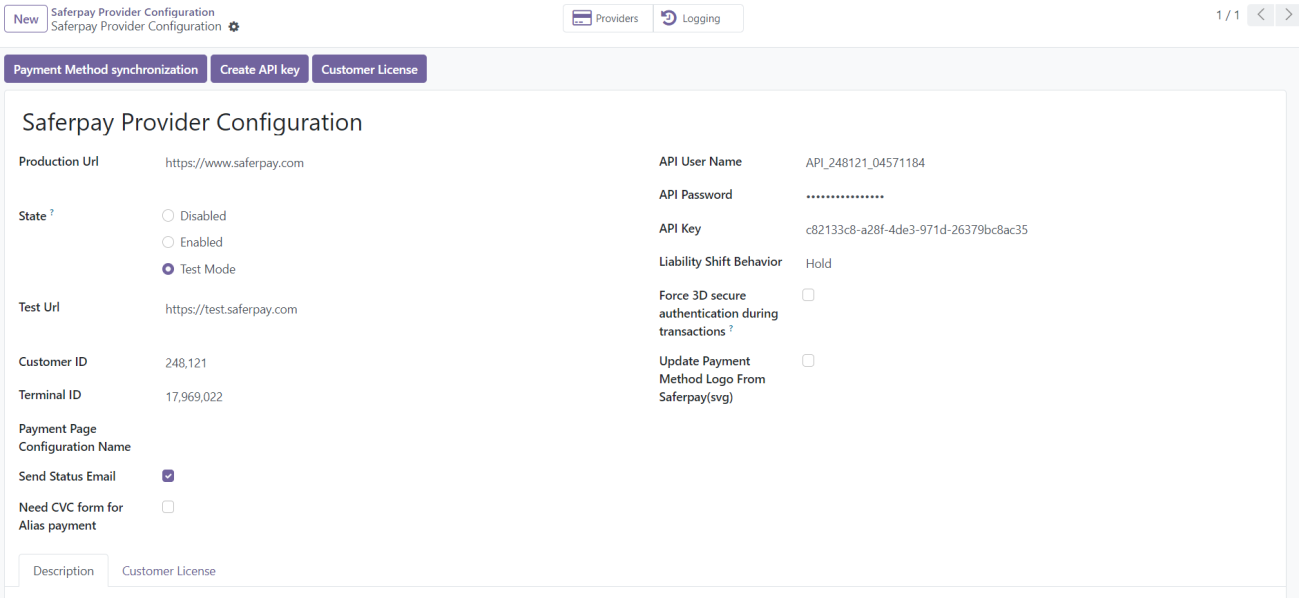
Figure 5 – Configuration Form View
- Smart buttons
- Providers: List of acquires (Payment methods) under this configuration.
- Logging: List of all logs regarding the API call
5. Payment Method Configurations
We can configure the payment methods for Saferpay from the menu Invoicing → Configuration → Payment Methods, as shown in the figure.
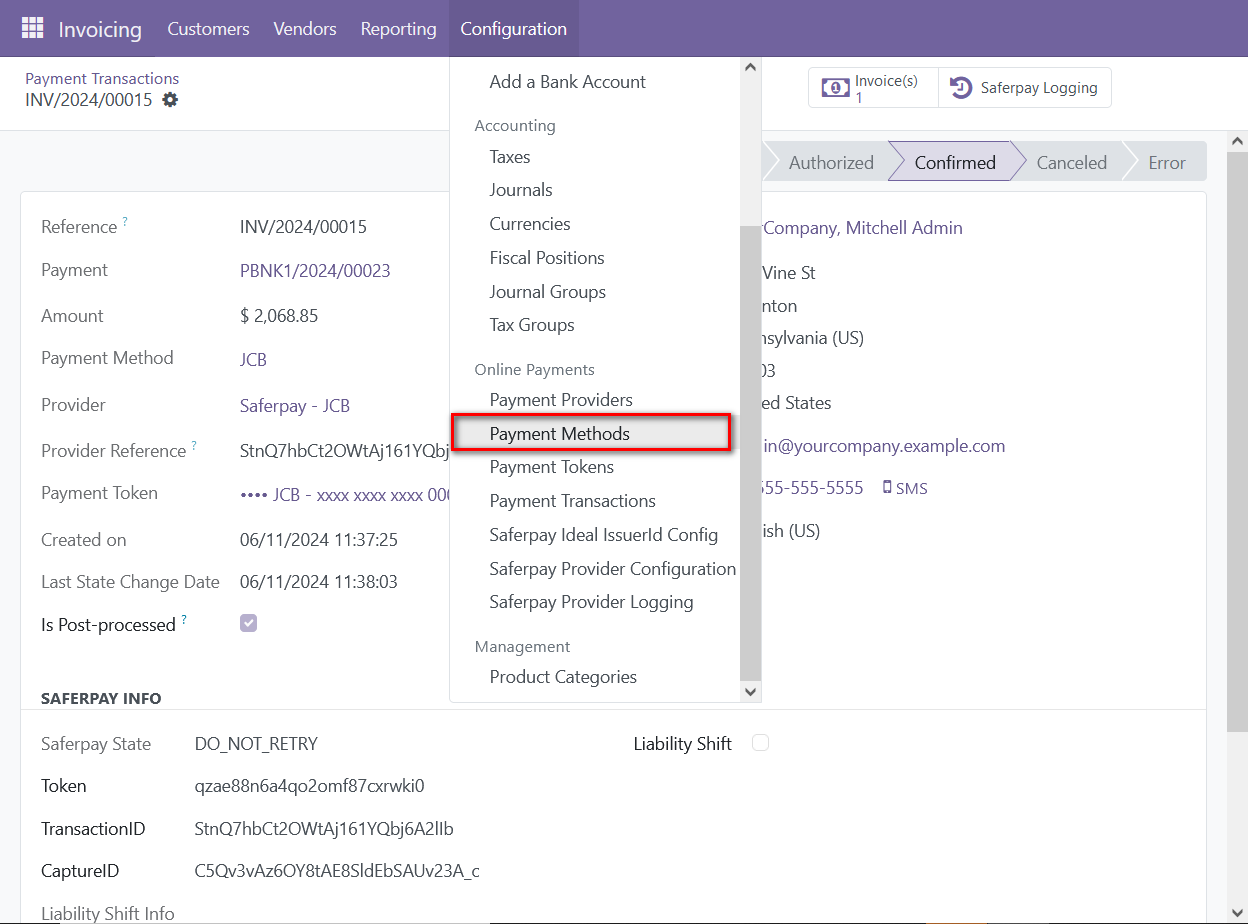
Figure 6 - Payment Methods list view
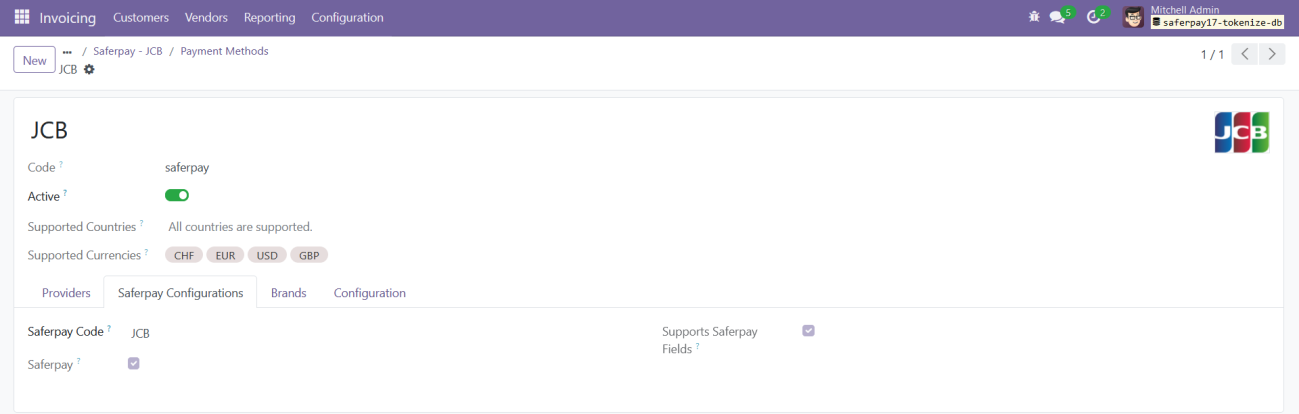
Figure 7 - Payment Method form View
Here we can set the allowed currency and code that are used for Saferpay transaction.
- Saferpay Code: Code that is used for Saferpay communication. To identify the payment method used for the transaction.
- Allowed Currencies: Used to set up the predefined currencies to that payment method.
6. Provider Configurations in Backend
We can set the acquirers/payment methods for Saferpay from the menu Invoicing → Configuration → Payment Providers, as shown in the figure.
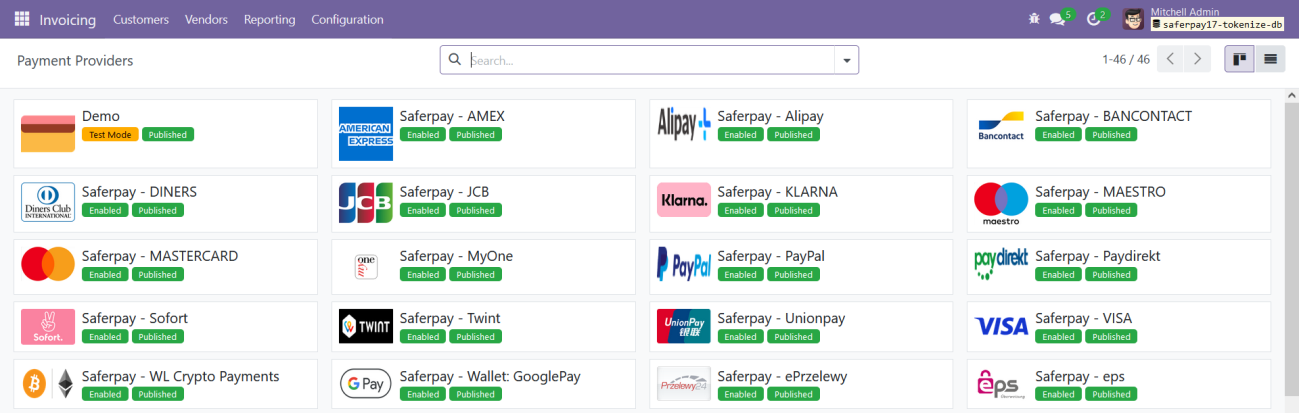
Figure 8 – Payment Providers Kanban View
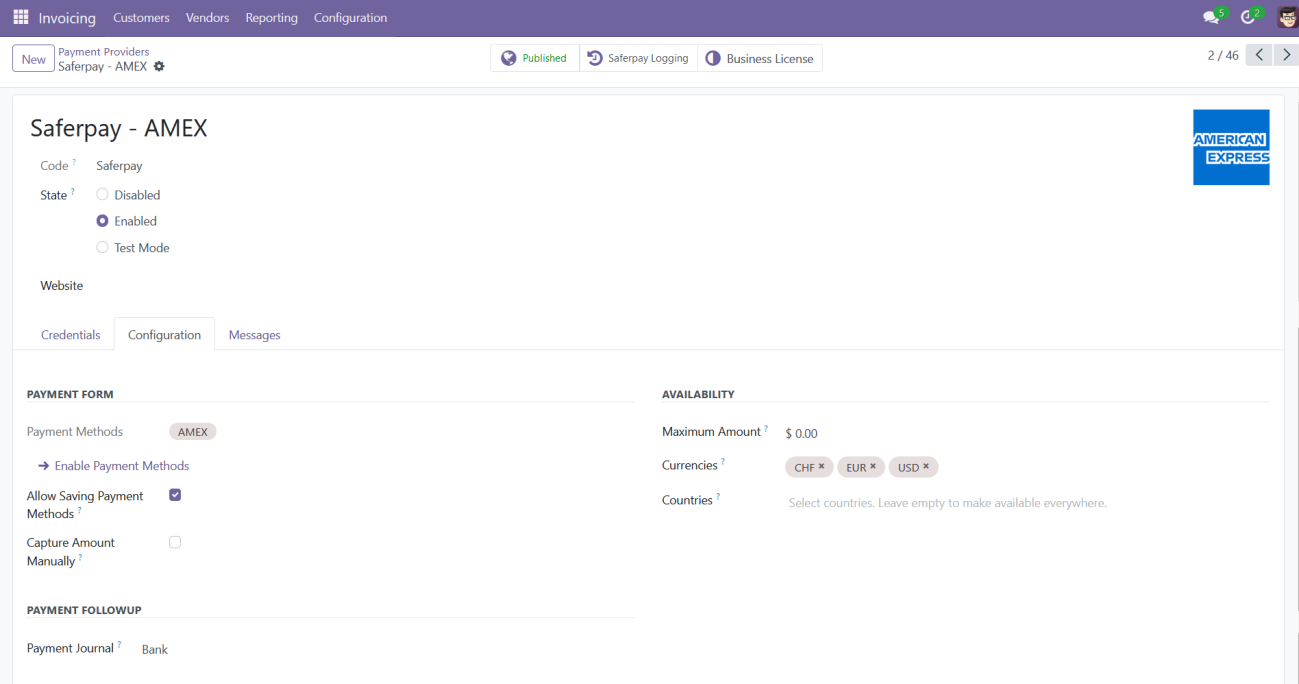
Figure 9 - Payment Providers form view
Here we can set the Odoo default configurations for providers:
- Payment Journal: Used to set up the Journal used for this provider.
- Capture Amount Manually: If selected then the manual capture option gets activated for that provider.
- Allow Saving Payment Methods: An option that enables the card to be saved for future transactions from checkout page and from My Account -> Payment Methods.
- Tokenization: This option is used along with the Allow Saving Payment methods feature. Go to related payment method of the provider -> Configuration -> Enable “Tokenization Supported” checkbox. This enables users to decide whether to save the card while making payment.
- My Account save card permission for Portal Users: Go to Settings -> Technical -> Access Rights. Provide full access to Portal user for payment.token.system and payment.provider.system.
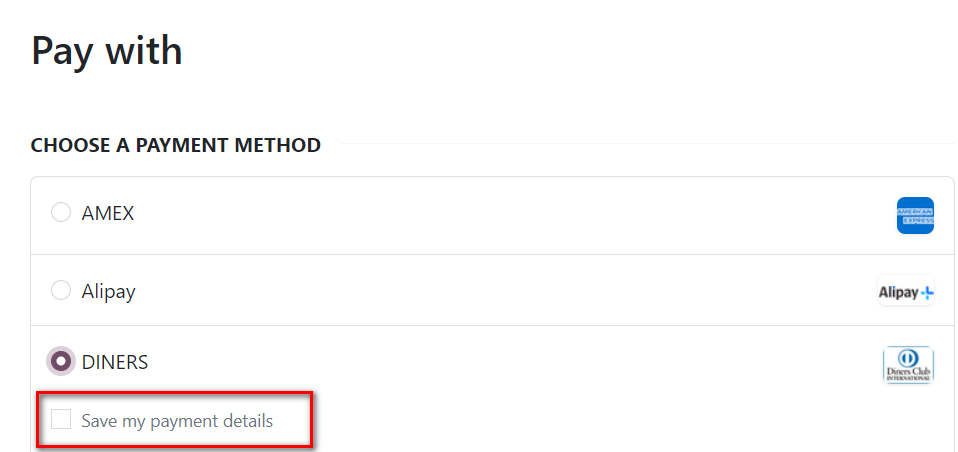
Figure 10 - Save Card feature enabled
Payment Methods: Used to display the Supported payment methods. We get the Allowed Currencies and Code for Payment provider from payment methods.
7. Configurations Only for Saferpay Providers
- Need Order Limit: If checked we can set the minimum and maximum order limits.
- Send Customer Address: Used to decide to send the customer delivery and billing address to Saferpay back office.
- Support Notify URL: It is used to set this acquirer’s support Notify URL.
- Customer Confirmation email: It is used to set whether a customer confirmation email is needed. Saferpay sends the mail only if the customer is redirected to Saferpay payment page. Saferpay Payment Provider Plugin v17.0
- Allowed Currencies: The Allowed Currencies are loaded from Payment methods, the listing of payment methods on the payment page depends upon this currency. If the shop currency is not listed in these allowed currencies, then it is not listed on the shop payment page.
- Payment Interface: It is used to change the payment interface, there are 3 options:
- Payment page: If enabled, then the checkout page will direct to the Saferpay Payment page.
- Transaction Interface: If enabled, then the checkout page will load the transaction interface (iframe).
- Saferpay Fields: If enabled, payment can be proceeded with Saferpay Fields. The workflow is the same as an I-frame, the data is captured by a fully PCI-certified system.
- Register Payment Type: This is used to define the type of payment method/acquirer, it is more important for saving cards. Which are,
- CARD
- BANK_ACCOUNT
- POSTFINANCE
- TWINT
- Support Refunds: It is used to specify whether this acquirer supports refunds.
- Smart Buttons:
- Saferpay Loggings: List of all logs regarding the API call used for this acquirer.
- Business License: This is used for license switching, e-Commerce, and Business license.
8. Payment Interface
Go to menu Invoicing → Configuration → Payment Providers, choose the acquirer. Then the configuration of the payment method is as shown in the below figure
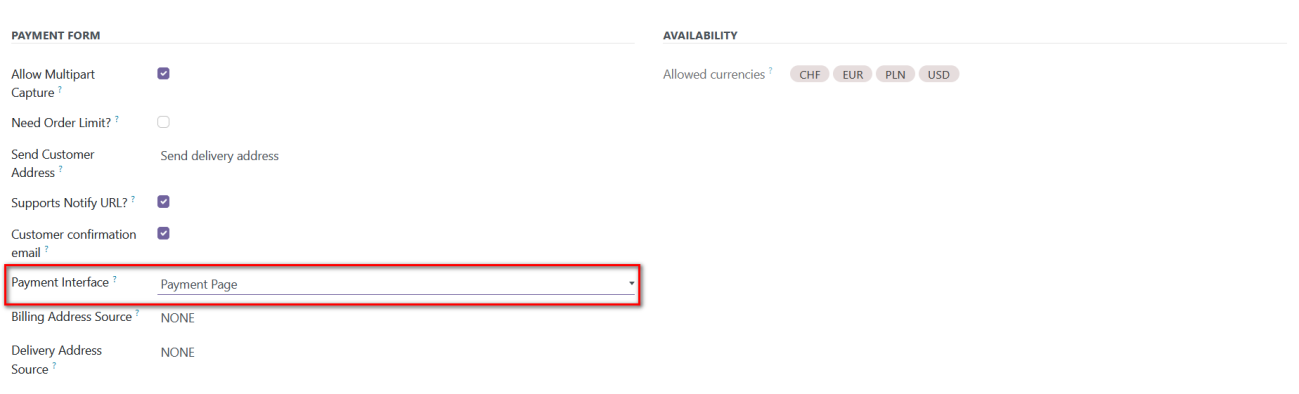
Figure 11 – Configuration for Payment page
9. Transaction Interface
- Go to menu Invoicing → Configuration → Payment Providers, choose the acquirer. The configuration of the transaction flow is shown below figure.
- Need to switch the acquirer license to a business license to activate this flow
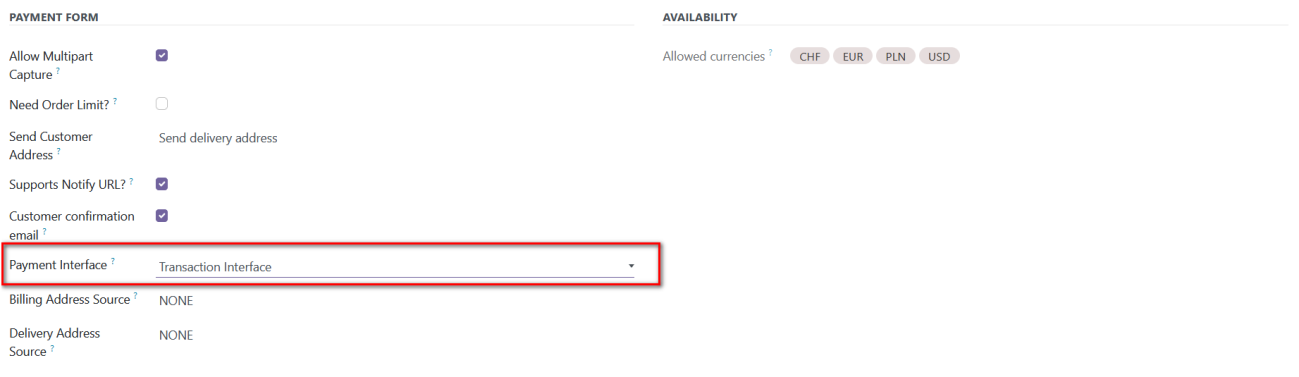
Figure 12 – Configuration for Transaction Interface
10. Manual Capture & Multipart Capture & Void Transaction
- Manual Capture: After the transaction is completed and enters the authorized state, the capture button must be clicked to finalize the transaction.
- Multipart Capture: The amount can be captured either fully or partially. Clicking the Capture Transaction button captures the full amount, while using Multipart Capture allows for partial captures.
- Void Transaction: By using the Void Transaction button, we can cancel the transaction.
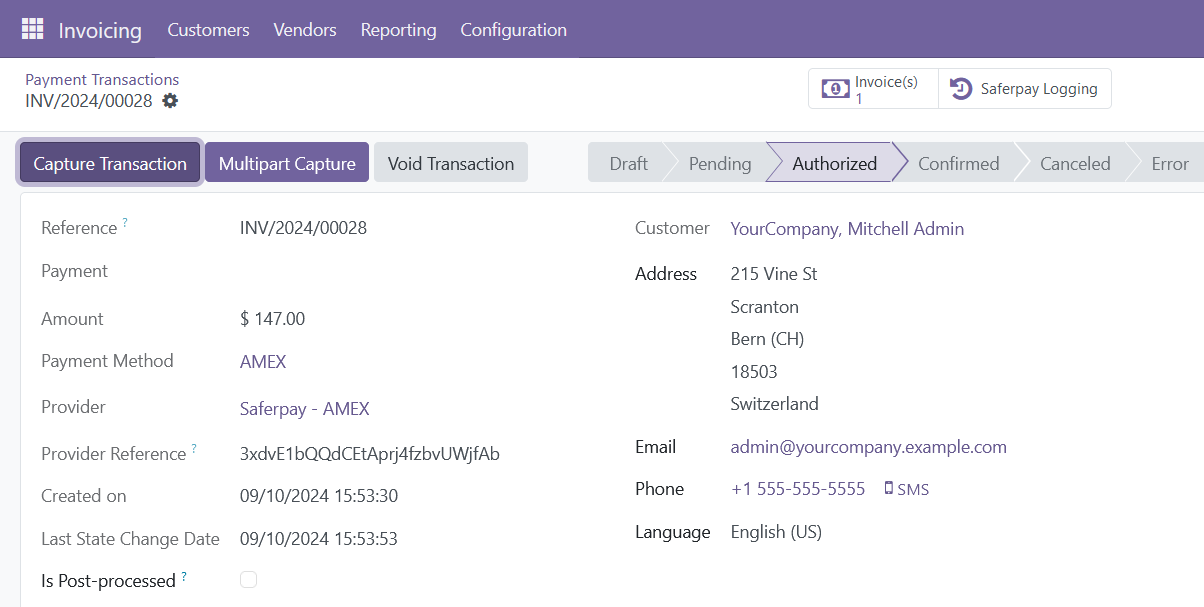
Figure 13– Manual/Multipart Capture
11. Refund
- For the refund option need to switch the acquirer to the Business license.
- The refund has two options:
- Referenced Refund: This option allows you to reference the original transaction in the Saferpay back office. Referenced refunds can be performed for both multipart (manual) captured transactions and normal captured transactions.
- Manually Refunded in Saferpay BO: If refund is completed from Saferpay backoffice to map same in Odoo need to enable this button to proceed with the credit note flow
Note: For WL Crypto payments, Refunds is only possible from Saferpay backoffice.
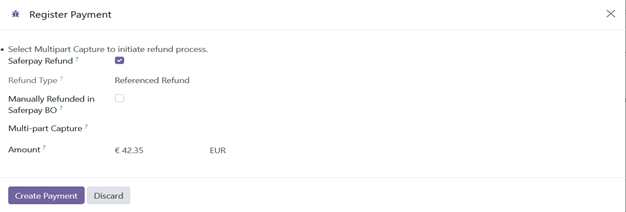
Figure 14– Referenced refund for Multipart capture
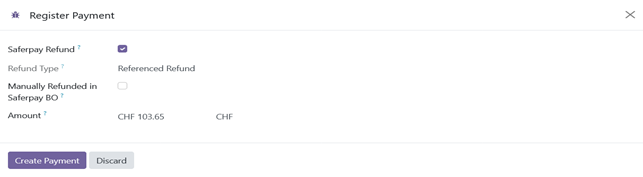
Figure 15 – Referenced refund
-
- Direct Refund: This type of refund can be used when the original transaction is not present in the Saferpay back-office.
- Manage by merchant: The refund can be made to any saved payment token in the system.
- Refund managed by Customer: The refund is made against the original transaction.
- Direct Refund: This type of refund can be used when the original transaction is not present in the Saferpay back-office.
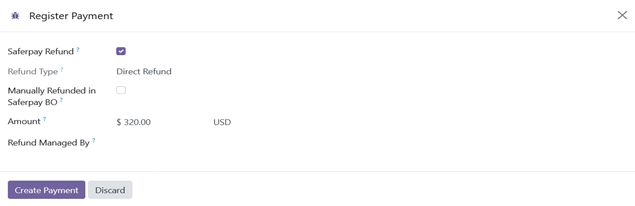
Figure 16 - Direct Refund
- Important Note: Some payment methods may not support direct refunds. It is essential to consult the Saferpay documentation before configuring these options to ensure compatibility and proper setup.
- To process a refund for multiple credit notes, select the credit notes for which you want to initiate the payment. Then, click on the Register Payment option. This action will create individual refund payment transactions for each selected credit note.
12. Saferpay Multi-website Backend configuration
- If no website is mapped against a payment provider, it will be available for all website domains.
- For multi-website configuration, need to create multiple Saferpay payment Provider by duplicating the existing Saferpay payment Provider.
- After creating the Saferpay payment Provider, map the respective website and add the Saferpay credentials.
- For multi-website functioning, it is necessary to set the domain for the websites.

13. Brief Description
For the smooth functioning of this plugin, there are a few configurations that need to be done in the backend.
- Setting up Saferpay Provider Configuration is the initial step where the Terminal ID, Customer ID, API Username, API Password, API Key of your Saferpay web administration tool must be provided.
- The Saferpay payment methods will be listed on the shop payment page.
- Choose the Saferpay payment method, pay from the Saferpay payment page, and get back to the odoo webshop.
Initial step-by-step description
Prerequisites: Before integrating the Saferpay payment Acquirer plugin make sure that you have a Saferpay web administration tool. The interface with which you can easily verify and process transactions. API Username, API Password, API Key are the details we need from the webadmin tool for Odoo backend configuration.
Step 1: Install the Saferpay Payment Plugin.
Step 2: Add the Saferpay credentials (Terminal ID, Customer ID, API Username, API Password, API Key) in the Saferpay Acquirer Configuration record in the Odoo backend configuration.
Step 3: Click on “Payment method synchronization” button to automatically configure and enable available payment methods or can manually enable desired payment providers.
Step 4: Go to the e-commerce website, add products to the cart, and proceed to checkout.
Step 5: Choose the Saferpay payment method and click Pay now.
Step 6: Complete the transaction by filling out the necessary details on the Saferpay Payment Page.
Step 7: The order is placed on a successful payment transaction.
Saferpay Multi-website
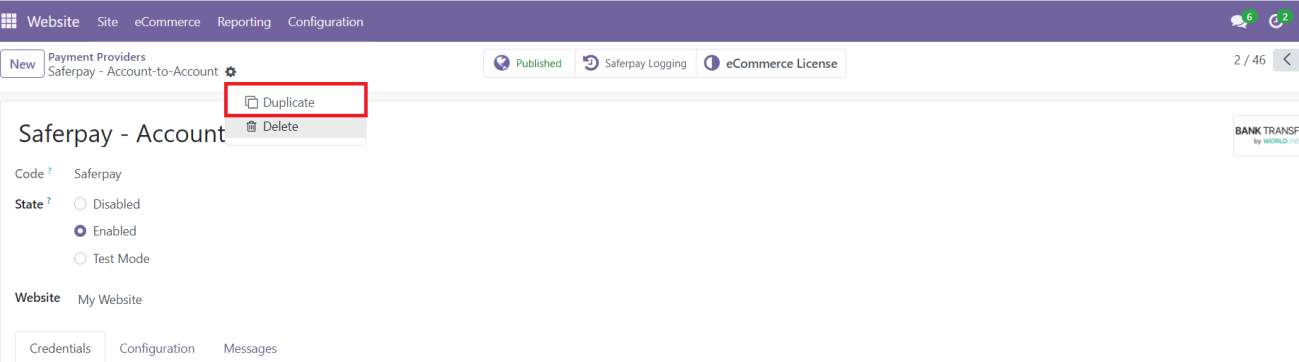
Step 8: Multi-Website Configuration:
- To set up Saferpay for multiple websites, duplicate the Saferpay Provider configuration using the Duplicate button.
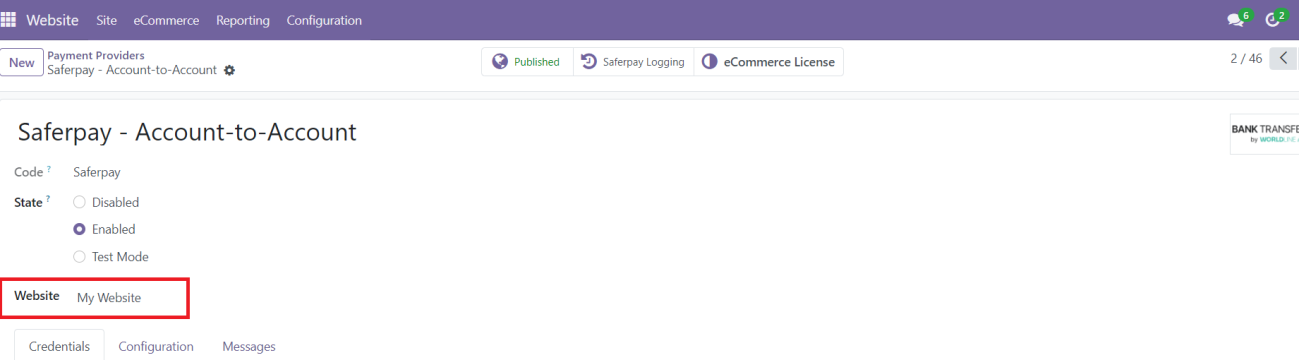
Step 9: Map and Configure Multiple Websites:
- Map the duplicated Saferpay Provider to the respective websites and enter the appropriate credentials for each.
Step 10: Set Domain for Websites:
- Ensure each website’s domain is correctly set up in Odoo for proper multi-website functionality.
14. Technical Requirements / Compatible With:
- Technical Requirements: Odoo Sales, Payment, Contact and Website Module.
- Compatibility: Supports Odoo 17 Community and Enterprise editions.
- Supported API: Saferpay JSON API version 1.40.
15. Changes Log / Release Notes
Version 2.0.2: June 2025
- Enhanced access rights management for both Administrators and Users, ensuring more granular control and improved security.
Version 2.0.1: February 2025
- Improvements and Odoo Enterprise edition compatibility.
Version 2.0.0: October 2024
- Updated to JSON 1.40.
- Added support for Account-to-Account, SEPA ELV, and WeChat Pay providers.
- Introduced multi-website support.
Version 1.0.0: September 2024
- Initial release.
16. Support
If you have questions, use our contact form at webshopextension.com or email at support@webshopextension.com.