Categories
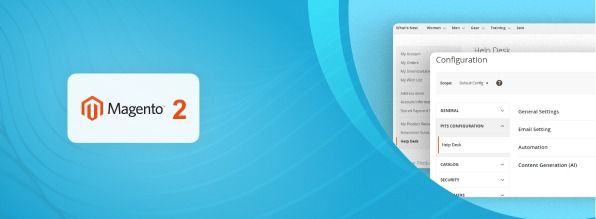
Magento
WordPress
SAP Commerce
Odoo
Shopify
Typo3
Shopware
nopCommerce
Pimcore
Hyvä
OXID eShop


Product Specification
The Help Desk Extension for Magento 2 enhances customer support management within the Magento platform by streamlining ticket handling, communication workflows, and service efficiency. Designed with best practices in Magento extension development, it allows seamless creation, tracking, and prioritization of support tickets, enabling assignment to specific agents or departments for organized and efficient customer service. Threaded conversation views provide agents with complete context, resulting in faster and more accurate responses.
The extension includes customizable response templates and personalized email templates to accelerate resolutions and improve customer engagement. Working hours configuration ensures clear visibility of support team availability. With advanced AI integration, agents receive intelligent suggestions for quick and consistent replies, significantly reducing response times. Reporting and analytics empower agents with data-driven insights for continual service improvement. See below for the full feature list.
Features
- Multi-domain capability.
- Multi-Email account connections.
- AI-driven suggestions for quick answers and ticket responses based on the query.
- Clear presentation so that different people can work with it.
- Clear status information.
- Configure spam filters to focus on relevant tickets only.
- Browse the full history of a ticket.
- Create custom fields.
- Manage access permissions.
- Evaluate customer satisfaction using support with star rating.
- View the operational efficiency in helpdesk reports dashboard.
- Create Unlimited Departments, Agents, and Categories.
- Able to Create & Reply to Ticket directly to Email.
- File Attachment to the ticket.
- Set Priority, Status, and Category section for each ticket.
- Quick Reply or Close a ticket.
- Easy to Check ticket history with threaded conversation view.
- Ticket auto-expiration & auto-reminder.
- Send replies not only to a ticket author, but also to all users that should be notified.
- Organize your helpdesk team into departments, set default agents for each and solve customer problems quickly
Installation Steps
To install the Help Desk Extension for Magento 2, follow these steps. If you are installing the extension using Composer, you can skip steps 1, 2, and 3.a.
- 1. Download the extension.
- 2. Access your web server directories, unzip the downloaded file, and upload its contents to the app/code/Pits/HelpDesk directory.
- 3. From the SSH terminal, run the following commands to complete the installation:
- a) Install the required package:
composer require willdurand/email-reply-parser - b) Enable the module:
php bin/magento module:enable Pits_HelpDesk - c) Update the database schema:
php bin/magento setup:upgrade - d) Generate and pre-compile classes:
php bin/magento setup:di:compile - e) Deploy static files:
php bin/magento setup:static-content:deploy - f) Clear the cache:
php bin/magento cache:flush
- a) Install the required package:
Features Overview
- Ticket Management System: Efficiently handle customer inquiries, track their progress, assign them to the right agents or departments, and provide a comprehensive view for better context and quicker resolutions.
-
- Creation and Tracking: Customers can easily create and track support tickets within their accounts.
- Prioritization: Ability to prioritize tickets for urgent issues.
- Threaded Conversation View: Provides a contextual view for agents, aiding in faster and more accurate responses.
- Customer Interface: Seamlessly integrated into customer accounts, this interface simplifies ticket submission and offers real-time updates, ensuring a hassle-free experience for users managing their inquiries.
-
- User-Friendly Interface: Integrated interface within customer accounts for seamless ticket submission and real-time updates on inquiries.
- Convenience: Customers can view and manage their tickets effortlessly.
- Agent Dashboard: Empower agents with data-driven insights into ticket volumes, resolution rates, and customer satisfaction metrics, enabling informed decisions and continual improvement in service delivery.
-
- Comprehensive Overview: Provides agents with a dashboard displaying ticket statuses, response times, and pending tasks.
- Categorization and Filtering: Ability for agents to categorize and filter tickets for effective management.
- Support Tools: Features for agents to efficiently resolve issues, including customizable response templates and personalized email templates for enhanced customer engagement.
- Reporting and Analytics: Empower agents with data-driven insights into ticket volumes, resolution rates, and customer satisfaction metrics, enabling informed decisions and continual improvement in service delivery.
-
- Insightful Reports: Reporting capabilities to track ticket volumes, resolution rates, and customer satisfaction metrics.
- Data-Driven Insights: Empowers agents with data to make informed decisions for continual
- Security and Privacy: Ensures the utmost safety and confidentiality of customer information and ticket data, implementing robust measures to safeguard sensitive data within the system.
-
- Data Security Measures: Ensures the safety and confidentiality of customer information and ticket data.
- AI Integration: Incorporates advanced AI capabilities enabling administrators to generate quick-answer templates and ticket replies. AI-driven features enhance efficiency, streamlining customer inquiries and elevating the overall support experience.
Admin Panel Configuration
Navigate to Admin > Help Desk > Settings.
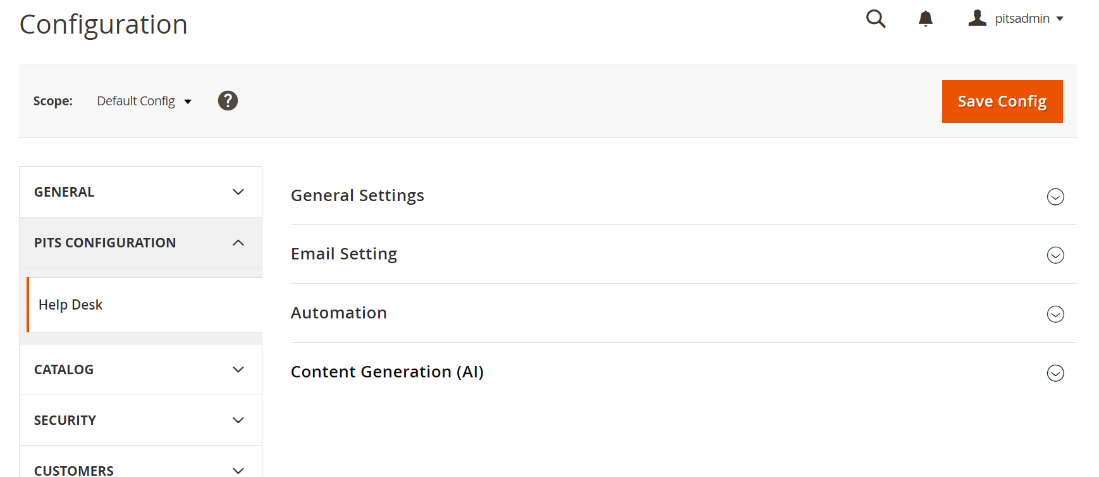
Figure 1 – Help Desk Settings – Configuration
Figure 1 displays the admin configurations of the extension, these settings are categorized into four groups, each containing specific fields.
The Groups are listed below
- General Settings – Controls general parameters of the extensions.
- Email Settings – Controls configurations for email-related features like notifications and communication preferences.
- Automation – Governs automated processes and workflows, enhancing operational efficiency within the extension.
- Content Generation (AI)– Manages the generation of content through AIdriven processes.
The General Settings encompass the following fields
- Module Enable – Enable / Disable module.
- Additional Info Note – Space for extra instructions or clarifications.
- Show Spam Status in Frontend – Display spam status prominently on the user interface.
- Customer Can Edit Rating – Customers can edit rating if the field is enabled.
- Customer Can Edit Like – Customers can edit like if the field is enabled.
- Show Working Hours – Exhibit designated operational hours on the user interface.
- Add Working Hours Note Before – Include instructions preceding the displayed working hours.
- Working Hours – Field to enter the working hours
- Add Working Hours Note After – Include instructions following the displayed working hours.
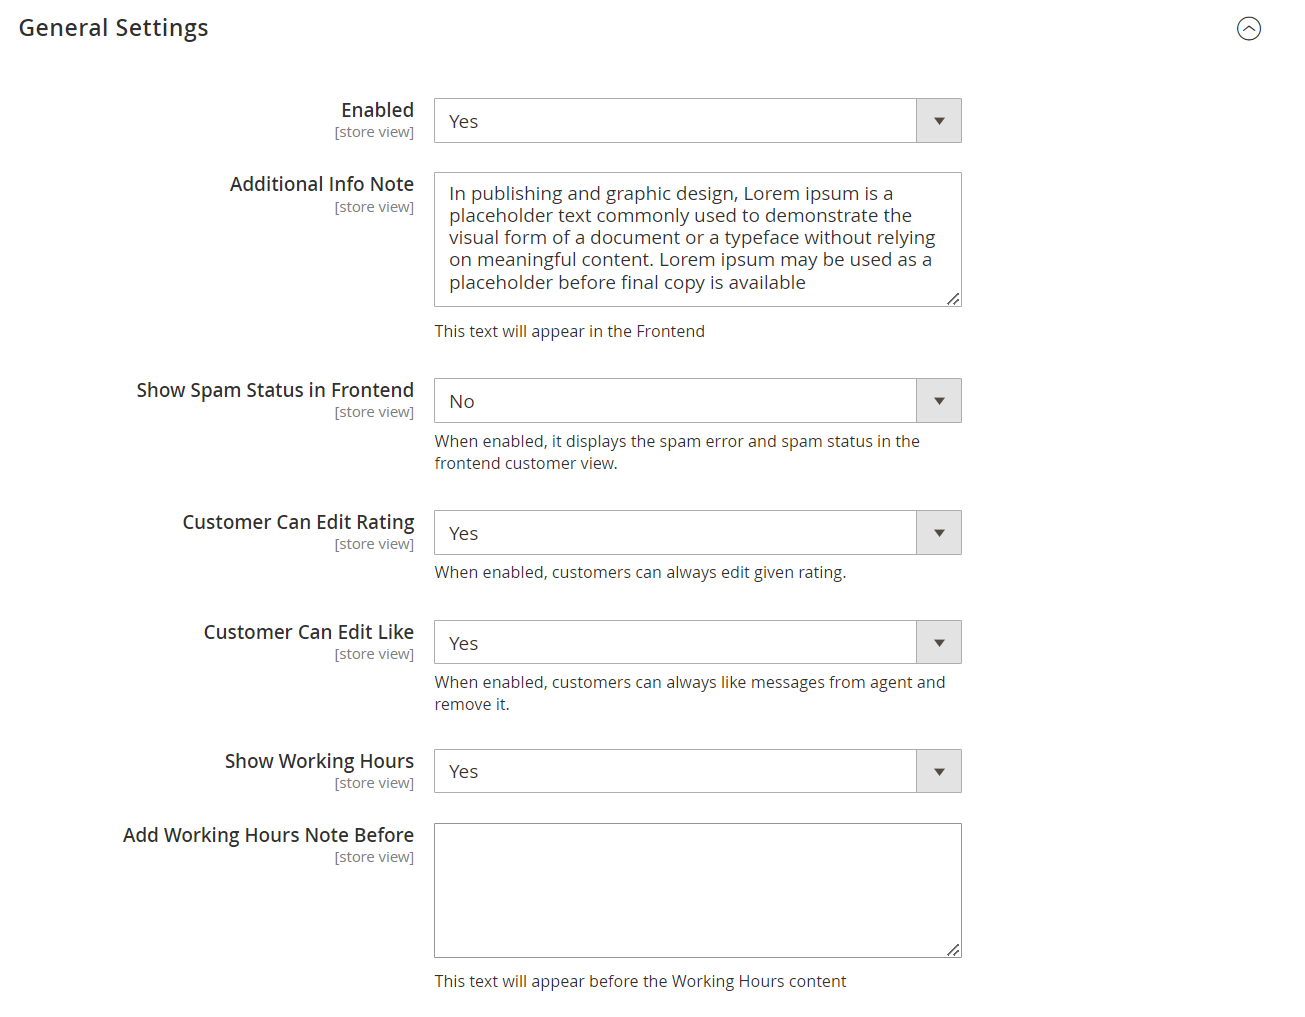
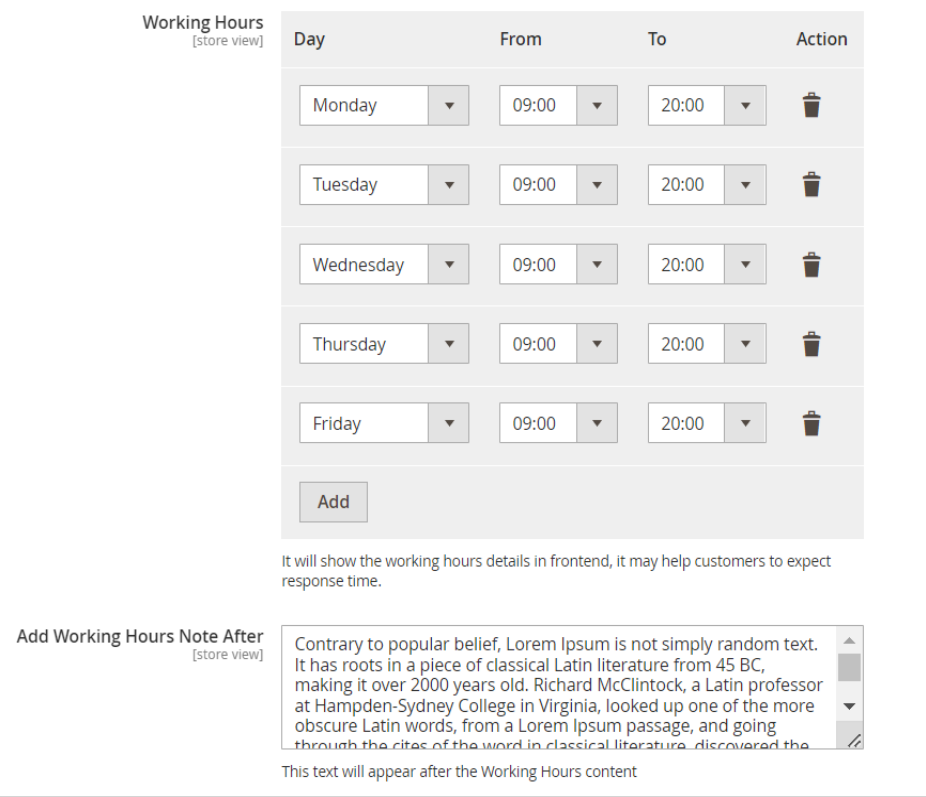
Figure 2 – Help Desk Settings – General Settings
The Email Settings encompass the following fields
- Send Notification Email Copy To – Specifies email addresses for receiving notifications, supporting multiple email addresses.
- Enable Test Mode – Allows toggling email sending functionality. When Test Mode is activated, emails will not be dispatched.
- Email Sender – Options to choose the identity from which emails are sent.
- Template of New Ticket Email – Selects the template for new ticket emails.
- Template of New Message Email – Selects the template for new message notification emails.
- Template of Status Ticket Email – Selects the template for status update emails.
- Template of Reminder Email – Selects the template for reminder notification emails.
- Template of Assign Ticket – Selects the template for assigned ticket notification emails.
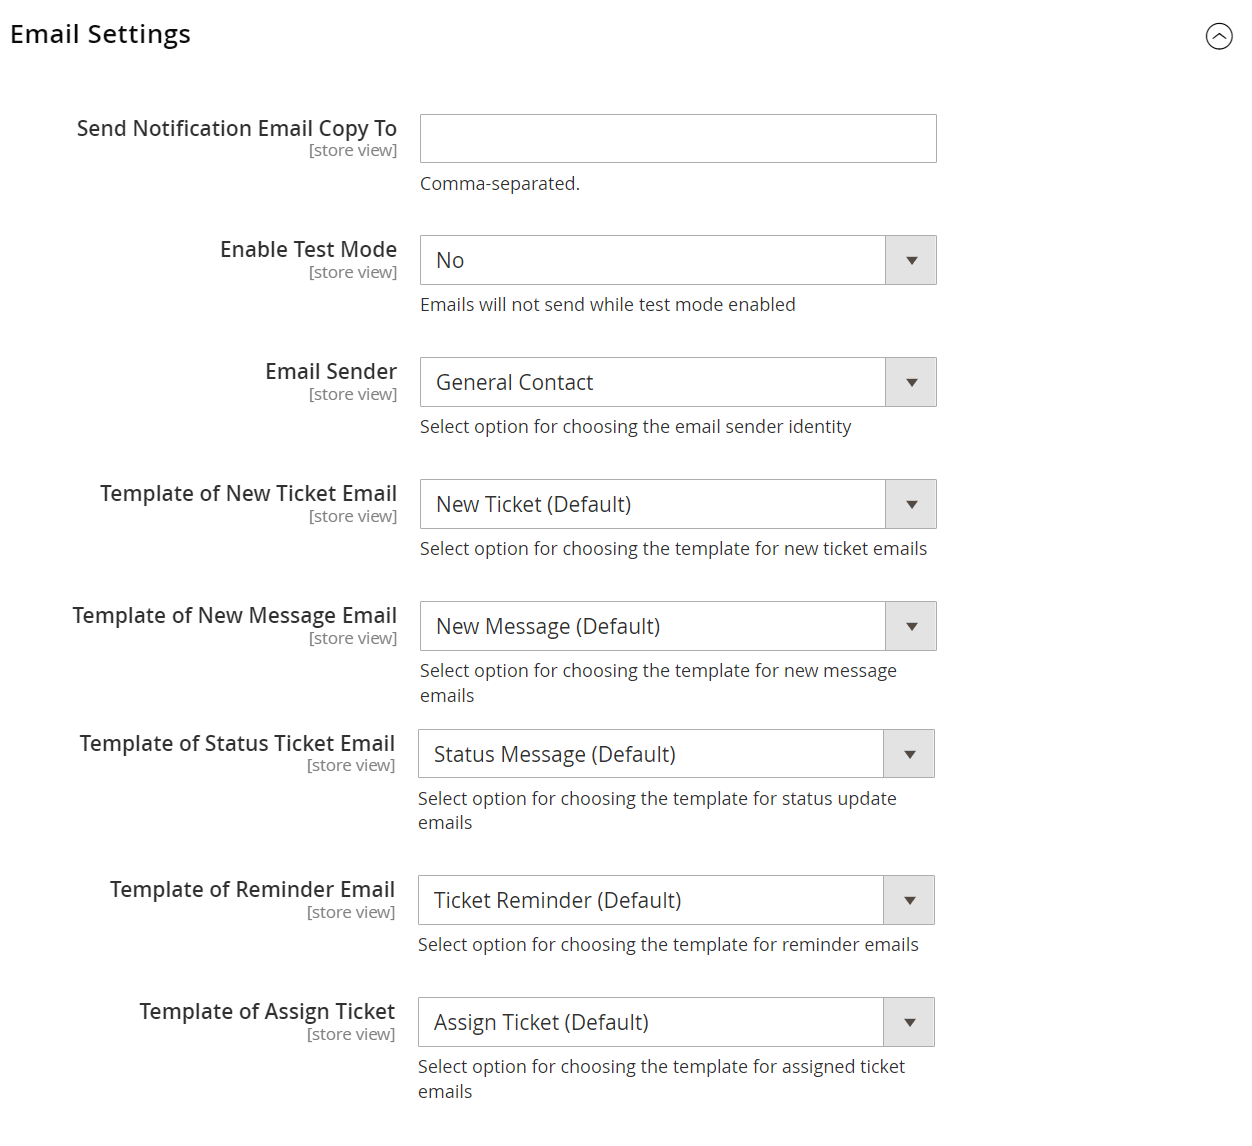
Figure 3 – Help Desk Settings – Email Settings
The Automation encompass the following fields.
- Enabled – Allows toggling automation functionality
- Auto Close Ticket For, days – Set the duration in days for automatic closure of tickets.
- Completed Ticket Statuses – Tickets with the selected statuses will be changed to closed.
- Auto Reminder Ticket For, days – Specify the time frame in days for automated reminder notifications to be sent.
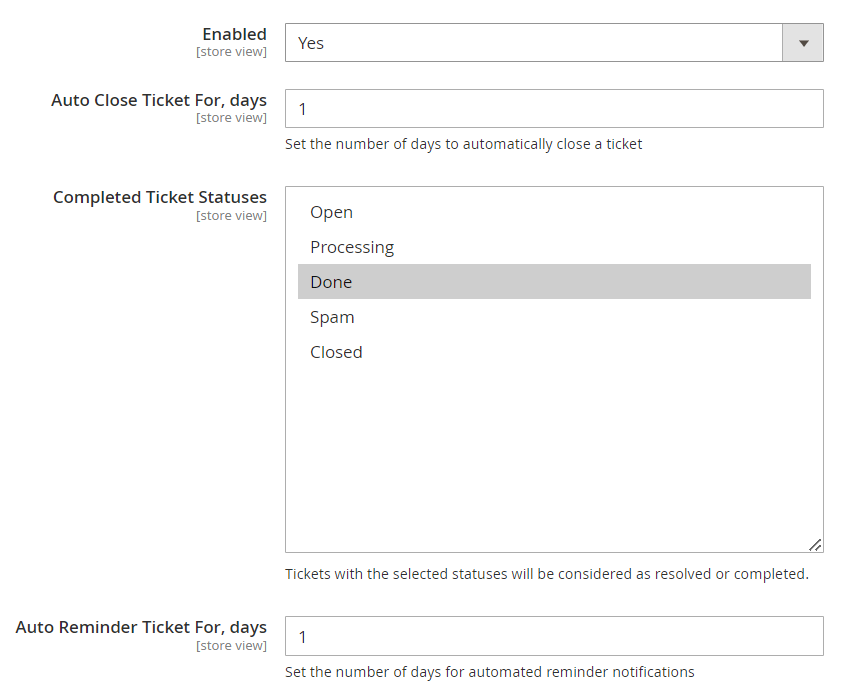
Figure 4 – Help Desk Settings – Automation Settings
The Content Generation (AI) encompass the following fields
- Enable Auto Content Generation – Toggles the system's automatic content generation feature.
- API URL – Field for entering the URL for accessing a specific API's functionalities.
- API Secret – Field for entering the Unique secret key used for API authentication.
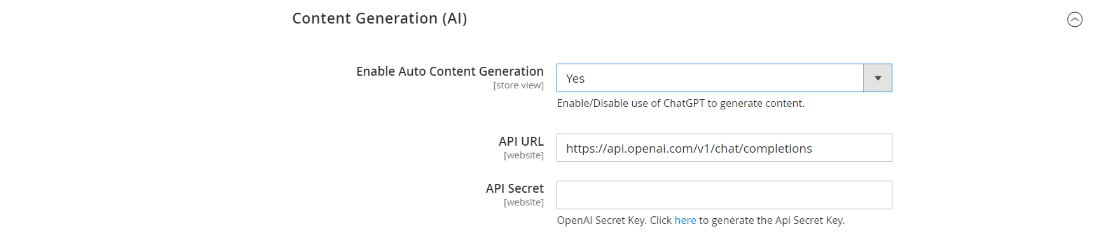
Figure 5 – Help Desk Settings – Content Generation (AI) Settings
How It Works in Frontend
The helpdesk extension seamlessly integrates into the user's account page, offering a centralized hub for managing support queries. To access helpdesk tickets, Navigate to Header Panel > Help Desk. For Hyvä theme users, navigate to My Account > Help Desk to view and manage your tickets.
The Features Included in Frontend are:
- Comprehensive Ticket Management: Easily monitor, review, and update your support tickets from one central hub.
- User-Friendly Support Requests: Initiate support requests effortlessly with a clear and simple form.
- Responsive Design: Enjoy a consistent and responsive design across all devices.
- Quick Helpdesk Access: Access your support tickets with one click, whether logged in or guided through a hassle-free login process.
- Detailed Ticket View: Delve into specific support queries on a dedicated page, tracking progress and interactions.
- User Feedback Rating: Provide feedback through the rating system, actively contributing to service improvement.
- Spam Status Enhancement: Enabling the "Show Spam Status in Frontend" option in the general configuration provides users with a clear representation of spam status. During the submission of the ticket if it is identified as spam a message informing the same will be displayed in the frontend. Also, the ticket status will be “Spam”. When this option is disabled, the ticket status will be “Processing” in the frontend even though the actual status is “Spam”, which will be correctly displayed in the backend.
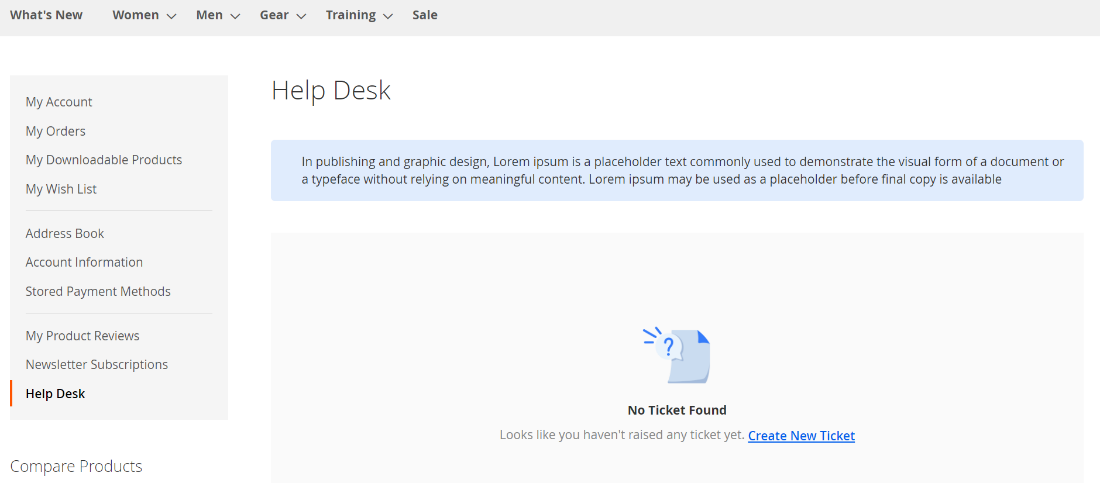
Figure 6 – Help Desk Frontend – No Tickets Found
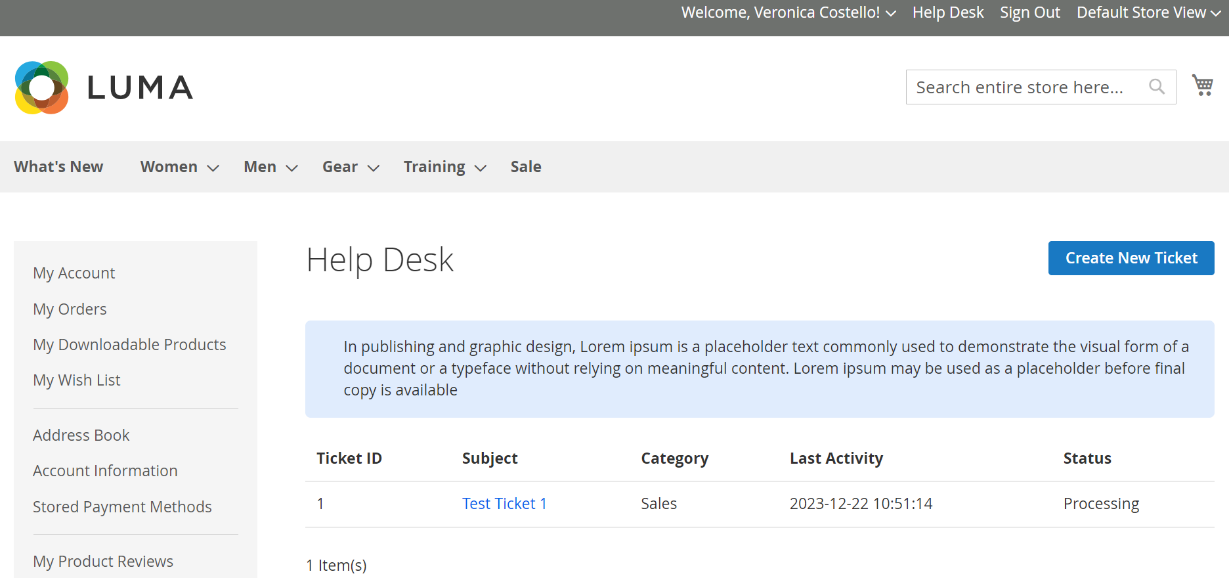
Figure 7 – Help Desk Frontend – Ticket Page
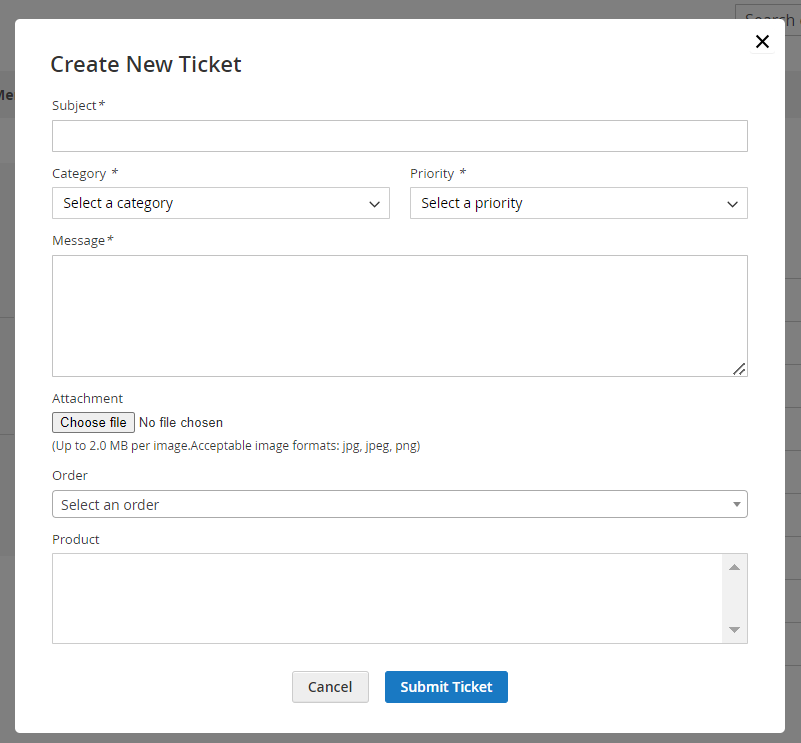
Figure 8 – Help Desk Frontend – Ticket Creation Form
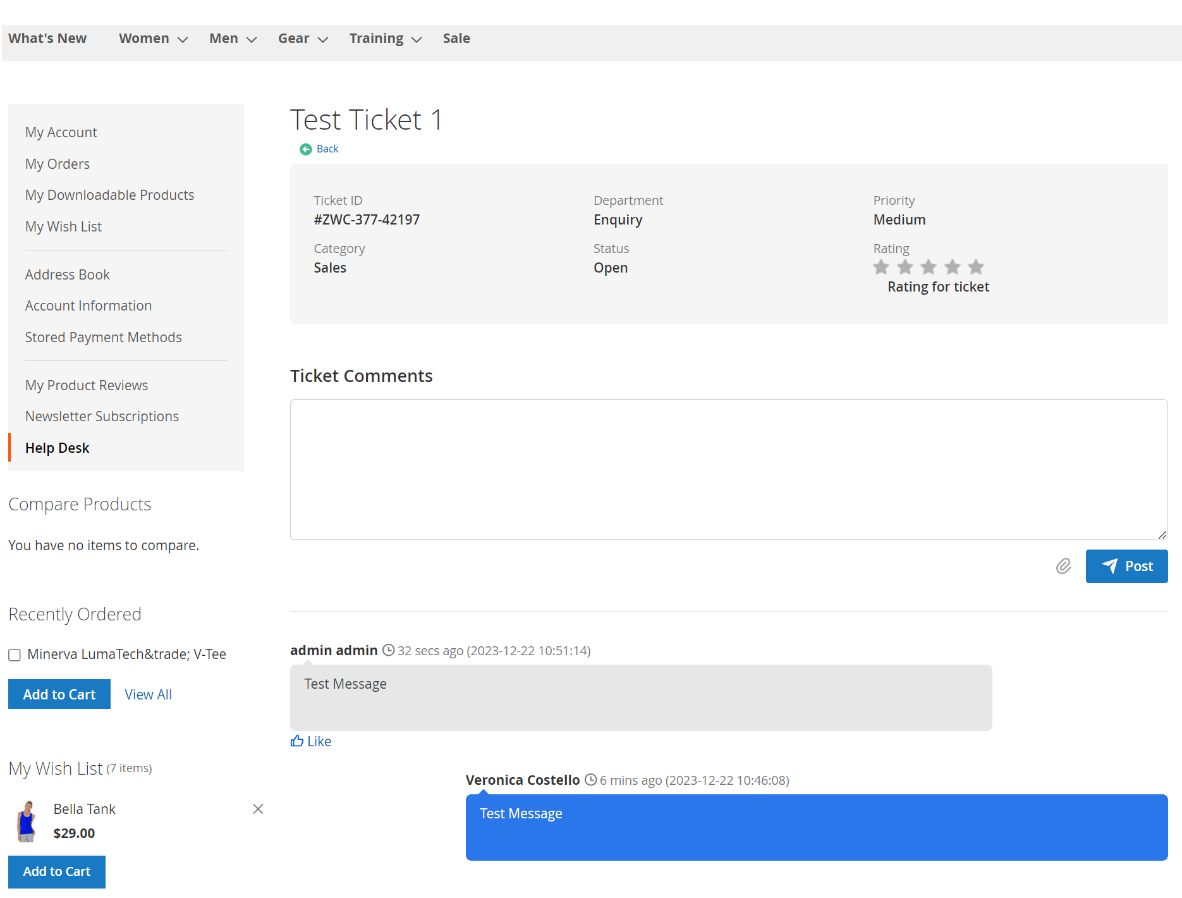
Figure 9 – Help Desk Frontend – Ticket View Page
- Working Hours: The working hours view can be viewed in frontend if it is enabled in configurations
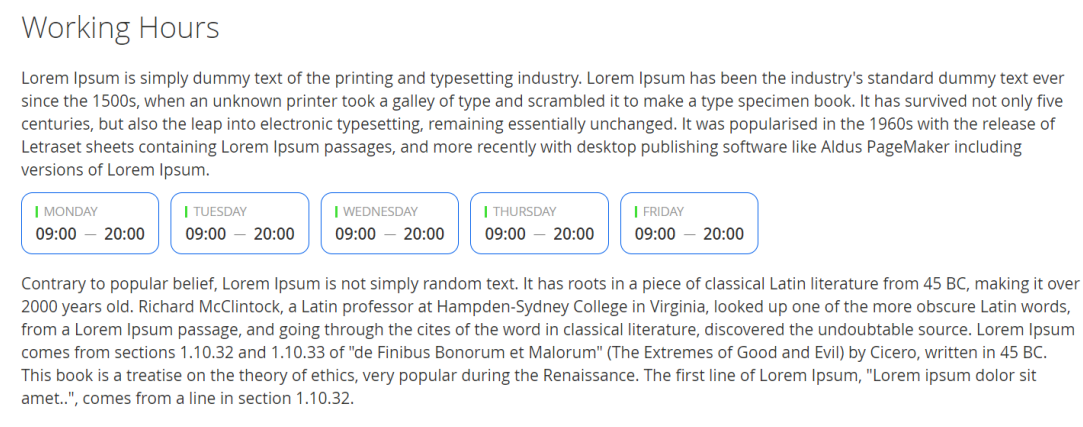
Figure 10 – Help Desk Frontend – Working Hours View
Note: The ‘Create New Ticket’ button will appear on the frontend only if the category and department are configured for the store views correctly by the administrator.
How It Works in Backend
Within the Magento 2 backend dashboard, the extension prominently features a dedicated menu that grants users access to various functionalities within the Helpdesk extension. This menu serves as a centralized hub, housing a range of submenus that offer distinct actions and options, catering to different aspects of the Helpdesk extension's operations.
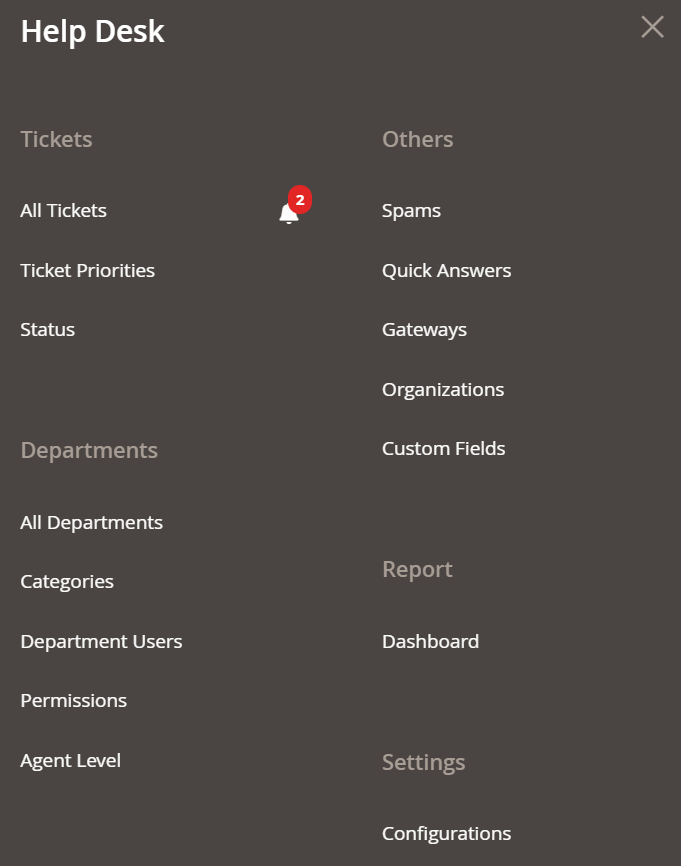
Figure 11 – Help Desk Menu
Admins need to set up specific configurations in the backend to enable a seamless Helpdesk extension experience. Once these settings are in place, users gain access to a full suite of support system features.
If categories, departments and ticket priorities haven't been added in the backend, the frontend will display a user-friendly notification, informing them that the necessary setup is pending from the administrator.
Admins have the ability to configure these settings, empowering users to effectively handle their support issues, monitor statuses, and interact efficiently with the support team. This ensures a streamlined and efficient user experience, guided by administrators' backend configurations in the Helpdesk system.
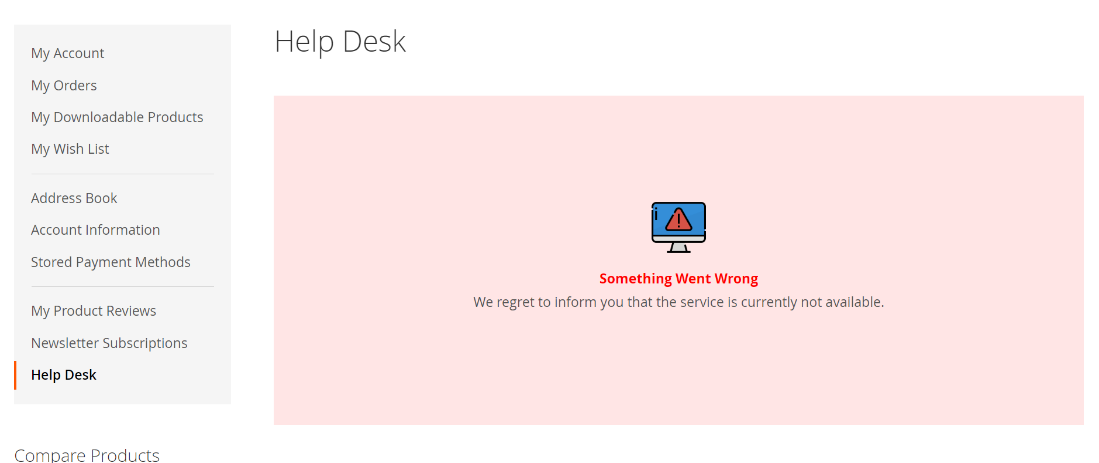
Figure 12 – Admin Setup Pending
The sub-menus included in the Help Desk extension
- All Tickets: Dedicated space ensuring efficient handling of customer inquiries or reported issues.
- Ticket Priorities: Handles the efficient creation and management of ticket priority options.
- Status: Handles the efficient creation and management of status options.
- Category: Handles with efficient creation and management of categories.
- Department: Handles with efficient creation and management of departments.
- Department User: Manages user access and permissions within specific support departments for controlled information access.
- Permission: Controls user access rights and privileges across various help desk sections.
- Agent Level: Handles the efficient creation and management of agent levels used to designate different levels of agents within the system.
- Spam: Automatically filters incoming emails to block spammers using specific patterns.
- Quick Answer: Repository for readily available solutions to common customer issues.
- Report: Generates comprehensive analytics for support performance and ticket resolution insights.
- Gateway: Automatically fetches and converts emails into tickets by connecting email accounts.
- Organization: Facilitates the addition and management of various organizations within the system, allowing agents to assign tickets to specific organizations for enhanced prioritization and streamlined handling.
- Configurations: Customizable parameters for tailoring help desk functionalities.
- Custom Fields: Creates and manages tailored data fields for specific business needs within support tickets.
All Tickets
The Ticket page is an interface designed for streamlined ticket management. It offers a range of functionalities for the efficient handling of ticket-related tasks.
To access the ticket, Navigate to Admin > Help Desk > All Tickets.
The Features included in the Ticket Menu are,
- Organizing and sorting tickets based on various parameters.
- Filtering by status, priority etc.
- Provides Mass Delete of tickets.
- Export Data in CSV or XML formats.
- The Messages tab in Ticket View Page provides threaded view for admin-user exchanges.
- The General tab in Ticket View Page displays vital customer details and user rating.
- The Additional tab on Ticket View Page includes ticket-handling agent information, ticket priority, and status for detailed context.
- The Other Tickets tab in the Ticket View Page displays the user's history, showing previous tickets from the same user.
- The Additional Data Field Tab in Ticket View Page includes the field values of the custom fields.
- Admins can prompt AI to generate replies for customer queries. If AI content generation is enabled in configurations.
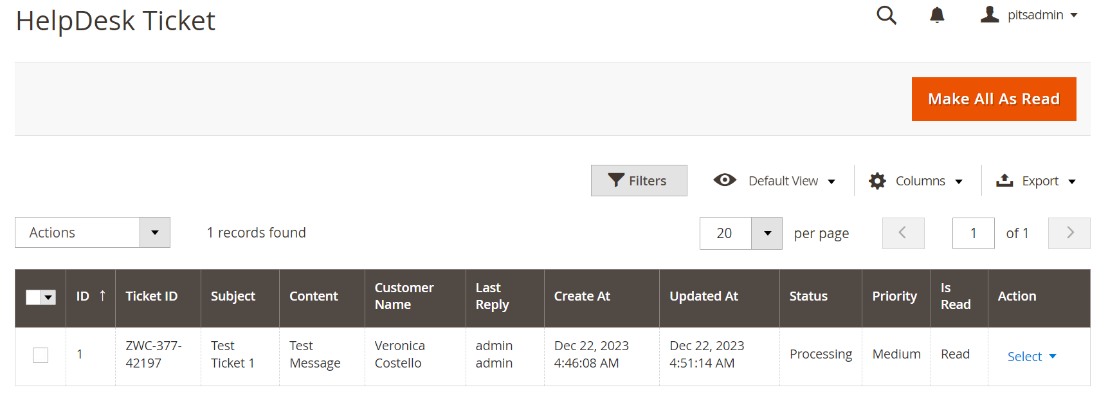
Figure 13 – Help Desk Ticket – Ticket Listing Page

Figure 14 – Help Desk Ticket – Ticket View Page
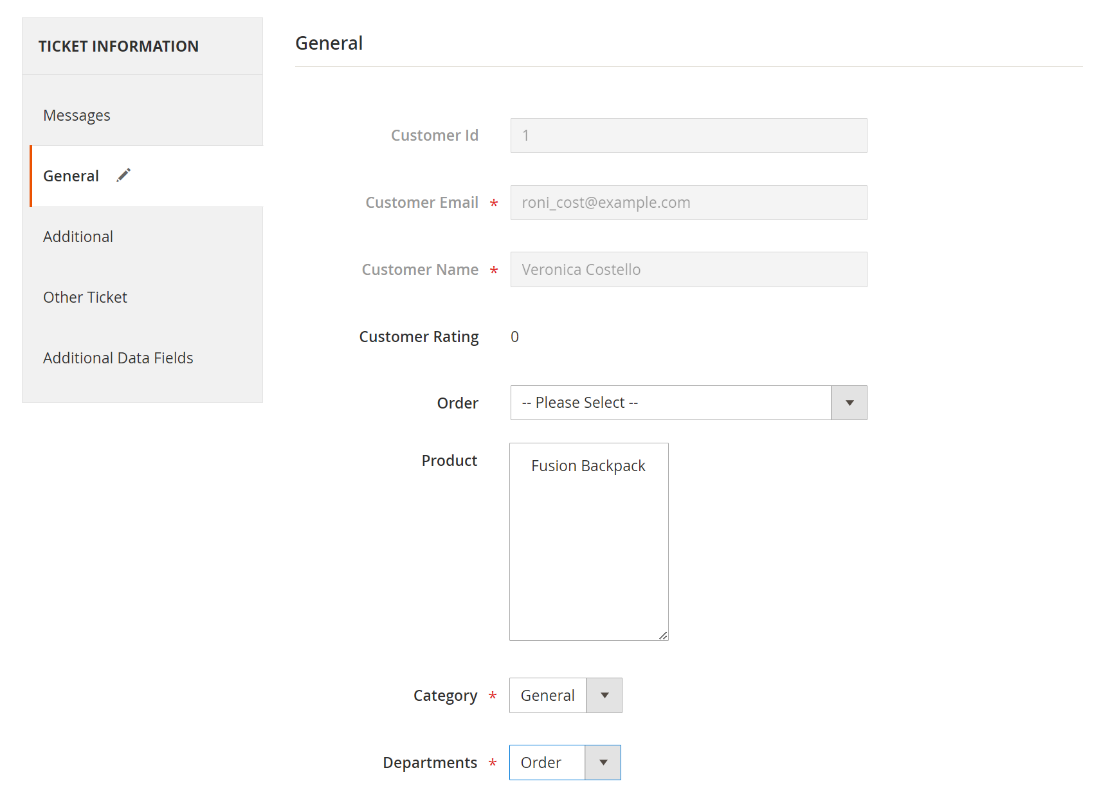
Figure 15 – Help Desk Ticket – Ticket View Page – General
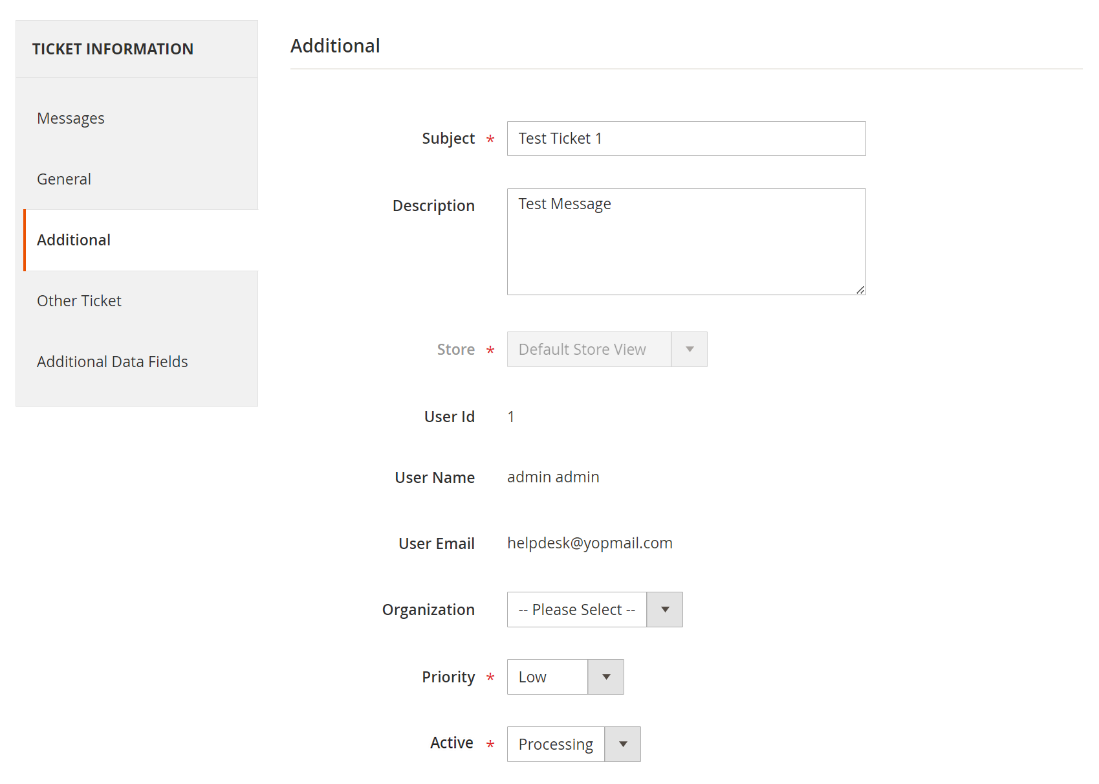
Figure 16 – Help Desk Ticket – Ticket View Page – Additional
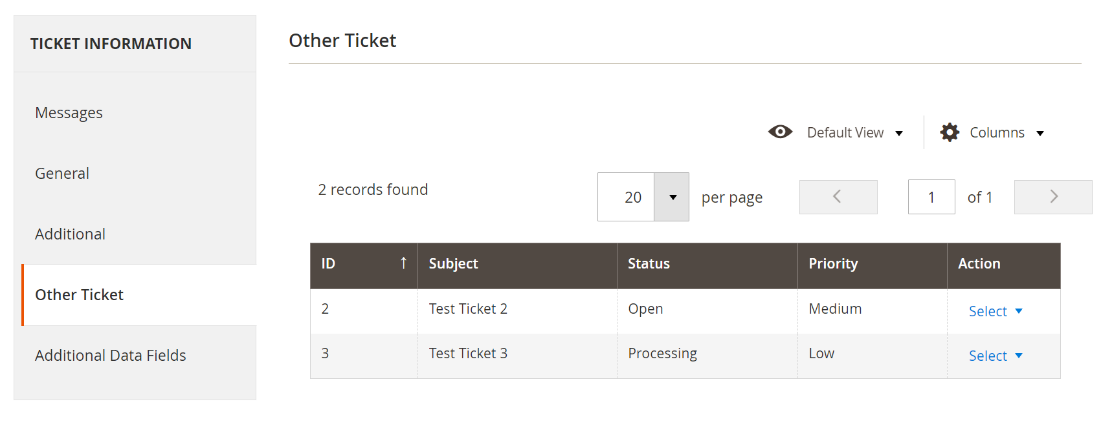
Figure 17 – Help Desk Ticket – Ticket View Page – Other Ticket
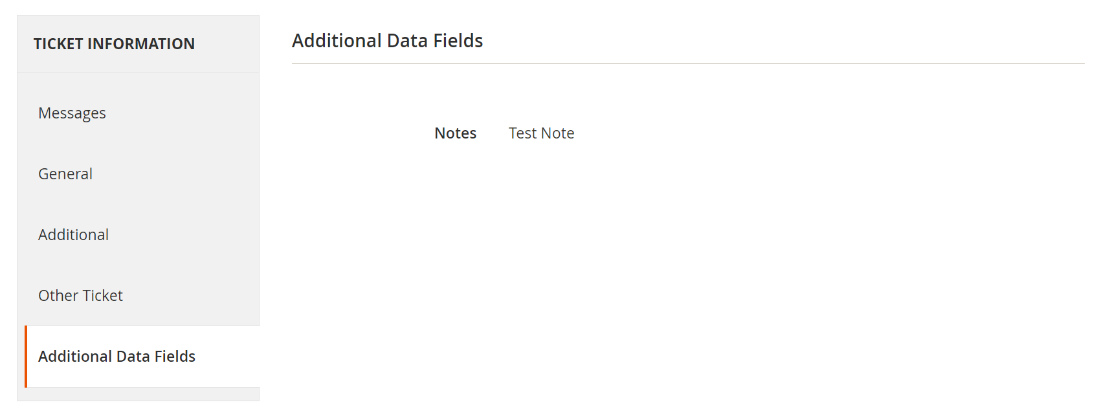
Figure 18 – Help Desk Ticket – Ticket View Page – Additional Data Fields
Generation of AI Content
- Click "Generate AI Content."
- Enter a prompt in the popup.
- Click "Generate" to create content.
- Review and edit the generated content if needed.
- Click "Apply" to transfer content to the message field.
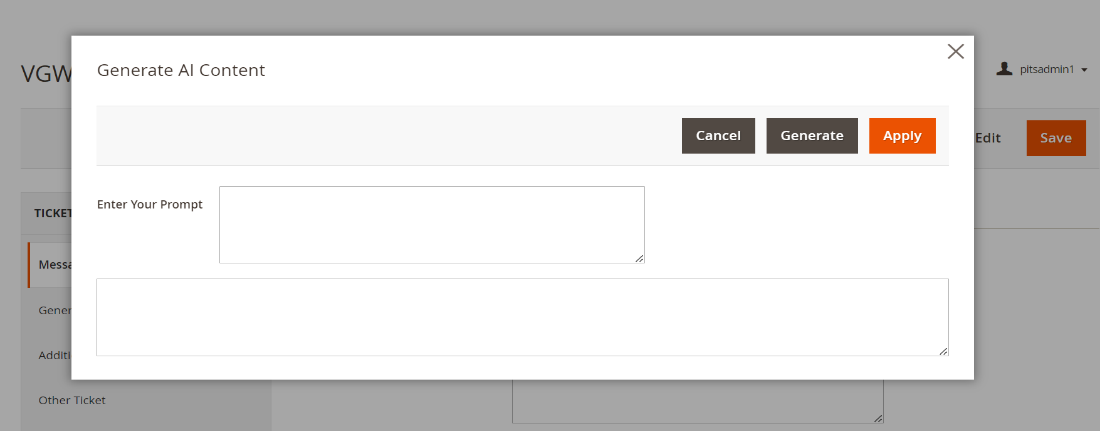
Figure 19 – Help Desk Ticket – AI Content Generation
Ticket Priorities
The Ticket Priority page is designed for streamlined priority management.
The fields included in the Ticket Priorities
- Priority Code: The unique identifier for the entity within the system which cannot be editable.
- Active: Toggle the priority visibility.
- Priority Label: Default descriptive name or label of the priority.
- Store View Specific Label: Store specific descriptive name or label of the priority
Steps to create a ticket priority
- Navigate to Admin > Help Desk > Ticket Priorities.
- Click on 'Add New Priority' button.
- Fill in the details for the ticket priority.
- Save the form to create the ticket priority.
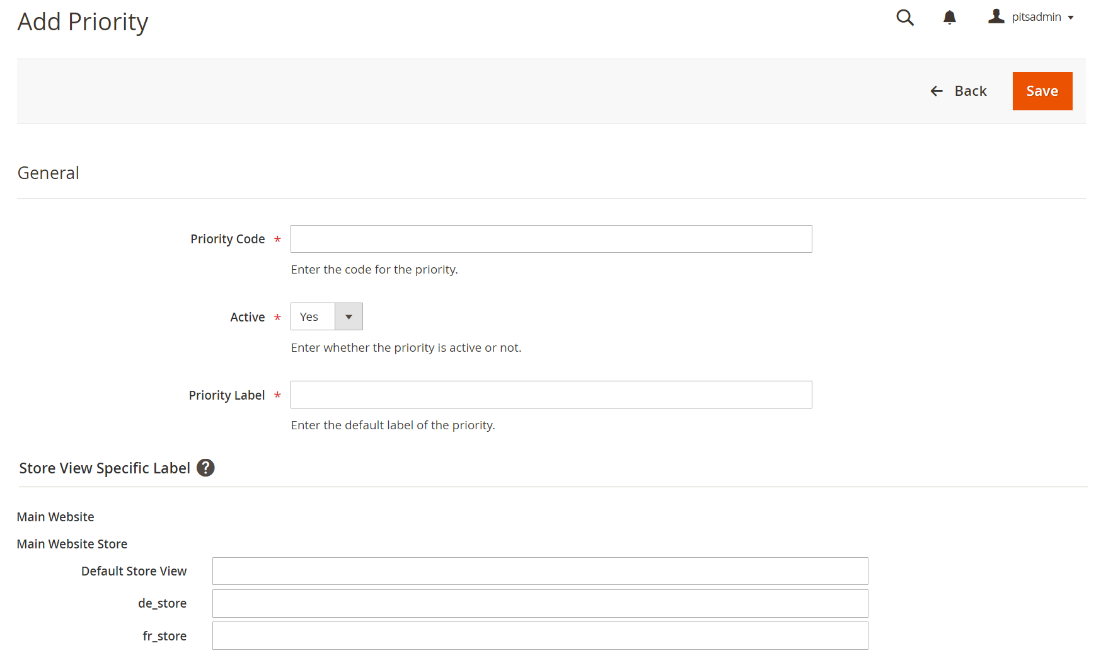
Figure 20 – Help Desk Ticket Priorities- New Priority Page
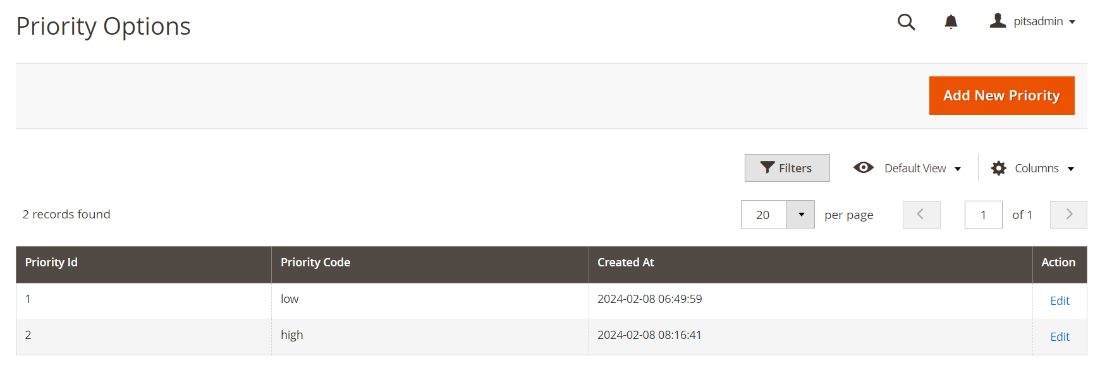
Figure 21 – Help Desk Ticket Priorities – Priorities Listing Page
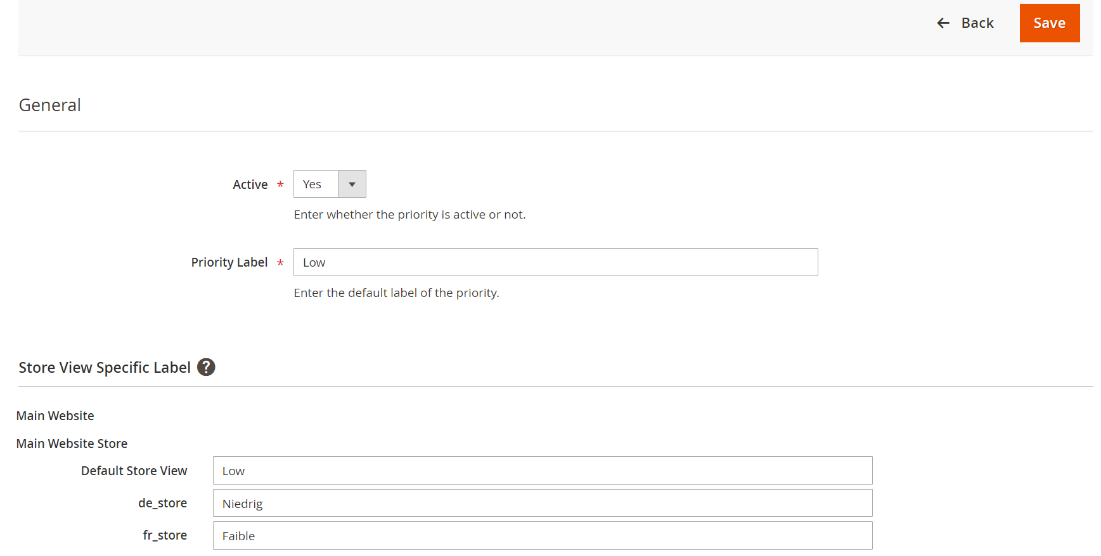
Figure 22 – Help Desk Ticket Priorities – Priority Edit Page
Steps to edit a ticket priority
- Navigate to Admin > Help Desk > Ticket Priorities.
- Select the ticket priority you want to edit.
- Click "Edit" in the Action column.
- Edit and update the ticket priority details in this view.
Status
The Status is designed for streamlined status management.
The fields included in the Status
- Status Code: The unique identifier for the entity within the system which cannot be editable.
- Status: Toggle the status visibility.
- Status Label: Default descriptive name or label of the status.
- Store View Specific Label: Store specific descriptive name or label of the status.
Steps to create a status
- Navigate to Admin > Help Desk > Status.
- Click on 'Add New Status' button.
- Fill in the details for the status.
- Save the form to create the status.
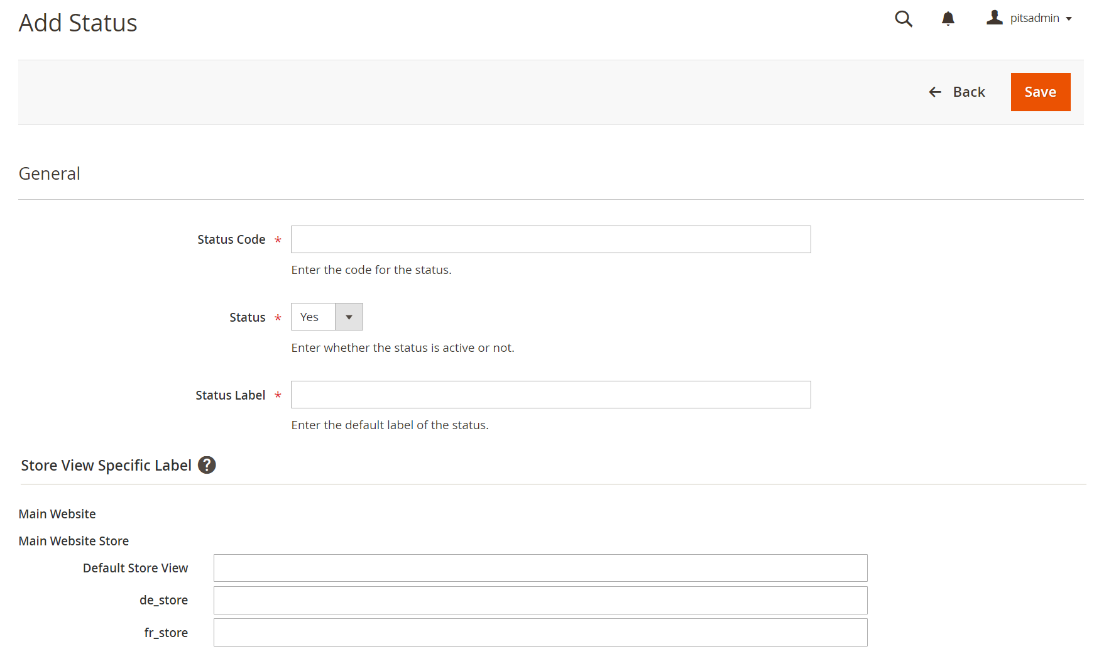
Figure 23 – Help Desk Status - New Status Page
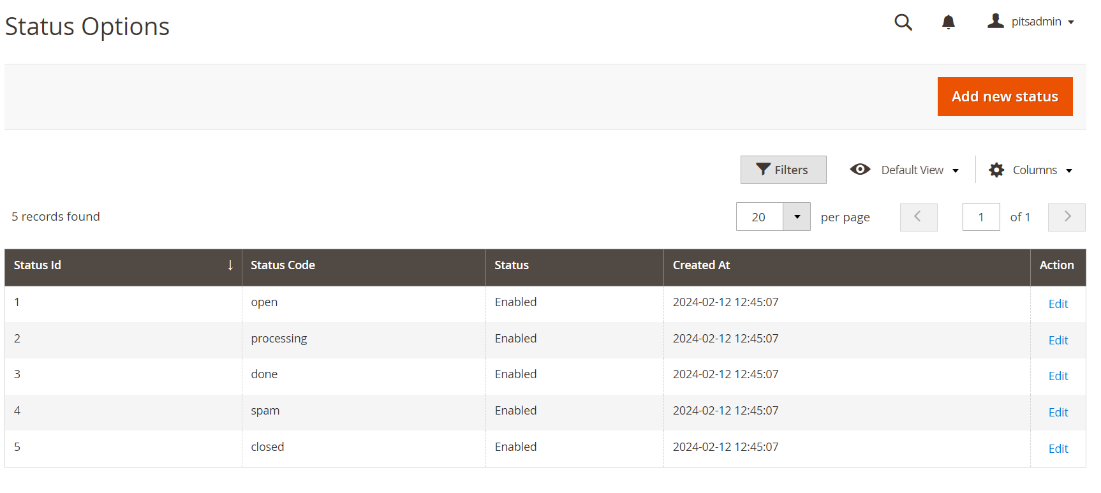
Figure 24 – Help Desk Status – Status Listing Page

Figure 25 – Help Desk Status – Status View Page
Steps to edit a ticket priority
- Navigate to Admin > Help Desk > Status.
- Select the status you want to edit.
- Click "Edit" in the Action column.
- Edit and update the status details in this view.
Category
The Category page is designed for streamlined category management.
The fields included in the Category
- Title: Descriptive name or label of the category.
- Store View: Option to choose stores in which the category is displayed.
- Status: Toggle the category visibility.
- Position: The placement of the category within its display sequence.
Steps to create a category
- Navigate to Admin > Help Desk > Categories.
- Click on 'Add New Category' button.
- Fill in the details for the category.
- Save the form to create the category.
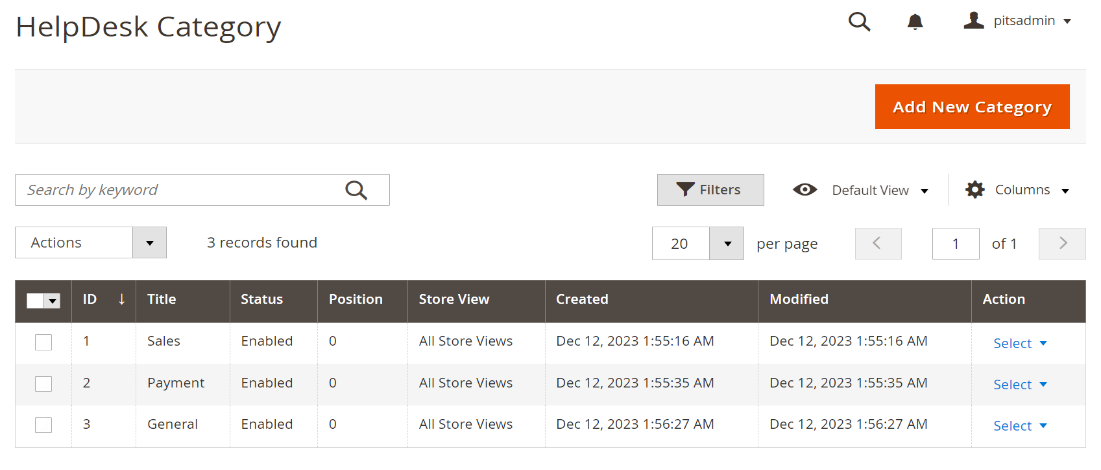
Figure 26 – Help Desk Category - Category Listing Page
Steps to edit a category
- Navigate to Admin > Help Desk > Categories.
- Select the category you want to edit.
- Click "View" in the Action column.
- Edit and update the category details in this view.
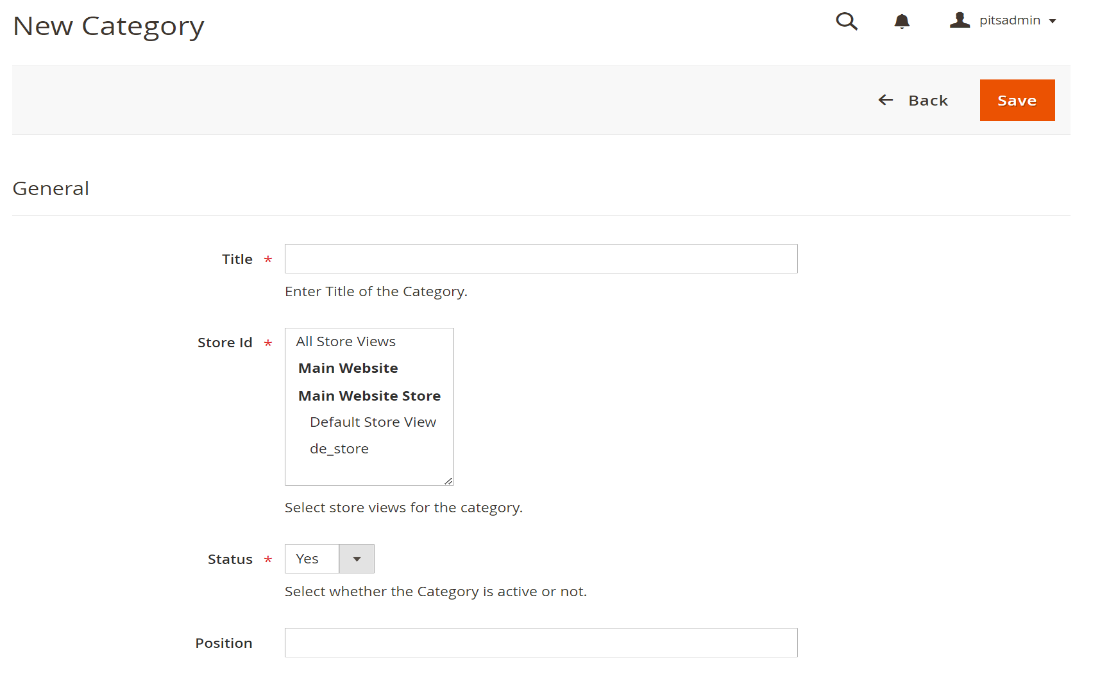
Figure 27 – Help Desk Category - New Category Page
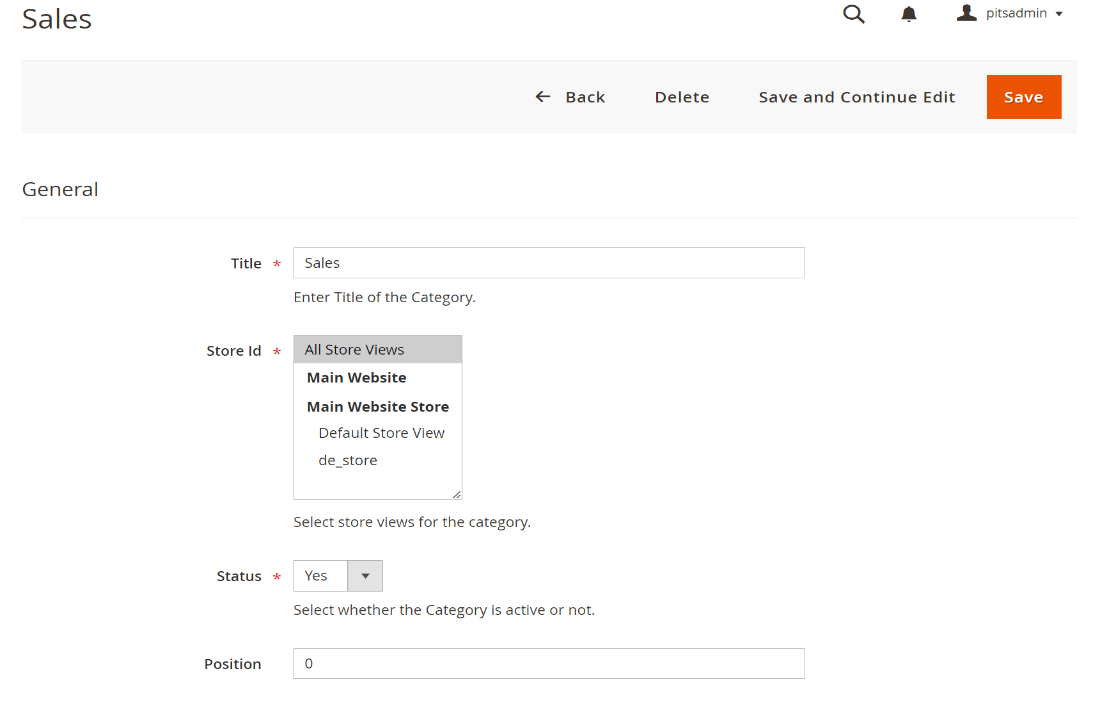
Figure 28 – Help Desk Category – Category View Page
Department
The Department page serves as a centralized hub for efficient departmental management within the system.
The fields included in the Department
- Title: Descriptive name or label of the department.
- Category: Organizes departments into specific groups for better classification and management.
- Members of Department: Assigns users to their corresponding departments, streamlining administrative oversight and coordination.
- Store View: Option to choose stores in which the department is displayed.
- Status: Toggle the department visibility.
- Position: The placement of the category within its display sequence.
Steps to create a department
- Navigate to Admin > Help Desk > Departments.
- Click on 'Add New Department’ button.
- Fill in the details for the department.
- Save the form to create the department.
Note: Categories selected in one department will not be visible in other departments.
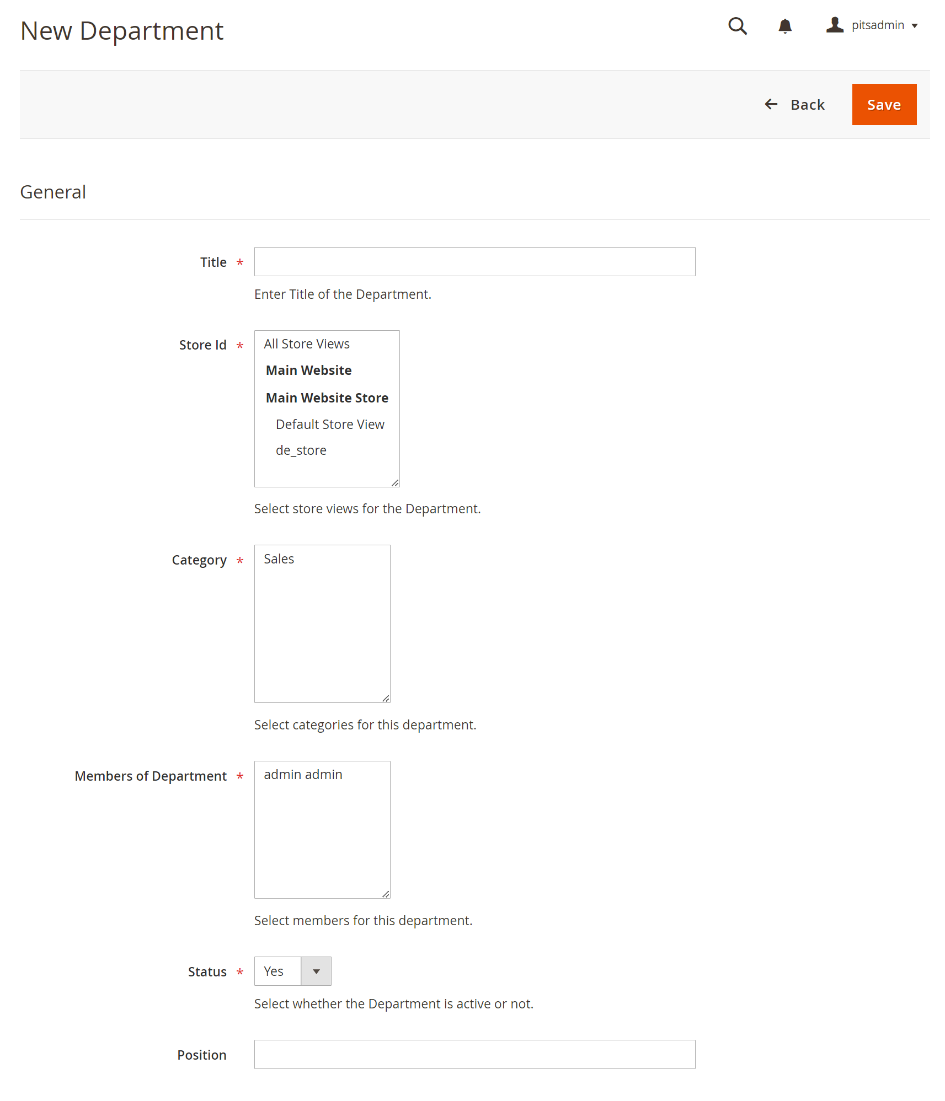
Figure 29 – Help Desk Department – New Department Page
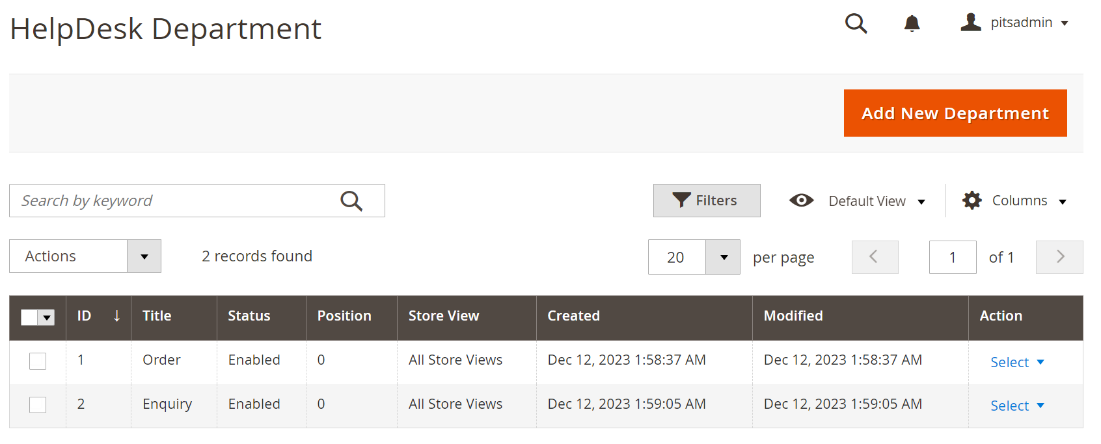
Figure 30 – Help Desk Department- Department Listing Page
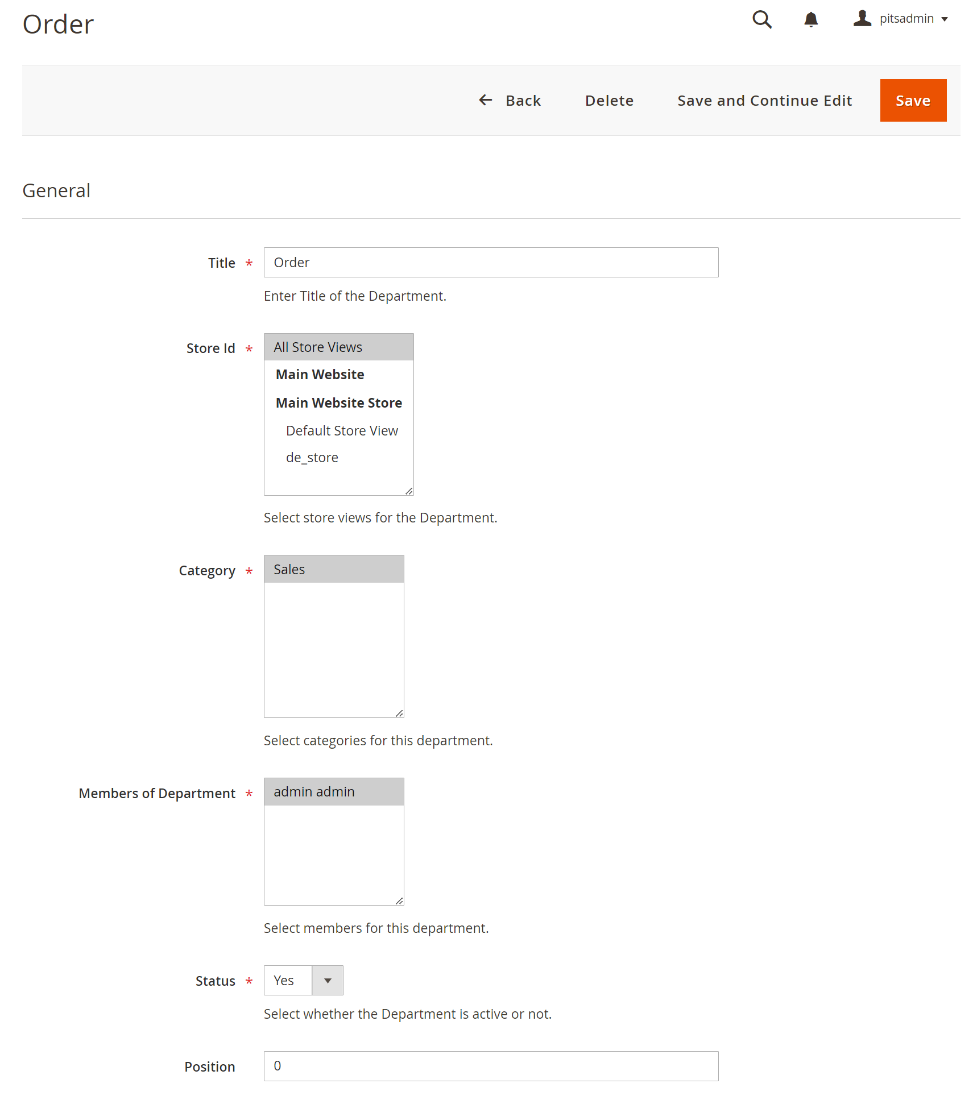
Figure 31 – Help Desk Department – Department view Page
Steps to edit a department
- Navigate to Admin > Help Desk > Departments.
- Select the department you want to edit.
- Click "View" in the Action column.
- Edit and update the department details in this view.
Department User
The department user interface displays a comprehensive list of agents along with their respective departments. A department user is automatically generated upon the inclusion of an agent as a member of that department.
- Presents the average ratings received by each agent.
- Admins have the capability to edit the agent level within this interface.
- Supports consolidated report generation.
To see the list of department users, Navigate to Admin > Help Desk > Department Users.
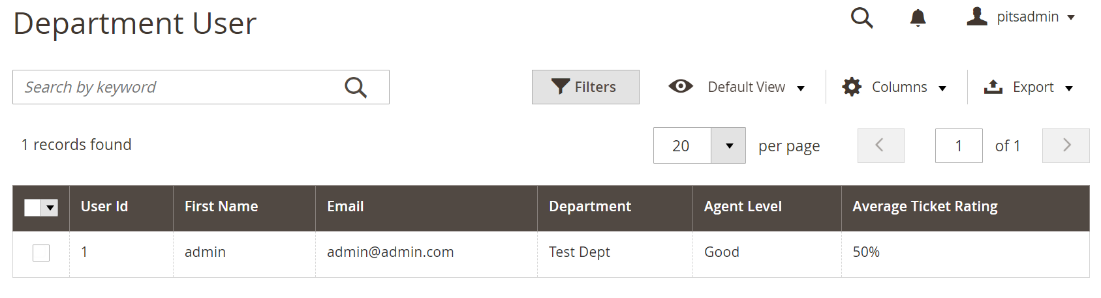
Figure 32 – Help Desk Department User - Department User Listing Page
Permission
The permission page is a hub for administrators to oversee and organize permissions within the system.
The fields included in the Permission
- Role: Determines system authority by specifying user roles within the helpdesk system.
- Access to tickets of departments: Streamlines ticket management by enabling the assignment of specific departments to selected roles.
- Can Delete Tickets: Empowers administrators to control ticket deletion privileges for the assigned role.
Steps to create a permission
- Navigate to Admin > Help Desk > Permissions for accessing the page.
- Click on 'Add New Permission’ button.
- Fill in the details for the permission.
- Save the form to create the permission.
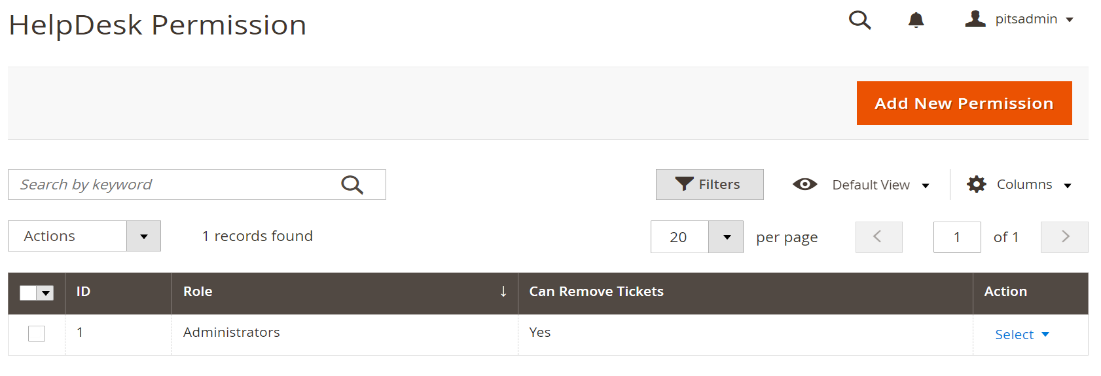
Figure 33 – Help Desk Permission - Permission Listing Page
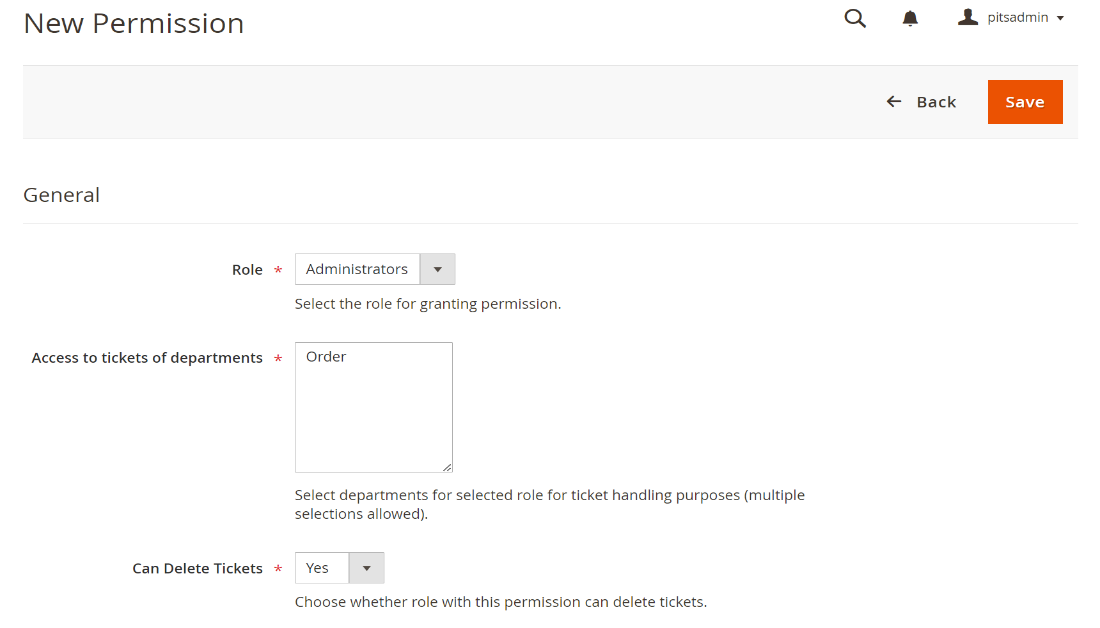
Figure 34 – Help Desk Permission – New Permission Page

Figure 35 – Help Desk Permission – Permission Edit Page
Steps to edit a permission
- Navigate to Admin > Help Desk > Permissions.
- Select the permission you want to edit.
- Click "View" in the Action column.
- Edit and update the permission details in this view.
Manage User Role
- Go to Admin > System > User Roles
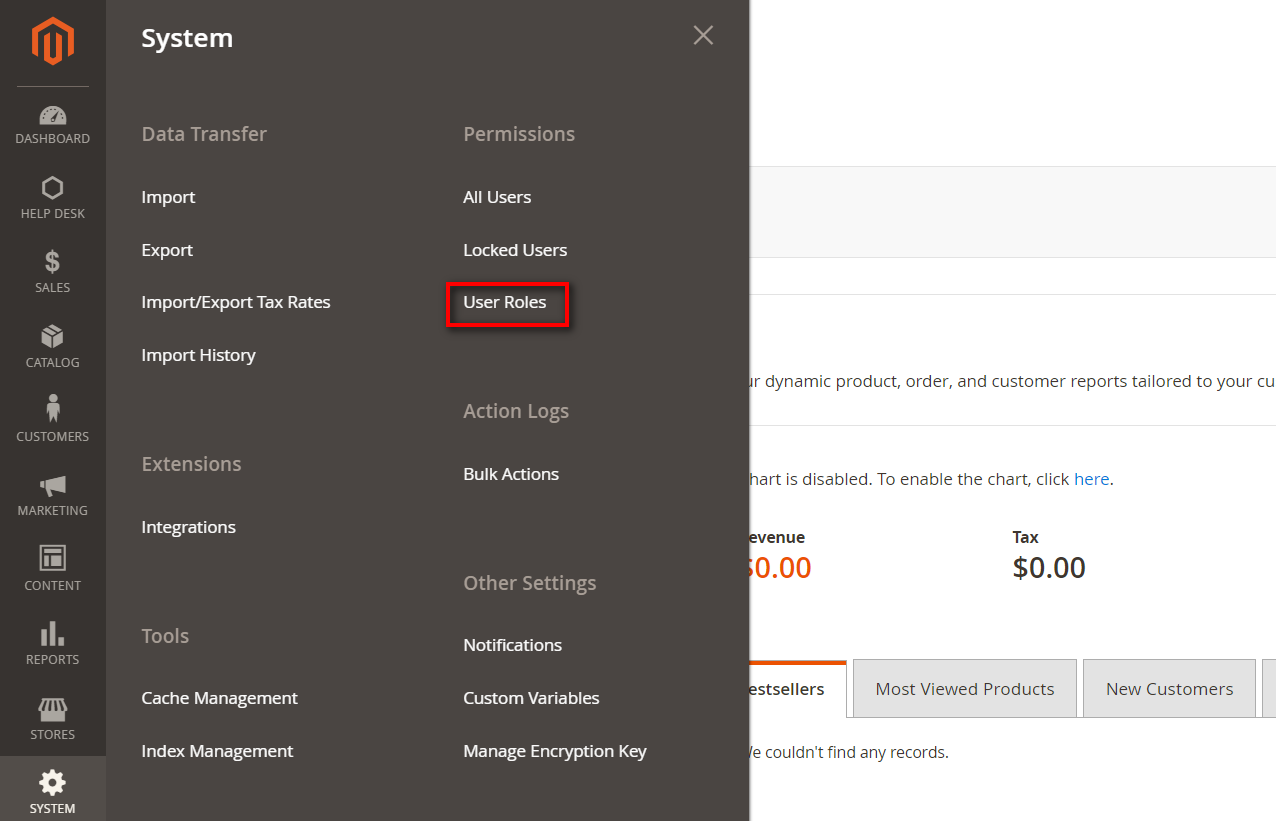
Figure 36 – User Roles
- Add a new role resource. Fill in the role information section.

Figure 37 – Role Information
- Select Help Desk role at Role Resources section.
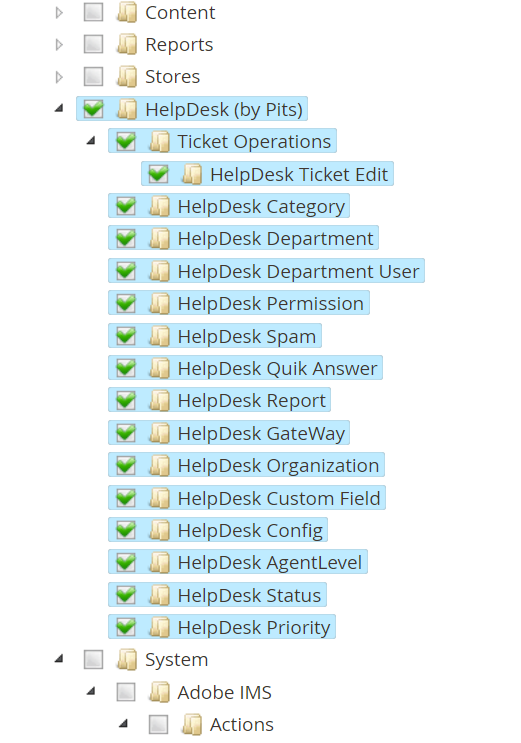
Figure 38 – Help Desk Roles
- Set role users for admin accounts, thin click on Save Role to finish.
Agent Level
The agent level menu in helpdesk system serves as a centralized hub for displaying all added agent levels.
The fields included in the Agent Level
- Agent Level: The name or label of the agent level.
- Status: Toggle the visibility of agent level.
Steps to create an agent level
- Navigate to Admin > Help Desk > Agent Level.
- Click on 'Add New Agent Level’ button.
- Fill in the details for the agent level.
- Save the form to create the agent level.
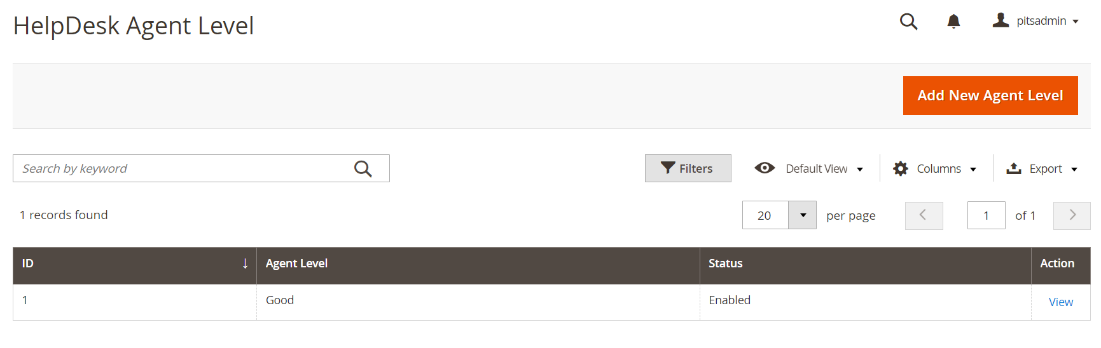
Figure 39 – Help Desk Agent Level- Agent Level Listing Page
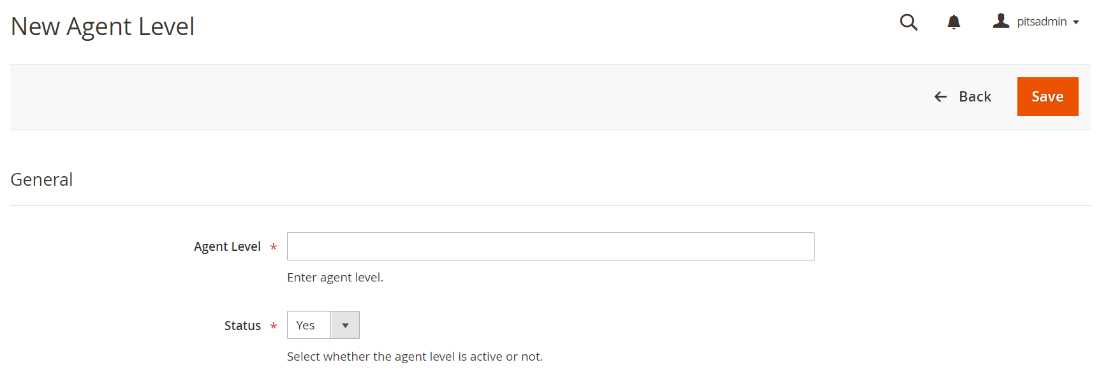
Figure 40 – Help Desk Agent Level – New Agent Level Page
Steps to edit an agent level
- Navigate to Admin > Help Desk > Agent Level.
- Select the agent level you want to edit.
- Click "View" in the Action column.
- Edit and update the agent level details in this view.
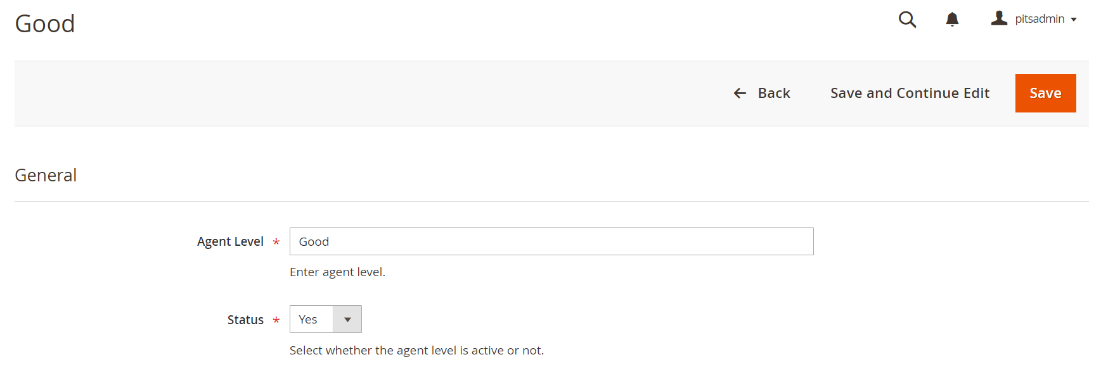
Figure 41 – Help Desk Agent Level – Agent Level View Page
Spam
The spam page in the helpdesk system serves as a centralized hub displaying all added spams, streamlining the process of managing and organizing them.
The fields included in the Spam
- Name: Labels configurations for easy identification within the system.
- Pattern: Inputs specific indicators of spam with formatting guidance.
- Scope: Allows selection of email segments for focused spam scrutiny.
- Status: Toggle the spam visibility.
Steps to create a spam
- Navigate to Admin > Help Desk > Spams.
- Click on 'Add New Spam’ button.
- Fill in the details for the spam.
- Save the form to create the spam.
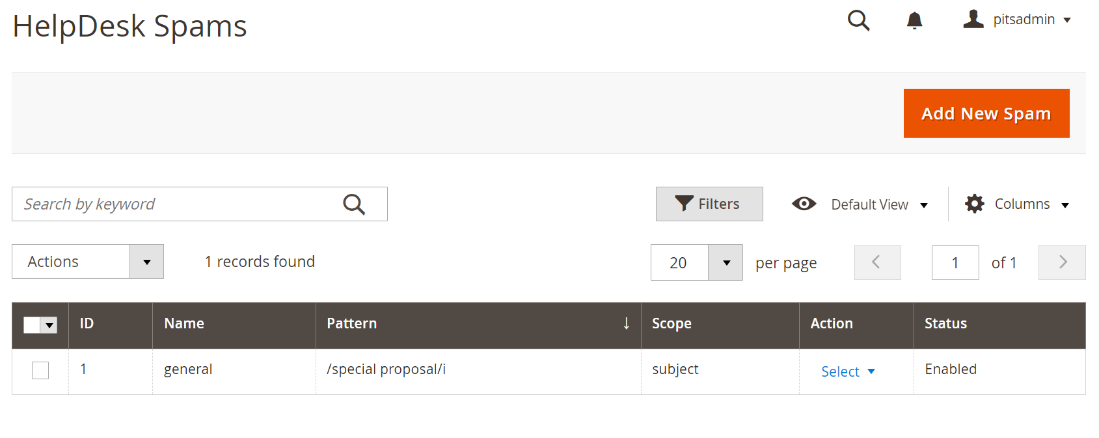
Figure 42 – Help Desk Spam- Spam Listing Page

Figure 43 – Help Desk Spam- New Spam Page
Steps to edit a spam
- Navigate to Admin > Help Desk > Spams.
- Select the spam you want to edit.
- Click "View" in the Action column.
- Edit and update the spam details in this view.
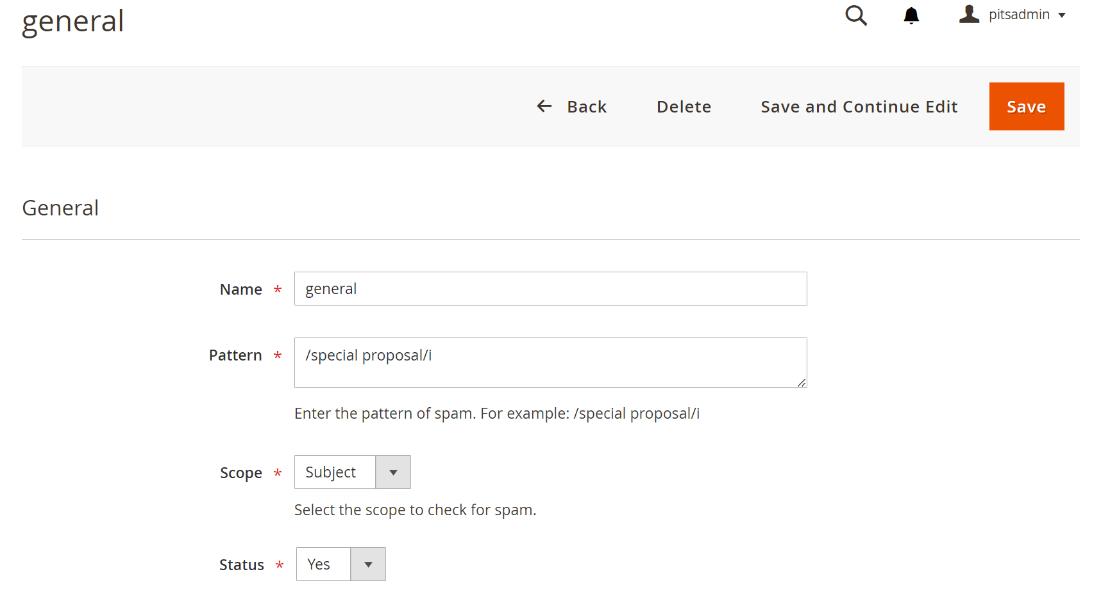
Figure 44 – Help Desk Spam- Spam View Page
Quick Answer
The Quick Answer feature streamlines communication management within the system by providing administrators with a comprehensive interface to oversee, organize, and modify a list of quick responses. This tool empowers efficient handling of inquiries by allowing the addition, editing, and activation of predefined responses, ensuring prompt and accurate support for users.
The fields included in the Quick Answer
- Title: Descriptive name or label of the Quick Answer.
- Content: Inputs specific content for Quick Answer.
- Status: Toggle the Quick Answer visibility.
- Generate AI Content: Generates AI content for Quick Answer. (Visible only with enabled Content Generation (AI) in configurations)
Steps to create a Quick Answer
- Navigate to Admin > Help Desk > Quick Answers.
- Click on 'Add New Quick Answer’ button.
- Fill in the details for the quick answer.
- Save the form to create the quick answer.
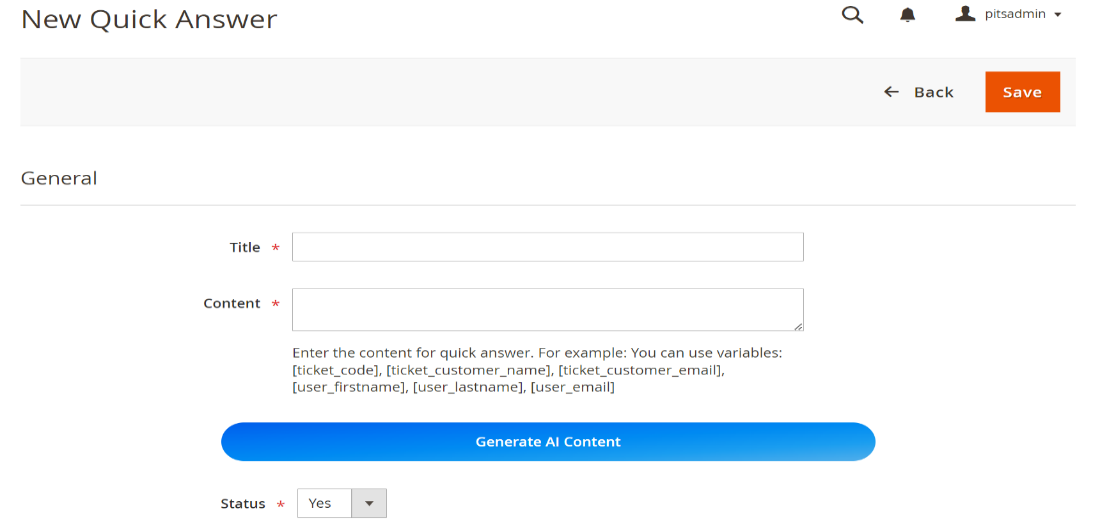
Figure 45 – Help Desk Quick Answer – New Quick Answer Page
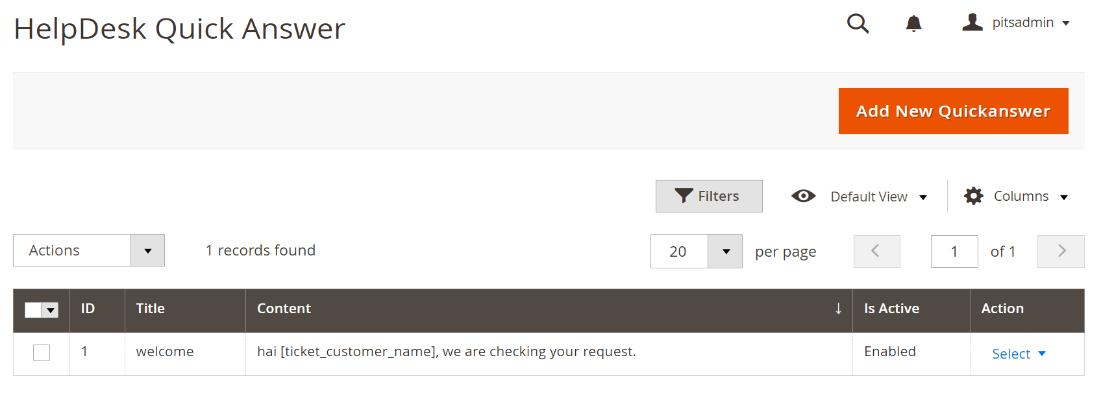
Figure 46 – Help Desk Quick Answer- Quick Answer Listing Page
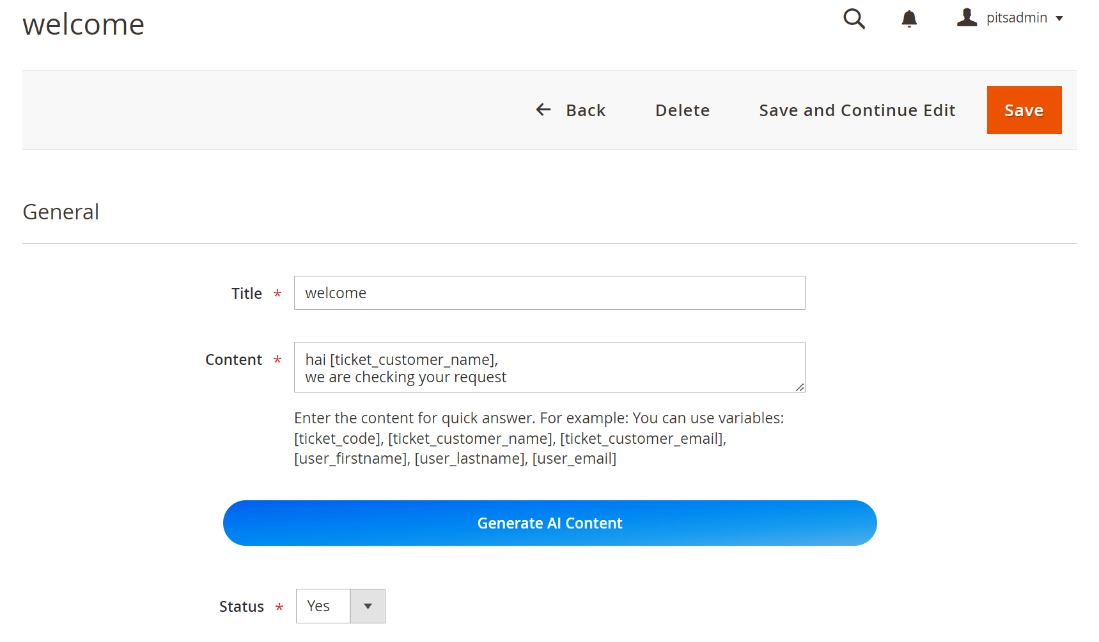
Figure 47 – Help Desk Quick Answer – Quick Answer view Page
Steps to edit a quick answer
- Navigate to Admin > Help Desk > Quick Answers.
- Select the quick answer you want to edit.
- Click "View" in the Action column.
- Edit and update the quick answer details in this view
Generation of AI Content
- Click "Generate AI Content."
- Enter a prompt in the popup.
- Click "Generate" to create content.
- Review and edit if needed.
- Click "Apply" to transfer content to the message field.
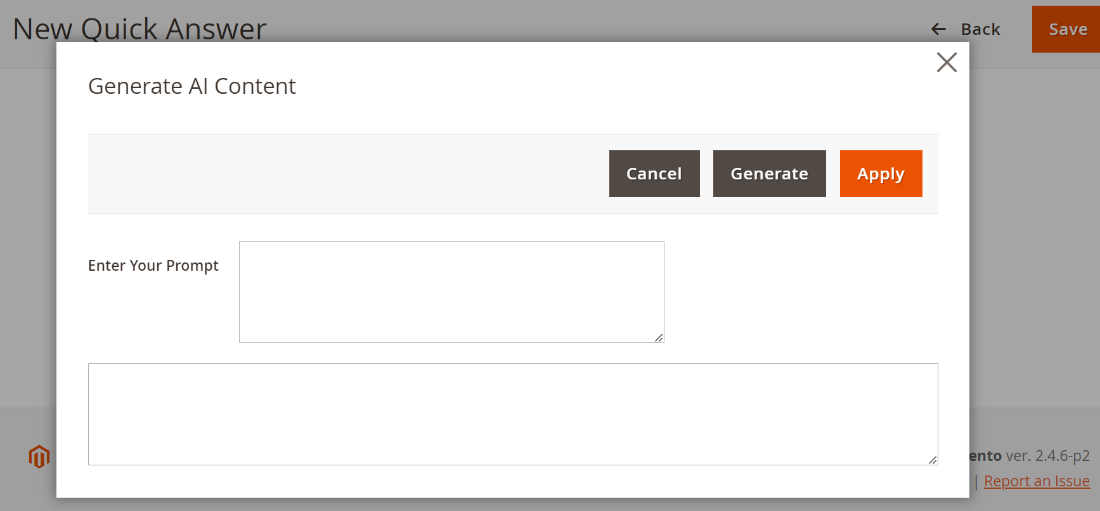
Figure 48 – Help Desk Quick Answer – Quick Answer AI Content Generation
Report
Reports provide a real-time graphical representation of the ticket-related data.
To see the report, Navigate to Admin > Help Desk > Report.
The report offers various features to enhance your understanding of ticket-related data.
- Allows tracking ticket fluctuations over days and months in real-time.
- Helps admins understand insights on seasonal trends and activity peaks.
- Facilitates proactive resource allocation for peak ticket periods.
- Optimizes team productivity across different operational cycles.
- Clearly delineates ticket statuses—open, closed, processing.
- Enables targeted interventions and issue prioritization.
- Empowers decision-makers to pinpoint bottlenecks in the resolution pipeline.
- Allows implementation of measures to speed up specific ticket categories.
- Equips support teams with concise yet comprehensive information.
- Enables continuous improvement of ticket resolution processes.
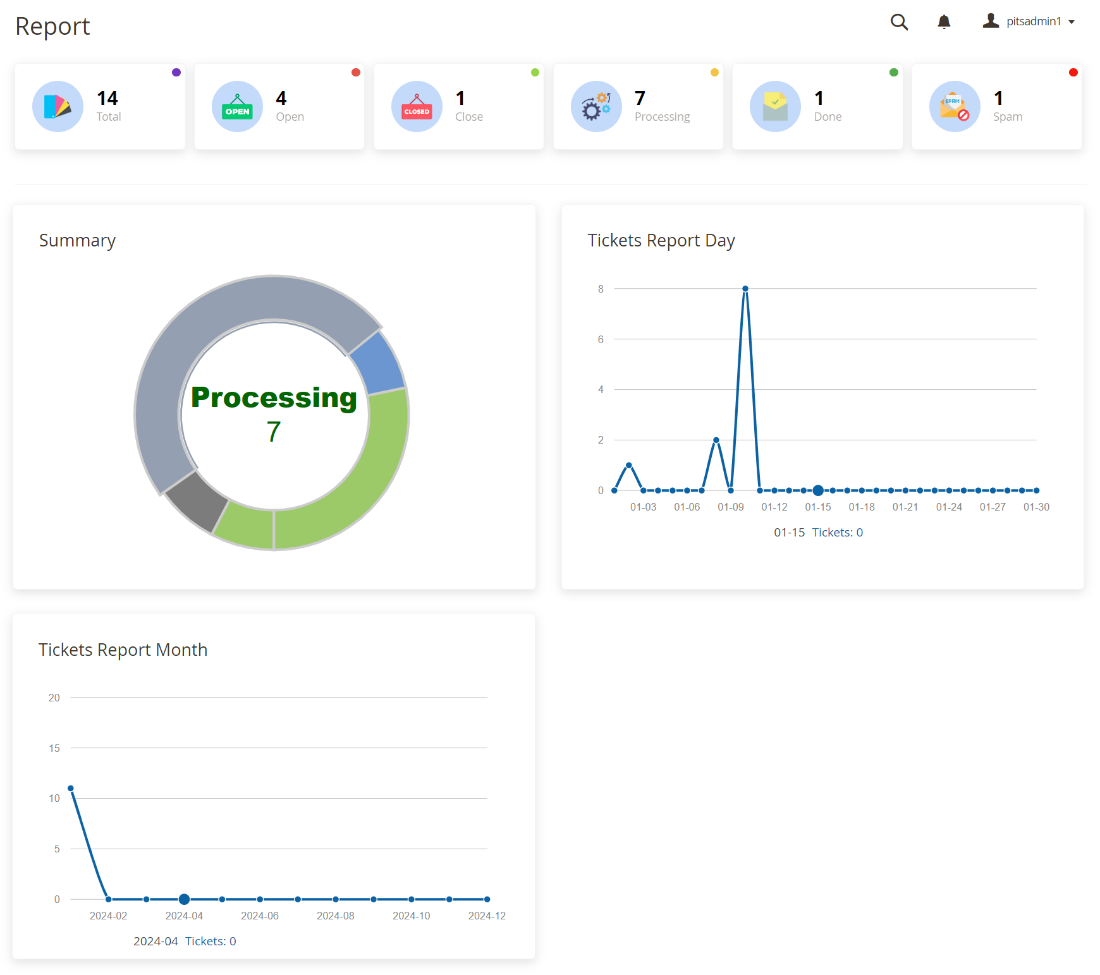
Figure 49 – Help Desk Report Page
Gateway
The fields included in the Gateway form.
- Name: Identifying label for the gateway configuration.
- Email: Email address associated with the gateway for communication.
- Login: Credentials used to access the gateway.
- Password: Secure key for gateway access.
- Status: Toggle to enable or disable the gateway.
- Host: Address indicating the location of the gateway.
- Port: Specific connection point for the gateway.
- Protocol: Communication method used by the gateway (e.g., POP3, IMAP).
- Encryption: Security protocol used for data transmission.
- Search Keyword: Term used to locate specific content within the gateway. We are using IMAP to get emails. This protocol provides a feature to search. We can create search keywords with the help of documentation - reference
- Fetch Folder: Folder for email retrieval.
- Fetch Max: Maximum number of emails to retrieve per cycle.
- Department: Allocation of tickets to specific operational units.
- Store View: Selection of specific stores where the gateway interface is accessible for operational use.
- Notes: Additional information or remarks related to the gateway.
Steps to create a Gateway
- Navigate to Admin > Help Desk > Gateways.
- Click on 'Add New Gateway’ button.
- Fill in the details for the gateway.
- Save the form to create the gateway.

Figure 50 – Help Desk Gateway- Gateway Listing Page
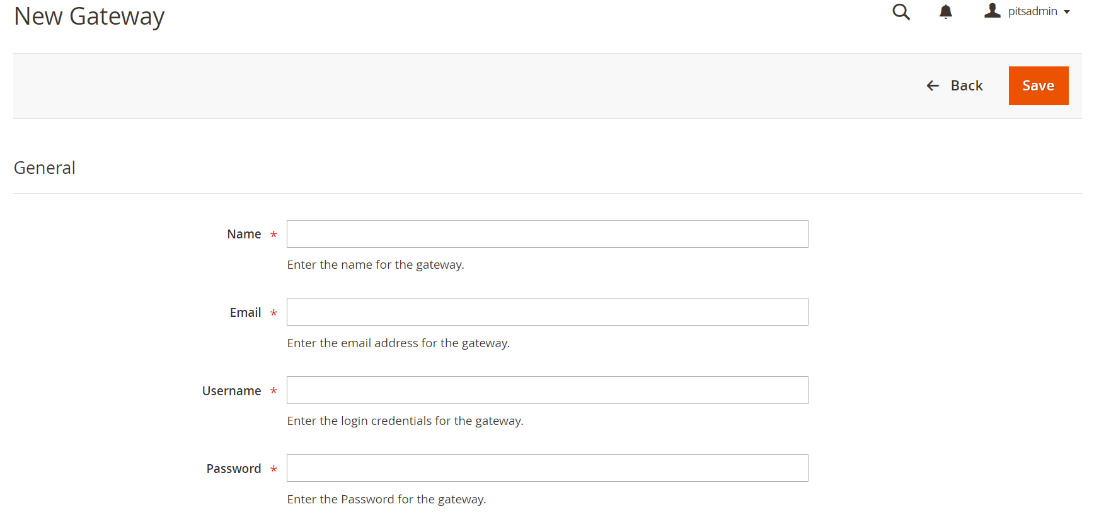

Figure 51 – Help Desk Gateway- New Gateway Page
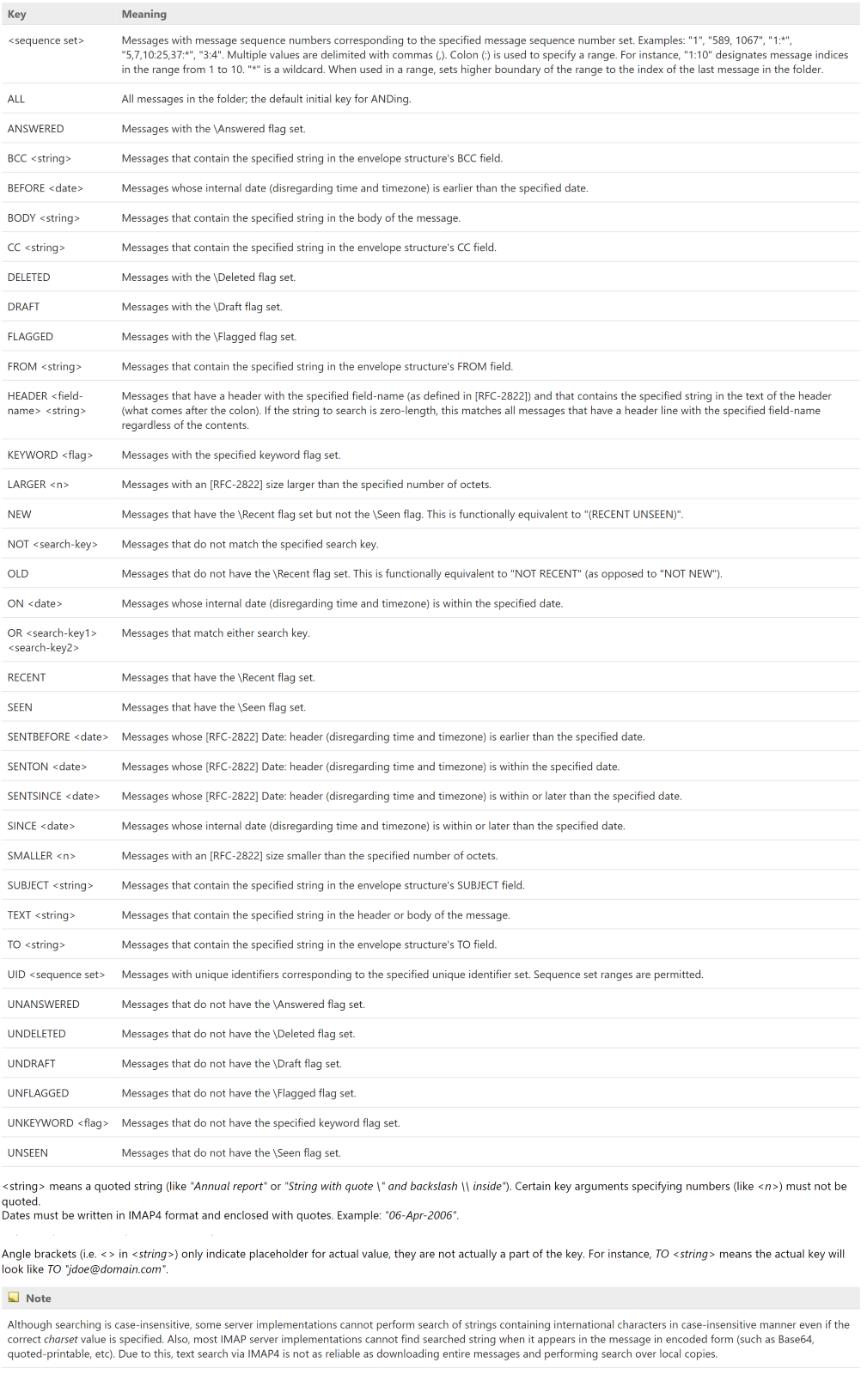
Figure 52 – Gateway Configuration- Search Keyword Reference
Steps to edit a Gateway
- Navigate to Admin > Help Desk > Gateways.
- Select the gateway you want to edit.
- Click "View" in the Action column.
- Edit and update the gateway details in this view.
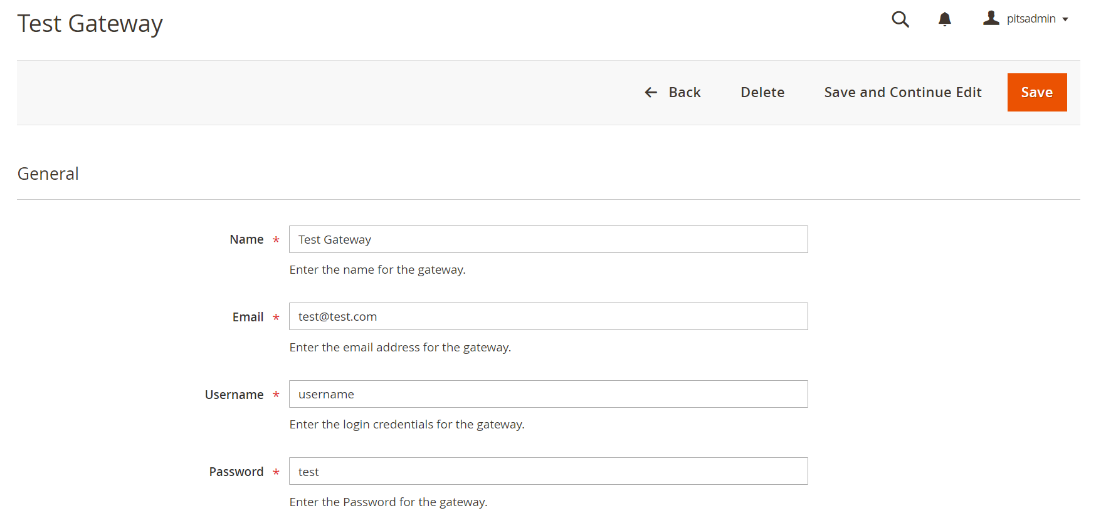
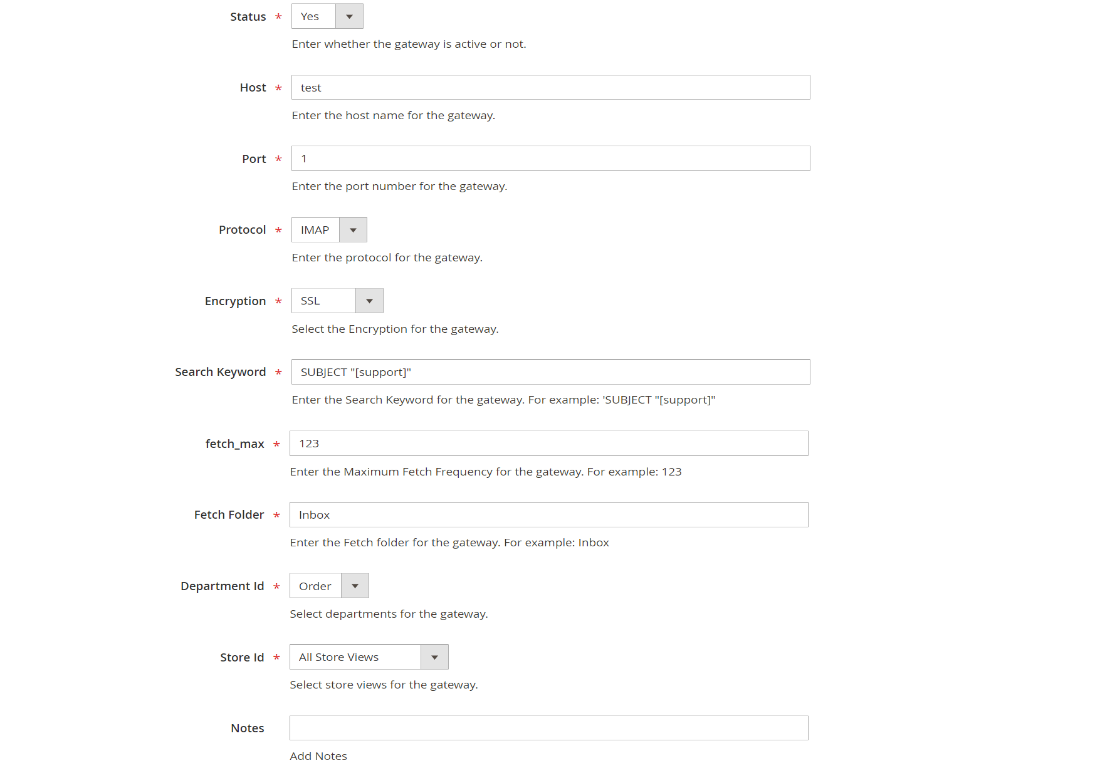
Figure 53 – Help Desk Gateway- Gateway View Page
Organization
The organization menu in helpdesk system serves as a centralized hub displaying all added organizations.
The fields included in the Organization
- Organization Name: The unique identifier for the entity within the system.
- Email: Primary contact method for communication with the organization.
- Contact Number: The designated phone number for direct communication with the organization.
- Point of Contact: Individual responsible for interaction and management within the organization.
Steps to create an organization
- Navigate to Admin > Help Desk > Organizations.
- Click on 'Add New Organization’ button.
- Fill in the details for the organization.
- Save the form to create the organization.
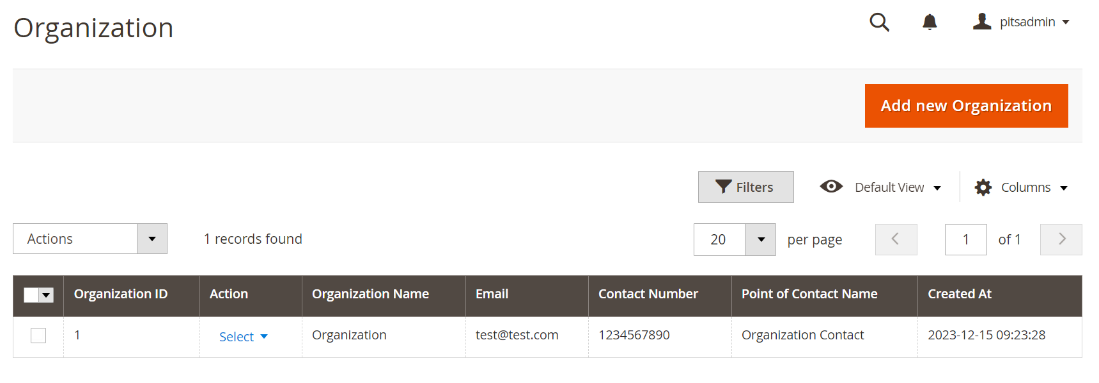
Figure 54 – Help Desk Organization- Organization Listing Page
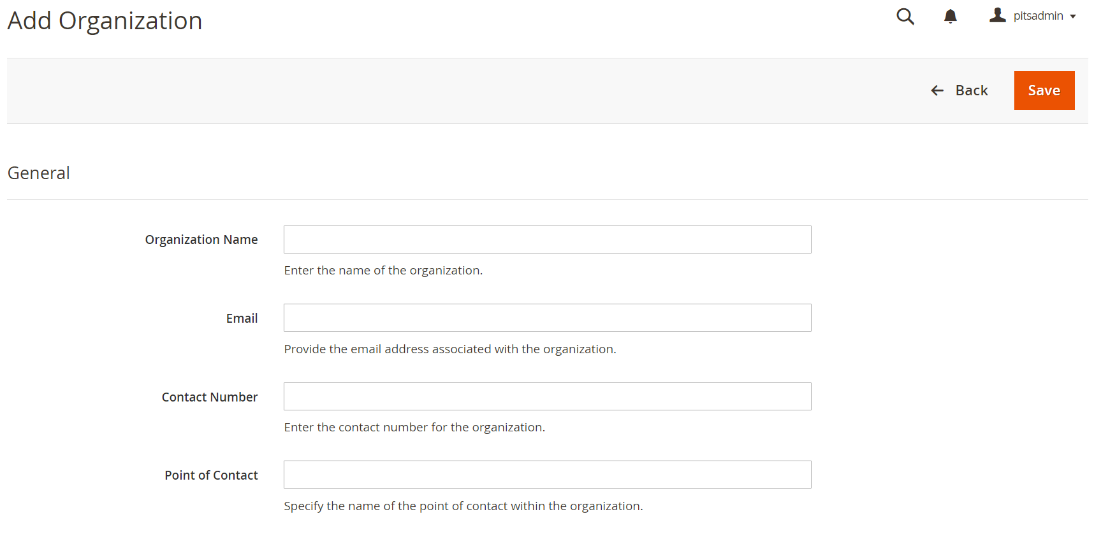
Figure 55 – Help Desk Organization – New Organization Page
Steps to edit an organization
- Navigate to Admin > Help Desk > Organizations.
- Select the organization you want to edit.
- Click "View" in the Action column.
- Edit and update the organization details in this view.
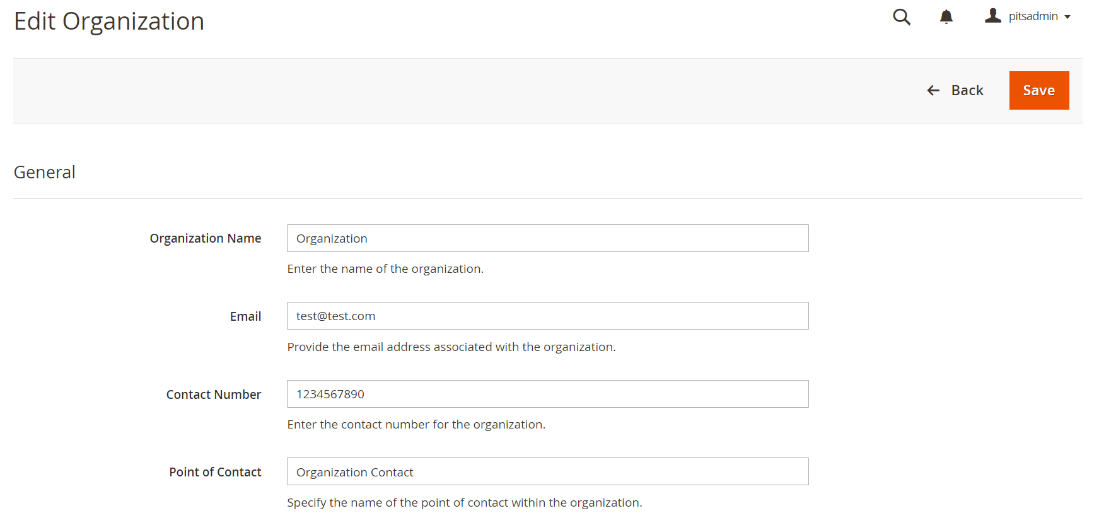
Figure 56 – Help Desk Organization – Organization View Page
Custom Fields
Custom Fields displays a list of personalized data fields available in the system.
When creating a ticket, only the active custom fields are visible to the user.
The fields included in the Custom Fields
- Field Title: A name or label for the custom field.
- Field Code: A unique identifier for the custom field within the system.
- Field Type: Specifies the kind of data the field will contain (text, dropdown, etc.).
- Option List: Provides a set of predefined choices or options for the field.
- Description: A brief explanation or instructions for the custom field.
- Is Active: Indicates if the custom field is currently in use or not.
- Position: Determines the display order of the field within the form.
- Is Required: Specifies whether the field must be filled out before submission.
- Store View: Option to choose stores in which the custom fields are displayed.
Steps to create a Custom Field
- Navigate to Admin > Help Desk > Custom Fields.
- Click on 'Add New Custom Field’ button.
- Fill in the details for the custom field.
- Save the form to create the custom field.
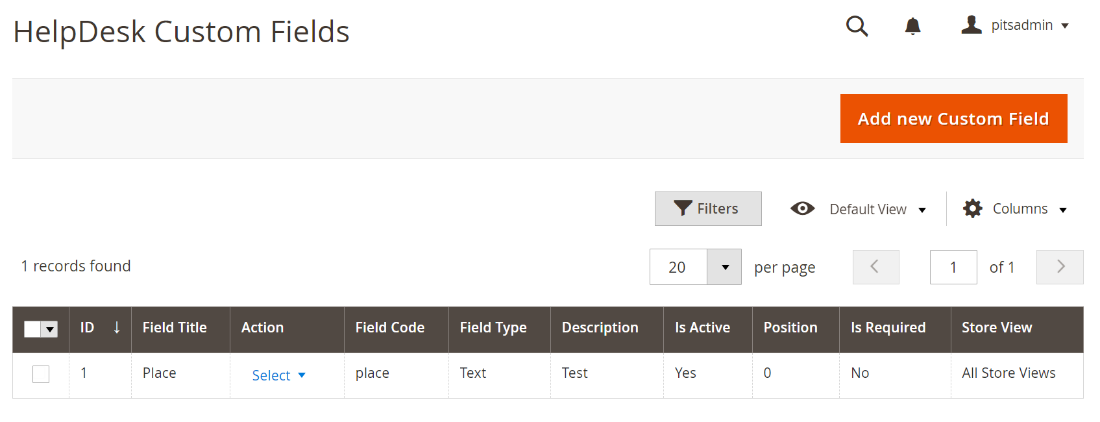
Figure 57 – Help Desk Custom Fields - Custom Fields Listing Page
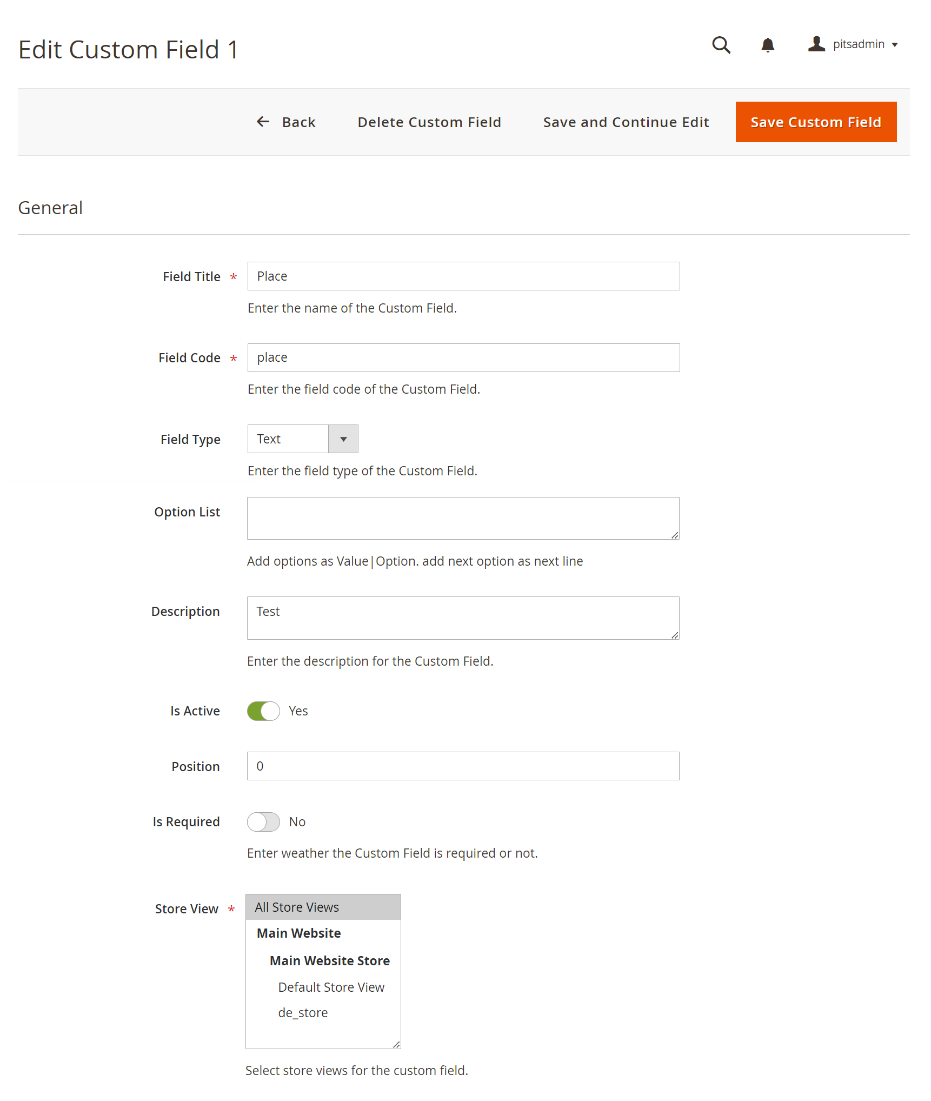
Figure 58 – Help Desk Custom Fields - Custom Fields View Page
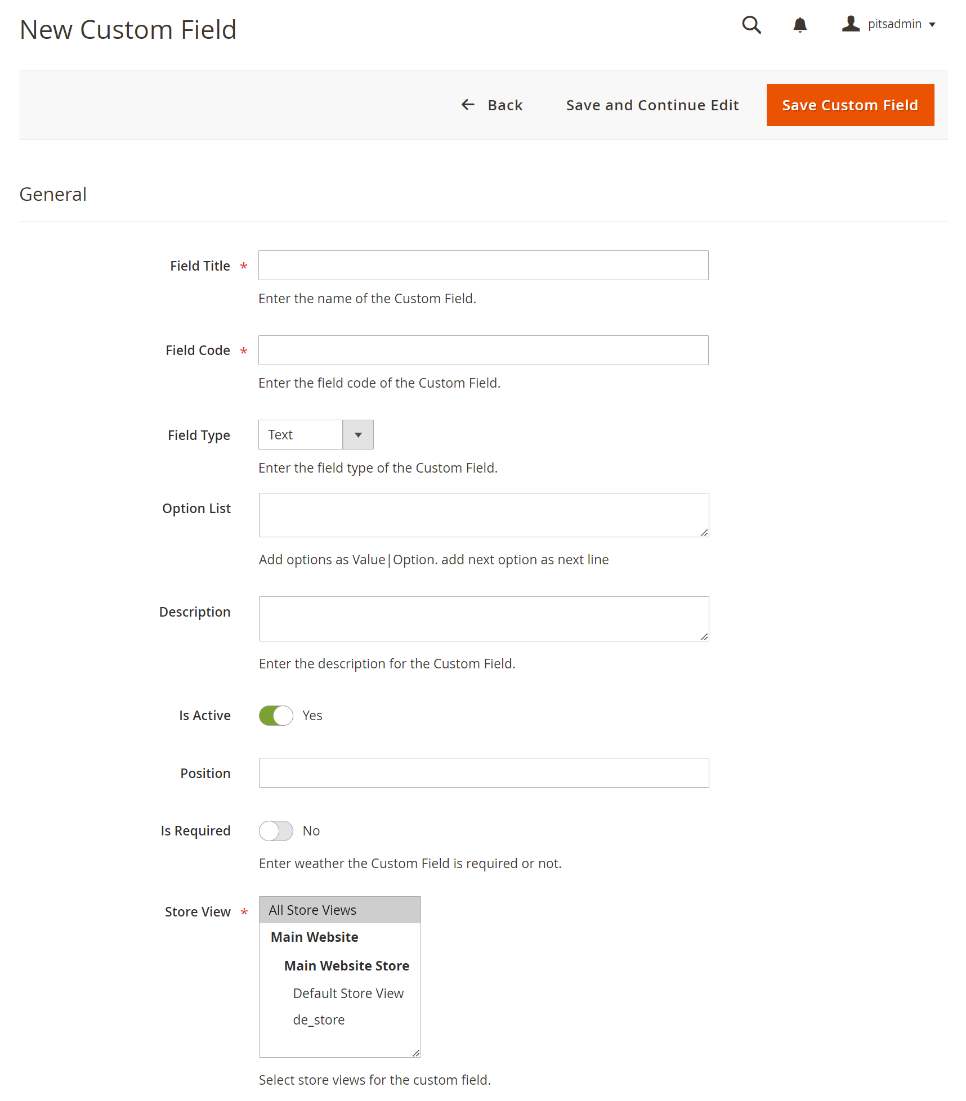
Figure 59 – Help Desk Custom Fields - New Custom Fields Page
Steps to edit a Custom Field
- Navigate to Admin > Help Desk > Custom Fields.
- Select the custom field you want to edit.
- Click "View" in the Action column.
- Edit and update the custom field details in this view.
Auto Closing of Tickets
In the helpdesk module, the auto closing of tickets is a streamlined process that enhances efficiency in managing support requests.
Process of Auto Closing of Tickets
- This automated process relies on specific parameters configured in the system, "Auto Close Ticket For, days" and "Auto Reminder Ticket For, days."
- The "Auto Close Ticket For, days" field determines the time frame within which a ticket will automatically close if there is no resolution or response.
- The “Completed Ticket Statuses” field determines which all tickets with the selected statuses will be marked as closed. Following the closure, an email notifying the customer of the status change will be sent.
- The "Auto Reminder Ticket For, days" field triggers reminders at predefined intervals, ensuring that unresolved tickets receive prompt attention and action.
- Reminder emails will not be sent for tickets with the status selected in the "Completed Ticket Statuses" field.
- These customizable settings contribute to timely resolution and customer satisfaction.
- By systematically handling pending requests within the system, this automated functionality ensures that tickets stay on the radar until they are appropriately addressed.
Technical Requirements / Compatible with:
- Magento Open Source v2.4.2 and higher
- Adobe Commerce (EE & Cloud) 2.4.x
Supported Languages
- English, German, French, Italian and easily customizable for other Magento supported language packs.
Change Log / Release Notes
Version: 1.0.7: January 2026
- Compatible with Hyva theme 1.4.1
Version: 1.0.6: December 2025
- Compatible with Adobe Commerce (EE & Cloud) for version 2.4.2-2.4.8
Version: 1.0.5: June 2025
- Compatible with Magento 2.4.2 (CE) – 2.4.8(CE)
- Compatible with Hyva Theme 1.3.14
Version: 1.0.4: August 2024
- Bug Fix – Resolved unwanted tags in message while creating ticket from email.
Version: 1.0.3: August 2024
- Bug Fix – Resolved incorrect sender email address issue in admin replies.
Version: 1.0.2: July 2024
- Compatible with Magento 2.3.4 (CE) version and greater.
- Compatible with Magento v2.4.7-p1 (CE)
Version: 1.0.1: March, 2024
- Improvements & Magento v2.4.6-p4 compatibility changes
Version: 1.0.0: February, 2024
- Initial version
Support
If you have questions, use our contact form at webshopextension.com or email at support@webshopextension.com