Categories
Magento
WordPress
SAP Commerce
Odoo
Shopify
Typo3
Shopware
nopCommerce
Pimcore
Hyvä
OXID eShop


1.0 ABOUT PATCHCRAFT
Currently patches concept is complicated, such as for a patch we need to create the folder structure, impex, header file, class file, bean changes etc. It carries a lot of manual effort, and is time consuming as well. Our idea is to simplify the patching idea.
In PatchCraft, the user just needs to paste the impex files in the releases folder(with respect to their release and patch) within the resources/patchcraft and perform an Update. Both ant updatesystem or Update via HAC is sufficient.
PatchCraft helps to run patches in the most user-friendly way. It has a backoffice view as well. Users can find PatchCraft in the backoffice tree node. Going through the backoffice view, the user gets a complete idea about what all are the available patches, their statuses, path, and what are impex files under each patch, their statuses and the error message etc.
2.0 TECHNICAL OVERVIEW
This extension is built on top of SAP Commerce Cloud version 2211. Thus, make sure you have the project running with version 2211.
3.0 TECHNOLOGIES AND TOOLS
The following table summarises the proposed platform and software recommended for the system hosting.
| Sl No: | Component | Description |
| 1 | Operating Platform | Windows 11 |
| 2 | Web Server | Tomcat |
| 3 | Technology | SAP Commerce |
| 4 | Development Environment | IntelliJ IDE |
| 5 | Source Control | Git |
4.0 DATA MODEL
PATCHCRAFT
| Attribute | Type |
| code | String |
| entries | List (PatchCraftEntry) |
| status | Enum |
| path | String |
PATCHCRAFTENTRY
| Attribute | Type |
| file | String |
| status | Enum |
| error | String |
5.0 PLUGIN REQUIREMENTS SCOPE
The following functionalities are covered as part of the “PatchCraft Plugin” :
-
5.1 AUTOMATED PICKING OF IMPEX FILES
-
- Removed the complexities in the folder structure and its naming criteria.
- Users can paste their patches within resources/<extensionname>/releases directory with respect to their release and patch id. For more details refer Folder Structure.
- During update, the impex files will be automatically picked up from this location.
- Impex files stored within the subfolders inside any patch will also be picked.
-
5.2 NO CODE CHANGES AND SPRING BEAN CONFIGURATIONS FOR EACH PATCHES
-
- No need to make code changes for new patches or impex files, users just need to save the impex files according to the folder structure. No other changes need to be done.
- No spring bean configurations are required for new patches
-
5.3 AFTER EXECUTION PATCH AND ENTRIES WILL BE MARKED IN THE DATABASE
-
- After execution all the initiated patches and impex files are updated in the database.
- Information like code, status, path, error message (if any) of all the patches and entries are stored within the database.
- If any impex gets FAILED then the corresponding patch is also marked as FAILED.
- If any impex or patch gets failed it will not affect the execution of the other patches.
- All the detected error cases are handled.
-
5.4 DESIGNED AS A TEMPLATE EXTENSION
-
- PatchCraft is designed as a template extension, so the users can create their new custom extensions with PatchCraft using the simple ant extgen command.
-
5.5 CREATED A BACKOFFICE VIEW FOR PATCHCRAFT
-
- Created PatchCraft tree node and can be accessed by an admin user via backoffice.
- Designed the listview and editor areas for displaying and accessing PatchCraft and PatchCraftEntry details.
-
5.6 RUN SYNCJOB AND SOLRINDEXER DURING PATCH EXECUTION
-
- Users can create a property file in patch, in which they can mention keys ‘runSyncJob’ & ‘runSolrIndex’.
- Within the keys, users can add which all are the SyncJobs and SolrIndexers(in comma separated manner) which they need to perform during patch execution.
6.0 INSTALLATION
- Include patchcraft & patchcraftbackoffice extensions within the project suite.
- Navigate to the platform folder and open a Terminal there.
- PatchCraft is designed as a template, so users can simply create their custom extensions from PatchCraft by simply using ant extgen command.
> ant extgen - We can see an output like this:

Figure 1 : Output of ant extgen
- Select patchcraft from the list.
- In the next prompt provide your custom patchcraft extension name.
- Provide the package in the next prompt.
- Custom extension is created.
- Add the new custom extension and patchcraftbackoffice within the localextensions.xml file.
<extension name='yourcustomextension'/>
<extension name='patchcraftbackoffice'/>
- Build the application and perform server startup.
7.0 WORKING WITH PATCHCRAFT
- Save the impex and property files within the extension according to the folder structure.
- Add your core and all other required extensions in the extensioninfo.xml file.
Example:
<requires-extension name="extensionname"/> - Perform ant updatesystem.
- During update, the impex files will be automatically picked up and will be initiated to import.
- In case of ant initialize, make sure that you have added the core and all other required extensions in the extensioninfo.xml file.
- Also all the mentioned syncJobs and solrIndex will get initiated.
- Login to backoffice as admin and navigate into the PatchCraft tree node for a detailed view of the executed patches.
- Refer below for more details.
-
7.1 FOLDER STRUCTURE
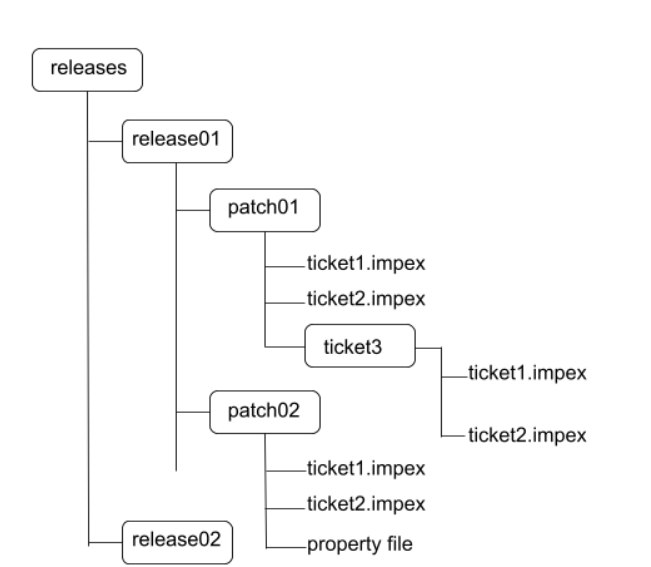
Figure 2 : Folder Structure
-
- PatchCraft has a very simple folder structure.
- Within the resources/, we can see a releases folder.
- Users can paste their patches within this directory with respect to their release and patch id.
- Patch folder consists of all the impexes of that particular patch and if any ticket consists of multiple impexes, then the user can create a subfolder for that ticket and store the impexes there.
- Within the patch folder, users can create a property file in which they can set the runSolrIndex & runSyncJob keys
-
7.2 ImpEx Files
-
- Users can save the Impex files within the patch folder and if any ticket consists of multiple impex files, then the user can create a subfolder for that ticket and store it there.
- Users must be cautious when naming the impex files, as no impex files of the same patch must have the same name.
- Users can name the impex files with the ticket id, language, country, purpose of the impex etc.
- If any impex fails during import, the entry and the corresponding patch will be marked as FAILED.
- Once executed patches will be skipped till there are no new impex files in that patch.
- If a user adds a new impex file in an already executed patch, then the already imported files will be skipped and the new one will be imported.
-
-
7.2.1 Rerunning of Failed Impex Files
-
-
-
- Once FAILED, the entry can be removed manually from the backoffice.
- After correcting the Impex error, User can do an update again.
- Now the PatchCraft & entry will be updated with a SUCCESS status.
-
-
7.3 Property File
-
- Users can create a property file within the patch folder.
- Within the property file user can define two keys:
| Key | Value |
| runSyncJob | SyncJob code in comma separated manner |
| runSolrIndex | SolrFacetSearchConfig name in comma separated manner |
Example:
runSyncJob=job1,job2,job3
runSolrIndex=index1,index2,index3
-
- For one patch one property file is only required, that means no need to create the file for each ticket.
- If no job needs to run on that sprint, then no need for a property file for that patch. That means it’s not at all a mandatory one.
- If more than one property file is present in a patch folder, the first one will only be considered.
- Other than these two keys, no other keys can be used.
-
7.4 BACKOFFICE VIEW
-
- Login to backoffice as admin, navigate to the PatchCraft tree node in the Administration cockpit.
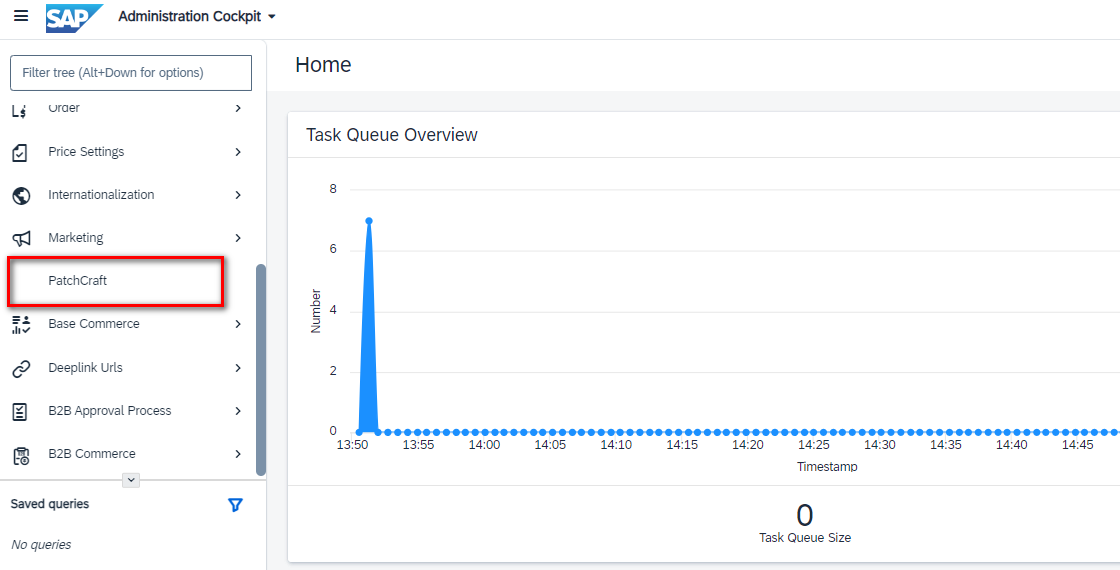
Figure 3: PatchCraft Backoffice Tree node
-
- Click on the PatchCraft and the listview is displayed with code, status, created time, executed time and the path.
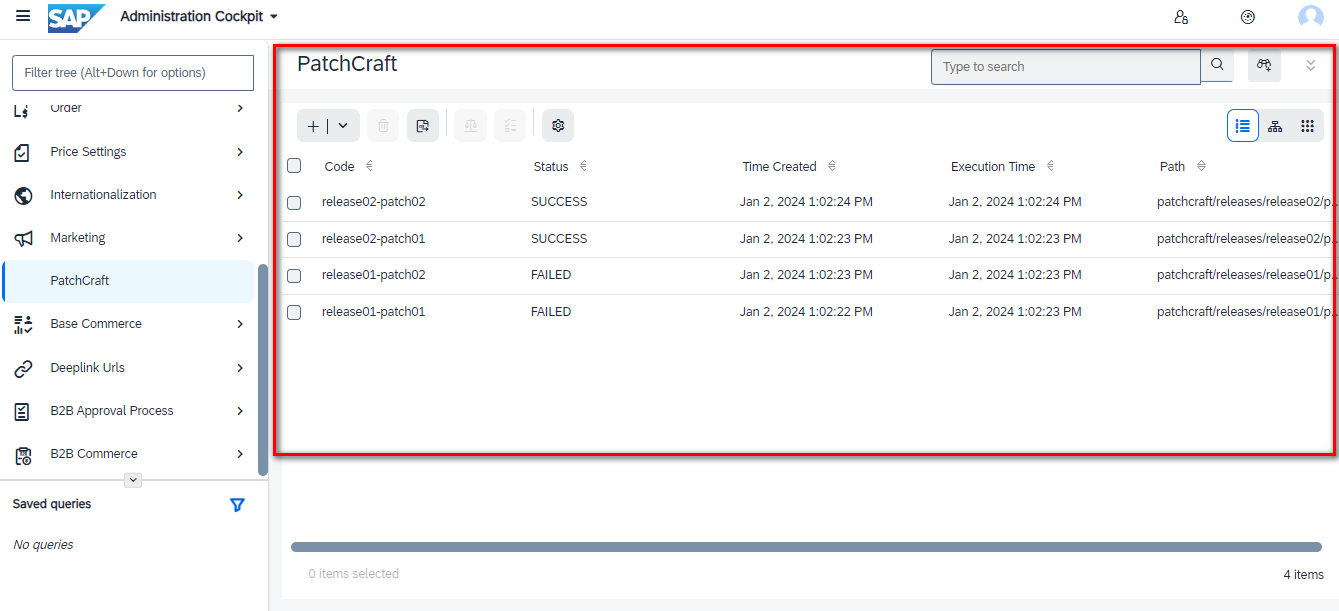
Figure 4 : PatchCraft listview
-
- Once any patch is selected, the editor area of that particular patch is displayed, where the user can see code, entries, status and the path within the Common tab.
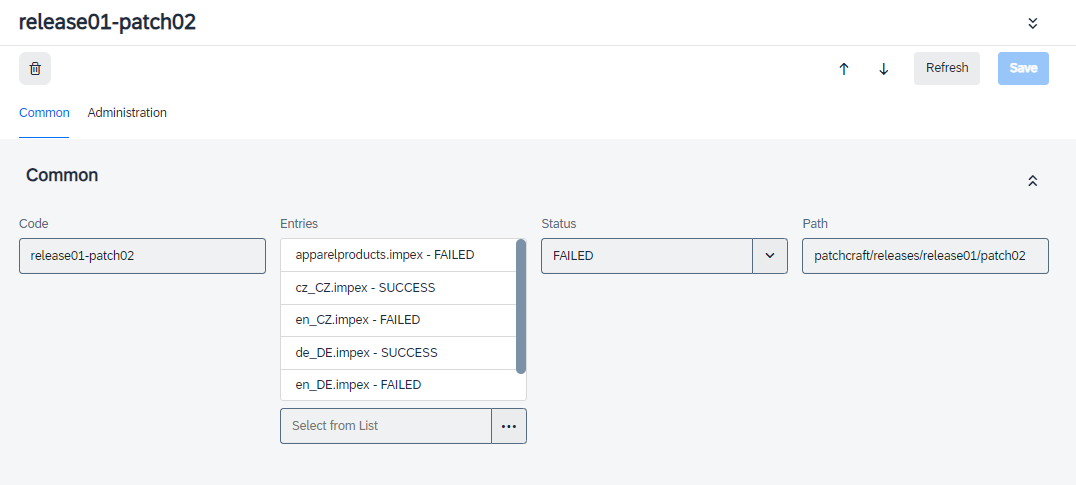
Figure 5 : Editor area of Patch
-
- Once any entries are double clicked, the editor area of the entries are displayed, where the user can see the file name, status and the error in the Common tab.
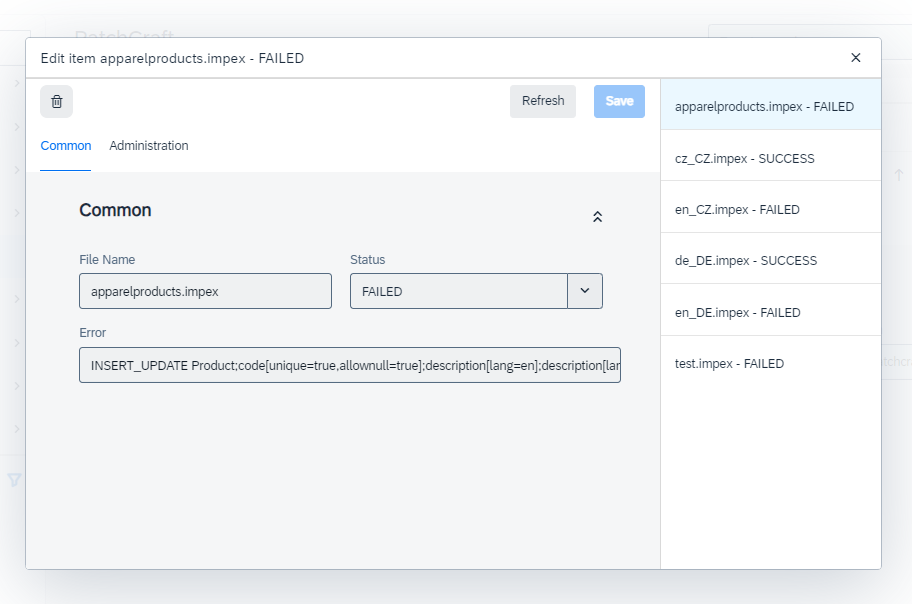
Figure 6 : Editor area of Entry