Categories
Magento
WordPress
SAP Commerce
Odoo
Shopify
Typo3
Shopware
nopCommerce
Pimcore
Hyvä
OXID eShop


1.Introduction
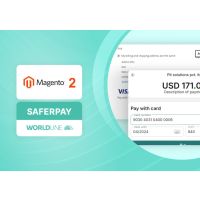
1.1 About Saferpay
Saferpay is a comprehensive and secure e-commerce payment solution developed by Worldline, designed to meet the needs of merchants operating in both local and international markets. With Saferpay, businesses can offer their customers a seamless, user-friendly checkout experience that supports a wide range of national and international payment methods—including credit, debit cards, and digital wallets. Tailored for flexibility, Saferpay integrates easily with various shop systems and platforms, making it suitable for online shops of all sizes. The solution also ensures high levels of security and compliance, including PCI DSS certification and 3-D Secure support, helping merchants protect sensitive customer data and reduce fraud. With its modular design, Saferpay allows businesses to customize their payment process, streamline transaction management, and provide features like tokenization (Alias Management) and support for multiple payment methods. Whether you operate an online store Saferpay offers a reliable, scalable, and future-ready payment infrastructure
This guide is designed to help merchants install, configure, and manage the Saferpay Payment Module in their OXID eShop.
Using the Saferpay plugin, merchants can:
● Offer various secure payment methods to their customers
● Ensure smooth integration between backend settings and frontend user experience
● Customize payment behaviour based on flexible configuration options
This manual will walk you through:
● System requirements and installation steps
● Configuration of key settings and how they affect frontend behaviour
● Functional impact of each setting on the checkout and payment process
1.2 ABOUT OXID ESHOP MODULE
This module is implemented to integrate Saferpay Payment methods in Oxid eShop. It supports the following payment methods of Saferpay to work with default Oxid eShop checkout.
1] SAFERPAY ACCOUNTTOACCOUNT
2] SAFERPAY ALIPAY
3] SAFERPAY AMERICAN EXPRESS
4] SAFERPAY APPLEPAY
5] SAFERPAY BANCONTACT
6] SAFERPAY BLIK
7] SAFERPAY CARD
8] SAFERPAY CLICKTOPAY
9] SAFERPAY DINERS
10] SAFERPAY EPRZELEWY
11] SAFERPAY EPS
12] SAFERPAY GOOGLEPAY
13] SAFERPAY IDEAL
14] SAFERPAY JCB
15] SAFERPAY MAESTRO
16] SAFERPAY MASTERCARD
17] SAFERPAY PAYPAL
18] SAFERPAY POSTFINANCEPAY
19] SAFERPAY SEPA ELV
20] SAFERPAY TWINT
21] SAFERPAY UNIONPAY
22] SAFERPAY VISA
23] SAFERPAY WECHATPAY
24] SAFERPAY WL CRYPTOPAYMENTS
This module supports all the features of online payment methods like invoice capturing, refunding & cancellation. All these payment operations done in the Oxid eShop backend will be synced to Saferpay account also.
1.2.1 SUPPORTED LANGUAGES
The module provides translation for German (Germany), English (United States), French (France) and Spanish (Spain).
2. Installation
In this chapter, the installation of the Saferpay plugin for OXID eShop version 7.0 – 7.2 is described.
System Requirements
Please ensure the following requirements are fulfilled before installing the plugin:
● PHP version: 8.1 – 8.2
● Enabled cURL extension
● Enabled OpenSSL
● OXID eShop 7.0 to 7.2
● SSL-enabled (HTTPS) shop setup
Note: Saferpay requires a secure HTTPS environment to function correctly.
2.1 New Installation
If the plugin is not pre-installed in your OXID shop, follow these steps to manually install and activate the Saferpay payment module.
Step 1: Download the Plugin
● Download the Saferpay module ZIP file and extract it into the following folder of your shop: source/modules/
Step 2: Register the Module Autoloader
In your root composer.json file, add the following autoload configuration under the "autoload" section:
"autoload": {
"psr-4": {
"Saferpay\\PaymentService\\": "source/modules/Saferpay/PaymentService/"
}
}
Then, run the following command to update the autoload mapping: composer dump-autoload
Step 3: Install the Module
Run the following CLI command from your shop root to install the module:
php vendor/bin/oe-console oe:module:install source/modules/Saferpay/PaymentService
Note: - Please use the appropriate php CLI command for your environment instead of just php
Step 4: Activate the Module
Once installed, activate the module using this command:
php vendor/bin/oe-console oe:module:activate saferpay_paymentservice
Step 5: Configure Saferpay Module
It runs the necessary database migrations, generates OXID views, and prepares the plugin for use.
php vendor/bin/oe-console saferpay:configure
Note: To view the Saferpay payment methods during checkout, please fill in valid values for the Saferpay
General Configurations mentioned in sections 3.1.4 to 3.1.8 and save the configuration.
Step 6: Cron Setup (optional)
To ensure smooth operation and maintain a clean database, the plugin provides automated cleanup functionality via cron jobs
Set up a system cron on your server to run the following commands at your preferred intervals:
1. Removes abandoned orders stuck in "Pending Payment" state (after 1 hour or 120 hours for A2A). vendor/bin/oe-console saferpay:clear-pending-orders
2. Deletes inactive alias registrations older than 2 days. vendor/bin/oe-console saferpay:clear-pending-alias.
Make sure your server's cron service is active and configured by your system administrator.
Sample Cron Entry
*/30 * * * * /usr/bin/php /var/www/html/YOUR_PROJECT/vendor/bin/oe-console saferpay:clearpending-orders >> /var/www/html/YOUR_PROJECT/source/log/saferpay_cron.log.
These tasks can also be triggered manually from the backend if needed.
3. Configuration
Saferpay module configuration includes two section
1. General configuration
2. Payment method-specific configuration
3.1 General configuration
Configure general module settings from Saferpay > Configuration Tab
This section explains how to configure the Saferpay plugin settings in your OXID admin panel. These configurations directly affect both the backend setup and the customer experience in the frontend —especially during the checkout process and payment handling. Each field plays a critical role in ensuring secure, stable, and seamless payment functionality. General Plugin information can be viewed from here
3.1.1. Version : Current Plugin Version
3.1.2. API Spec Version : Current API Spec version. This gives information about technical features, modifications and enhancements that are integrated
3.1.3. Environment
Options: Test or Live
Description:
Specifies which environment the plugin should use for processing payments.
● Test – Use this for development or pre-launch testing. Transactions are simulated using test credentials.
● Live – Use this for real transactions in your live online store.
Impact: Determines whether the system uses test or live API credentials and endpoints. Ensure this is set to Live before going live.
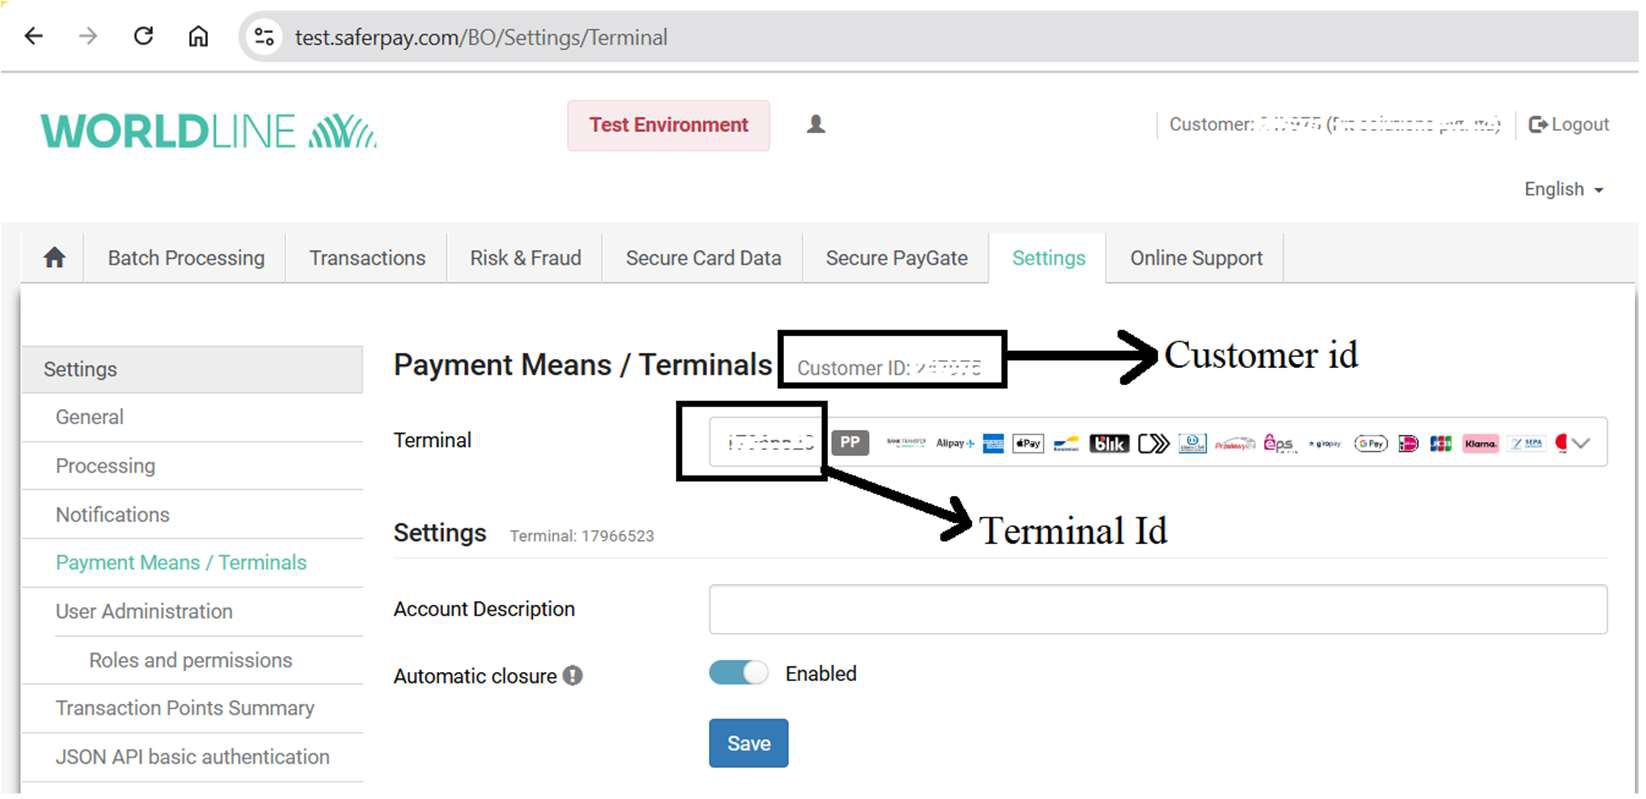
Figure 1
3.1.4. Customer ID
Description:
The unique Customer ID issued by Saferpay for your account. This value is required when the test environment is selected.
Where to find it:
Available in your Saferpay Backoffice. Refer Figure 1
Impact:
The plugin uses this ID to authenticate and process payments.
3.1.5 Terminal ID
Description:
Terminal ID assigned by Saferpay, which works in conjunction with your Customer ID.
Where to find it:
Available in your Saferpay Backoffice. Refer Figure 1
Impact:
Used to identify the payment terminal during transactions.

Figure 2
3.1.6 JSON API Username
Description:
API username used to authenticate requests via the Saferpay JSON API.
Where to find it:
Available in your Saferpay Backoffice. Refer Figure 2
Impact:
Essential for API calls such as payment authorization, capture, and refund. Must be entered exactly as provided.
3.1.7. JSON API Password
Description:
The password associated with the above JSON API Username.
Where to find it:
The password is displayed only once at the time of generating new API credentials in the Saferpay Backoffice. Refer Figure 2
Important: It will not be visible again later. Please ensure you save it securely at the time it is created.
Impact:
Required for authentication of backend communication with Saferpay servers. Keep this secure and never share it.
3.1.8. Saferpay Base URL
Description:
Base URL for the Saferpay JSON API, which handles payment initialization, authorization, and other backend actions.
Typical value:
For Test accounts
https://test.saferpay.com/api
For Live Accounts:
https://www.saferpay.com/api
Impact:
All JSON API requests are routed through this URL. Ensure it's accurate to allow proper transaction
flow.
3.1.9. Licence
Description:
A read-only field that displays the type of Saferpay license associated with your account.
How it works:
Every time you press the Save button in the configuration, a request is sent to the Saferpay Management API, which fetches and updates the license type (e.g., Saferpay Custom, ECommerce, etc.).
Impact:
Used internally to determine the plugin’s behaviour or supported features based on the license type. This is not manually editable and is derived dynamically based on your Saferpay credentials.
To know more about Saferpay Licensing, check the link below
https://docs.saferpay.com/home/master/licensing
3.1.10. Liability Shift Behavior
Options:
● Auto Capture
● Manual Capture
● Auto Cancel
Description:
This setting defines how the plugin should handle transactions when Liability Shift is not achieved.
What each option does:
- Auto Capture:
Liability shift is not checked. The payment is immediately authorized or captured depending on the selected payment method’s capture setting (auto or manual).
Use this only if you fully trust your customer base and want a frictionless payment process — less secure.
- Manual Capture:
Liability shift is checked. The payment is always authorized first. If liability shift fails, then even if the payment method is set to auto-capture, the transaction will stay authorized and won't be captured.
Safer but requires manual action if 3D Secure fails. Suitable for merchants who want to evaluate risk before capturing the funds.
● Auto Cancel:
Liability shift is checked, and if it fails, the transaction is immediately cancelled.
Prevents any chance of processing high-risk payments without liability protection. Highly recommended for high-risk sectors (e.g., electronics, luxury goods).
Impact:
This setting directly influences how safely and automatically your payments are handled in case of a failed 3D Secure check. Merchants should balance security vs. convenience based on the nature of their business and risk exposure.
3.1.11. Force 3D Secure authentication during transactions
Options: Yes / No
Description:
Forces 3D Secure (e.g., Verified by Visa, Mastercard SecureCode) for every transaction, regardless of the amount or risk assessment.
Impact:
● Yes – Increases payment security by requiring cardholder authentication.
● No – May allow frictionless flow but could result in liability for fraudulent transactions.
Recommended: Enable this (Yes) especially if you sell high-value or sensitive products.
3.1.12. Enable Saved Cards Option
Options: Yes / No
Description:
This setting allows returning customers to securely save their card details (tokenized) for future purchases.
Impact on Frontend:
When enabled:
● A "Saved Cards" tab will appear in the My Account area. Please see Figure 3
● Customers can manage their saved cards and add new ones directly from this section.
● This feature is only available for logged-in customers.

Figure 3
3.1.13. Re-enter CVC value when using saved cards for payment
Options: Yes / No
Description:
Prompts users to re-enter the Card Verification Code (CVC) even when using saved cards.
Impact: Adds an extra layer of security, especially helpful in reducing fraud or misuse of stored cards.
3.1.14. Merchant Email
Description:
The email address where the merchant will receive payment authorization confirmations from Saferpay for Payment Page Transactions only.
Note: When using Dynamic Currency Conversion (DCC), email can also serve to notify payers with required DCC details, ensuring compliance – applicable to Payment Page and Transaction Interface transactions.
Impact:
Ensures you’re notified each time a transaction is authorized. Useful for tracking orders.
3.1.15. Order Description
Description:
A human-readable description of the order is shown on the hosted Saferpay payment page.
Typically includes key info like the shop name and order number (e.g., Order #12345 – MyOnlineShop), helping customers quickly recognize their purchase during checkout.
3.1.16. CSS URL
Description:
A URL pointing to a custom CSS file that allows you to style the payment interface if the authorisation method is set to Transaction Interface.
Example:
Enter a valid CSS URL which is included in the transaction interface. This file must be hosted on an SSL/TLS secured web server (the url must start with https://) Example: https://merchanthost/merchant.css.
Impact:
Lets you brand the transaction interface (colours, fonts, spacing) to match your store’s look and feel.
3.1.17. Name of the Saferpay Payment Page Configuration
Description:
Defines the configuration used for customizing the design and behaviour of the hosted Saferpay payment pages.
Where to find it:
You can create and manage configurations in the Saferpay Backoffice under Settings > Payment Page Configuration.
Behavior:
The selected configuration ID applies styles, logos, text, and other customizations to the payment page. If no specific configuration is set here, the one marked as default in the Saferpay Backoffice will be usedautomatically.
Impact:
Enables a seamless and branded customer experience by applying consistent design and behaviour settings across the hosted payment interface.
3.2 Payment method-specific configuration
Individual payment methods which come under Saferpay can be configured from Shop Settings > Payment Methods section. Not all payment will be in your contract so be careful while enabling payment methods.
Saferpay-specific configurations are explained in detail.
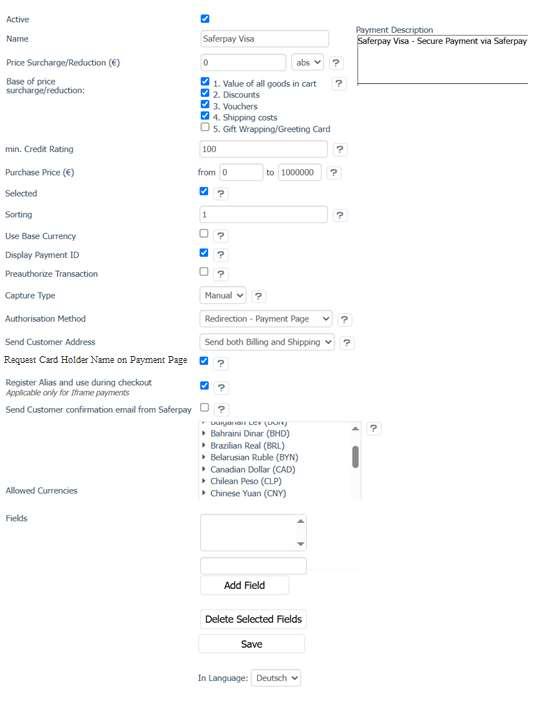
Figure 4
Default Payment Options
3.2.1. Active
Type: Checkbox
Purpose: Enables or disables the payment method.
Frontend Impact: If unchecked, the payment method will not be shown during checkout.
3.2.2. Name
Type: Text
Purpose: Sets the payment method's label as shown in the OXID backend and in the checkout. Please see Figure 4 and 5.
Note:
● This field is language-dependent – make sure to enter the name in each available store language to ensure proper display on the storefront.
● The current input is based on the selected language from the "In Language:" dropdown at the bottom of the form.
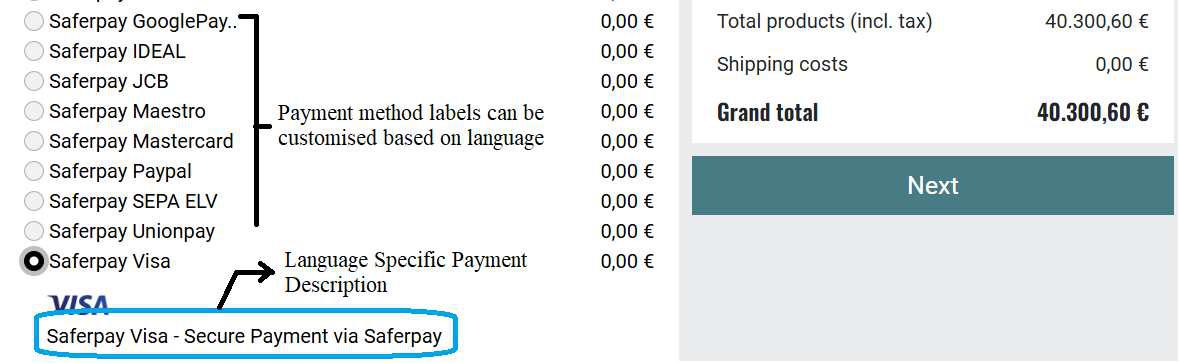
Figure 5
3.2.3. Payment Description
Type: Textarea
Purpose:
Allows merchant to enter a custom description for the payment method. This description will appear during the checkout process to help customers better understand the purpose or details of the payment option.
This field is language-dependent – make sure to enter the name in each available store language to ensure proper display on the storefront.
Frontend Impact:
Displayed below or alongside the payment method name on the checkout screen, providing clarity or additional context to the customer. Please see Figure 5
3.2.3. Price Surcharge/Reduction
Type: Number
Purpose: Adds a surcharge (positive value) or applies a discount (negative value) for selecting this payment method.
Options: abs (absolute) / % (percentage)
Purpose: Determines if the surcharge/reduction is a fixed amount or a percentage of the order total.
3.2.4. Base of Price Surcharge/Reduction
Options:
1. Value of all goods in cart
2. Discounts
3. Vouchers
4. Shipping costs
5. Gift Wrapping/Greeting Card
Purpose: Sets which components of the cart total are considered when calculating the surcharge or reduction.
3.2.5. Minimum Credit Rating
Type: Numeric
Purpose:
Defines the minimum credit score a customer must have in order to see and use this payment method during checkout
Usage Details:
● Use this to restrict payment methods based on the customer's creditworthiness.
● This value is checked against the customer's credit rating, which can be entered manually under: Administer Users > Users > Extended tab.
● If the customer’s credit rating is lower than the specified value, the payment method will not be shown during checkout.
Example:
If set to 100, only users with a credit score of 100 or more (as defined in their profile) will see this payment option.
3.2.6. Purchase Price Range (€)
Type: Range (from - to)
Purpose:
Defines the minimum and maximum cart value for which this payment method is available.
Usage Details:
● Use this to restrict the payment method’s availability based on the total purchase amount in the cart.
● Enter values in the “from” and “to” fields to create a valid range.
Frontend Impact:
● FE: If the cart total is outside the specified range, the payment method will not be displayed during checkout.
3.2.7. Selected
Type: Checkbox
Purpose: You can use Selected to define which payment method is be selected as the default method if the user can choose between several payment methods.
3.2.8. Sorting
Type: Integer
Purpose: Controls the display order in the payment method list during checkout.
Saferpay Payment Options
3.2.9. Use Base Currency
Type: Checkbox
Purpose: If enabled, the payment amount is sent in the shop’s base currency rather than the customer's selected currency.
3.2.10. Display Payment ID
Type: Checkbox
Purpose: Displays the unique transaction ID in the order confirmation page and confirmation email.
Please see Figure 6.
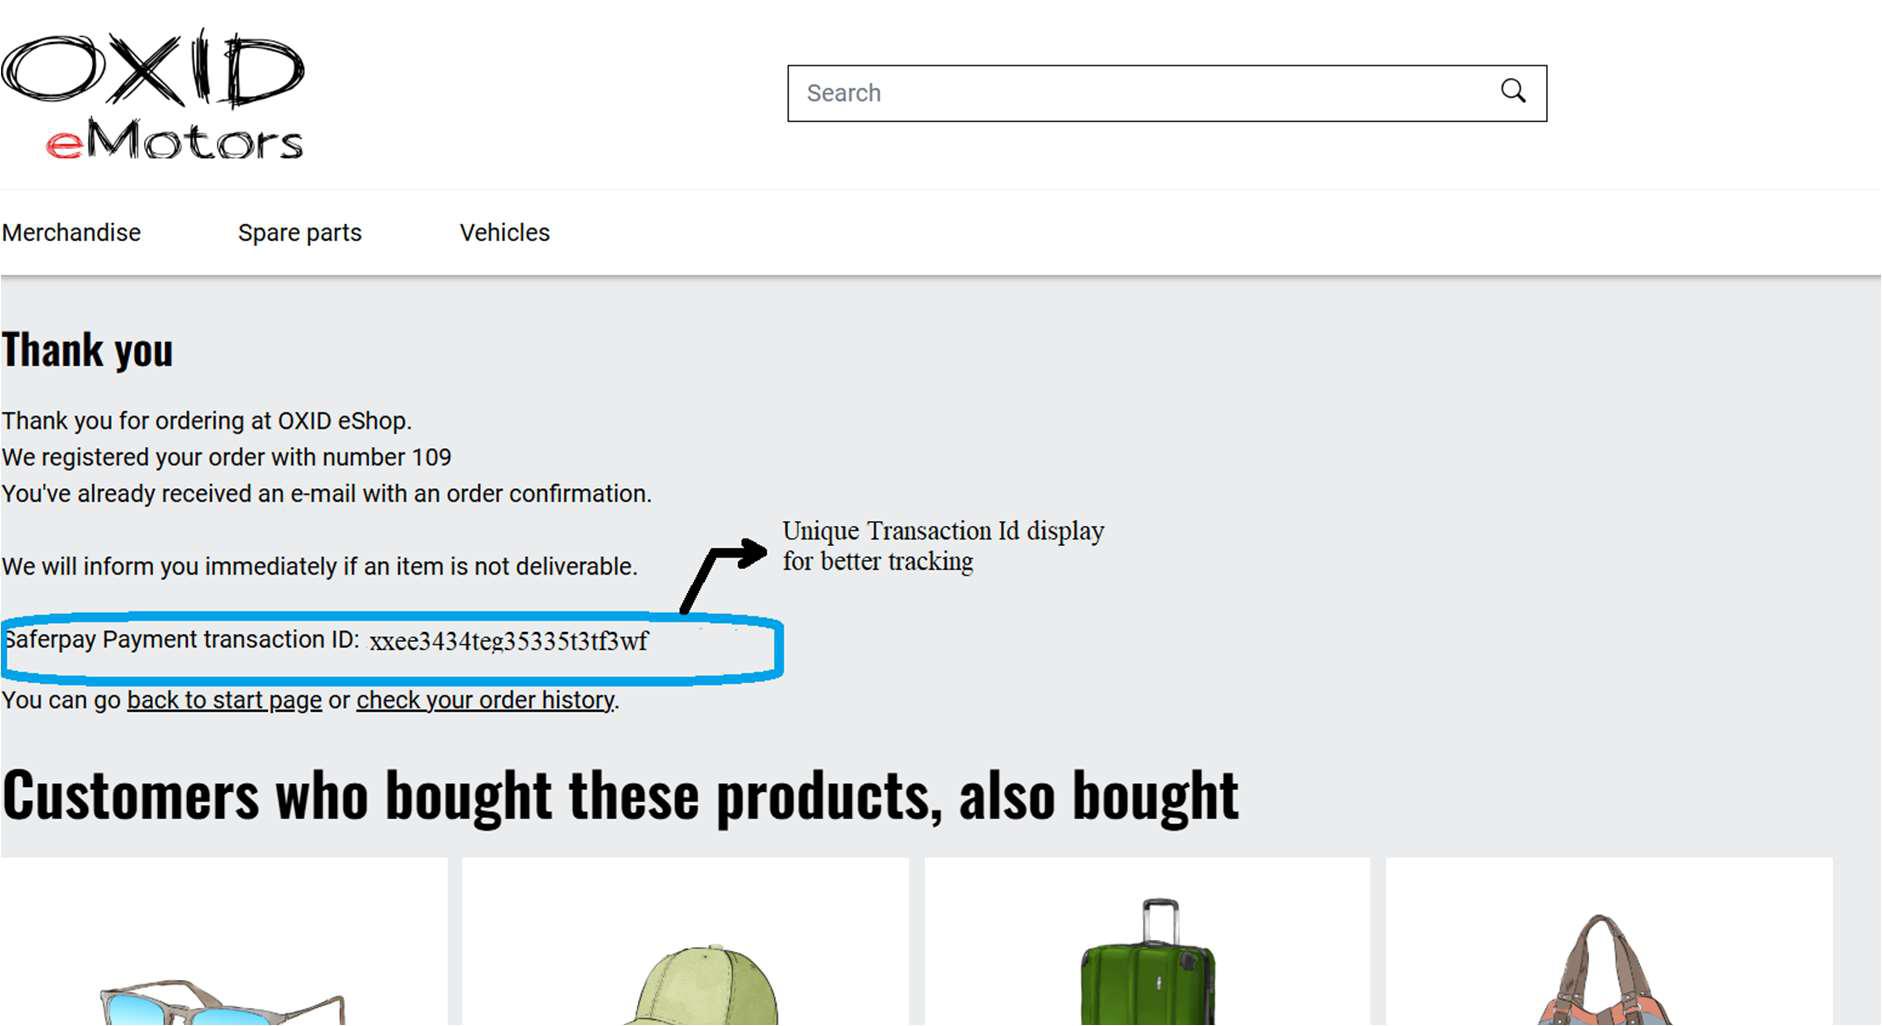
Figure 6
3.2.11. Preauthorize Transaction
Type: Toggle (Yes/No)
Purpose:
Controls whether the transaction is processed as a pre-authorization or a final authorization.
Usage Details:
● Yes (True): The transaction is processed as pre-authorization. This means the payment is only reserved and must be manually captured later.
● No (False): The transaction is processed as final authorization, and will follow the capture type setting (e.g., Autocapture).
Important Note:
Even if Capture Type is set to Autocapture, enabling Preauthorize Transaction will prevent the automatic capture. In such cases, you must manually capture the transaction.
3.2.12. Capture Type
Options: Auto / Manual
Purpose:
● Auto: Captures payment immediately after authorization.
● Manual: Payment will be authorized, but merchant will have to capture manually from the shop Backend.
3.2.8. Authorisation Method
Type: Dropdown
Purpose:
Defines how the payment method is presented and processed during the checkout flow. Certain payment methods support more than one authorisation method.
Options & Details:
● Redirection - Payment Page:
Redirects the customer from your OXID shop to the Saferpay hosted payment gateway to process the payment. Once the payment is completed, the customer is redirected back to your shop.
-
- Use Case: Simplified, secure payment integration with minimal PCI requirements.
- Compatibility: Works with eCommerce or Business licenses.
- Supported Methods: All payment methods are supported by Saferpay.
- Interface Used: Saferpay Payment Page Interface.
● IFrame - Transaction Interface:
Displays the payment form within a lightbox directly in your OXID shop, offering a seamless user experience.
o Use Case: Offers advanced features like Hosted Entry Form (HEF) and Secure Card Data tokenization.
o Requirements: Requires a Business License on the Live system.
o Interface Used: Saferpay Transaction Interface, extending the Payment Page Interface.
FE Impact:
Changes the checkout flow experience:
● Redirect for Payment Page
● In-page lightbox for Transaction Interface
3.2.14. Send Customer Address
Options:
● Send both Billing and Shipping
● Send only Billing
● Do not send
Purpose: Controls which customer address details are sent to Saferpay.
Saferpay will display the address details along with the order details in the Saferpay Backoffice, depending on the configuration. Please refer Figure:7

Figure 7
3.2.15. Request Card Holder Name on Payment Page
Type: Checkbox
Purpose: Enables or disables the display of the cardholder name field on the payment form.
FE Impact: If set to 'Yes', the cardholder name field will be displayed in the payment interface during checkout. Please refer Figure 8
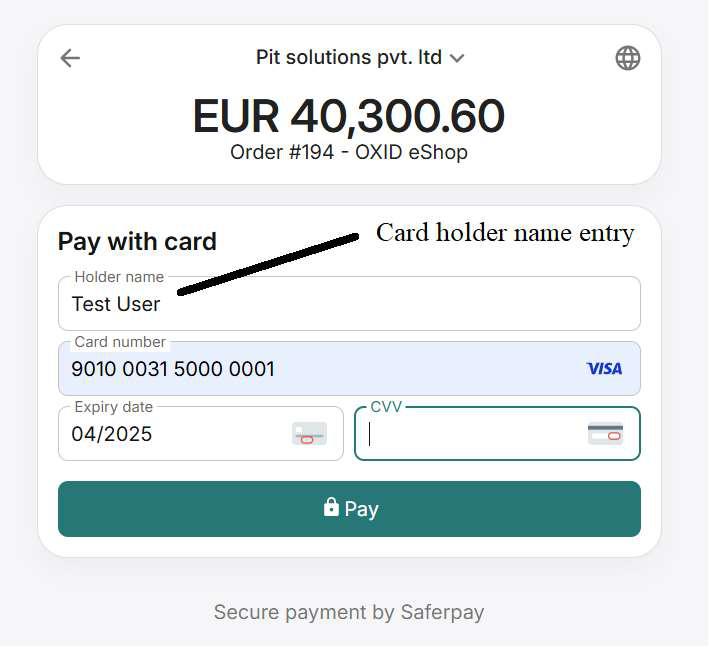
Figure 8
3.2.16. Register Alias and Use During Checkout
Type: Checkbox
Applicable: Only for Iframe payments
Purpose:
Provides customers with the option to save their card details securely with Saferpay during checkout. When this option is enabled, the card used in the transaction is automatically saved (as an alias). These saved cards can then be used for faster and more convenient future purchases, without re-entering card details.
FE Impact:
On the payment checkout screen, customers will see a checkbox allowing them to choose whether they want to save the card for future use. If cards were previously saved, they will also be displayed as selectable options during checkout, enabling quicker payments. Please refer Figure 9.
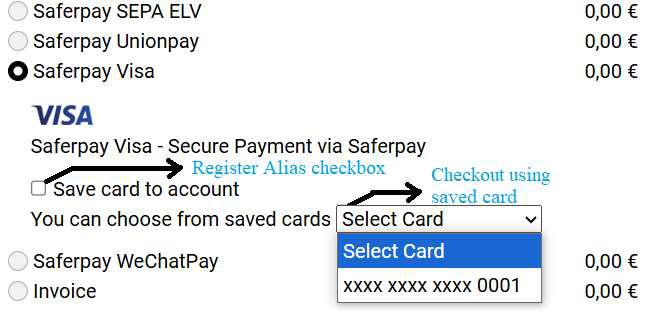
Figure 9
3.2.18. Send Customer Confirmation Email from Saferpay
Type: Checkbox
Purpose: If enabled, Saferpay sends an email to the customer after successful payment.
3.2.19. Allowed Currencies
Type: Static Information Field
Purpose: Defines which currencies can be used with this payment method.
Tip: Make sure your terminal in Saferpay supports all selected currencies.
3.2.20. Fields
Type: Key-Value Additions
Purpose: Add custom fields to be sent along with the payment (e.g., tracking info, order comment).
Functionality:
● Enter field name and value
● Use “Add Field” to include them
● Select and use “Delete Selected Fields” to remove
3.2.22. Payment Brands
Type: Multi-select (only applicable for Apple Pay and Google Pay)
Purpose:
Allows the merchant to select specific payment brands (e.g., Visa, Mastercard, AMEX) to be accepted under the respective payment method. Please refer Figure 10.
Frontend Impact:
Only the selected and supported brands will be displayed in the payment interface at checkout.
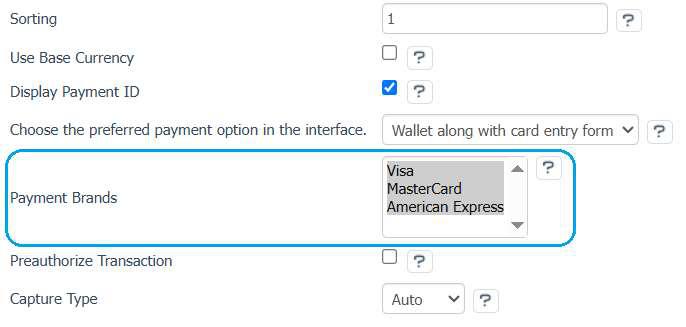
Figure 10
3.3 Payment Method Specifics
Account-to-Account Payments - Refer https://docs.saferpay.com/home/integration-guide/payment-methods/account-to-account-payments
Alipay - https://docs.saferpay.com/home/integration-guide/payment-methods/alipay+
American Express - https://docs.saferpay.com/home/integration-guide/payment-methods/american-express
Apple Pay - https://docs.saferpay.com/home/integration-guide/payment-methods/applepay
Bancontact - https://docs.saferpay.com/home/integration-guide/payment-methods/bancontact
Blik - https://docs.saferpay.com/home/integration-guide/payment-methods/blik
Click to Pay - https://docs.saferpay.com/home/integration-guide/payment-methods/click-to-pay
Diners - https://docs.saferpay.com/home/integration-guide/payment-methods/diners-and-discover
ePrzelewy - https://docs.saferpay.com/home/integration-guide/payment-methods/eprzelewy
EPS - https://docs.saferpay.com/home/integration-guide/payment-methods/eps
Google Pay - https://docs.saferpay.com/home/integration-guide/payment-methods/google-pay
iDEAL - https://docs.saferpay.com/home/integration-guide/payment-methods/ideal
JCB - https://docs.saferpay.com/home/integration-guide/payment-methods/jcb
Maestro - https://docs.saferpay.com/home/integration-guide/payment-methods/maestro
Mastercard - https://docs.saferpay.com/home/integration-guide/payment-methods/mastercard
PayPal -https:/docs.saferpay.com/home/integration-guide/payment-methods/paypal
PostFinance Pay - https://docs.saferpay.com/home/integration-guide/payment-methods/swiss-postcard-and-postfinance
SEPA ELV - https://docs.saferpay.com/home/integration-guide/payment-methods/sepa-direct-debit
TWINT - https://docs.saferpay.com/home/integration-guide/payment-methods/twint
UnionPay - https://docs.saferpay.com/home/integration-guide/payment-methods/china-unionpay
Visa - https://docs.saferpay.com/home/integration-guide/payment-methods/visa-and-vpay
WeChat Pay - https://docs.saferpay.com/home/integration-guide/payment-methods/wechat-pay
WL Crypto Payments - https://docs.saferpay.com/home/integration-guide/payment-methods/crypto-payments
4. Order Management
Once payment is completed and authorized through Saferpay, order-level management actions can be performed from the OXID admin panel under Administer Orders → Orders.
Select an order to view detailed Saferpay transaction data from the custom Saferpay Payment tab and perform the following actions:
4.1. Transaction Status
The current transaction status (e.g., AUTHORIZED, CAPTURED) is displayed at the top of the ‘Saferpay Payment’ tab.
Redirect
● When? Right after the customer clicks the Place Order button and is being redirected to the payment page.
● Details: A transaction entry is created, but the payment has not yet been completed. This may happen if the customer abandons the payment or an error occurs.
● OXID Internal Status: Pending Payment
Pending Payment
● When? The customer is still in the payment process (e.g., bank transfer in progress). Only for Account to Account payment method
● Details: Payment is not yet completed or confirmed.
● OXID Internal Status: Pending Payment
Authorized
● When? The payment has been approved by the customer’s bank, but funds are not yet transferred.
● Details: Requires manual or automatic capture based on the capture and liability settings.
● OXID Internal Status: Ok
Captured
● When? Funds have been successfully captured from the customer.
● Details: This is the final step for most transactions.
● OXID Internal Status: Ok
Refund Pending
● When? A refund has been initiated but not yet completed.
● Details: The refund is still processing.
● OXID Internal Status: Ok
Refunded
● When? The transaction has been successfully refunded.
● Details: The customer has received their money back.
● OXID Status: Payment Refunded
4.2. Actions Available
● Capture Payment
If the payment configuration Capture Type is set to Automatic, the transaction will be captured automatically by Saferpay after authorization. No manual action is required from the OXID backend in this case.
However, if the capture type is Manual, the Capture Payment button becomes visible when a transaction is in the AUTHORIZED state. Please refer Figure 11.
Clicking this button:
● Triggers the capture of the authorized amount.
● Finalizes the payment so it can be settled.
Once captured, the payment status will be updated accordingly in both the OXID admin and Saferpay Backoffice. Please refer figure 12.
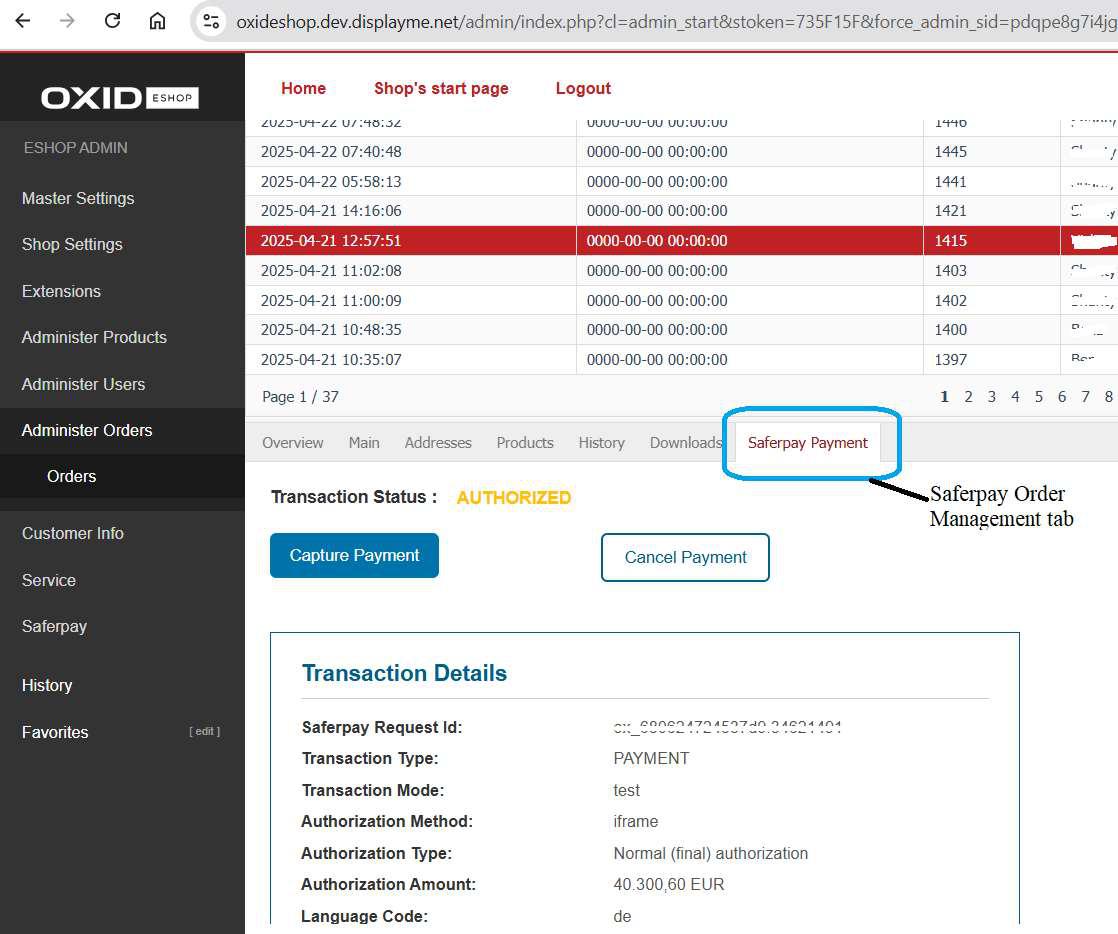
Figure 11
● Cancel Payment
Cancels the authorized transaction, preventing any capture from occurring. Only available before the payment is captured. Please refer figure 11.
● Refund Payment
The Refund Payment option allows the merchant to return a previously captured amount to the customer.
Note: This option is only available after a payment has been successfully captured (i.e., in the “CAPTURED” state). Please refer Figure 12.
When clicking Refund Payment:
● You can issue a full refund for the transaction.
● The refunded amount will be displayed in the Transaction Details section.
Refunds are processed via Saferpay and reflected in both the OXID admin and in the Saferpay Backoffice.
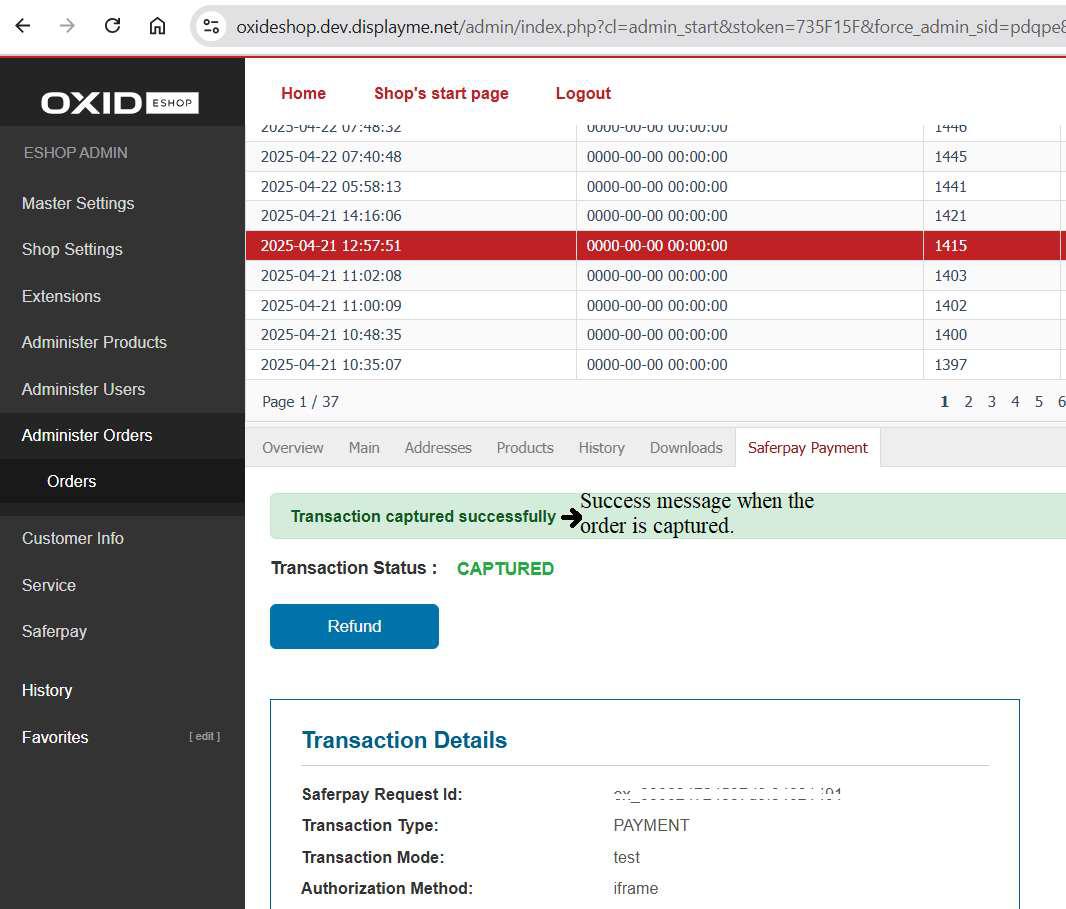
Figure 12
5.Transaction Overview
The Transaction Overview section provides a detailed breakdown of the payment transaction processed via Saferpay. This information is crucial for merchants to verify the status and key attributes of each order’s payment. Below is an explanation of the fields shown: Please refer Figure 13.
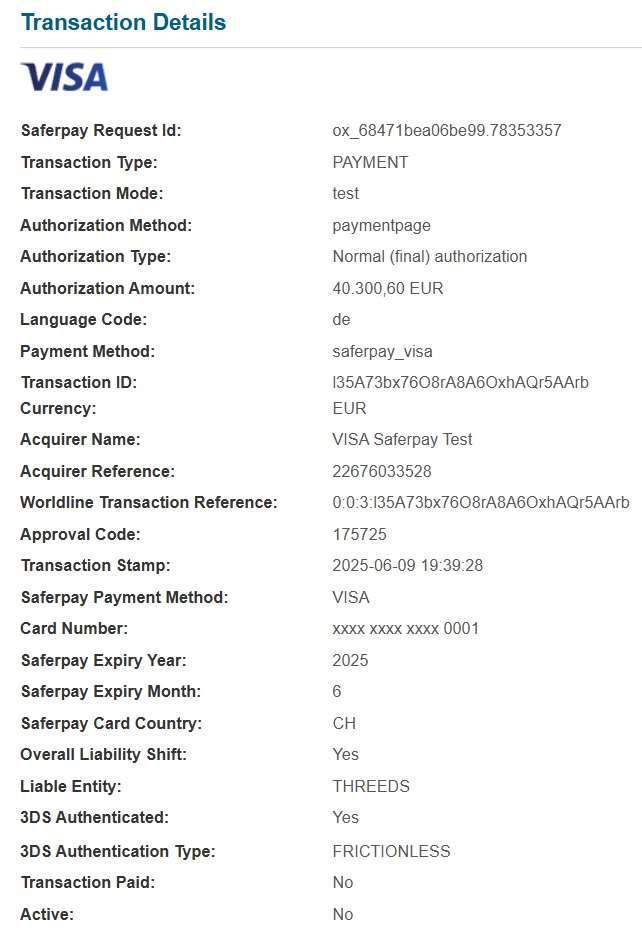
Figure 13
Transaction Details
Field Description
Saferpay Request Id Unique identifier for the transaction generated by Saferpay.
Transaction Type Type of transaction processed. Common values: PAYMENT, REFUND.
Transaction Mode Indicates if the transaction was a real transaction or processed in test mode.
Authorization Method Shows how the payment form was presented, e.g., iframe or payment page.
Authorization Type Type of authorization requested: Normal (final) or Pre-authorization.
Authorization
Amount Total amount authorized by the customer.
Language Code Language used in the payment interface (e.g., de = German).
Payment Method Indicates the type of payment method used (e.g., saferpay_visa).
Transaction ID Unique ID generated for the transaction in Saferpay.
Currency The currency used for the transaction (e.g., EUR).
Acquirer Name Name of the acquiring bank that processed the card transaction.
Acquirer Reference Reference number provided by the acquirer for tracking purposes.
Worldline Transaction
Reference Internal reference number generated by Saferpay.
Approval Code Code indicating authorization success from the card issuer.
Transaction Stamp Exact timestamp of when the transaction was initiated.
Saferpay Payment
Method Payment method detected and processed (e.g., VISA).
Card Number Masked card number of the customer’s credit card.
Card Expiry Year /
Month Expiration details of the customer’s card.
Saferpay Card
Country Country from which the card originates (e.g., CH = Switzerland).
Alias Registered Indicates if the card was saved as a reusable alias (Yes/No).
Overall Liability Shift: Indicates if the liability for fraud-related chargebacks has shifted to the card issuer, based on 3D Secure verification.
Liable Entity Indicates who is liable in case of chargebacks (THREEDS for 3D-Secure).
3DS Authenticated Shows whether 3D Secure authentication was performed.
3DS Authentication Type Indicates the type of Strong Customer Authentication (SCA) applied.
Transaction Paid Whether the payment has been fully processed and marked as paid.
Active Indicates whether the transaction is currently active.
Amount Shows the amount authorized/captured/refunded.
6.Special Cases
Wallet payment methods
Google Pay
● Google Pay supports both wallet and card entry form flows.
● Supported card brands: Visa , MasterCard and American Express.
Apple Pay
● Apple Pay also supports wallet and card entry methods.
● Supported card brands: Visa , MasterCard , American Express, Maestro and Diners Club.
Account to Account (A2A) Payment Method
● With A2A, payments rely on bank transfers, and approval may take time.
● During the waiting period, Saferpay assigns the transaction a Pending status.
● OXID Status: Pending Payment — introduced specifically to reflect this transitional state.
● Timeouts: If no update is received within 120 hours (5 days), the transaction will expire.
WL Crypto Payments
Cryptocurrency transactions (via Bitcoin Suisse integration) have distinct limitations and refund behavior.
Payment Notes:
● The currencies supported are CHF or EUR only.
● EUR payouts are currently limited to Belgium and Luxembourg.
Refund Process:
● Refunds are not instant and must go through a manual approval process.
● Status flow:
o Initially set to PENDING.
o Once processed by Bitcoin Suisse and confirmed, Saferpay updates the refund to CAPTURED.
7. Alias Management
Description:
Alias Management allows returning customers to securely store their card details (tokenized) for faster and more convenient future purchases. This is achieved through Saferpay's Secure Card Data (SCD) service, which ensures sensitive card information is safely stored in Saferpay's PCI-certified data centre — keeping it entirely separate from your store’s infrastructure.
Frontend Impact:
When enabled:
● A dedicated “Saved Cards” tab will appear in the My Account section, when “Enable Saved Cards Option” in global settings is set to "Yes" (see Figure 14).
● Logged-in customers can add, manage (update/delete), and use saved payment methods directly from this section.
● All card data entry and management is handled securely via Saferpay’s hosted card entry form.
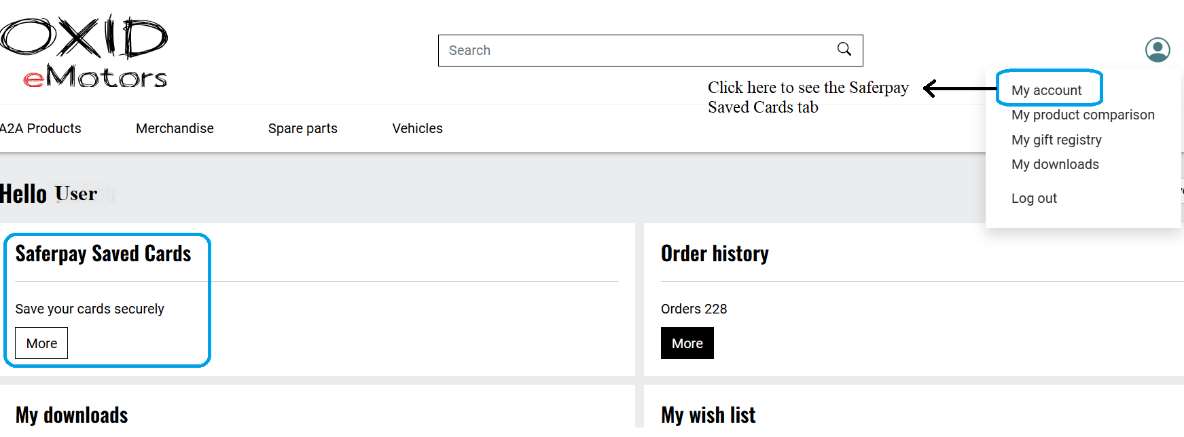
Figure 14
How to Use the "Saved Cards" Section Please refer Figure 15
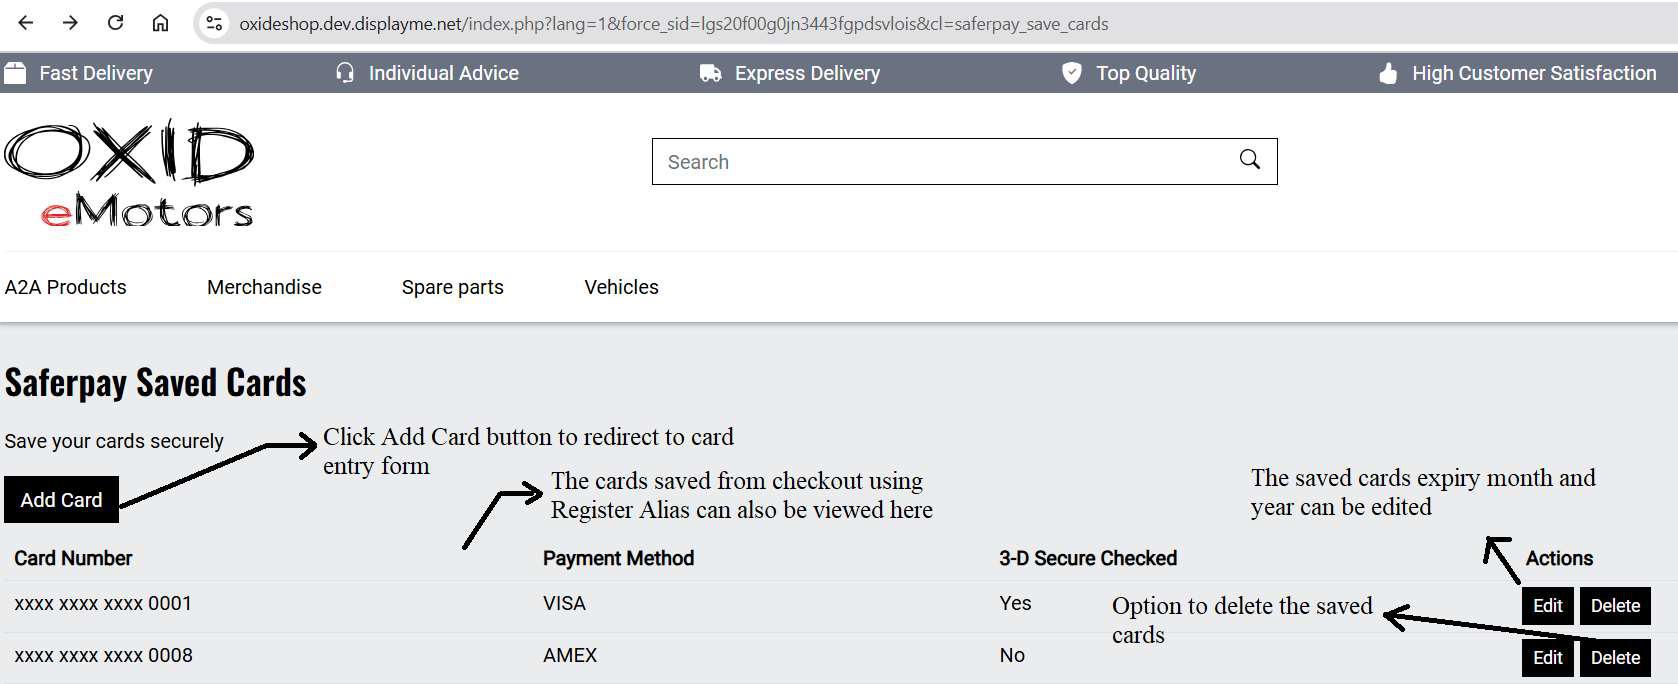
Figure 15
The "Saferpay Saved Cards" section under My Account allows customers to securely manage their saved payment cards. Here's how it works:
Add a New Card
● Click the “Add Card” button.
● You will be redirected to the Saferpay-hosted card entry form, where you can enter and securely save your card details
View Saved Cards
● All cards saved during checkout using Register Alias will also appear here, along with the cards saved from saved cards section.
● The list includes the masked card number, payment method (e.g., VISA, AMEX), and whether 3- D Secure was applied.
Edit Saved Card
● Customers can edit the expiry month and year of a saved card by clicking the "Edit" button next to the respective entry. After changing the month and year the update button needs to be
clicked. Please refer Figure 16
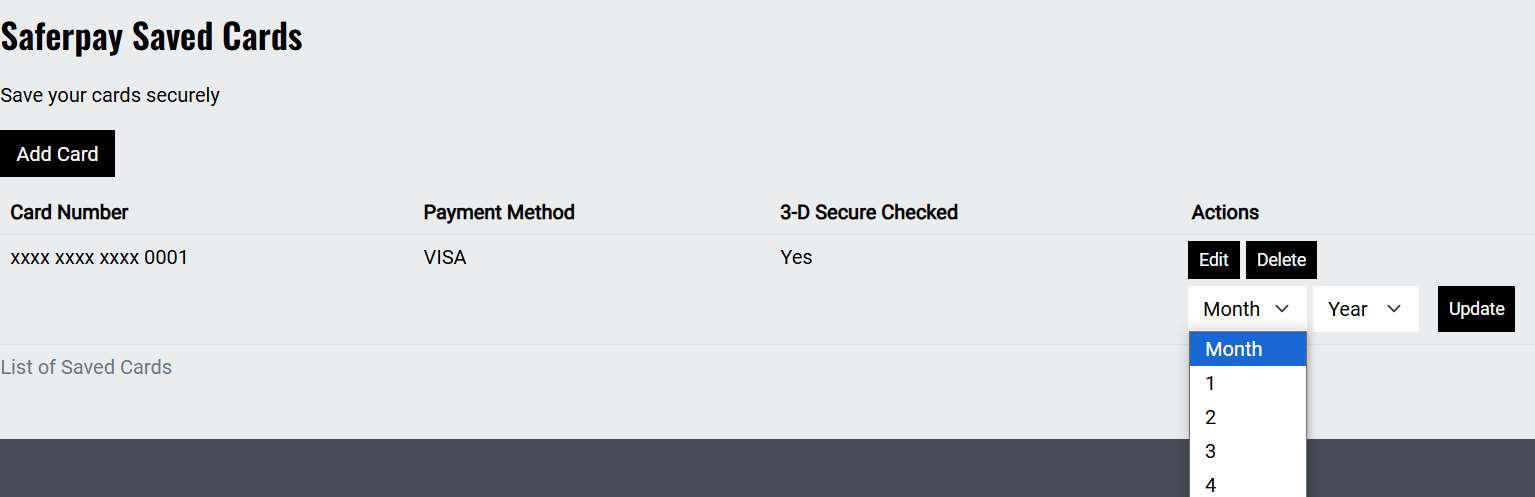
Figure 16
Delete Saved Card
● To remove a saved card from the account, click the "Delete" button under the Actions column.
Saved Card Information Displayed:
● Card Number: Masked format provided by Saferpay (e.g., **** **** **** 1234).
● Payment Method: Type of saved payment method.
● 3-D Secure Checked: Indicates whether 3-D Secure (3DS) verification was performed during card registration.
Cards added through the Saved Cards section will typically be 3D secured, as the Saferpay Secure APIs are used for saving cards, ensuring an extra layer of security and compliance with PSD2 requirements. This helps reduce fraud.
● Expiry Date Management: Customers can update the expiry date of already saved cards.
8. Cron Jobs and Manual Cleanup
To keep the database clean and operations efficient, the plugin uses automated background tasks (cron jobs) along with manual cleanup buttons provided in the backend. Refer Figure 17.
NB:- For cron jobs to work, cron must be set up on the server. Please ensure your system administrator has configured it appropriately.
Two CLI console commands are provided for automated cleanup:
● Vendor/bin/oe-console saferpay:clear-pending-orders
→ Clears abandoned orders that are stuck in "Pending Payment" state beyond the allowed time (e.g., 1 hour, or 120 hours for A2A payments).
● vendor/bin/oe-console saferpay:clear-pending-alias
→ Deletes inactive alias registrations that are older than 2 days.
Cancel Abandoned Orders
● Scope: Orders stuck in the "Pending Payment" status.
● Logic:
o Standard payments: These orders are automatically deleted after 1 hour if they remain unpaid.
o Exception: For Account to Account (A2A) payments, deletion is delayed to 120 hours (5 days) to allow for possible bank approval delays.
Delete Expired Aliases
● Scope: Secure card tokens (aliases) that were never activated.
● Logic:
o An alias is considered expired if:
▪ It is inactive.
▪ And it was created more than 2 days ago.
o These expired aliases are automatically deleted to maintain security.
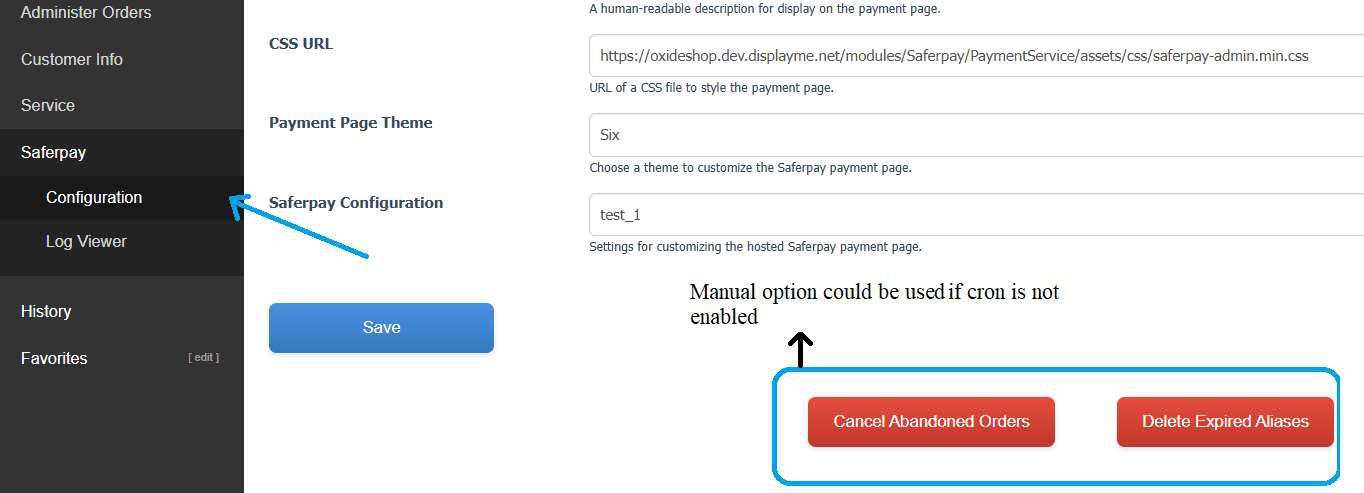
Figure 17
9. Error Logs
All error-related activities and exceptions triggered by the plugin are logged and can be viewed directly from the OXID backend under:
Saferpay → Log Viewer . Please refer Figure 18.
This section provides a centralized view of:
● Saferpay transaction errors (e.g., failed payments, invalid responses)
● Exception logs triggered during payment processing
● Configuration or API issues (e.g., invalid credentials, connectivity problems)
This tool is especially useful for developers and support teams when troubleshooting issues or validating system behaviour. For in-depth error tracing, the logs include timestamps.
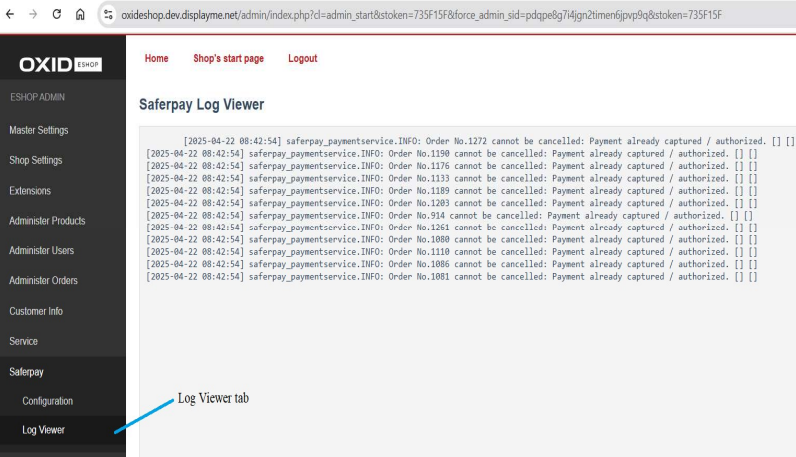
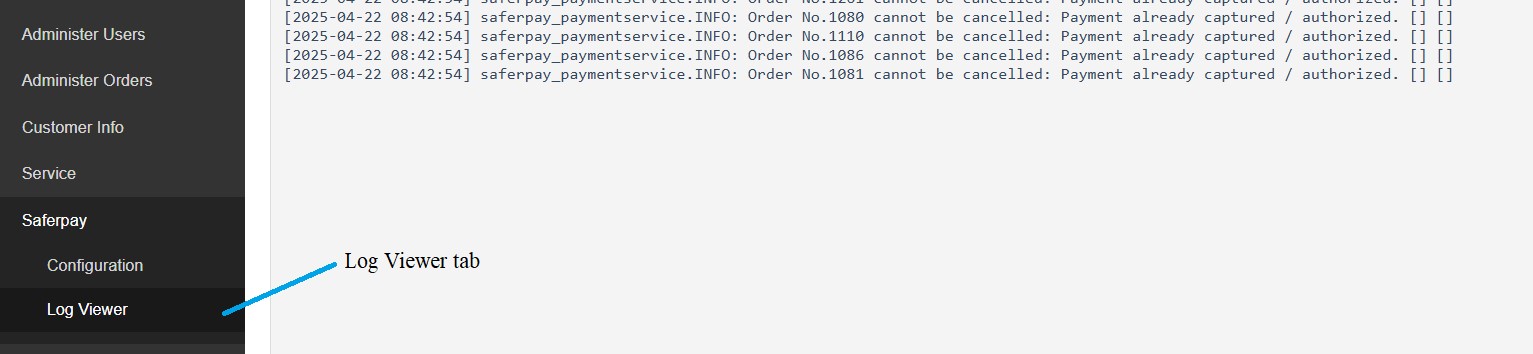
Figure 18