Categories
Magento
WordPress
SAP Commerce
Odoo
Shopify
Typo3
Shopware
nopCommerce
Pimcore
Hyvä
OXID eShop


ABOUT SAFERPAY
Saferpay is the convenient, flexible, secure, and comprehensive e-payment solution offered by Worldline Payment Services to facilitate easier and more secure payments in your online shop.
Worldline, listed on Euronext as WLN, is the leading provider of payment and transactional services in Europe and ranks as the fourth largest player globally. With a strong global presence and a dedication to innovation, Worldline is the preferred technology partner for merchants, banks, third-party acquirers, public transport operators, government agencies, and industrial companies across all sectors. With a workforce of over 20,000 employees in more than 50 countries, Worldline delivers sustainable, reliable, and secure solutions throughout the payment value chain, supporting business growth worldwide.
Worldline Payment Services, a division of Worldline since late 2018, has become Europe's largest technology partner for banks and merchants. Their customized solutions include a wide range of payment terminals and services for accepting and processing national and international payments with credit, debit, and prepaid cards, as well as smartphone payments.
ABOUT WORDPRESS PLUGIN
This plugin has been developed to seamlessly integrate Saferpay payment methods into WooCommerce. It enables the following Saferpay payment methods to be fully compatible with the WooCommerce plugin.
- VISA
- MASTERCARD
- MAESTRO
- AMERICAN EXPRESS
- BANCONTACT
- DINERS/DISCOVER
- JCB
- SEPA ELV
- PAYPAL
- TWINT
- IDEAL
- EPRZELEWY
- APPLEPAY
- ALIPAY
- CREDITCARD (SAFERPAY FIELDS)
- KLARNA PAYMENTS
- EPS
- SOFORT
- WL CRYPTO PAYMENTS
- GOOGLEPAY
- POSTFINANCEPAY
- CREDITCARD / DEBITCARD
- GIROPAY
- ACCOUNT TO ACCOUNT
- WECHAT PAY
- BLIK
- CLICKTOPAY
- UNIONPAY
- REKA
This plugin fully supports all the features of online payment methods, including payment capturing, refunding, and cancellation. All of these payment operations are seamlessly executed within the WooCommerce backend and will be automatically synced with your Saferpay account.
REQUIRMENTS
In order to successfully install and configure the Saferpay plugin in WordPress, the following steps are necessary:
- WordPress (upto 6.7.2) and WooCommerce (upto 9.6.2)
- License for Saferpay.
- To process payments, you must have a valid Saferpay account with at least one active Saferpay terminal.
- API credentials like Terminal ID, Customer ID, JSON Username and JSON Password for the Saferpay Live- and/or Test environment.
- Valid acceptance agreement for payment methods.
INSTALLATION
To install Saferpay Plugin, follow the steps below. Step 1: Download Saferpay plugin ZIP package.
Step 1: Download Saferpay plugin ZIP package.
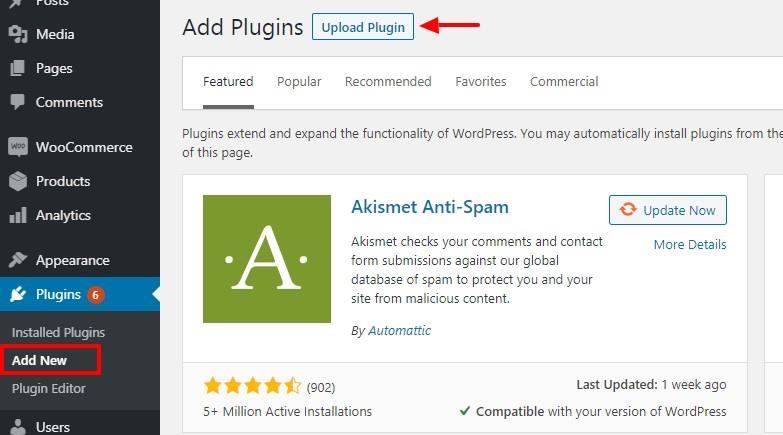
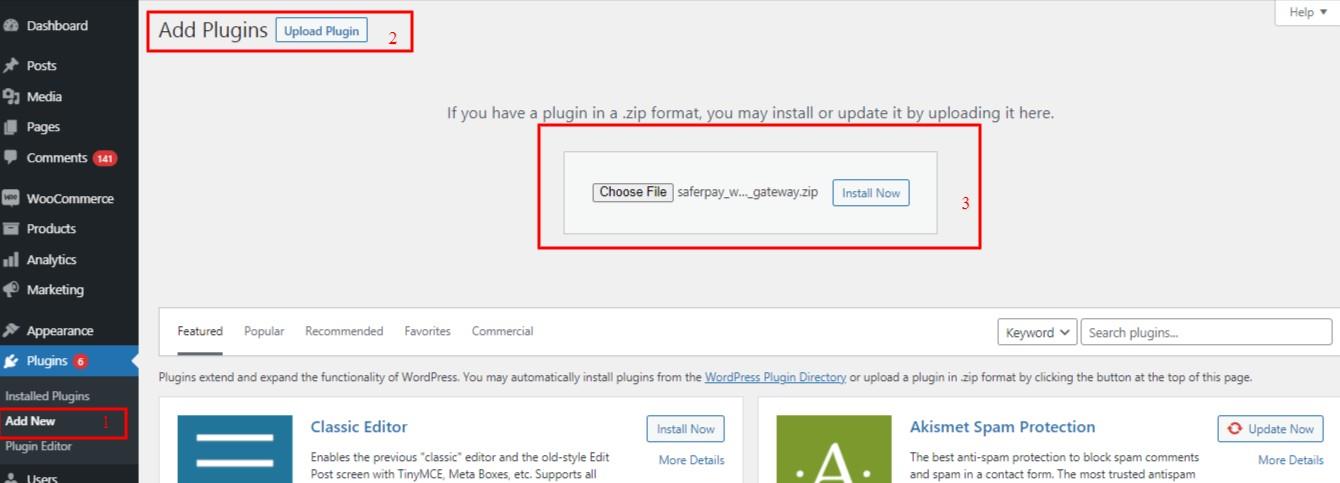
Step 2: To access the WordPress admin dashboard, navigate to Plugins and select Add New. From there, locate the 'Upload Plugin' button at the top of the page and click on it..
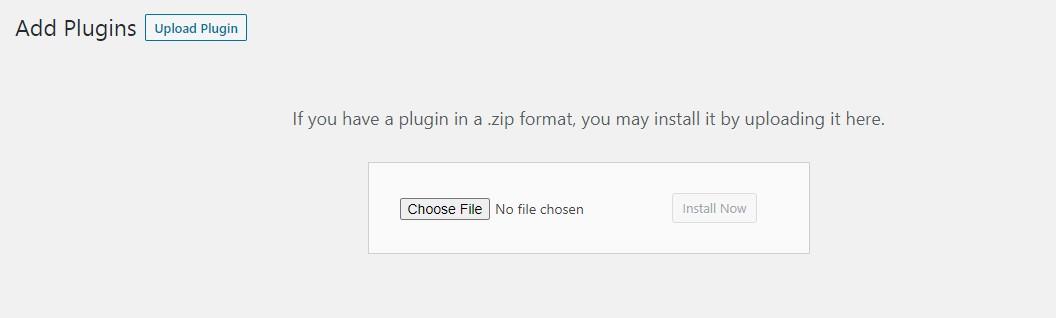
Step 3: Next, a plugin upload form will appear. To proceed, simply click on the 'Choose File' button and select the plugin file that you downloaded previously.
Step 4: Once you have chosen the file, simply click on the 'Install Now' button
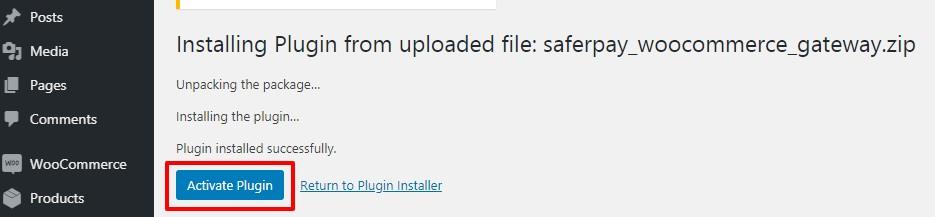
WordPress will then proceed to upload the plugin file from your computer and install it seamlessly. Upon completion of the installation process, a success message will appear confirming the successful installation.
Step 5: After installation, simply click on the "Activate Plugin" link to begin utilizing the plugin's features.

Manual installation via FTP
In some rare instances, your WordPress hosting provider may impose file restrictions that could prevent you from installing a plugin through the admin area. In such cases, the best course of action is to manually install the plugin using FTP.
To begin, you will first need to download the plugin's source as a zip file. Once downloaded, extract the zip file on your computer. Open your FTP client and connect to your website using the login credentials provided by your web host. After establishing a connection, navigate to the /wp-content/plugins/ folder on your website and upload the extracted plugin folder to that directory.
Once the files have been successfully uploaded, visit the WordPress admin area and click on the Plugins link in the admin menu. You should see the Saferpay plugin listed as successfully installed on the plugins page. To start using the plugin, simply click on the Activate link below the plugin.

Once the plugin has been successfully installed, you have the option to enable either test mode or live mode
Plugin update
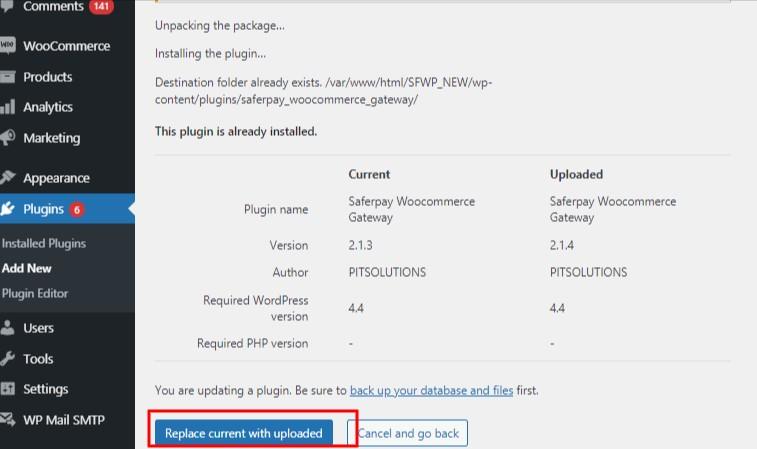
In order to update the plugin, you must follow steps 1 through 4 of the installation process outlined above.
Step 5: After the installation process is complete, you will be redirected to a page similar to the one shown below. On this page, you will need to click on the "Replace current with uploaded" button.
Starting from version 2.4.1, the Saferpay WooCommerce Gateway will now display the default plugin update notification from WordPress. This means that users can easily update the plugin just like any other plugins used in WordPress.

SAFERPAY TEST ACCOUNT
Saferpay provides the opportunity to thoroughly test all interfaces, specifically tailored to your unique test account.
The Saferpay test account enables you to seamlessly integrate Saferpay into your system and conduct trial transactions across various payment simulators before launching live operations.
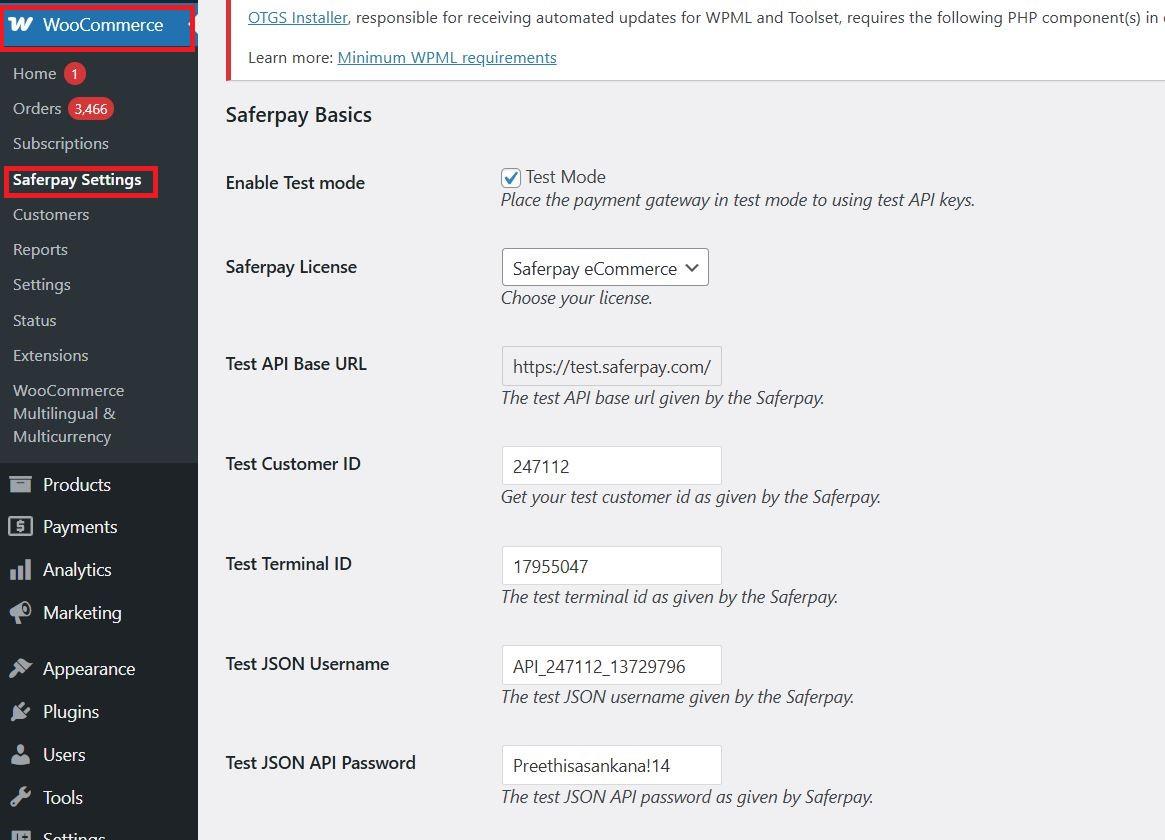
Test mode configuration
To configure Saferpay settings, we must input the test credentials provided:
Menu → WooCommerce →Saferpay Settings
To begin, activate test mode and enter the provided test credentials into the Saferpay settings:
Required Data:
- Test-Customer ID
- Test-Terminal ID (eCommerce Terminal).
- Test JSON API
- Test JSON API password.
Live mode configuration
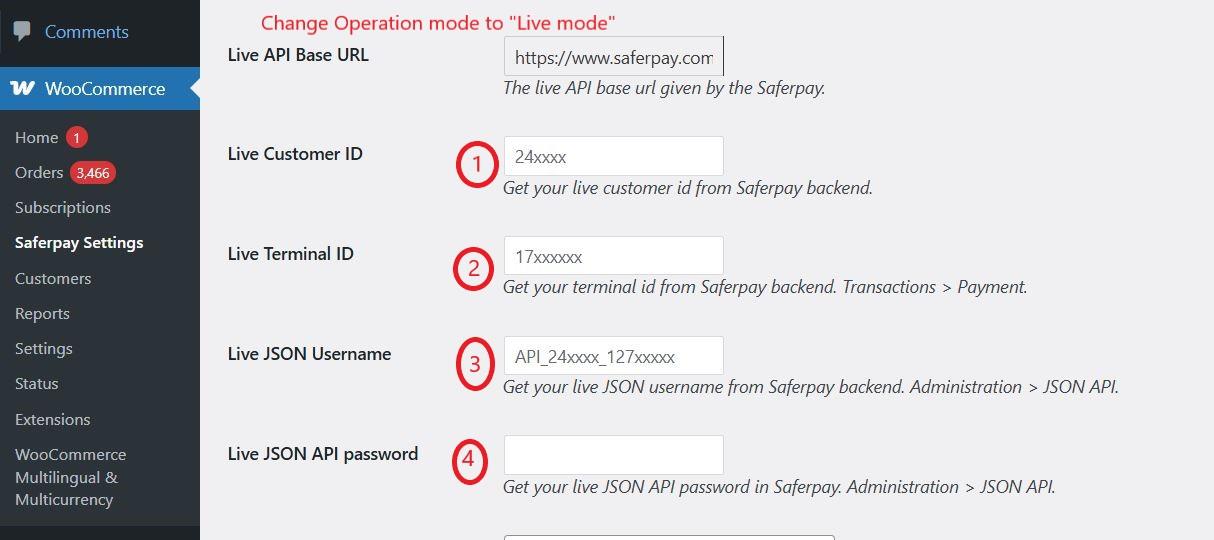
To ensure a secure transaction process, it is recommended to switch to Saferpay Operation mode. In order to do so, we must enter the live credentials provided into the Saferpay settings:
The following data is required
- Live-Customer ID
- Live-Terminal ID
- Live JSON API username
- Live JSON API password
Note: When using WPML, it is essential to create a Saferpay Checkout page in all supported languages to ensure proper translation functionality. Refer screenshot below
CONFIGURATION
Saferpay Plugin configuration includes two sections
- Saferpay general settings
- Payment method specific settings
SAFERPAY GENERAL SETTINGS
Configure general Saferpay settings from Menu → Settings →Saferpay Settings
The Saferpay basic settings offer a variety of configurations for users to choose from
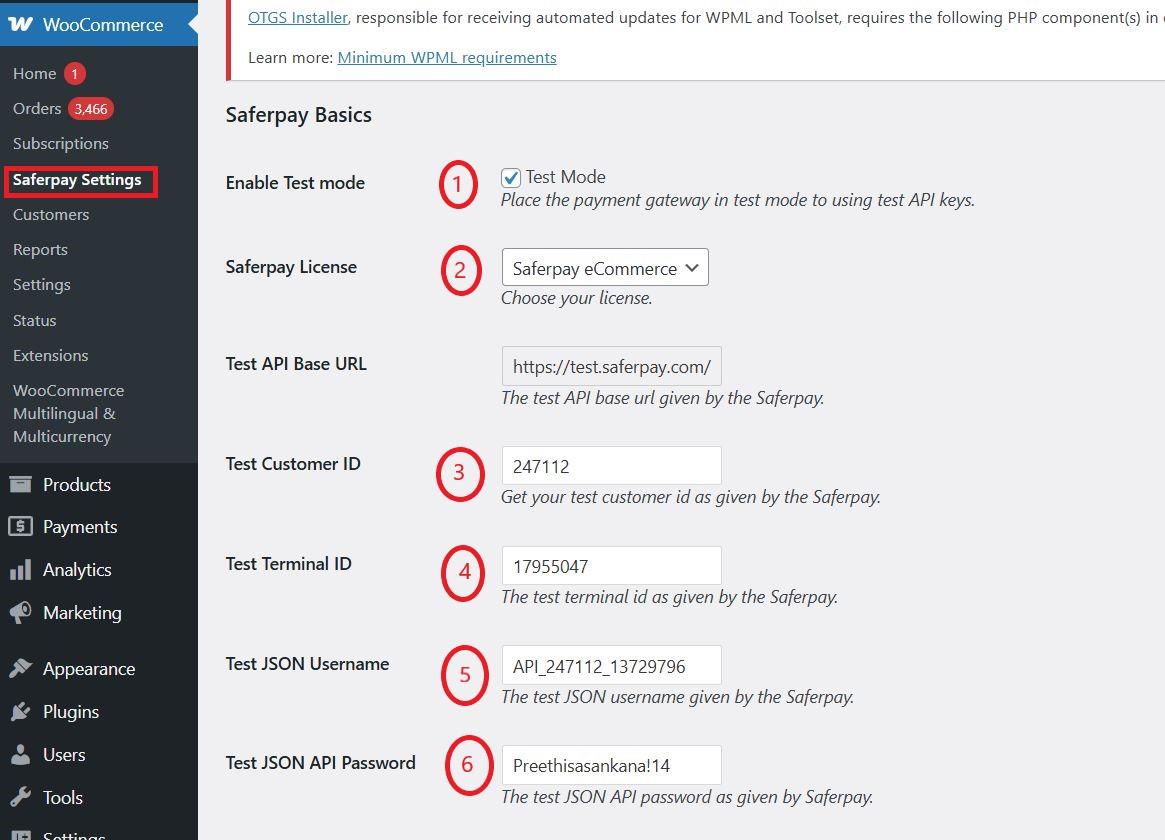
1. Enable Test Mode: The Saferpay Operation mode determines how the payment gateway functions. When enabled, it allows the gateway to operate in test mode using test API keys. Otherwise, it will function in live mode. By default, test mode is enabled.
2.Saferpay Licence: Choose the Saferpay licence you Saferpay has two licenses:
-
- Saferpay eCommerce
Access to: Payment Page Interface
-
- Saferpay Business
Access to: Payment Page Interface
Transaction Interface
Saferpay Fields and more
If you are using Saferpay Business without the appropriate license, the API will generate an error.
3. Test API Base URL: The default values for the API base URL have already been set in these fields.
E.g.: https://test.saferpay.com/api. Note: Recommended not to change it in ideal case. Changes applicable only if there is an update in base test url from Saferpay side.
4. Test Customer ID: Please enter the test customer ID provided by Saferpay when setting up a partner account.
5. Test Terminal ID: Enter your test terminal id given by the Saferpay.
6. Test JSON Username: Enter test JSON username given by the Saferpay.
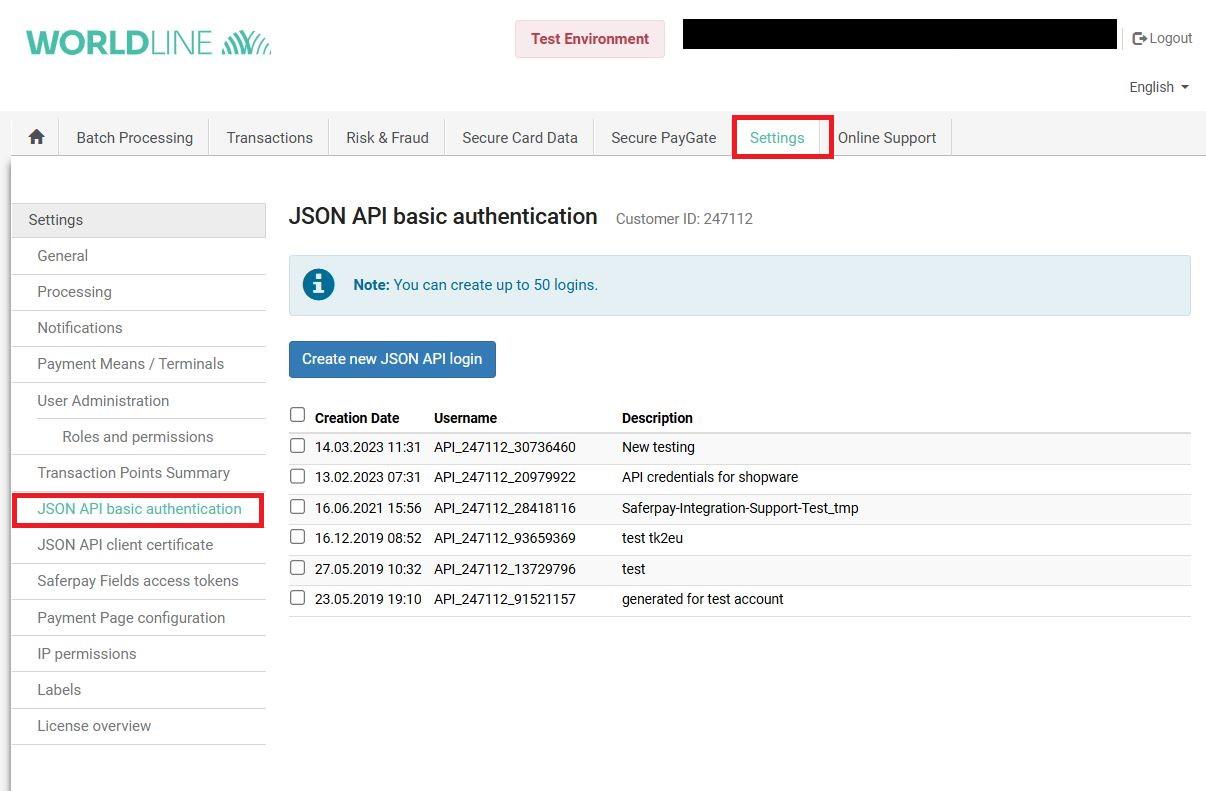
7. Test JSON API Password: Please enter the test JSON API password provided by Saferpay. In order to obtain the JSON API username and password, you must log in to the Saferpay management interface and navigate to Settings -> JSON API basic authentication. For further information, please refer to https://docs.saferpay.com/home/integration-guide/introduction and https://saferpay.github.io/sndbx/index.html#terms.
8.E-Mails: Saferpay will send an email to the address specified in this field. You have the option to include multiple email addresses, separated by commas. Please note that this field is not mandatory and is only applicable for the PaymentPage interface.
9. Order Prefix:- This prefix is exclusively visible in the Saferpay back office. The format for the example is "order_" and it allows for the use of the following characters: digits (0-9), uppercase letters (A-Z), lowercase letters (a-z), underscore (_), and hyphen (-).
10. Pass order number instead of order id:- By selecting this option, the order number will be transmitted to Saferpay instead of the order ID.
11.Force Authentication: It is highly recommended for high-risk businesses, such as those in the jewelry and electronics industries, to adhere to the highest level of security measures. Otherwise, you may choose to opt out of additional authentication by selecting "No, I do not want extra levels of authentication."
12. Liability Shift Behavior: This field dictates the protocol for handling transactions in the event of a fraudulent card being used on the website. By utilizing this feature, the responsibility is transferred to the authorizing bank, absolving the store owner of any liability for chargebacks. There are two available options within this field.:
- Option A:” If no liability shift has been granted transaction will be on-hold, merchant can capture or cancel transaction”. Here order placed via fraudulent card will be on-hold and merchant can capture or cancel transaction
- Option B: If no liability shift has been granted transactions will be auto Here order placed via a fraudulent card will be cancelled.
- Option C: All transactions are captured automatically, including those without a granted liability shift.
13. Description of the order: A merchant-provided description that is easily understandable by humans and will be displayed on the Payment Page.
14. Payment Page Configuration Name: You can specify the name of the payment page configuration here. This configuration can be created in the Saferpay Backoffice under Settings > Payment Page Configuration. If the configuration is not found in Saferpay (Settings / Backoffice), the default configuration will be used.
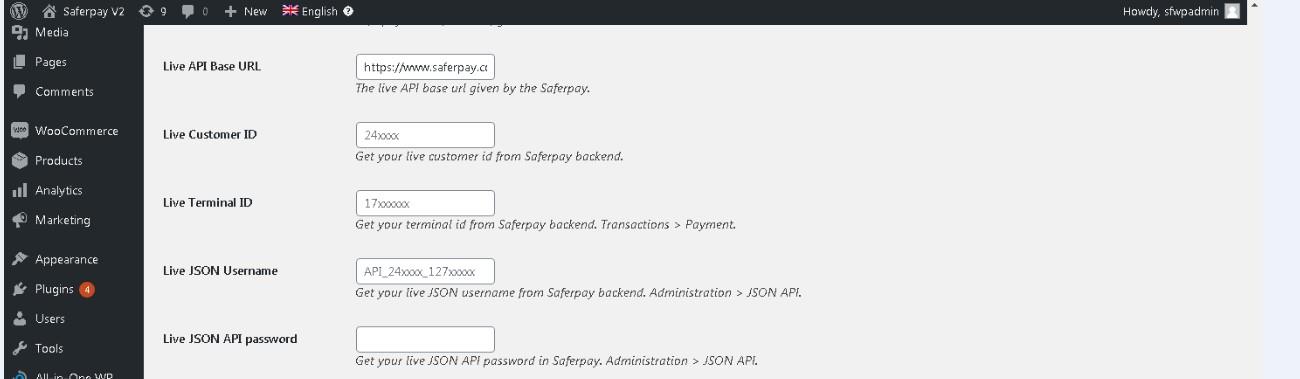
15. When using live mode, please enter the Live Customer ID, Live Terminal ID, Live JSON Username, and Live JSON API password provided by Saferpay when creating a partner account. To obtain access information for the live environment, please request an offer here. For access information to a live account, please follow this link.
16. Payment Page Theme: Select a theme to personalize the look of Saferpay payment pages. By default, a sleek and responsive design will be applied. There are three different types of settings to choose from:
- Default lightweight responsive theme
- Six
- No Theme
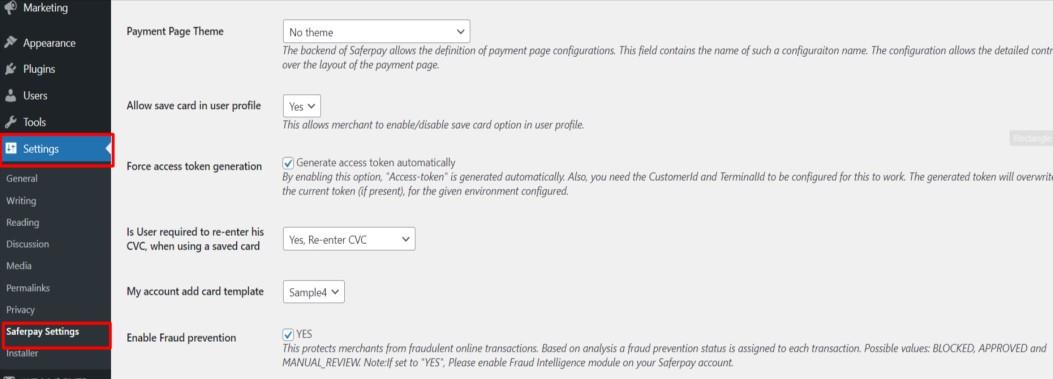
17. Allow save card in user profile: Merchants have the ability to enable or disable the option for customers to save their card information in their user profile. When enabled, customers can conveniently store their credit card details in the 'My Account' section for future use. If disabled, the 'Saved Cards' menu will be hidden from the 'My Account' page.
18. Force access token generation: Merchants have the option to enable or disable Access-token generation. When enabled, the Access-token is automatically generated. To make this feature work, the CustomerId and TerminalId must be properly configured. The generated token will replace the current token in the configured environment. If the feature is disabled, access-tokens must be manually created from the Saferpay back office. Detailed instructions can be found on page 26 under SAFERPAY (HOSTED) FIELDS SETTINGS (SAFERPAY CREDIT CARD).
19. Is User required to re-enter his CVC, when using a saved card: If the option "Yes, Re-enter CVC" is selected, the user will be prompted to re-enter their card's CVC during checkout when using a saved card for their transaction.
-
- If the option "No need to re-enter CVC" is selected, the user will not be required to enter the CVC during checkout when using a saved card for their transaction.
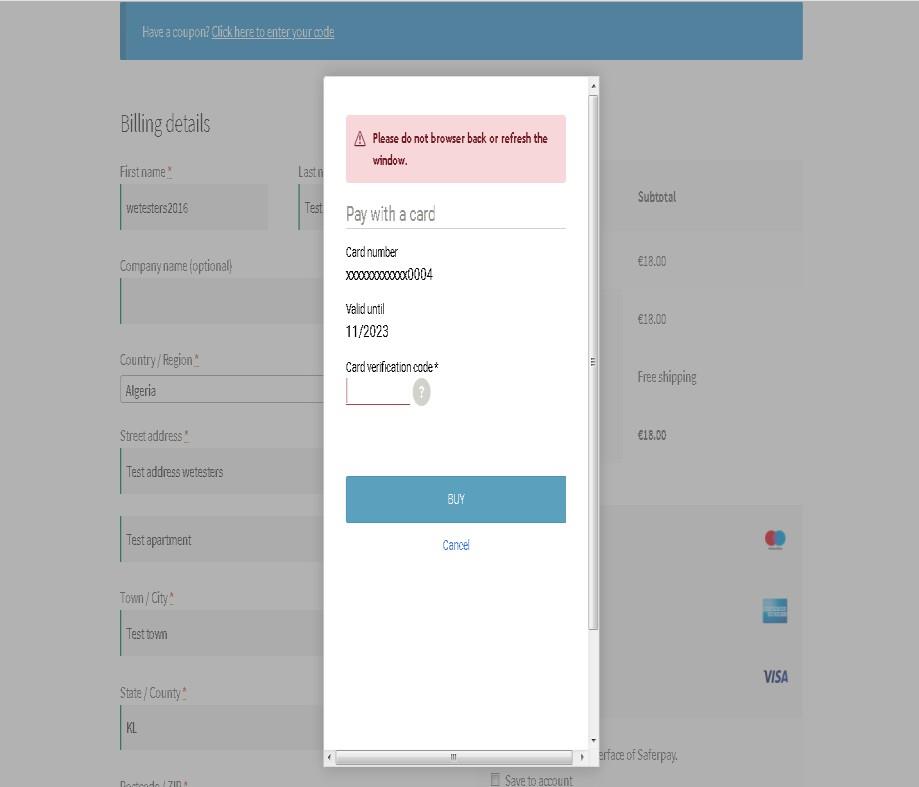
Screenshot: When the "Yes, Re-enter CVC" option is selected in the Saferpay Settings, users will be prompted to re-enter their CVC during checkout
20. My Account Add Card template: In the My Account Saved Cards section, users have the option to choose from four different templates for adding card details. These templates provide a convenient way to store payment information securely.After configuring the Saferpay general settings, it is important to carefully review all settings before proceeding. Once you have confirmed that everything is set up correctly, simply click the "Save Changes" button to finalize the process.
21.Saferpay Fields Access Token: Generated automatically with the API URL.
22. Saferpay Fields API-URL
23. JS-Library-URL: Here enter JS library
24. Enable Fraud Prevention: This system protects merchants from potential fraudulent online transactions by assigning a fraud prevention status to each transaction after analysis. The possible values for the status are BLOCKED, APPROVED, and MANUAL REVIEW. If you wish to enable this feature, please activate the Fraud Intelligence module on your Saferpay account.
Note: Please refer to the following link for instructions on setting up Fraud Intelligence in the Saferpay Backoffice. This guide will help you establish your Fraud Intelligence business efficiently and effectively
https://docs.saferpay.com/home/features/fraud-intelligence#initial-setup-in-the-saferpay- backoffice
25. Auto Configure: We have implemented an auto-configure button that allows users to easily enable payment methods with just one click.
JSON API USERNAME AND PASSWORD GENERATION
In order to create a JSON API username and password, you must first log in to the Saferpay management interface. Once logged in, navigate to Settings -> JSON API basic authentication. For further information, please visit https://worldline.com/de-ch/home/top-navigation/developers/e-commerce-developer/integration.
PAYMENT METHOD SPECIFIC CONFIGURATION
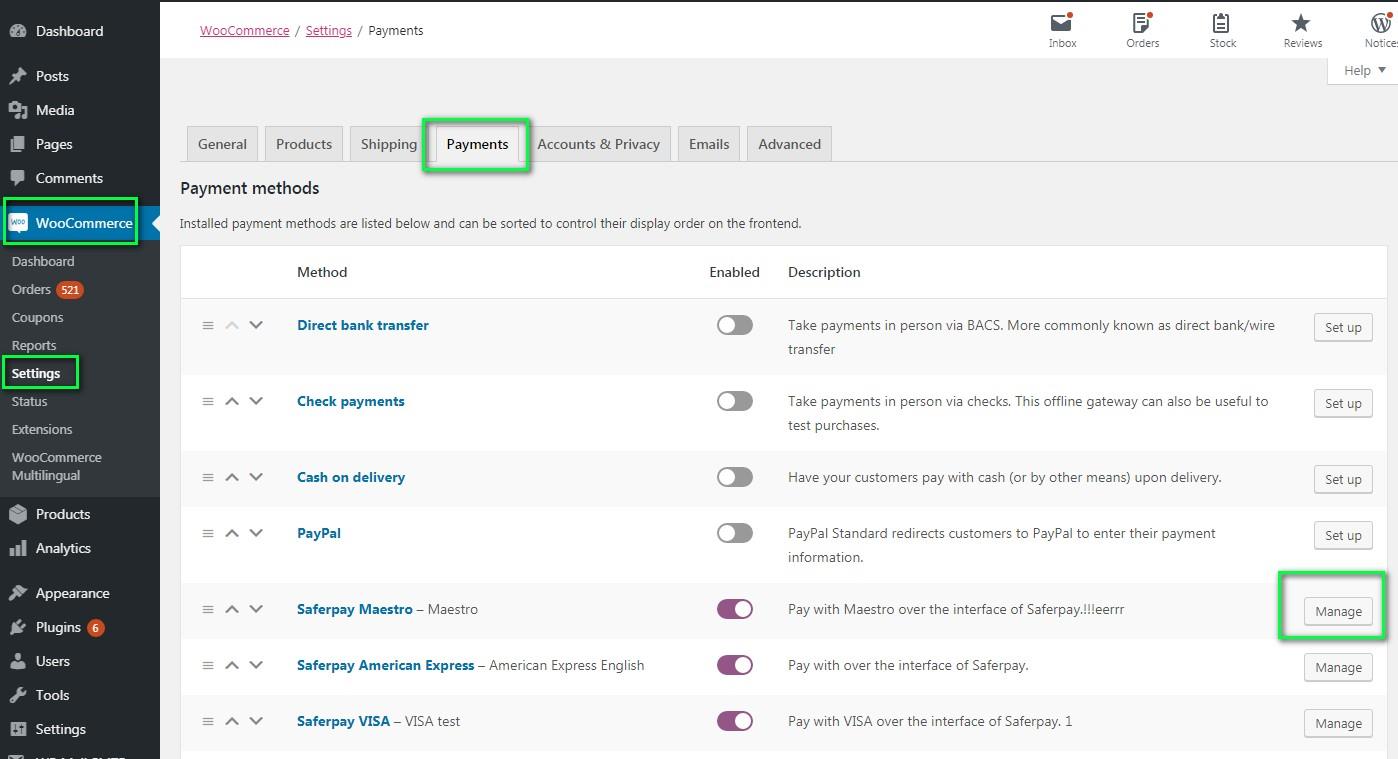
You can configure individual payment methods that fall under the Saferpay plugin from the WordPress backend by navigating to Menu WooCommerce → Settings → Payments.
Note: Not all payment methods will be outlined in your contract, so it is important to exercise caution when selecting payment options.
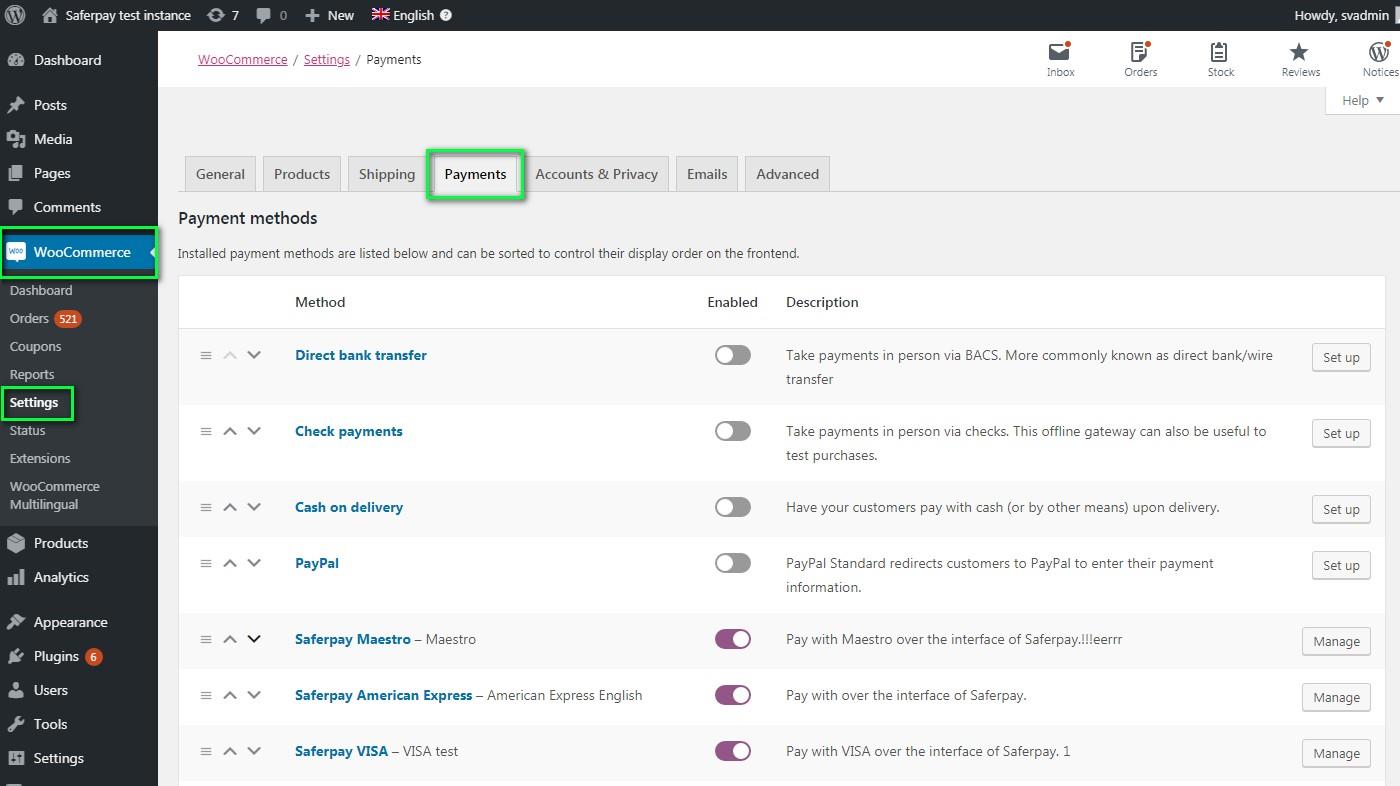
LIST OF PAYMENT METHODS
The settings for each installed payment method can be easily configured by clicking on the "Manage" button
PAYMENT SETTINGS
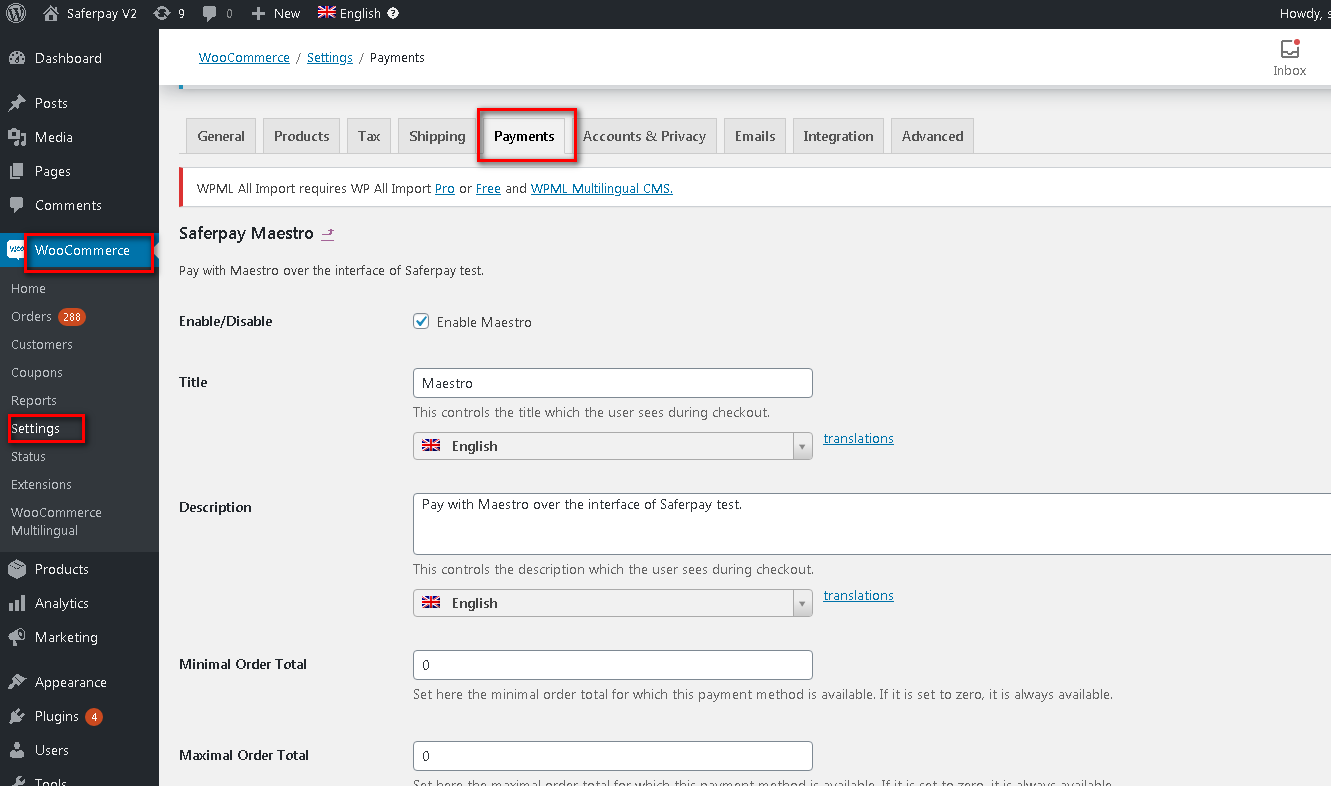
The specific configuration for the Saferpay payment method will be outlined in detail below:
1. Enable/Disable: Here, you have the option to adjust the visibility of installed payment methods during the checkout process. This feature allows you to customize which payment methods are displayed to customers at the time of purchase, providing a more tailored and user-friendly experience.
2. Title: Here, you have the option to customize the title of the payment method that will be visible to customers during the checkout process in your online store.
3. Description: You can customize the payment method description that appears in the shop during checkout.
4. Minimal Order Total: You can adjust the availability of payment methods based on the minimum order total. If the minimum order total is set to zero, the payment method will always be available during checkout, regardless of the order total.
5. Maximal Order Total: You can adjust the availability of payment methods based on the maximum order total. If the setting is set to zero, the payment method will always be available during checkout.
6. Allowed Countries: To specify which countries you wish to accept payment from, simply select the desired countries. You can choose multiple countries by holding down the Ctrl key. If no specific countries are selected, leave this field blank.
7. Allowed currency: Please select the currencies that are compatible with this payment method. If there are any specific currency requirements, please indicate them; otherwise, leave this field blank.
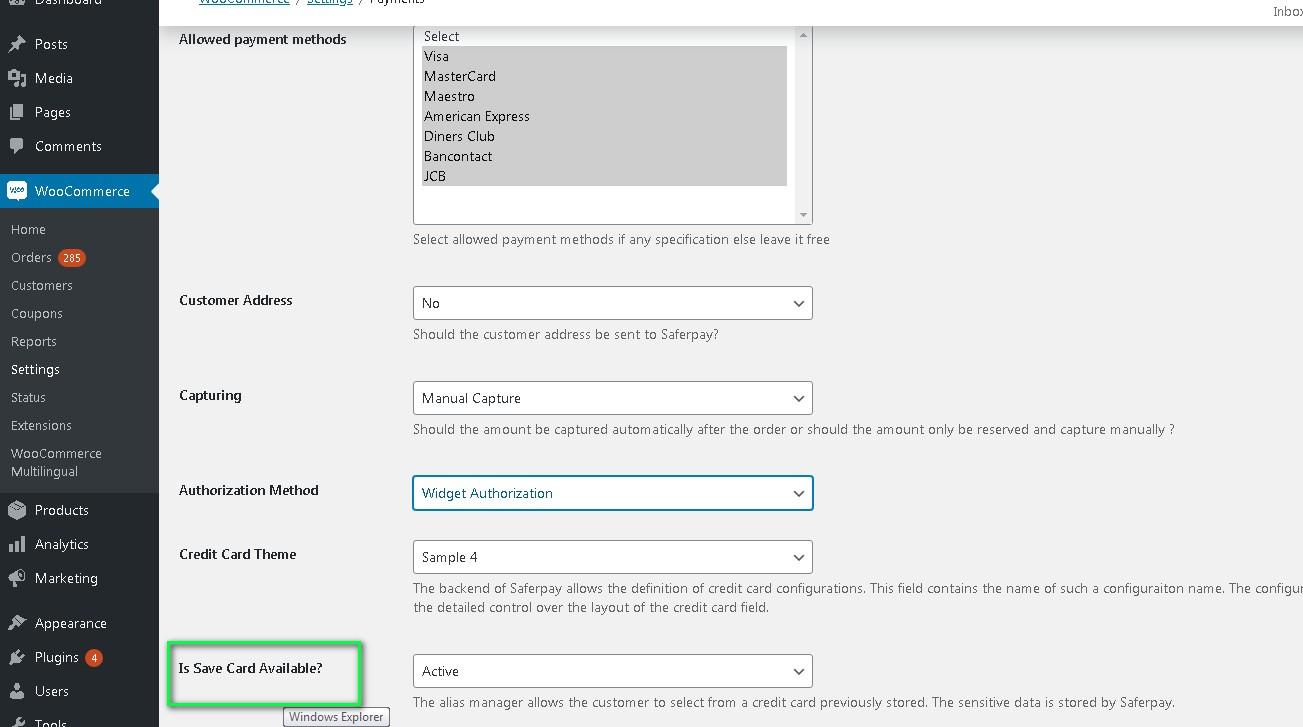
8. Customer Address: Here you can set customer address sent to Saferpay If it is set to No, Customer address won’t be sent to Saferpay. If it is set to Send delivery address, Customer delivery address would be sent to Saferpay. If it is set to Send billing address, Customer billing address would be sent to Saferpay. If it is set to Send both shipping and billing address, Customer’s both billing and shipping address would be sent to Saferpay.
9. Pre-Authorizations: It extends the validity of an authorization up to 30 days. If it is set to YES, only Manual Capture option will be possible under Capturing settings

10. Customer Confirmation Email: You can choose whether Saferpay sends a confirmation email to the customer. This option is only available if the customer is redirected to Saferpay
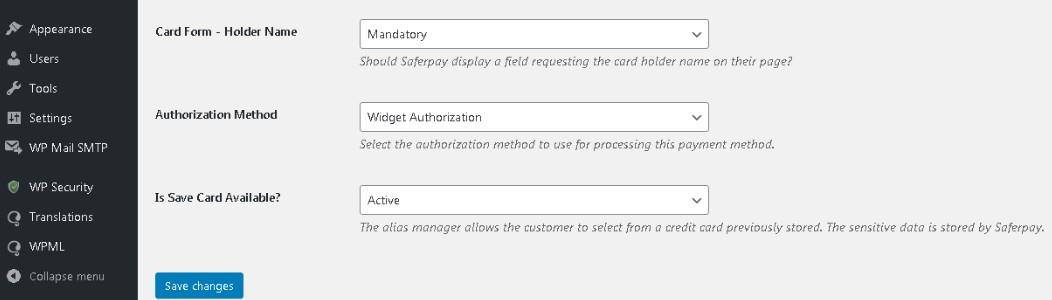
11. Card Form – Holder Name: When the setting is set to "None," Saferpay will not show a field requesting the cardholder's name in the payment interface. However, when the setting is changed to "mandatory," Saferpay will then display a field prompting the user to enter the cardholder's name during the payment process.
12. Capturing: Welcome to the capturing mode settings. When set to Manual Capture, the amount is only reserved and must be manually captured through the WordPress back-end. On the other hand, when set to Auto Capture, the amount is captured automatically. Please note that Auto Capture is not possible if Pre-Authorizations are said to YES.
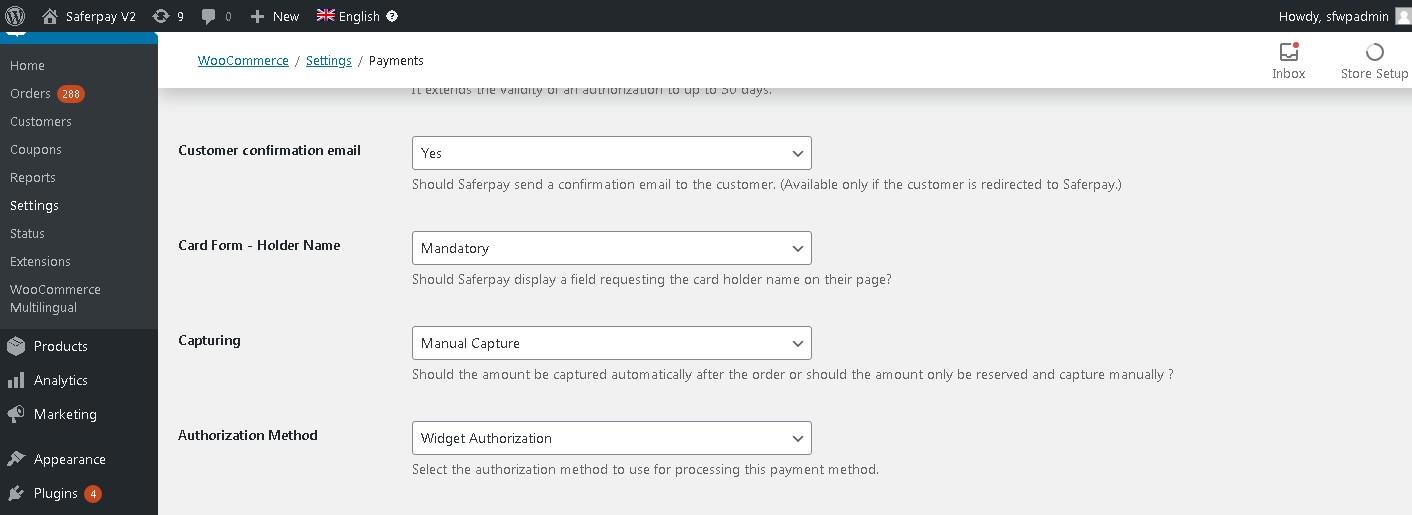
13. Authorization Method: Here, you have the ability to choose the authorization method for payment processing. There are two options available within these settings.
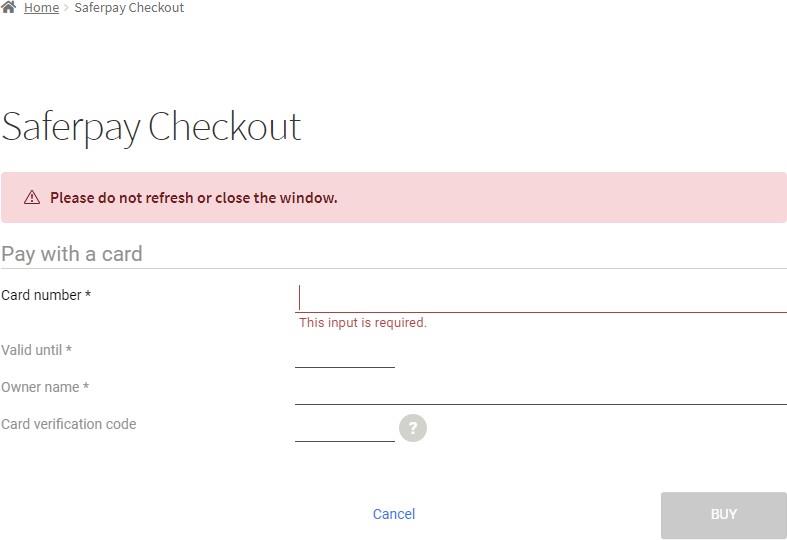
- Payment Page – During the order processing, users will be seamlessly redirected from the WooCommerce shop to the Saferpay payment gateway interface to securely process their payment. Upon successful completion of the payment, users will be redirected back to the WooCommerce shop to finalize their purchase.The Saferpay Payment Page Interface is designed to simplify and streamline the payment process by utilizing the PaymentPage form. This interface can be utilized with both a Saferpay eCommerce license and a Saferpay business license, providing a universal integration solution. Additionally, all Saferpay supported payment methods can be easily processed through the Payment Page Interface.
- Transaction Interface (Widget Authorization) - During the order processing the user is served with Saferpay payment forms in a pop up within the WooCommerce shop. The Transaction Interface is an extension to PaymentPage It offers the Hosted Entry Form (HEF) to process card payments seamlessly. This interface can also be used in combination with Secure Card Data to store/tokenize payment data during the payment process. The Transaction Interface is only for holders of a business licence on the live system.
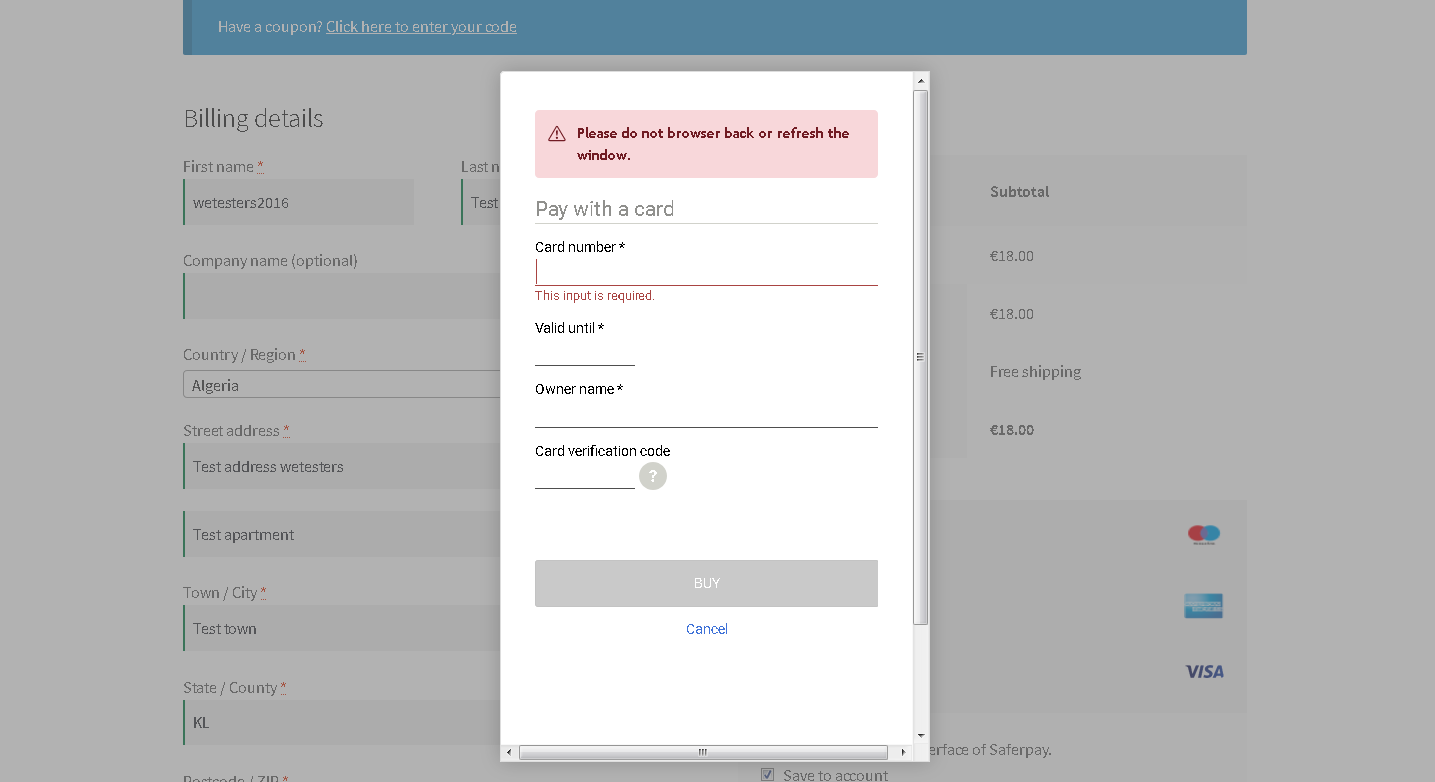
3DS pop up displayed during Checkout
14. Is Save Card Available? Here admin can set Active or Inactive status. By enabling this, the customer can register cards and use it for future payments. Card details will be stored in Saferpay. This option is available only for Widget Authorisation method. Once you have configured Saferpay payment method, review all the settings carefully. If everything is fine, click Save changes button
Credit Card Theme: Users can choose from four sample templates for credit card payments.
Throughout the order processing, users are presented with Saferpay payment forms in a pop-up window within the WooCommerce shop. This seamless integration allows for a secure and convenient payment experience for customers.
Is Save Card Available? Administrators have the ability to set the status of a card as either Active or Inactive. By enabling this feature, customers can register their cards and use them for future payments. The card details will be securely stored in Saferpay. Saved cards that are enabled in the allowed payment methods for credit card settings will be displayed during the checkout process.
SAFERPAY IDEAL
In addition to the general settings, Saferpay iDeal payment method offers additional settings, including account details. Here, administrators have the ability to add or remove bank accounts.
Customer able to select added bank account by admin during checkout
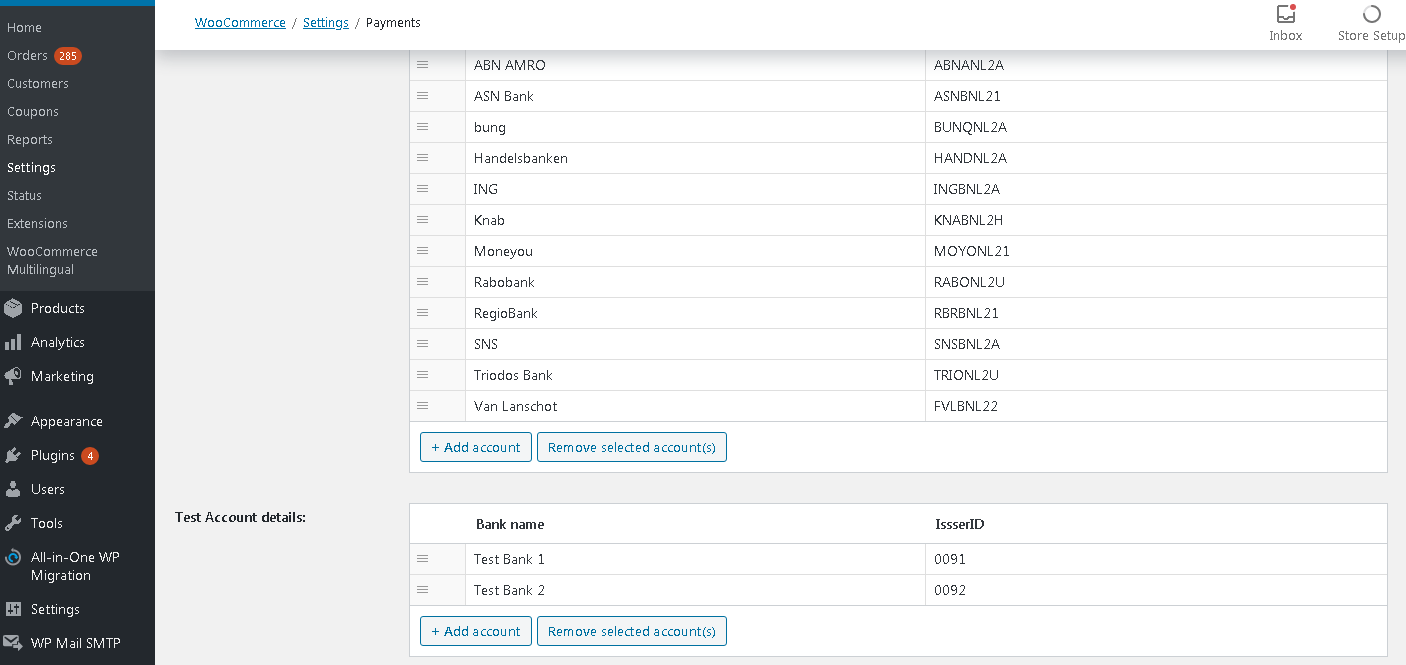
Saferpay iDeal additional settings.
SAFERPAY KLARNA PAYMENTS
In addition to the general settings, certain additional configurations are required in order to utilize Klarna payment methods.
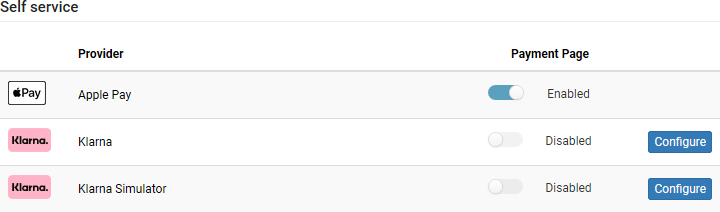
To activate Klarna on a specific terminal in Saferpay Back Office, navigate to Settings > Terminals. Choose the desired terminal and scroll down to Self Service. For further instructions, please refer to the link provided below
https://saferpay.github.io/sndbx/KlarnaPayments.html
This service operates differently depending on the Saferpay environment (test/live) you are using, so it is important to pay close attention.
You will have two options: Klarna and Klarna Simulator on the Saferpay test environment. Configure Klarna for Live mode and Klarna Simulator for test mode
Important: In order to enable Klarna Payment as an option in the checkout section, it is necessary to activate the country in both Saferpay Backoffice and the plugin settings.
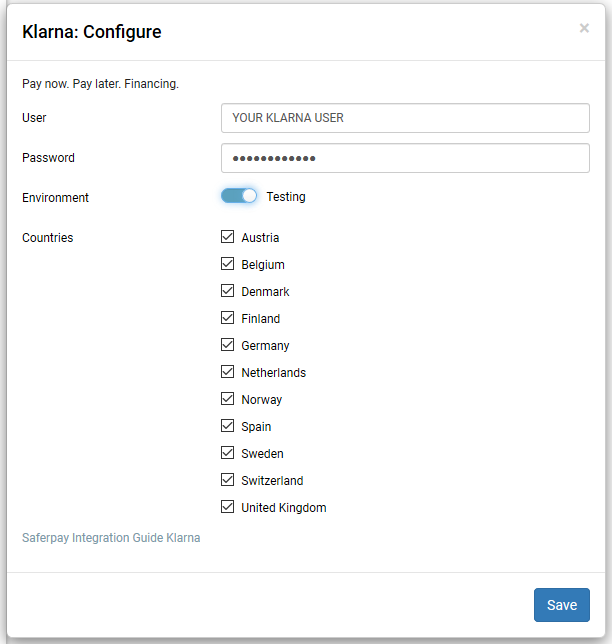
Note: Send Klarna attachment data to API: By selecting this option, Klarna provides the opportunity to include additional data points with each order. These data points are utilized for further analysis, such as conducting a risk assessment on the Klarna platform.
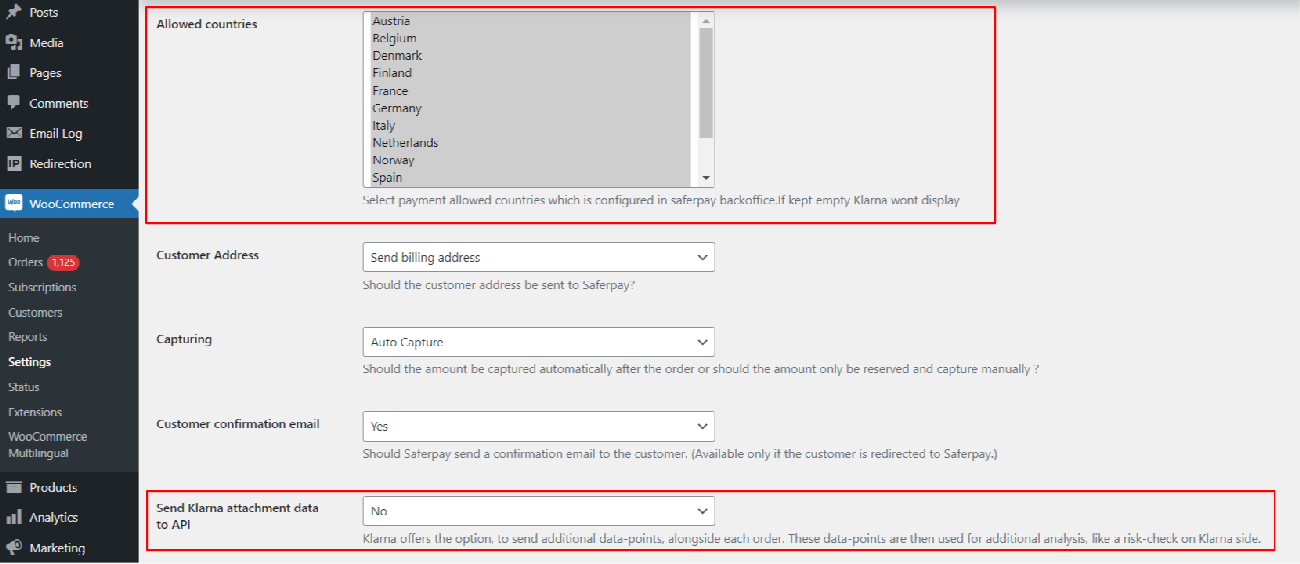
Klarna back-end settings for allowed countries
Additionally, Klarna will be displayed on the country-currency combination pair.
For e.g.: If you submit CHF for Switzerland as your country code but select EUR as your currency, Klarna will not be displayed!
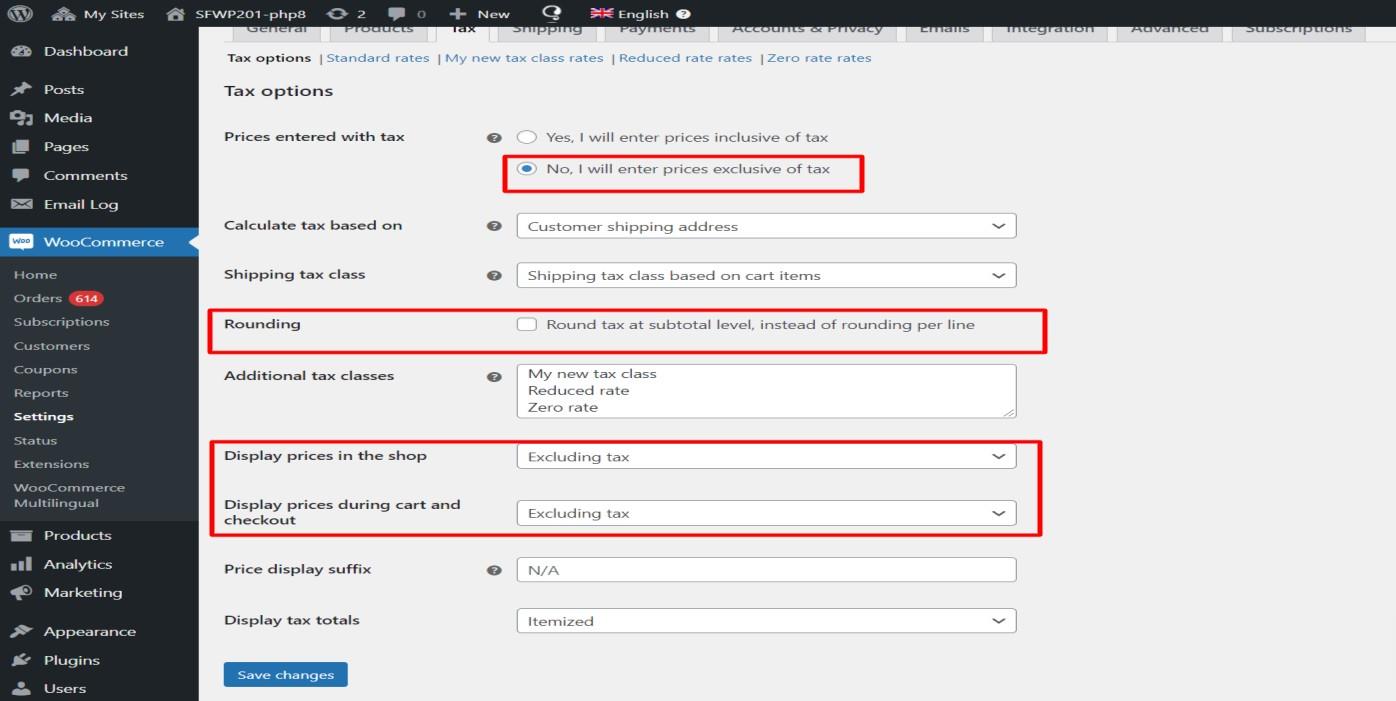
WooCommerce Tax settings should be like this for Klarna.
Attention: We have some limitations with Klarna payments, in order to work Klarna payments properly, any of the values (product price, tax etc.) shouldn't have decimal points.
The following links are helpful while configuring each payment methods
- Credit and Debit Cards – Refer:
- https://docs.saferpay.com/home/integration-guide/payment-methods/mastercard
- https://docs.saferpay.com/home/integration-guide/payment-methods/maestro
- https://docs.saferpay.com/home/integration-guide/payment-methods/visa-and-vpay
- https://docs.saferpay.com/home/integration-guide/payment-methods/american- express
- https://docs.saferpay.com/home/integration-guide/payment-methods/diners-and- discover
- https://docs.saferpay.com/home/integration-guide/payment-methods/jcb
- https://docs.saferpay.com/home/integration-guide/payment-methods/swiss-postcard- and-postfinance-1
- TWINT – Refer https://docs.saferpay.com/home/integration-guide/payment- methods/twint
- PayPal - Refer https://docs.saferpay.com/home/integration-guide/payment- methods/paypal
- SOFORT - SOFORT is a third party means of payment by Klarna Group. Refer https://docs.saferpay.com/home/integration-guide/payment-methods/sofort-by-klarna
- Klarna Payments - Klarna Payments is a 3rd party payment method, that is split into three ways of payment: Pay Now, Pay Later and Slice It/Financing. Refer https://docs.saferpay.com/home/integration-guide/payment-methods/klarna- payments
- eps - Refer https://docs.saferpay.com/home/integration-guide/payment- methods/eps
- Giropay - Refer https://docs.saferpay.com/home/integration-guide/payment- methods/giropay
- iDeal - Refer https://docs.saferpay.com/home/integration-guide/payment- methods/ideal
- SEPA ELV - Refer https://docs.saferpay.com/home/integration-guide/payment- methods/sepa-direct-debit
- ePrzelewy - Refer https://docs.saferpay.com/home/integration-guide/payment- methods/eprzelewy
- Bancontact - Refer https://docs.saferpay.com/home/integration-guide/payment- methods/bancontact
- Apple Pay - Refer https://docs.saferpay.com/home/integration-guide/payment- methods/applepay
- Alipay - Refer https://docs.saferpay.com/home/integration-guide/payment- methods/untitled-1
- Crypto Payments – Refer https://docs.saferpay.com/home/integration- guide/payment-methods/crypto-payments
- Google Pay - Refer https://docs.saferpay.com/home/integration-guide/payment- methods/google-pay
- BLIK – Refer - https://docs.saferpay.com/home/integration-guide/payment-methods/blik
- CLICKTOPAY – Refer - https://docs.saferpay.com/home/integration-guide/payment-methods/click-to-pay
- REKA – Refer - https://docs.saferpay.com/home/integration-guide/payment-methods/reka
Note: There are some issues with the test simulator for CLICKTOPAY, ALIPAY, and TWINT. For example, orders may be marked as successful even if the payment process is terminated, or orders may automatically be marked as successful after a certain amount of time.
SAFERPAY FEATURES
DESIGN CUSTOMIZATION
If you are looking to personalize the default design of the Saferpay interface, Saferpay offers the following customization options:
1. CSS-Styling: The CSS styling options can be used over the following
- Payment page
- Transaction Interface
- Alias Insert
Note: The CSS file referenced by the CssUrl parameter must be stored on a web server that supports HTTPS.
Refer to https://saferpay.github.io/sndbx/CssiFrame.html#css-usecss for detailed information.
2. Theme: This parameter allows you to customize the appearance of the payment pages that are displayed. By default, a lightweight responsive styling will be enabled. If you do not want any styling, please choose "NONE".
ORDER MANAGEMENT
Customer orders can be found under WooCommerce → Orders. This section allows you to easily access and manage all orders placed by customers
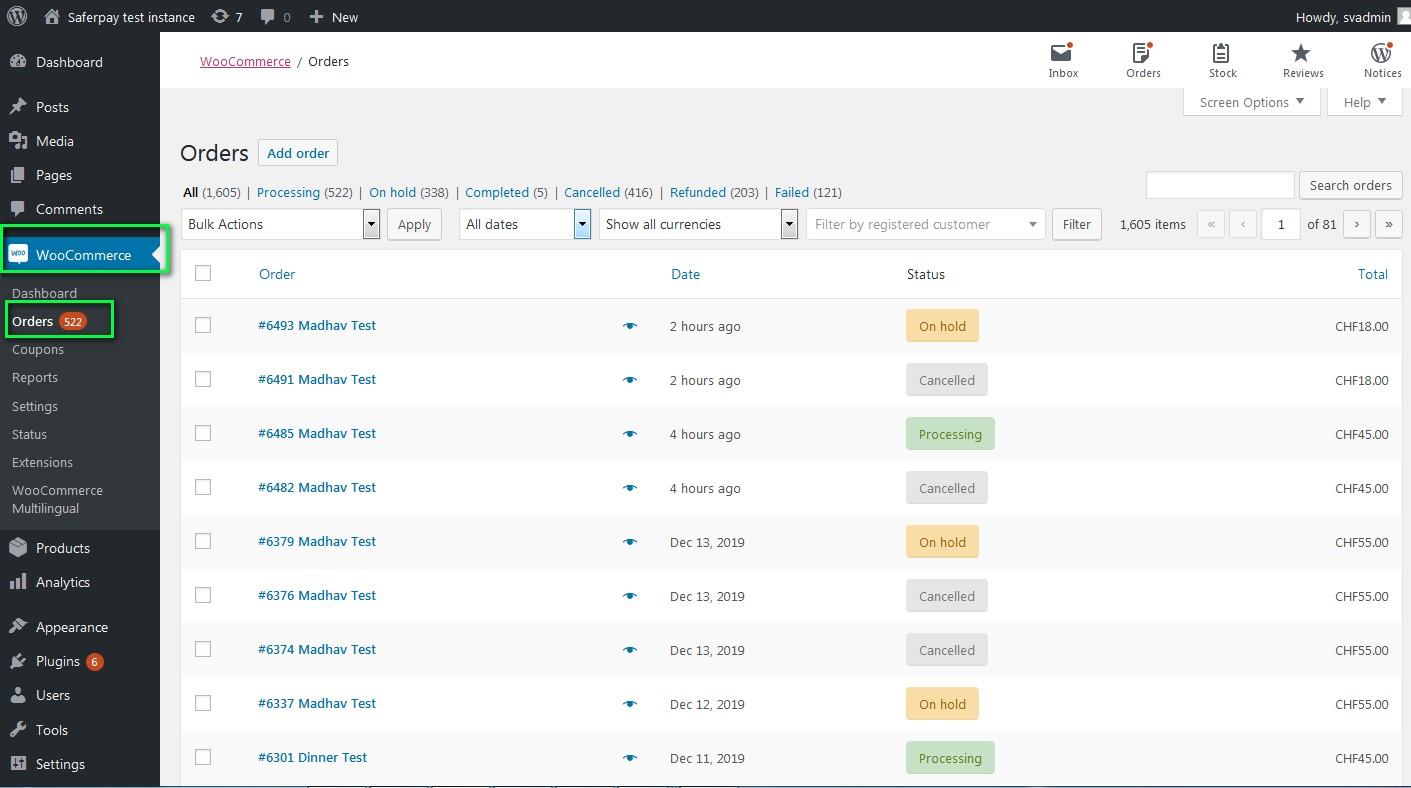
LIST OF ORDERS
To view the details of each order, simply click on the "Order" tab. Here, you will find a breakdown of the order details. Additionally, transaction details can be viewed under each order in the "Transaction" tab
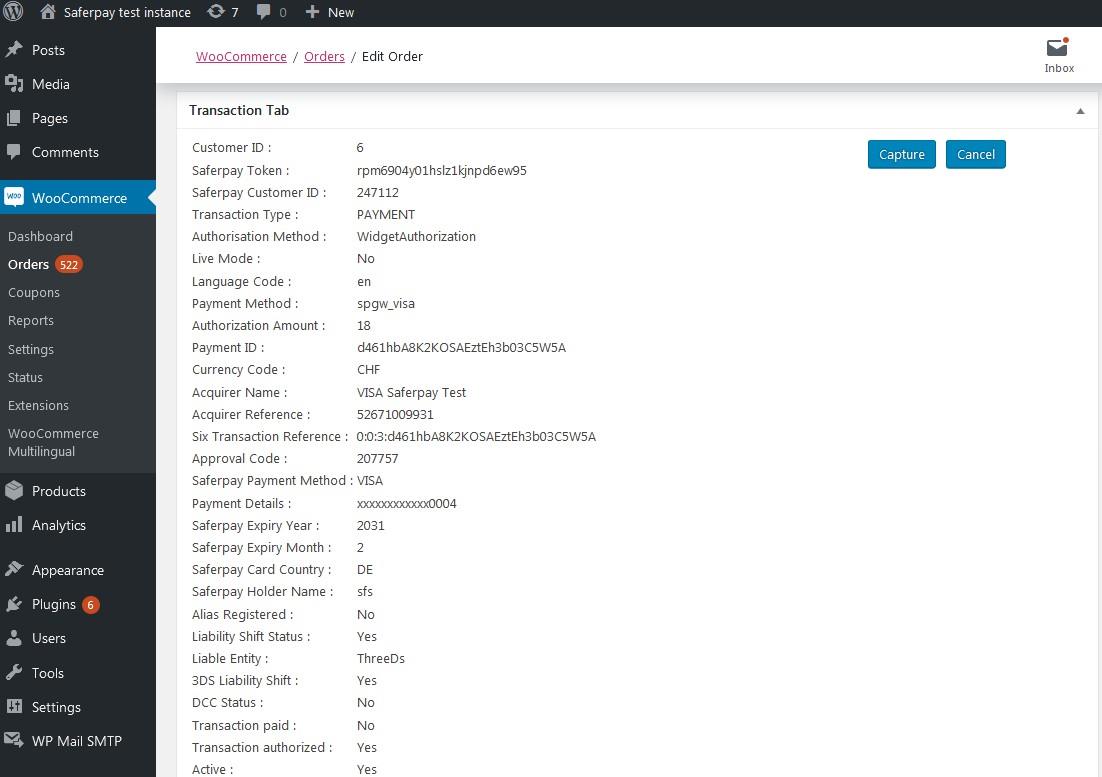
TRANSACTION DETAILS
CAPTURE PAYMENT
In the payment configuration, if the "Capturing" setting is set to "Auto Capture", the merchant will not need to take any action from the WordPress backend. Payments will be automatically captured by the system..
However, if the "Capturing" setting is set to "Manual Capture", the merchant will have the option to either Capture or Cancel transactions. By clicking on Capture, the transaction will be successfully captured.
For orders that only contain digital products, if the payment is successful, the status of that order will be marked as Completed
CANCEL PAYMENT
Only authorized orders that have not been processed can be cancelled. Once an order is cancelled, no further changes can be made to it. By clicking the "CANCEL" button, the transaction will be voided.
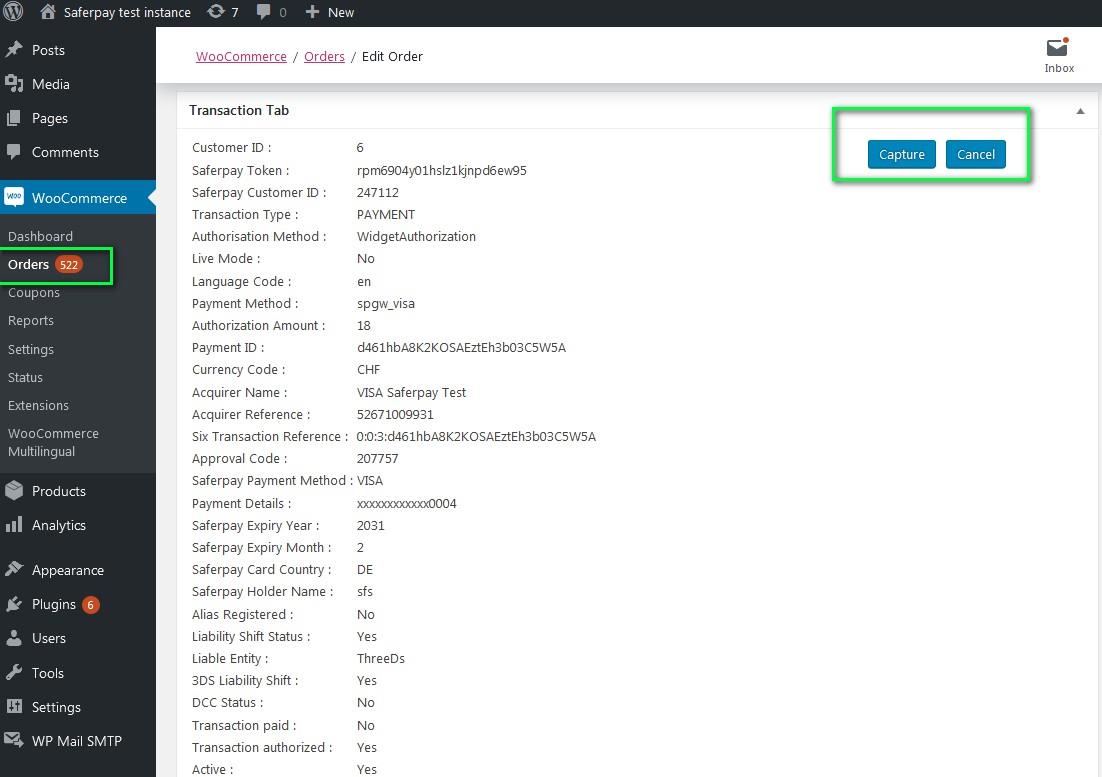
Order Details Transaction Tab with Capture/CANCEL button
When you click the Capture button, a confirmation pop-up will appear. By clicking the OK button, the amount will be successfully captured and the order status will be changed to Processing.
You can see transaction status and date under history tab mentioned in order detail page.

TRANSACTION STATUS UNDER HISTORY TAB
REFUND PAYMENT
Similar to Saferpay transactions, you have the ability to manage Saferpay refund transactions. Saferpay refunds are only possible if transactions are captured correctly. If transactions are not captured, simply click the 'Capture' button in the transaction tab to enable the Saferpay refund button. Manual refund options are always accessible. Administrators must manually process refunds and update details in the Saferpay back office. Refunds are also an option for orders with a completed status.
For Saferpay Refund do the steps mentioned below
1. Capture order from backend
2. Then click Refund button
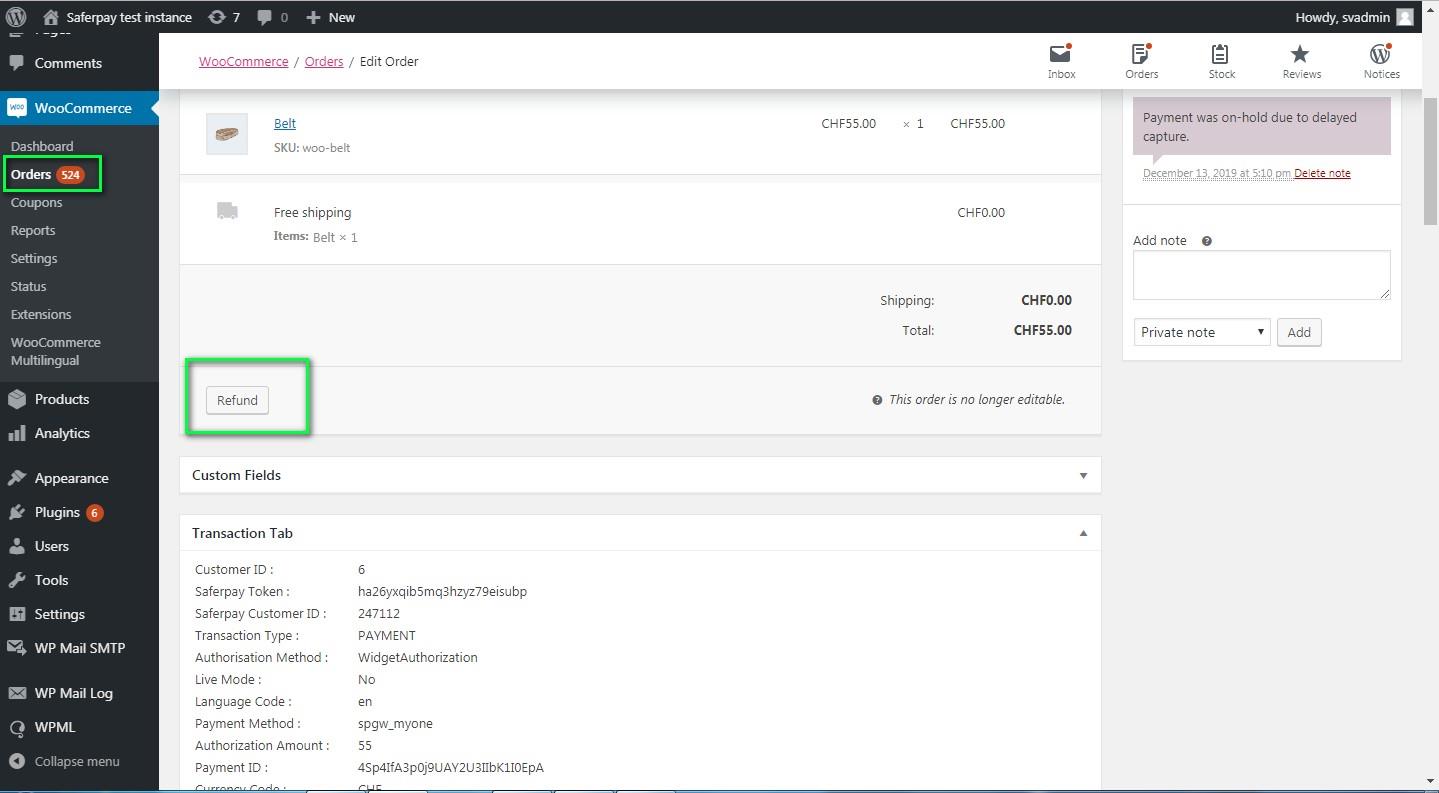
SAFERPAY REFUND
3. Click on items to be Refunded amount will be displayed.
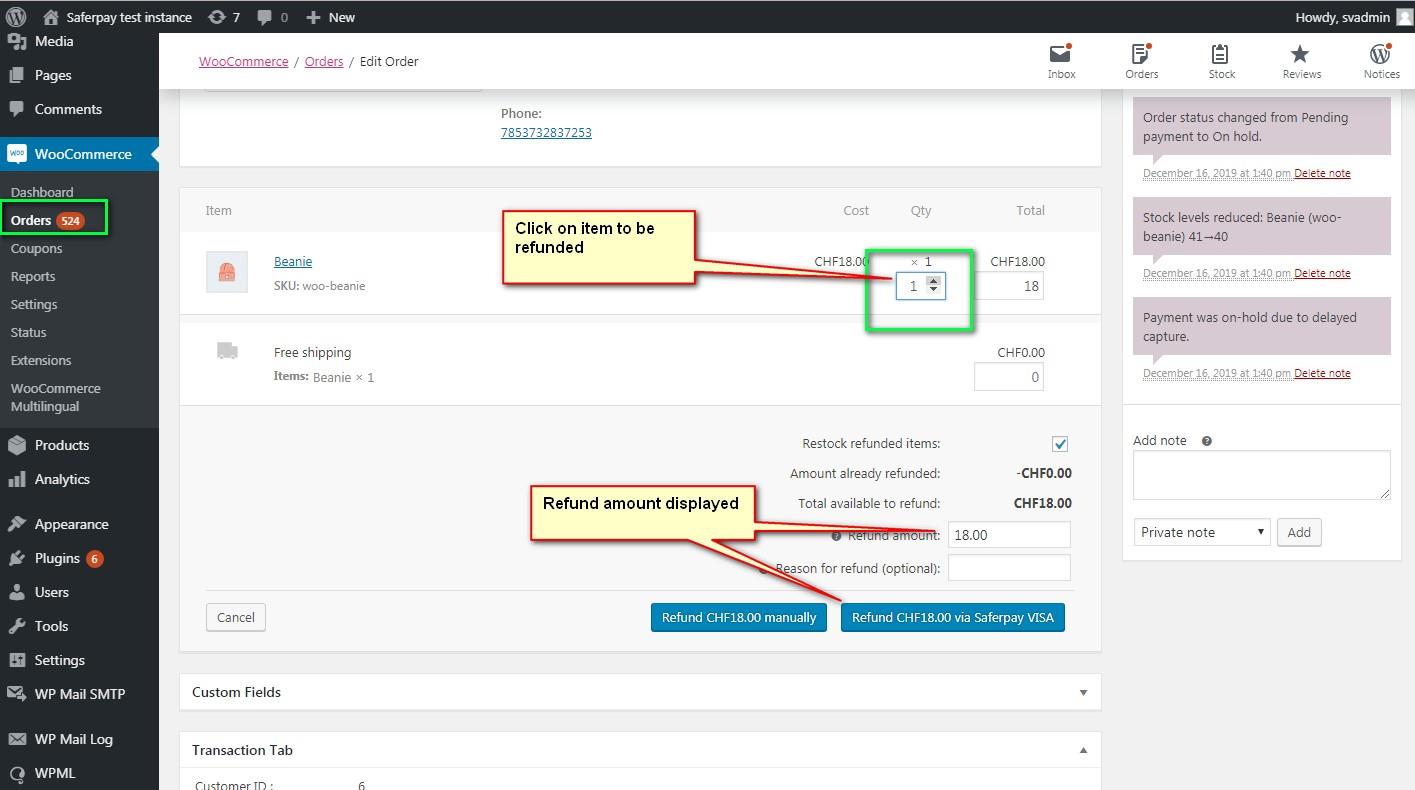
4. After that, click on the button labeled "Refund via Saferpay" to initiate the refund process. A confirmation pop-up will then be displayed to confirm the refund request.
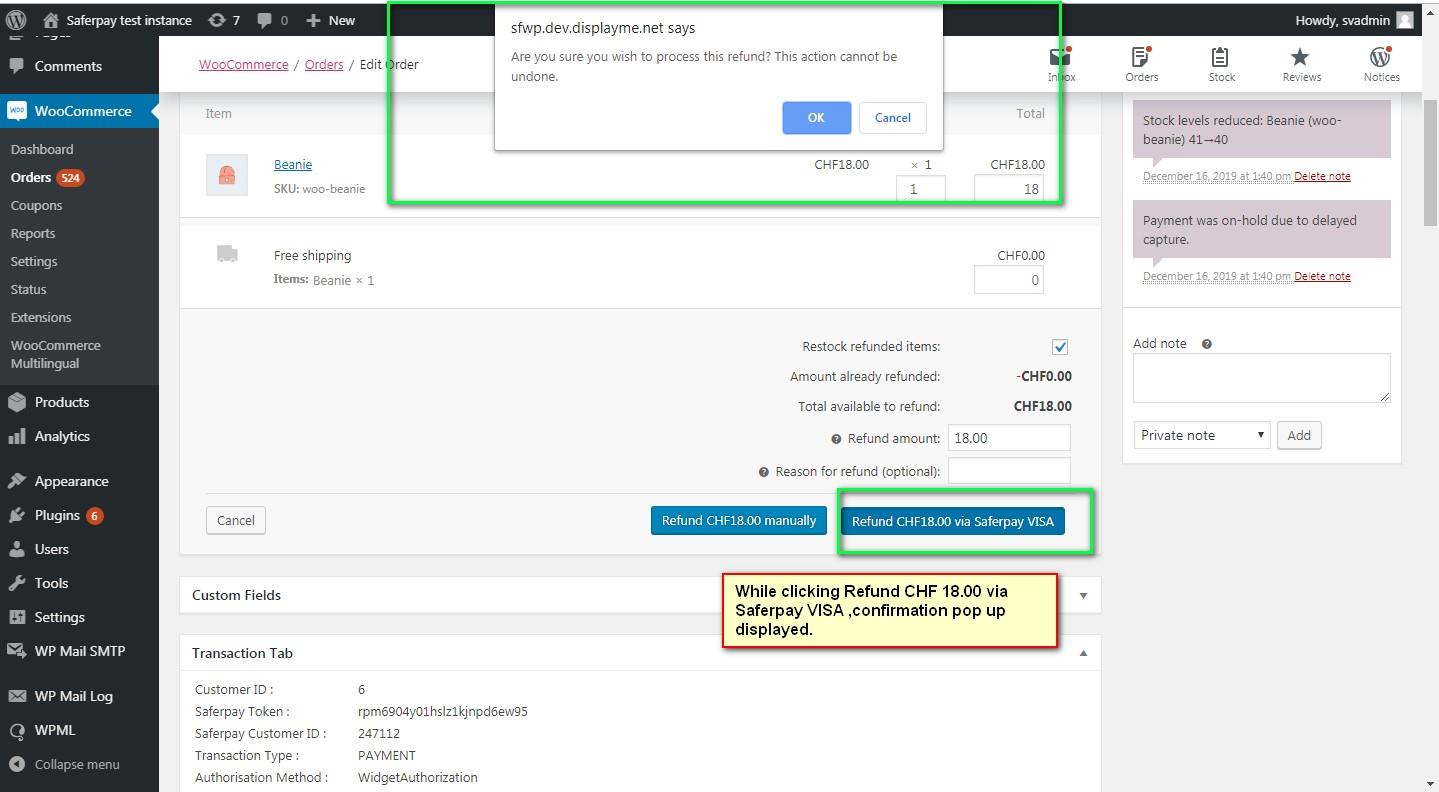
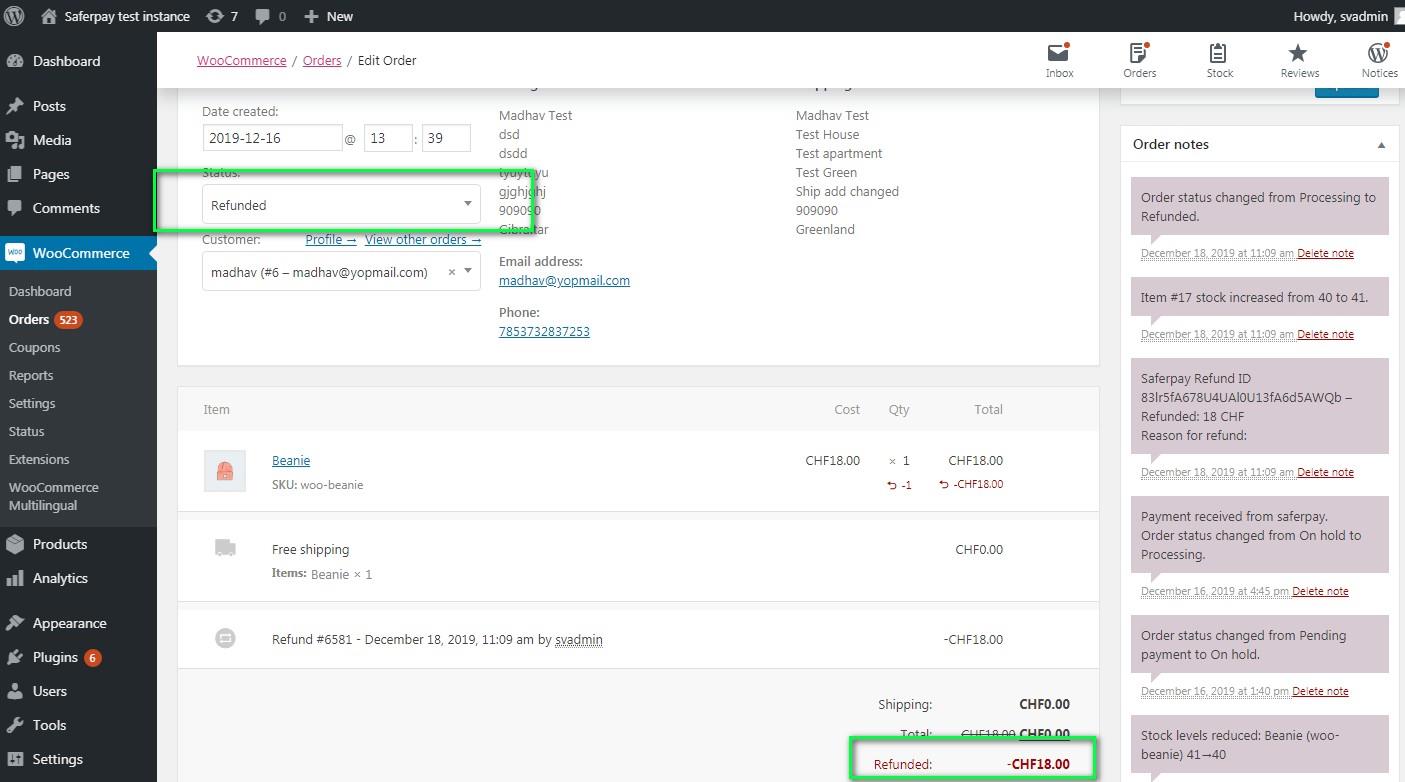
5.If you click 'OK,' the refund will be processed successfully, and the order status will be changed to 'Refunded.
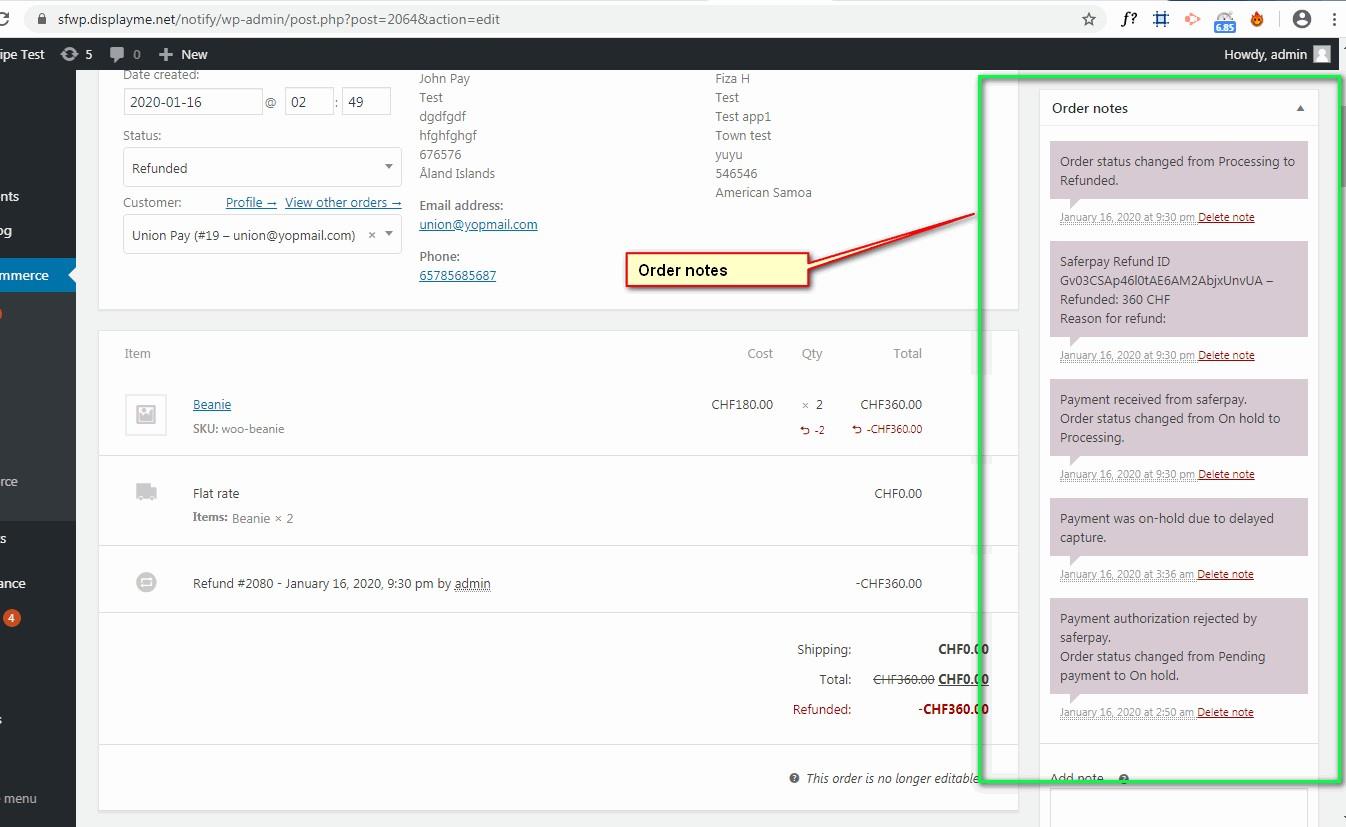
Order notes are available on the right side for each order. This feature allows the administrator to easily track and view all order details.
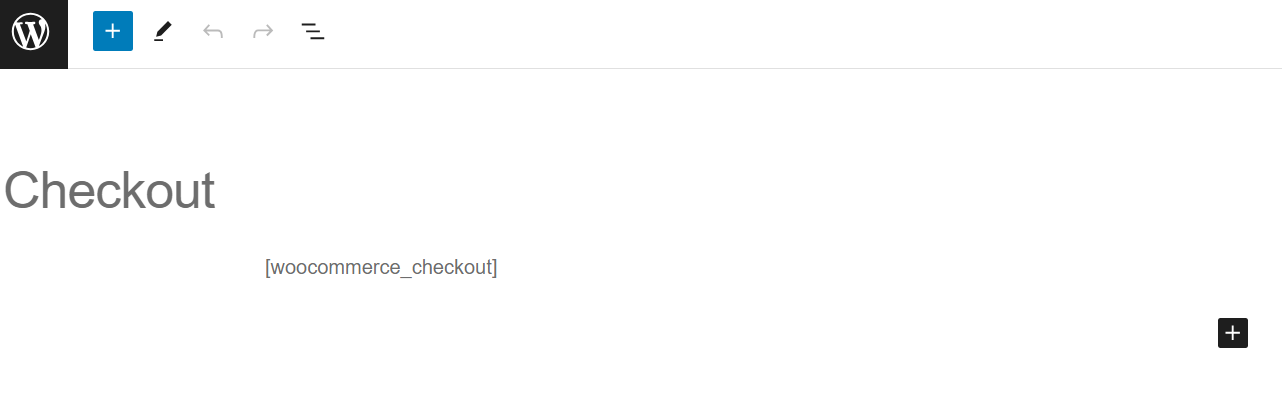
CHECKOUT BLOCK COMPATIBILITY
The checkout block compatibility feature has been successfully implemented. Our plugin now supports both the [woocommerce_checkout] shortcode method and the Gutenberg checkout block. This enhancement allows for seamless integration and improved functionality for users. This update ensures a smoother checkout process for customers, making their shopping experience more efficient and user-friendly.
- To utilize Gutenberg blocks on themes that support them, it is essential to incorporate the checkout block Gutenberg module on the Checkout page for WooCommerce version 8.3.1 and higher.
- For themes that do not support blocks and have WooCommerce versions below 8.3.1, please use the [woocommerce_checkout] shortcode. This will ensure proper functionality and compatibility with your website's checkout process.
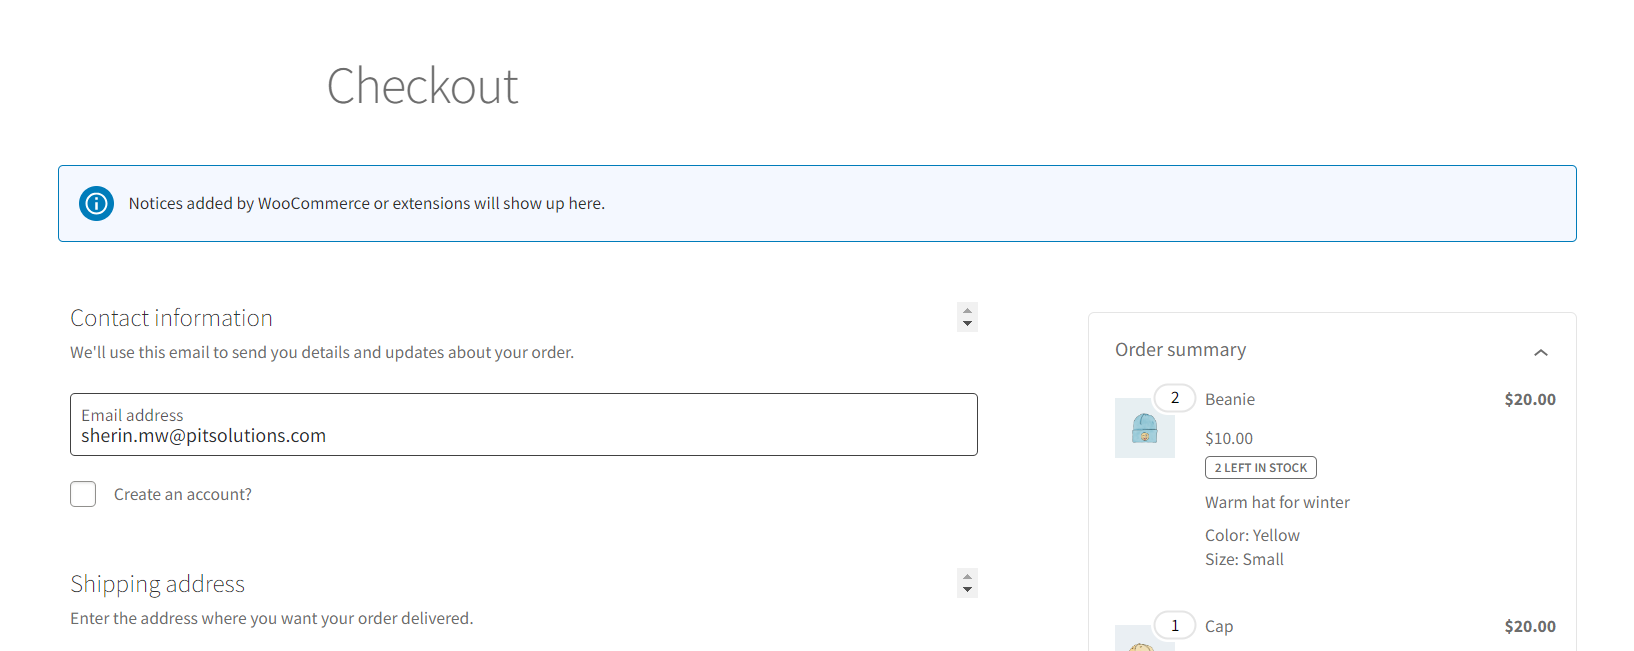
If you are encountering problems with missing validation messages, please make sure that you have placed the Store Notice block above the checkout block on the checkout page. This will ensure that all essential information is properly displayed and that customers are promptly notified of any errors or required fields.
ALIAS MANAGER
The Alias Manager feature enables customers to securely store their credit card information within their account for convenient use in future transactions.
Saferpay Secure Card Data (SCD) is a service designed to securely store sensitive payment information in the certified Saferpay data center. By utilizing SCD, payment data is kept separate from the merchant application, eliminating any direct contact between the two. This stored Secure Card Data can then be easily accessed for future payments through the Transaction interface.
This feature is available for payment methods that support secure card data. Sensitive payment data is stored exclusively in a certified Saferpay data center. If the settings
‘Is Save Card Available?’ When the "Is Active" option is selected on the Payment Method Configuration page, logged-in customers have the ability to securely save and utilize their card information for future transactions..
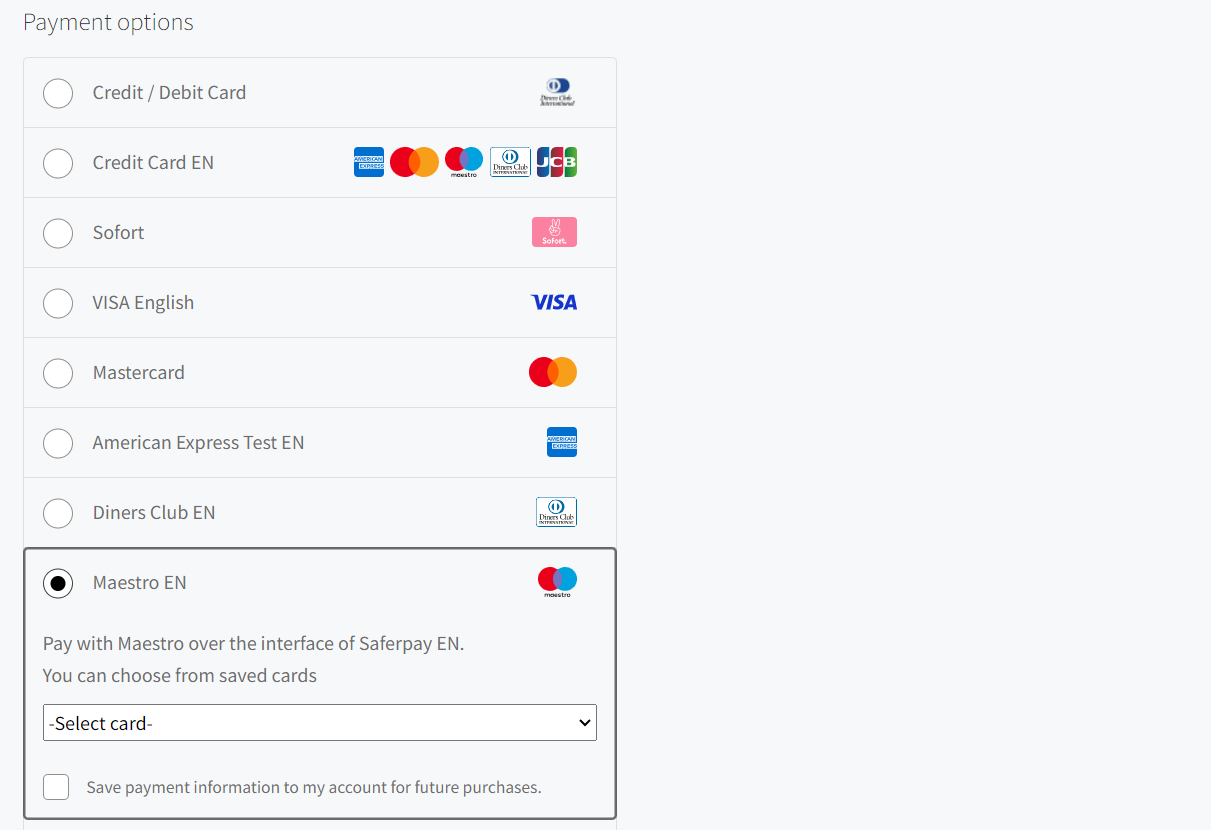
Furthermore, customers have the ability to manage their saved cards directly from their customer account in the "My Account" section. A new tab labeled "Saved Cards" has been added to the My Account page, allowing customers to easily add, update, and delete cards from their account.
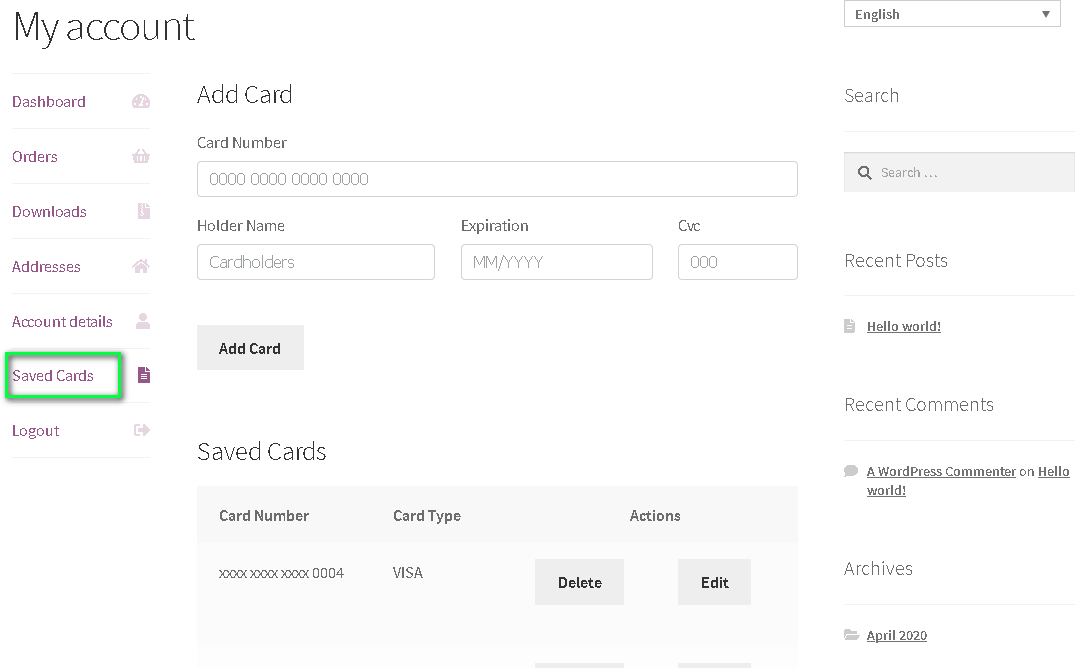
Note: ADD CARD option will only be available for customers if “Allow save card in user profile” set to Yes in Saferpay general settings.
Card Number – Displays the masked credit card number provided by Saferpay.
Customers can easily update the expiration date of their saved card by simply clicking on the "Edit" button.
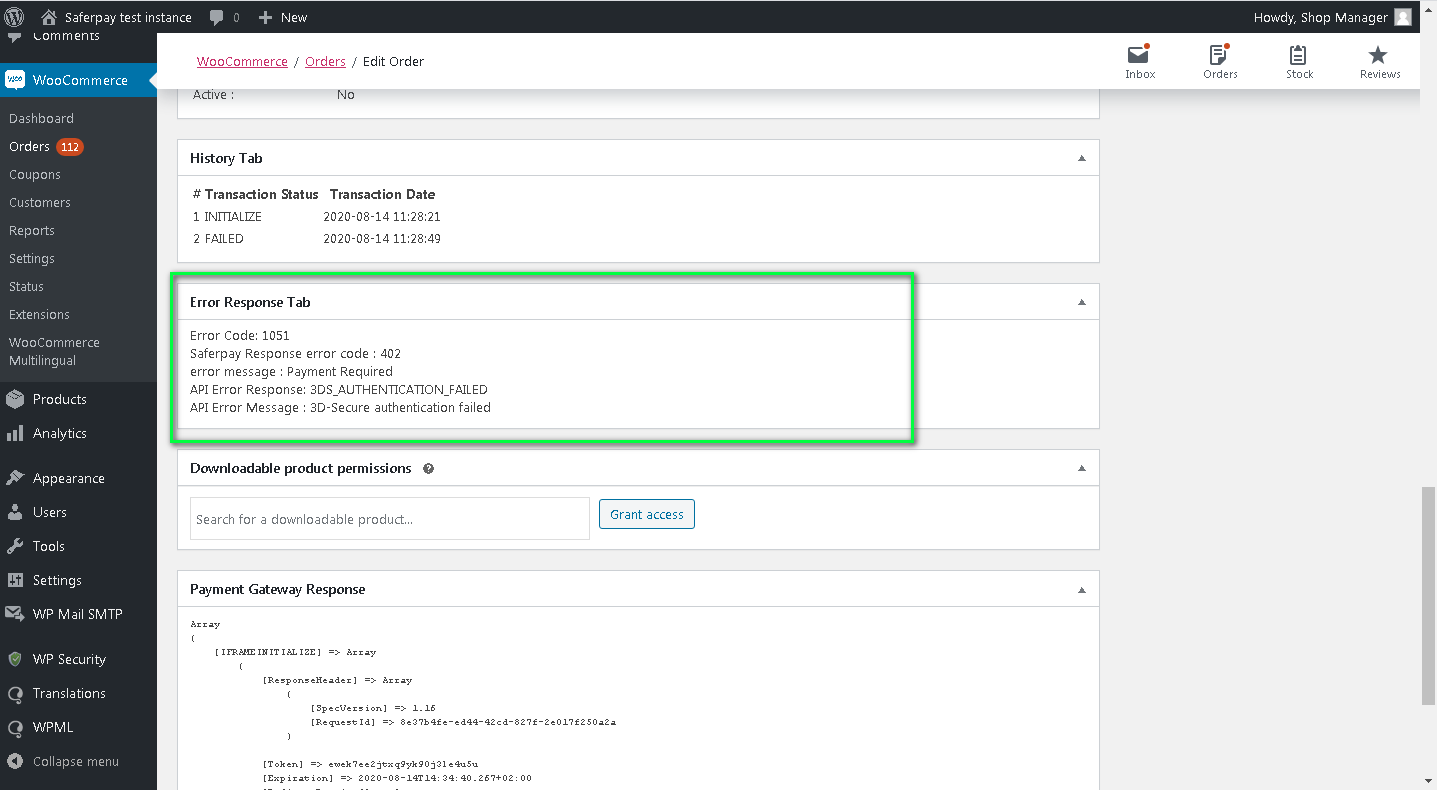
ERROR LOGS
The Error Log section contains details of transactions processed by Saferpay that were unsuccessful. This section provides valuable information on transactions that were not completed successfully.
Error details provided by the payment gateway will be recorded and shown in the order details section under the 'Error Response Tab'.
RECURRING PAYMENT MODULE
COMPATIBILITY WITH WOOCOMMERCE SUBSCRIPTION PLUGIN
We have successfully integrated the Saferpay WooCommerce Gateway to work seamlessly with the WooCommerce Subscription (https://woocommerce.com/products/woocommerce- subscriptions/) plugin version 7.2.1. Once you have installed both the Saferpay and WooCommerce Subscription plugins, you will have the ability to customize the recurring payment methods from the Saferpay general settings. This means that only the chosen payment methods will be displayed on the checkout page for subscription orders, providing a more streamlined and efficient payment process for your customers.
CONFIGURATIONS FOR RECURRING MODULE
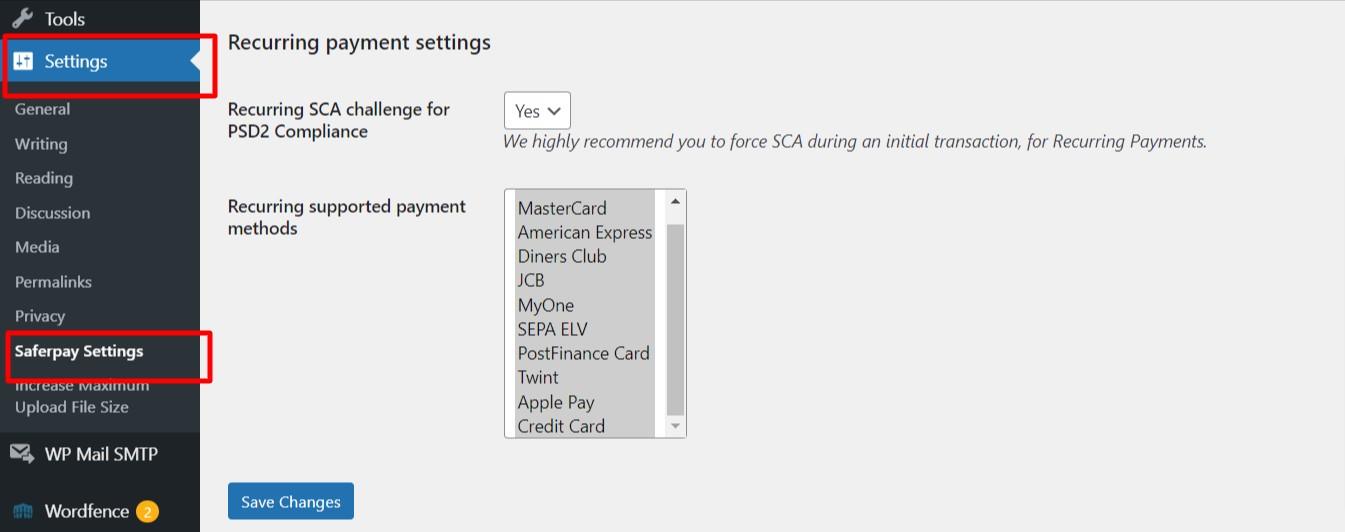
- Recurring SCA challenge for PSD2 Compliance
The Saferpay module is compatible with the WooCommerce Subscription plugin, specifically designed for orders containing subscription products. This feature guarantees PSD2 compliance for recurring payments made through Saferpay when the WooCommerce Subscription plugin is activated.
- Recurring supported payment
When a customer adds a subscription to their cart, only payment methods specific to the gateway will be available at checkout. It is important to ensure that the selected payment gateways are properly configured by navigating to WooCommerce > Settings > Payments.
Saferpay plugin is compatible with the following features of WooCommerce Subscription plugin,
- Subscriptions
- Manual renewal
- Subscription Cancellation
- Subscription Suspension
- Subscription Reactivation
- Subscription Amount Changes
- Subscription Date Changes
- Multiple Subscriptions (Multiple subscription products in same order)
The following Saferpay payment methods are supported for subscription orders.
- VISA
- MASTERCARD
- AMERICAN EXPRESS
- DINERS
- JCB
- GOOGLEPAY
- SEPA ELV
- APPLEPAY
- CREDIT CARD (SAFERPAY FIELDS)
- TWINT – Payment possible only if there is already saved card data available
- POSTFINANCE PAY – Payment possible only if there is already saved card data available
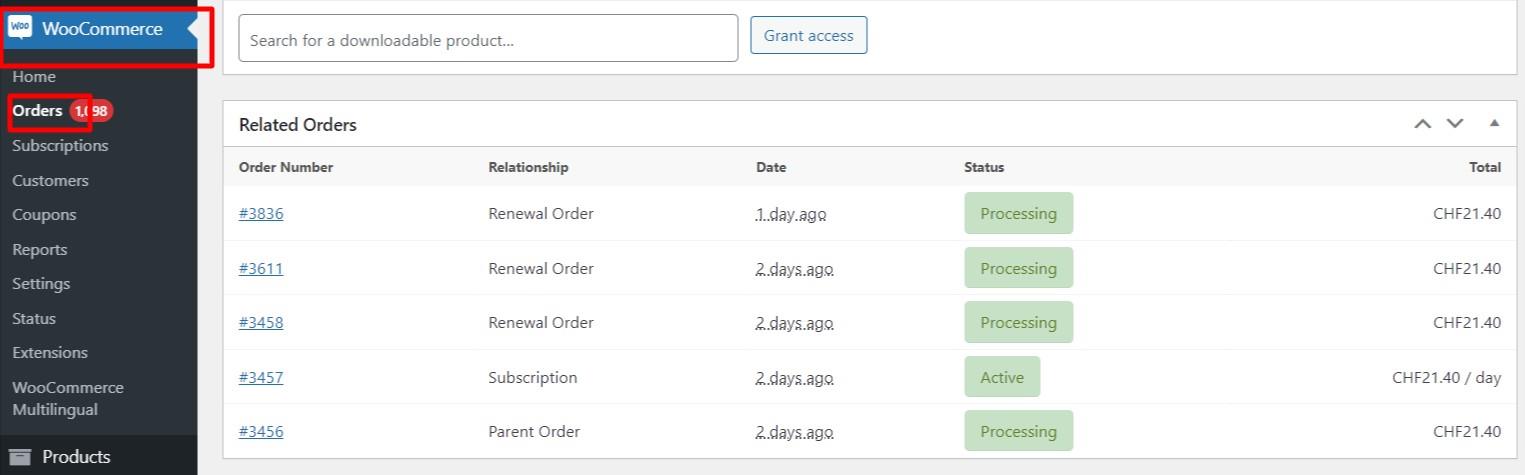
Renewal subscription orders are generated through the WooCommerce Subscriptions cron job. When the scheduled time arrives, a new subscription order is placed. If the payment for the subscription fails, the subscription is put on hold and the renewal process will not proceed until the subscription status is changed to Active. Merchants have the option to cancel subscriptions if necessary. Customers are notified via email during this time, prompting them to reactivate their subscription by paying the outstanding amount through their account.
Payment details are securely stored in Saferpay, and the WordPress backend displays a list of child orders linked to each subscription.
LIMITATIONS IDENTIFIED WITH THE RECURRING PAYMENT MODULE
- When checking out with a zero amount, such as during a free trial or with zero signup fee, the supported payment methods are Credit Cards, Twint, and Postcard. However, Twint and Postcard are not currently supported for recurring payments unless done through Alias and Authorize Direct. When processing a zero payment, the card information is saved instead of the payment being processed, making it challenging to implement for Twint and Postcard. Therefore, at this time, only Credit Cards support zero payments.
- With Apple Pay's "pay by wallet" option, users have the ability to checkout subscription products using cards that do not support recurring payments. For example, Maestro cards. While it may be possible to complete the checkout process, the actual subscription and related features may not function properly with Maestro cards due to their lack of support for recurring payments.
- In the Saferpay back-office, an auto-renewal typically generates an order as a child of the original order. However, manual renewals operate differently. When a user manually renews through checkout, a completely new order is created without any connection to previous orders within the same subscription. In contrast, in WordPress, both auto and manual renewals are grouped under the initial parent order.
- The Saferpay WooCommerce Gateway does not currently support the following features of the WooCommerce Subscription plugin.
- Subscription payment method change
- Subscription payment method change by customer
- Subscription payment method change by admin
The Saferpay API does not offer support for changing payment methods, as it requires the entire process to be re-initiated in order to implement such a change. Therefore, we are limited in our ability to facilitate this adjustment.
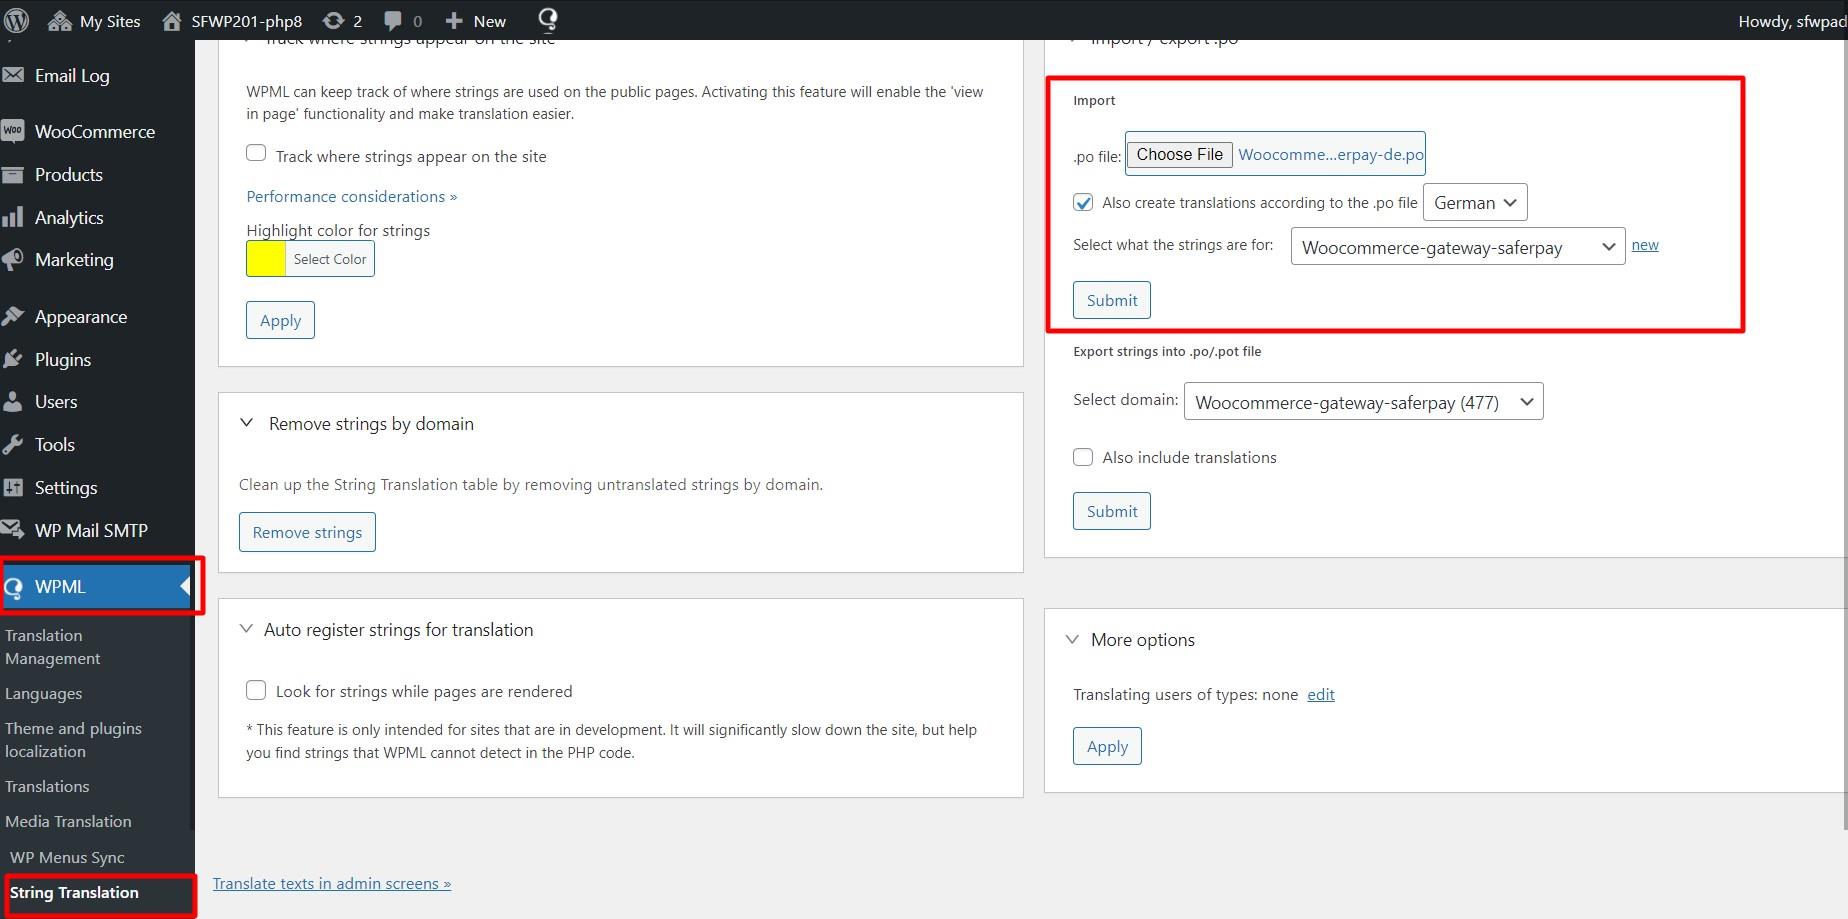
STRING TRANSLATION USING WPML
If translations are not available after updating the plugin to latest version, you need to import the .po file again. .po files can be found inside the plugin folder under “saferpay_woocommerce_gateway/languages/ Woocommerce-gateway-saferpay-de.po”
SAFERPAY PAYMENT API SPEC VERSION UPDATES
1.19 to 1.23
- Integrated crypto payments into the Saferpay Payment Page
- Expanded support for Klarna Payments to include Italy and France
- Added new currencies (PLN, HUF, and CZK) for SOFORT payments
- Updated logos for Bancontact and iDeal payment methods
- Now supporting EPS refunds
- Discontinued Bonus Card payment option
- Implemented Saferpay Fields Access Token generation through REST API
1.24 to 1.25
- Pre-authorizations now available for additional brands such as American Express, Diners Club, and JCB
- SuccessNotifyUrl and FailNotifyUrl now included in PaymentPage/Initialize for improved functionality.
- WL Crypto Payments now supports refunds for added convenience.
- Notification URLs have been added to Transaction/Initialize for enhanced communication.
- Saferpay fields JS URL has been updated for improved security.
- Klarna Payments now supports Extended Merchant Data for a more comprehensive payment experience.
- Management API now ensures that only payment methods enabled in Saferpay backoffice are accessible in the webshop backend
- New payment logos have been added for a fresh look and feel
1.26 to 1.31
- Integration of Google Pay completed
- Issue with WL Crypto Refunds has been resolved..
- Widget authorization now available for Google Pay and Apple Pay
- Auto-configure button has been added to Saferpay settings.
- New country restrictions have been added to Sofort Account for PLN and GBP currencies. Attention is required.
1.32 to 1.38
- Integration of account-to-account transfers
- Integration of PostFinance Pay
- Integration of credit card and debit card payments.
- Removal of Masterpass and UnionPay options
- Update of return URL.
- Introduction of EURO currency for Crypto transactions in Belgium and Luxembourg.
1.39 to 1.40
- Integrated WeChat Pay into our payment system
- Replaced PostFinance Card and PostFinance E-Finance with PostFinance Pay.
- Removed Bancontact from Savecard feature
- Eliminated Payment Page CSS URL and Payment Page Configuration Name
1.41 to 1.44
- Integrated BLIK into our payment system
- Integrated CLICK TO PAY into our payment system
1.45
- Integrated REKA into our payment system
- Added PayerNote in Refund request