Categories
Magento
WordPress
SAP Commerce
Odoo
Shopify
Typo3
Shopware
nopCommerce
Pimcore
Hyvä
OXID eShop


With the Magento 2 Extension "Magento 2 QR-Invoice Schweiz" you can offer your customers the simple, convenient, and future-proof payment method "QR invoice". And you save time on invoice processing with the included payment reconciliation and the sending of reminders
The Magento 2 QR Invoice switzerland extension allows merchants to generate and send Swiss QR bills directly from their Magento 2.4.0 - 2.4.8p3 store. A QR code payment slip is added automatically to Magento invoices, making it easier for customers to complete payments using Swiss banking standards. The extension follows ISO 20022 specifications and supports reference numbers that are generated automatically for each invoice.
Payment reconciliation is handled in the Magento backend using camt054 files downloaded from the merchant’s e-banking system. Imported payment data can be matched with invoices, including partial payments and manual reconciliation where required. This helps merchants track payment status without relying on external tools.
The extension also includes a dunning process for overdue invoices. Merchants can send reminders either automatically or manually and configure reminder levels, intervals, fees, email content, and PDF content from the admin panel. Invoices or customers can be excluded from the dunning process if needed, and the full reminder history is visible in the invoice view. Additional fields such as next dunning level, payment due date, and dunning status are available in the QR invoice grid.
The Magento 2 QR Invoice switzerland extension is compatible with Magento Open Source 2.4.0 to 2.4.8p3. If a third-party PDF invoice extension is used, compatibility support can be provided separately. All data remains on the merchant’s server, and the extension includes a 14-day money-back guarantee.
Features
-
Sending QR bills (ISO 20022)
-
Swiss QR code with Swiss cross
-
Option to send QR-Invoices automatically after receiving order
-
automatically generated reference numbers
-
Set payment method to “in advance” or “on account”
-
Import of .camt054 for payment reconciliation
-
Partial payments and manual reconciliation
-
Option for dunning process if there is delay in the payment of invoice.
-
Merchants can enable/disable the dunning settings.
-
Merchants can manage the reminder level, interval, fees, email and pdf content from admin configuration.
-
Merchants can exclude customers from dunning process and can disable dunning for specific Invoice.
-
Merchants can view the dunning history for an order in Invoice view page.
-
Merchant can easily download the dunning Invoice pdf from dunning page.
-
Option to generate report for the Invoices that completed the dunning levels.
-
Merchant can manually execute the dunning process through QR bill invoice page
-
Added fields "Next dunning level", "Next Payment due date" and Dunning status in the QR Bill Invoice grid
-
Added text field "Update Amount Manually" to manually update amount to invoice.
-
Added field "Amount Paid by other means" to show the total amount updated manually.
-
Added option to choose reminder mode, Email/Print corresponding to each dunning level
-
Secure: all data remains on your server
-
14 days money back guarantee
Requirements
-
Magento from Version 2.4.0 to 2.4.8p3
-
Bank account with IBAN or QR IBAN
-
Bank supports export of camt054 files
TECHNICAL REQUIREMENTS/ COMPATIBLE WITH
- Compatible with Magento Open Source versions 2.4.0 – 2.4.8p3
- Fully supports the Hyvä theme
- Available in English and German, with easy customization for additional Magentosupported language packs
INSTALLATION STEPS
To install ISO Bill extension, follow the steps below.
- Download the package.
- Access your web server directories and unzip and upload the content of the app folder to the path rootFolder/app/
- Access your web server directories and unzip and upload the content of the lib file to lib/internal/ directory.
- Run below commands on terminal
- php bin/magento setup:upgrade.
- php bin/magento setup:di:compile
- php bin/magento setup:static-content:deploy.
The Cron job should work properly for your shop
ADMIN CONFIGURATION
1. General Qr Bill Settings
Log in to the admin panel and navigate to Stores → Configuration → Sales → ISO QR Bill → General QR Bill Settings or Log in to the admin panel and navigate to Sales → QR Bill Invoice → Configuration.
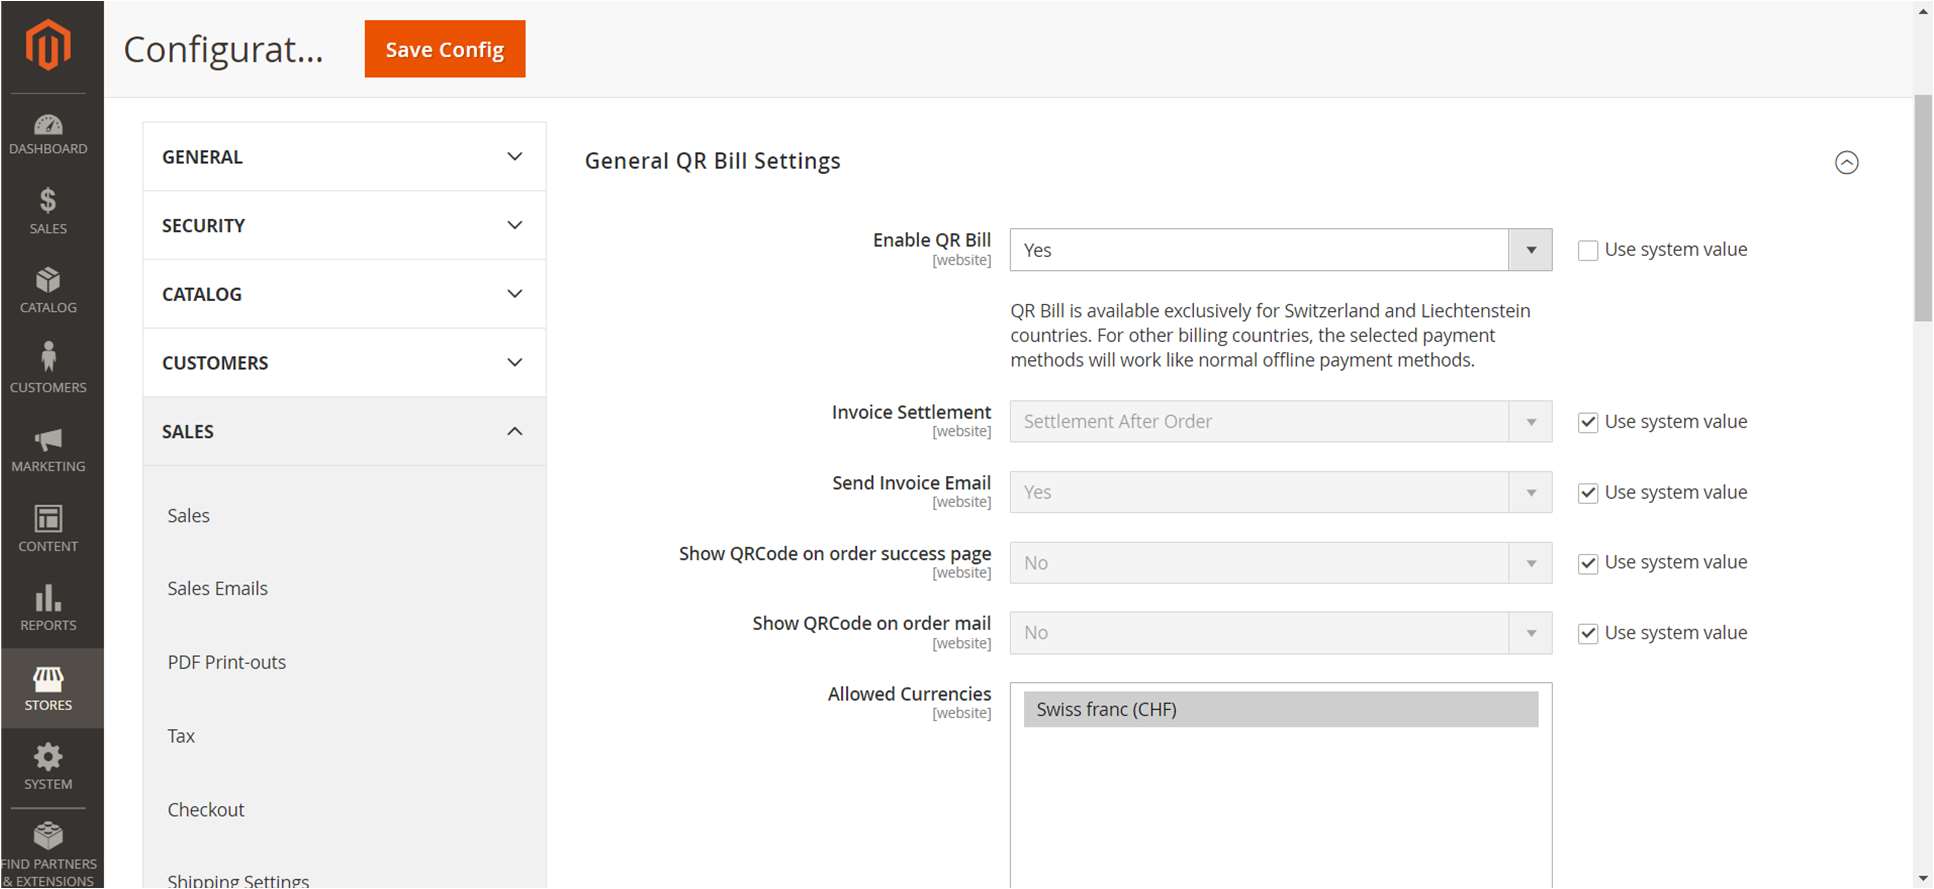
Figure 1
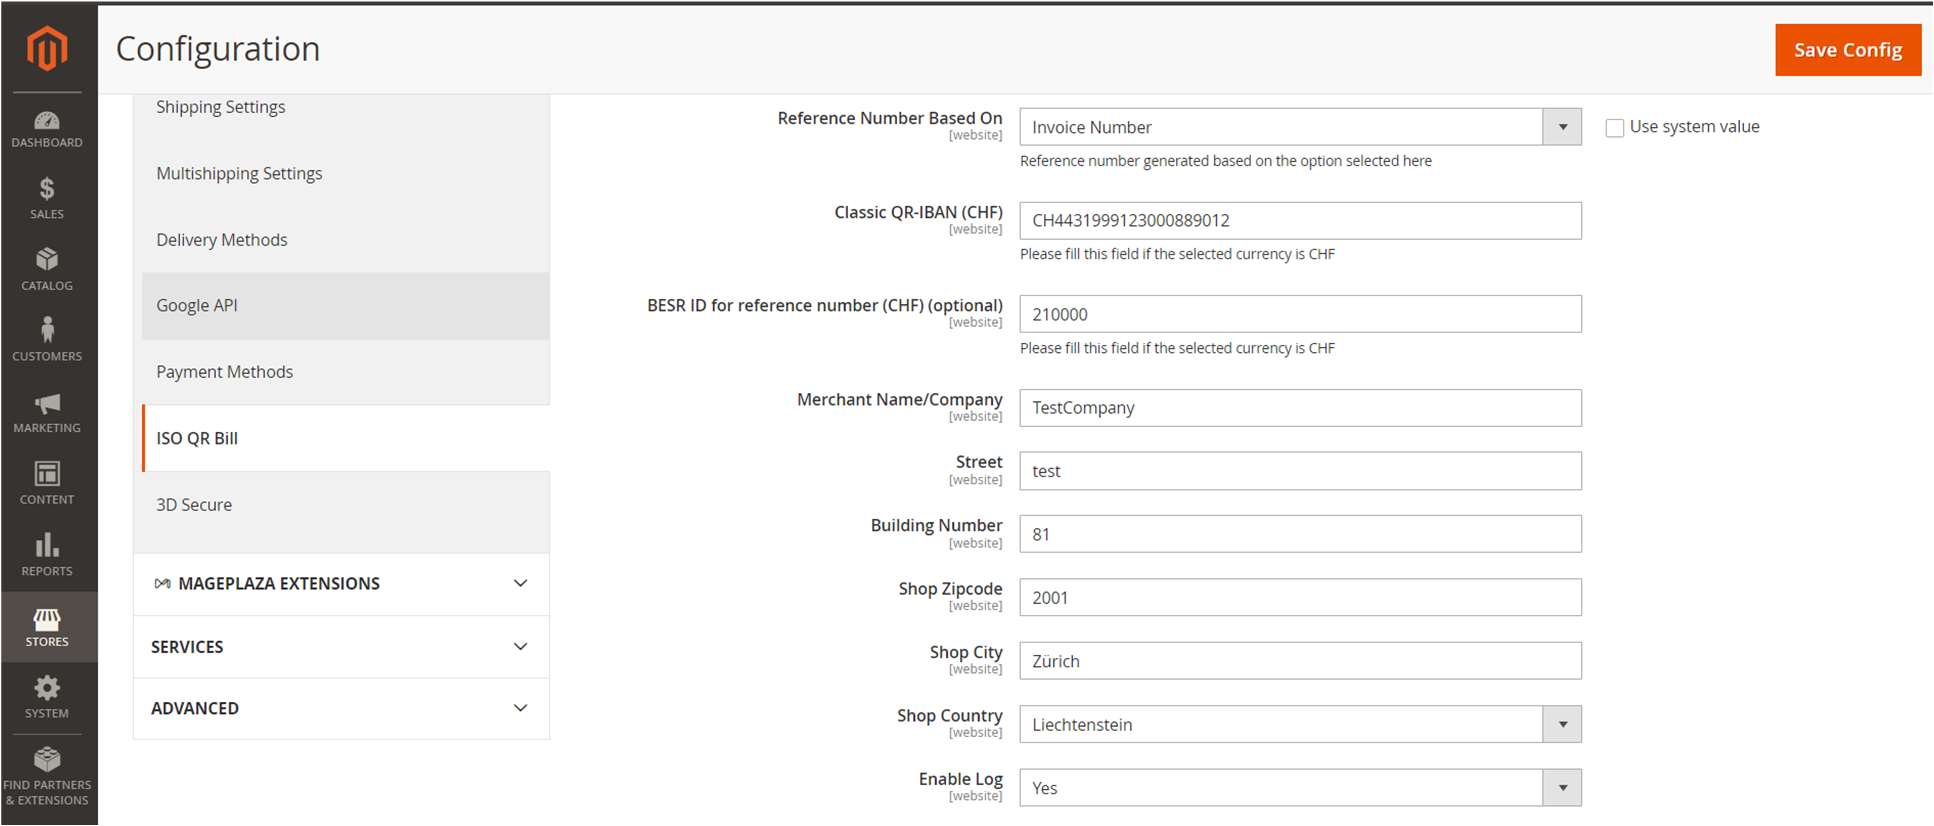
Figure 2
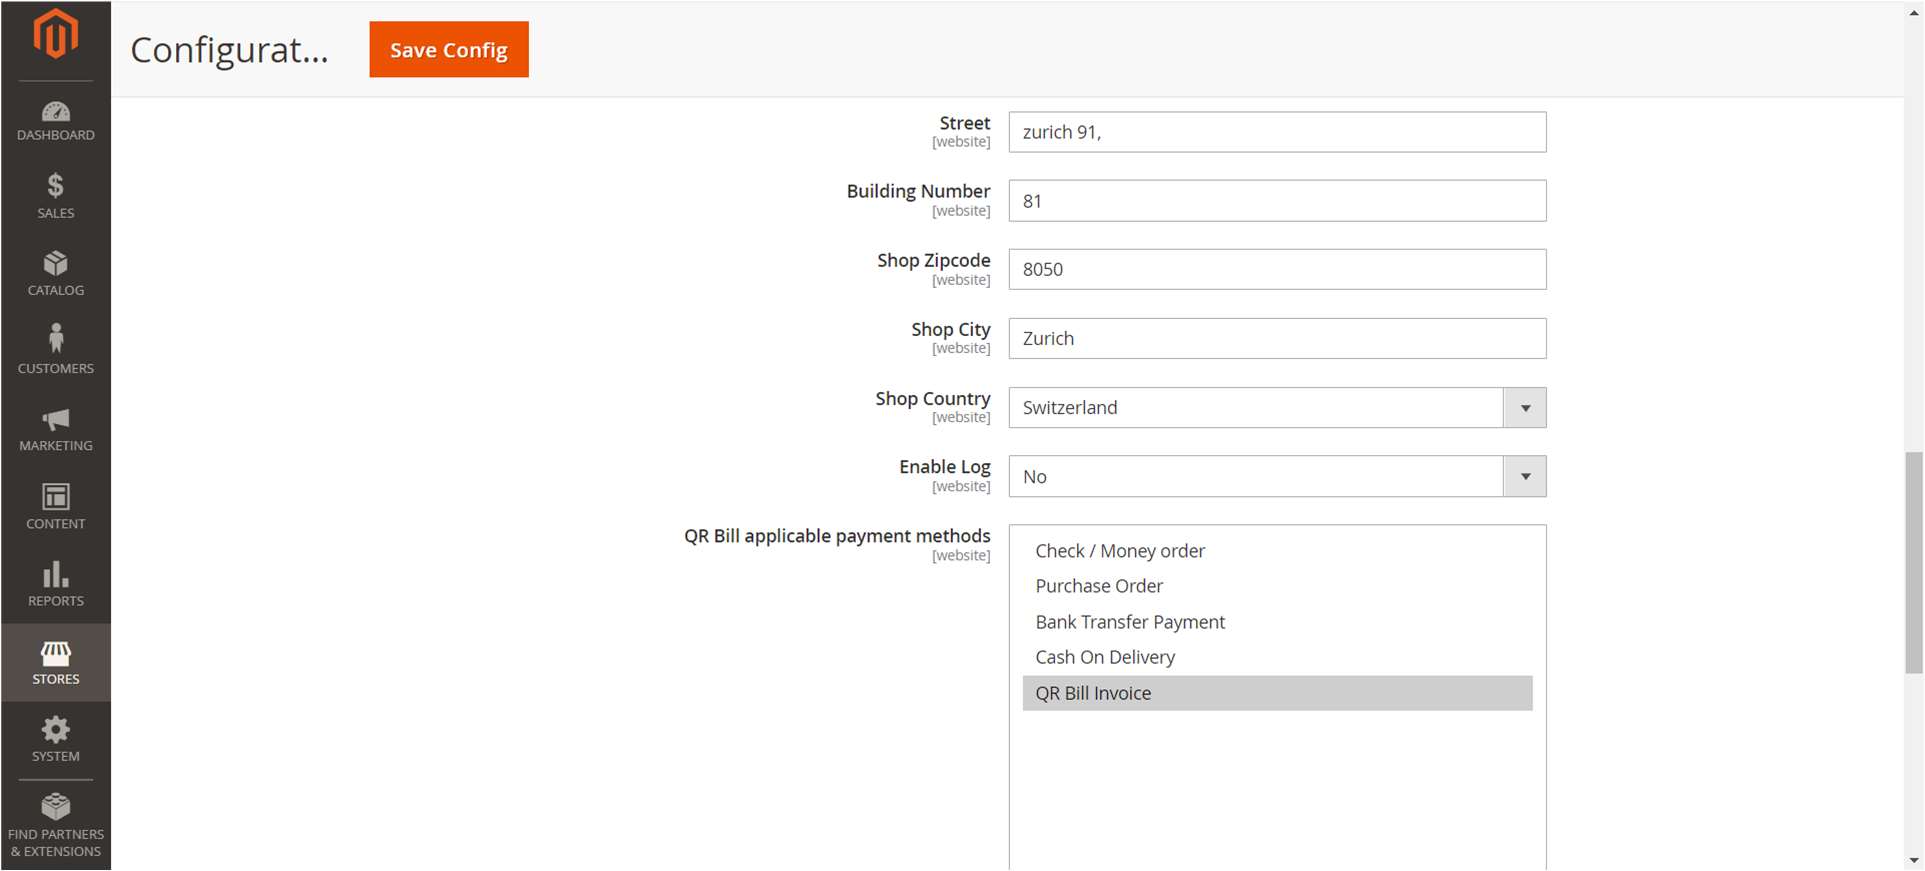
Figure 3
Enabled QR Bill – Option to enable the extension.
Invoice Settlement - You can choose the invoice settlement method options. “No invoice settlement” means no invoice is created while placing order and “Settlement after order” means automatically invoice is created after placing order.
Send Invoice Email - You can choose whether you can notify the customer after invoicing the order. If it is set to "Yes" it will send the invoice mail and if it is set to "No" it will not send the invoice mail.
Show QRCode on order success page - Option to show QRCode on Order success page. To display the QR code on the order success page, this option should be set to "Yes," and the Invoice Settlement option should be set to "Settlement after order."
Show QRCode on order mail - Option to show QRCode in Order mail. To display the QR code in the order mail, this option should be set to "Yes," and the Invoice Settlement option should be set to "Settlement after order.”
Allowed Currencies – This option to select all allowed currency for qrbill. Only CHF is allowed.
Reference Format - You can choose the reference format for ISO Bill. Format types are Classic Format and SCOR format. If you choose Classic format, then the field for entering Special QR-IBAN and BESR ID for reference number is displayed. For SCOR format, only you need to enter the Classic IBAN field.
Reference Number Based On - The QR Bill reference number is generated based on the option selected here. Two options are available "Order Number" and "Invoice Number"
Classic QR-IBAN (CHF) - This field will show if you choose Reference format “Classic format”. This IBAN is the number you receive from your bank. Using this, the reference number for order invoice is created. This should be unique for bank account holders.
BESR ID for reference number (CHF) (optional)- This field will show if you choose Reference format “Classic format”. If you have BESR ID (from bank) please fill this field otherwise skip as it is an optional field.
SCOR-IBAN (CHF)- This field will show if you choose Reference format “SCOR format”. The IBAN is the number you receive from your bank. Using this, the reference number for order invoice is created. This should be unique for bank account holders.
Merchant Name/Company - Merchant name or company name (Name of the payment receiver). This name will be displayed in QR Bill slip.
Street - Street name where the shop is located
Building Number - Building number of the building in which the shop is located
Shop Zipcode - Zip code of the shop
Shop City - City of the shop
Shop Country - Country of the shop
Enable Log - If enabled error details will be written to qrBillErrorLog.log in rootfolder/var/log directory.
QR Bill applicable payment methods – This option can be used to select all offline payment methods compatible with QR bill.
Additional Information - This field is used for adding any additional information within the generated payment slip with QR code.
Click Here – This link for configure QR bill payment method.
Note:
- You should give correct IBAN number, and you must fill the IBAN field according to the selected currency.
- Qr bill will work only with CHF currency, check whether CHF currency is enabled in your shop. Check this @Admin panel -> Stores -> Configuration -> General -> Currency Setup ->Currency Options -> Allowed Currencies. On frontend, switch the currency to CHF during checkout.
- This payment method is available only for Switzerland and Liechtenstein countries, so during checkout ensure that you choose either Switzerland or Liechtenstein as billing country.
- If you have selected “Settlement after order” as the “Invoice Settlement” settings value then, the invoice is created automatically after placing the order, and the customer will get an invoice email attached with the invoice pdf. If the “No invoice settlement” option is selected, then no invoice is created while placing order and the admin must create the invoice manually from backend. While creating invoice manually, make sure that invoice is created with “Not capture” option in Amount dropdown, otherwise the invoice become paid and further processing of payment and dunning will not work as expected.
2. Setup QR Bill invoice payment method
The QR Bill invoice payment method is a dedicated payment method for QR Bill invoices. We need to set up General QR Bill Settings to use QR Bill invoice payment during checkout. The QR Bill invoice payment method cannot be activated without configuring the General QR Bill Settings. Unlike other payment methods, QR Bill invoice payment relies on these settings, while other offline payment methods can operate independently without them
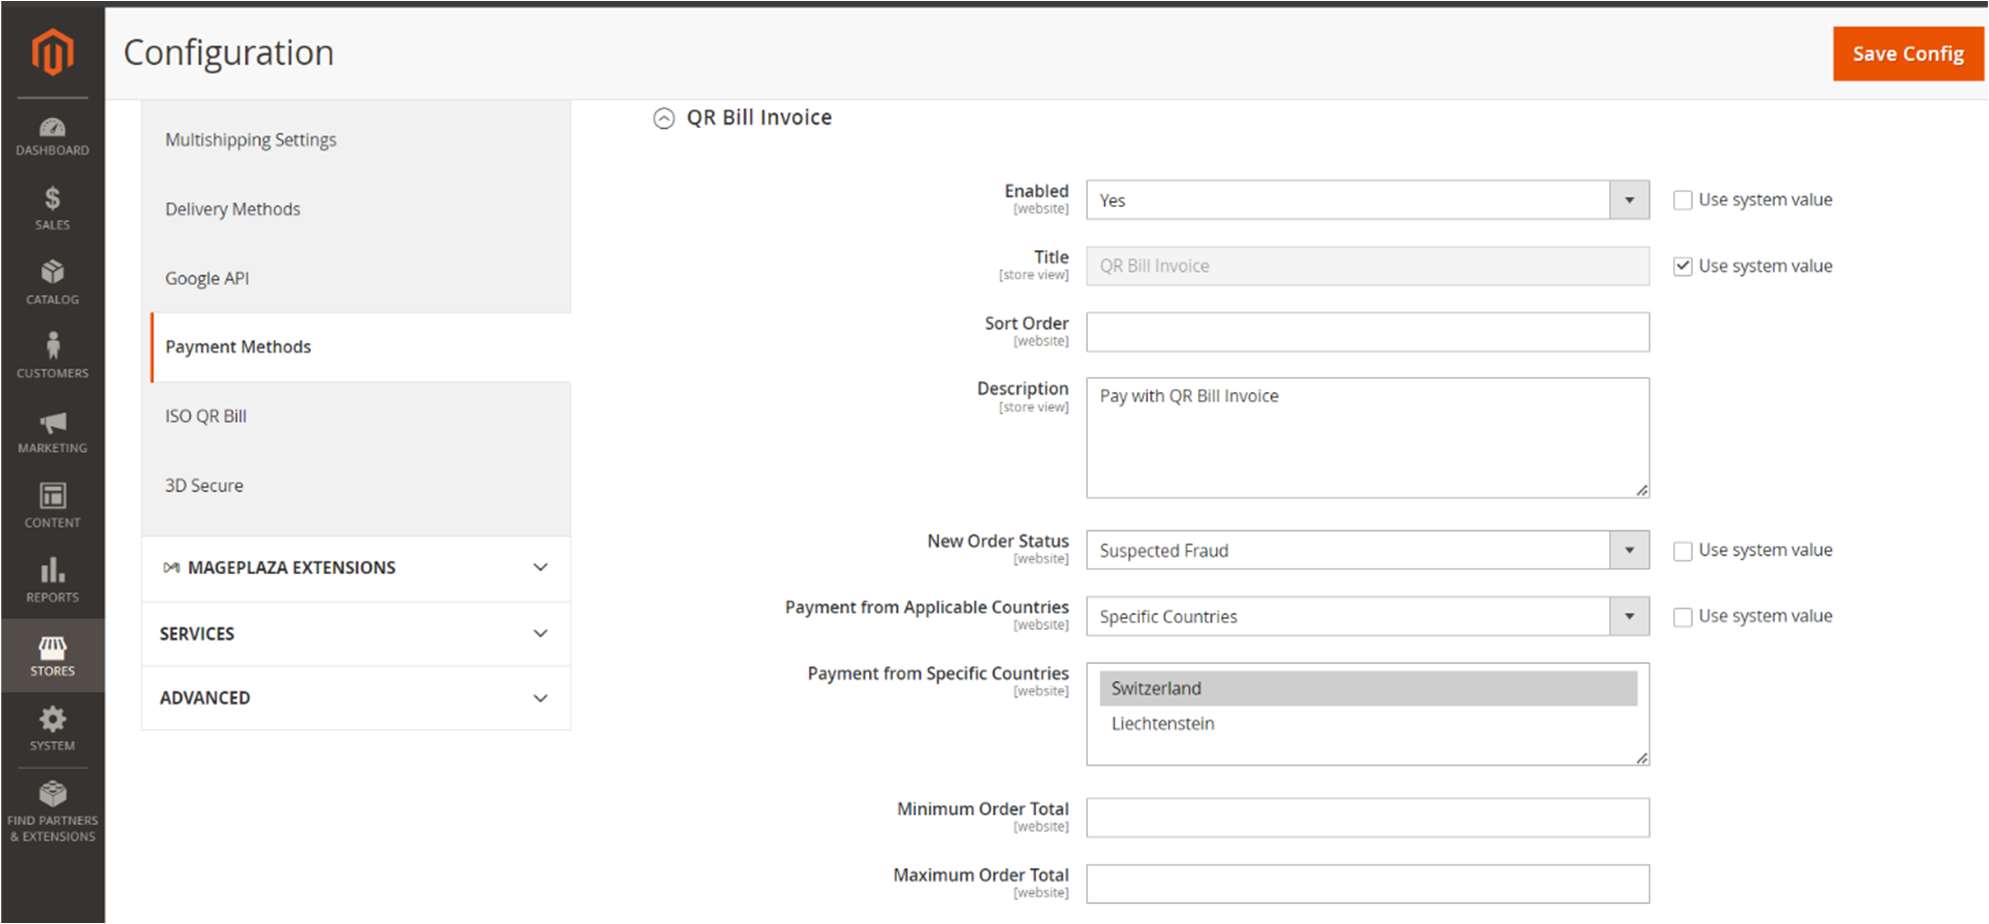
Figure 4
In the above image, we can see the QR Bill payment method configuration listed under “QR Bill Invoice”.
Order Placing with QR Bill
In this section, we discuss how to place an order with QR Bill feature enabled payment method. While placing an order, ensure that you select a country compatible with QR Bill (Switzerland or Liechtenstein) and use the allowed currency (CHF) specified in the General QR Bill settings. If the currency and country are compatible with QR Bill, you can select a QR Bill invoice supported payment method and place the order.

Figure 5
PAYMENT PROCESSING
This section explains the overall workflow and interfaces for managing payments. Below listed operations are the major steps involved in payment processing.
- Invoice generation with QR Bill
- Payment processing through CAMT file
1. INVOICE GENERATION
Once the user places an order through QR bill payment, system will generate Invoice based on system configuration Invoice Settlement. Two options are available
- No invoice settlement – Invoice is not created automatically after order. Merchant should manually create invoice. Steps are explained below.
- Navigate to admin dashboard and open the order you want to create invoice.
- In the header of the sales order, choose the Invoice option.
- Update the qty to invoice and tick the checkbox to send an email notification to the customer with a copy of the invoice.
- Select “Not capture” option in Amount dropdown to create invoice in pending state.
- Click Submit Invoice at the bottom of the page. Refer images Figure 6 & figure 7

Figure 6
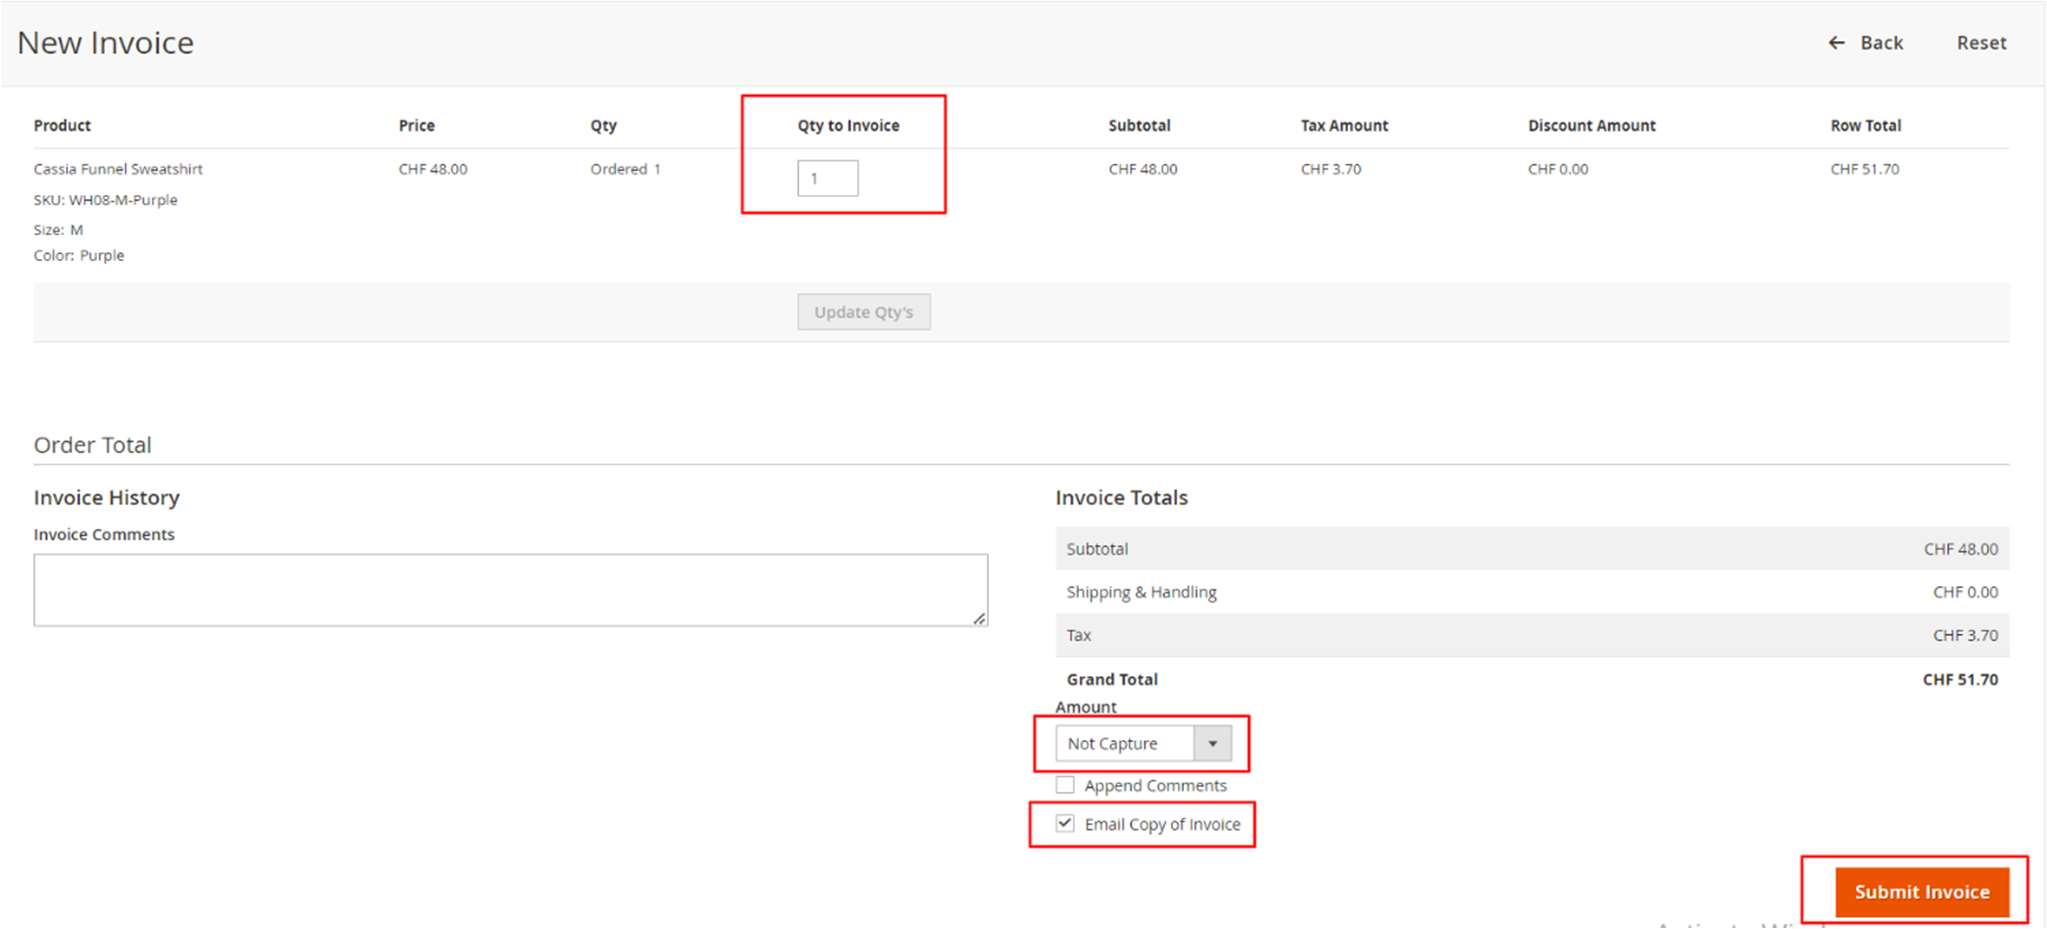
Figure 7
- Settlement after order – Invoice will be created automatically after placing order and QR invoice slip will be sent to customer along with invoice email.
From Magento versions 2.4.4 through 2.4.8-p3, email sending is handled through the Magento message queue system. The QR-bill invoice email is queued in the database and will be processed asynchronously by Magento’s consumer runner cron job.
Configuration Note: Ensure that the Magento cron jobs are properly configured and running. The consumer runner cron must be active, as it processes the queued invoice email jobs and triggers the QR-bill email dispatch.
Refer Figure 8 for sample QR bill

Figure 8
If we select "Settlement after order" in “General QR Bill Settings,” then we have three more options to select in “General QR Bill Settings”:

Figure 9
- Send Invoice Email: If select Send invoice email “Yes” then invoice email will send after the order placed.
- Show QrCode on order success page: If we select Show QrCode on order success page to “Yes” the Qr code will show in the order success page itself
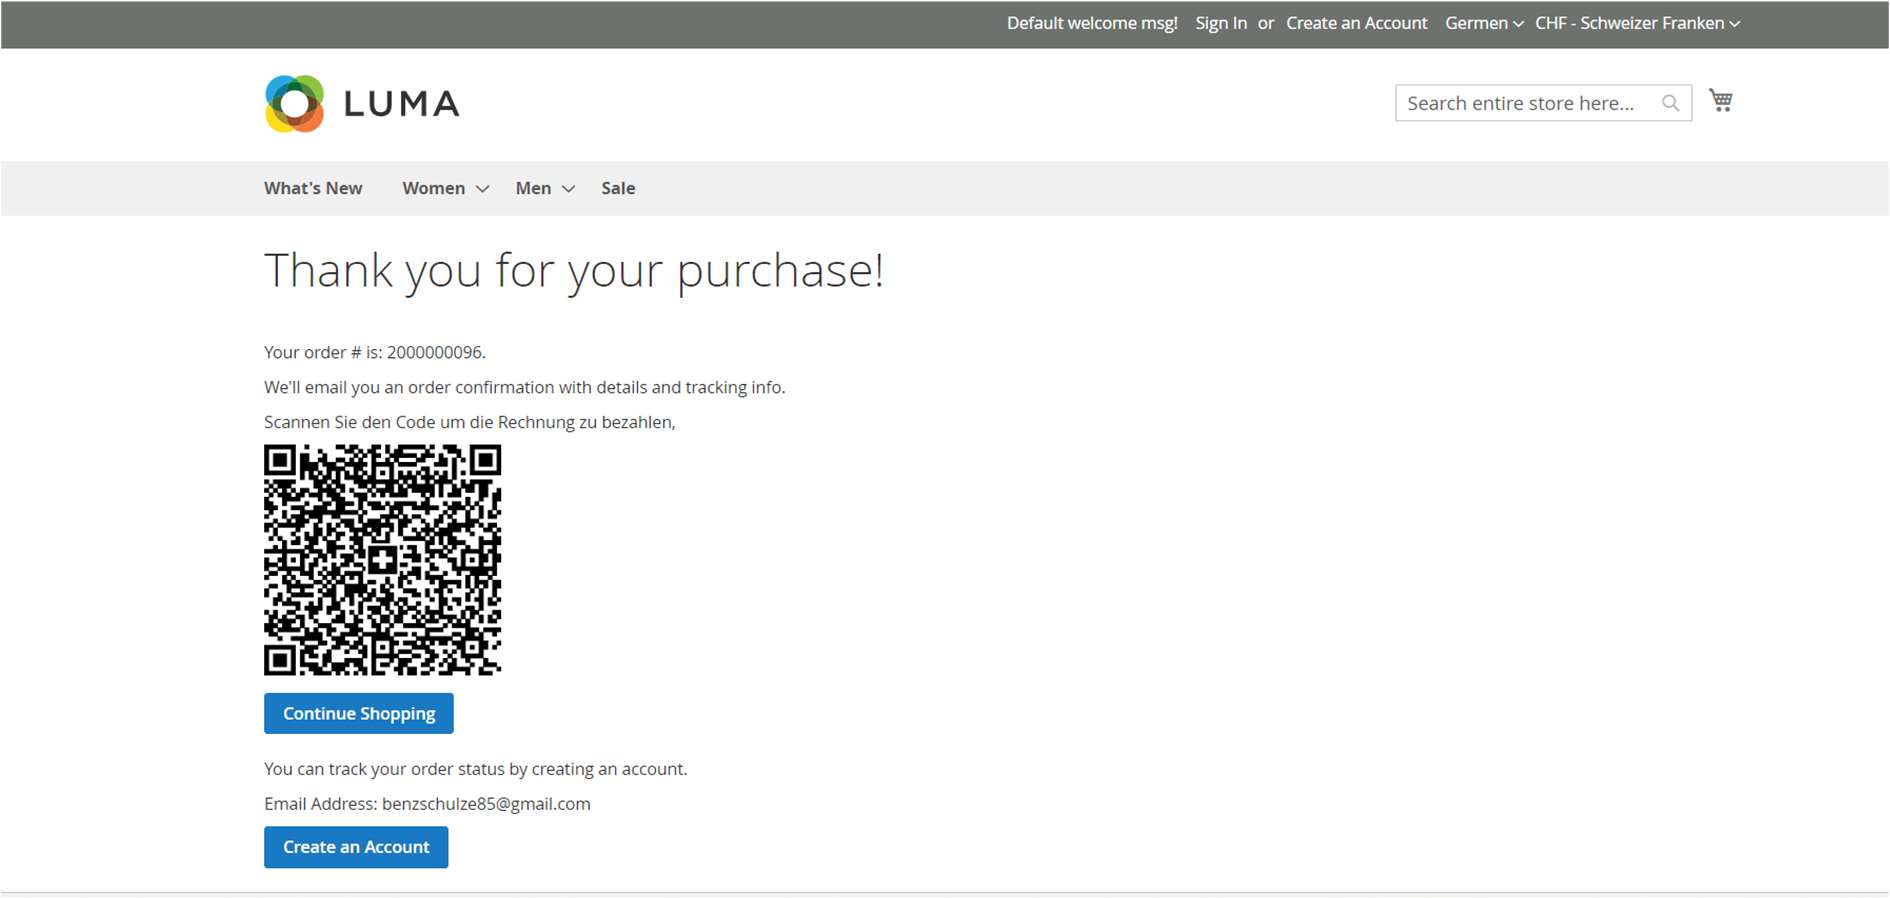
Figure 10
- Show QR Code on order email: If we select Show QrCode on order email to “Yes” the Qr code will show in the order confirmation email.
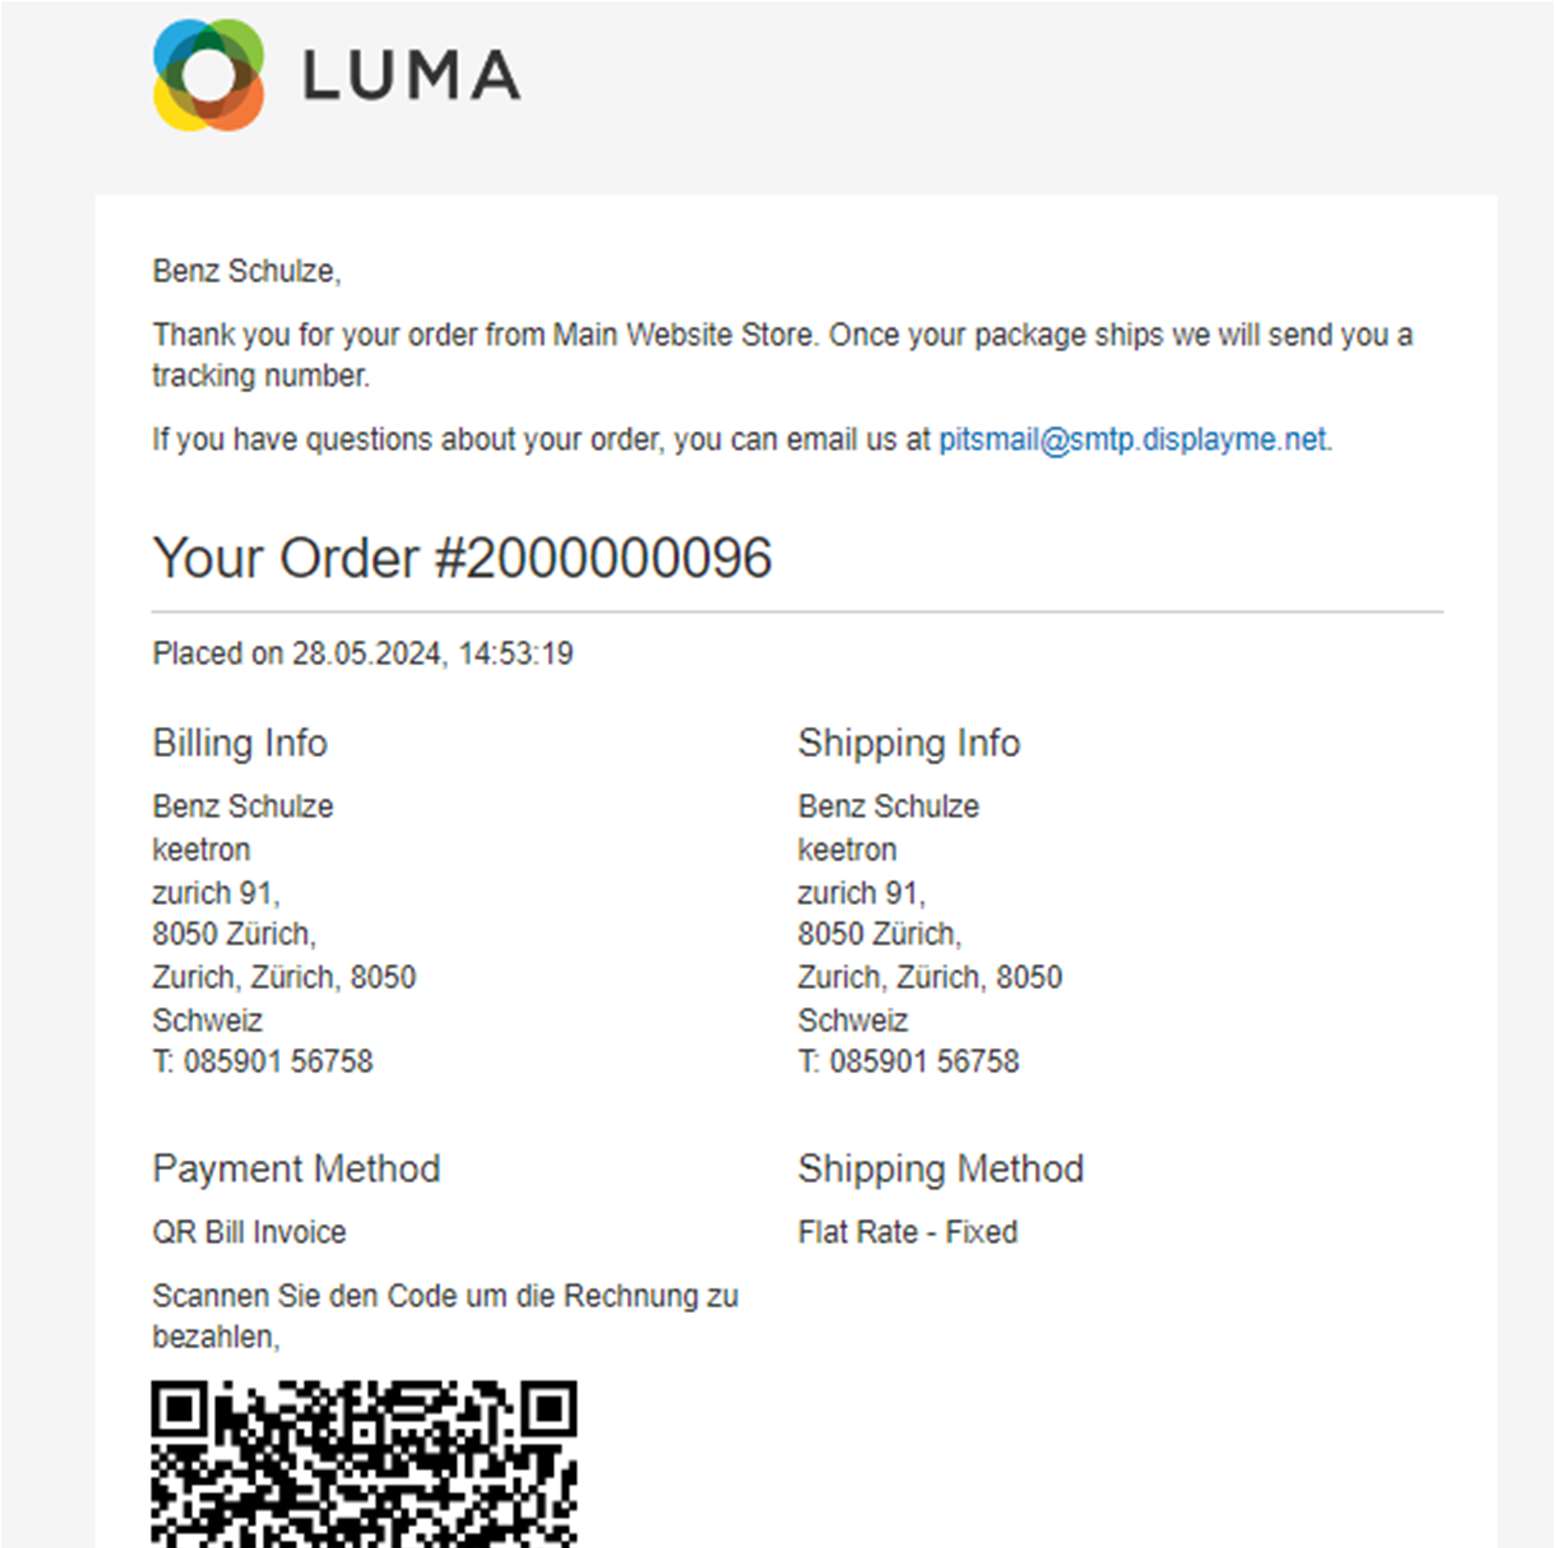
Figure 11
2. PAYMENT PROCESSING
The payments made through QR bill can be updated to Magento shop through processing CAMT file. CAMT file is a statement of payments that are made through QR bill invoice from bank. This can be done in two ways.
- Manual processing via uploading CAMT file.
- Automatic Processing via Cron job.
1. Manual processing
If you are choosing manual processing follow the below steps
- Navigate to configuration Sales → QR Bill Invoice → Process Bank Payments.
- Upload the payment statement from the bank in Camt054 format
- Click Process button in header section (Refer screenshot Figure 12 & Figure 13)

Figure 12
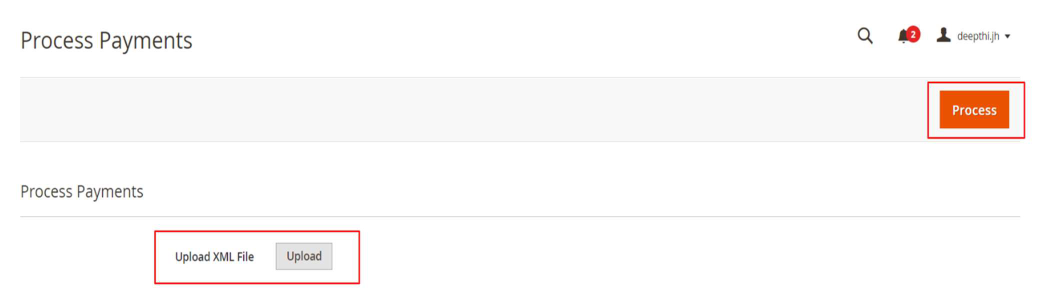
Figure 13
2. Automatic Processing
Automatic Processing of payments can be done through cron job. Follow the below steps
- Setup cron in your server and make sure it is working properly
- Upload payment statement from the bank in Camt054 format to your project rootfolder/pub/media/qrbill/cron/. Cron is configured to run every day at 12.00 am.
Once the file is processed, files will be copied and moved to the backup folder for future reference rootfolder/pub/media/qrbill/cron/processed/.
During the payment process, data in CAMT054 file and Magento system is thoroughly checked and validated and if correct it will be processed further. If there is any mismatch or error present in the Camt054 format, the error message will be displayed after file processing. If you try to update amount for a cancelled invoice, module will show error and prevent this action.
Four cases can be seen while the payment is processed.
- If the reference number of payment file and invoice match, the invoice status and paid status is marked as "paid"
- If customers paid only a less amount, then paid status will be “Paid less” and invoice status will be Pending on the invoice grid
- If customers paid too much, then paid status will be “Paid more” and invoice status will be Paid on the invoice grid
- If customer is paid without/incorrect reference number, then the invoice will not be processed.
PROCESS PAYMENT GRID
The processed payment details will be reflected in process payment grid. It gives detailed information about each invoice that are processed. Refer Figure 14 & 15 and find descriptions for each field
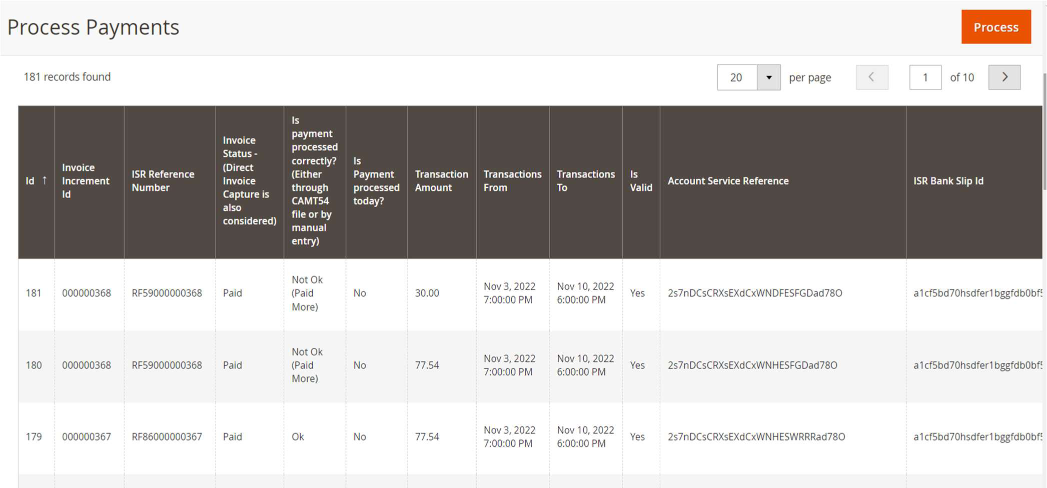
Figure 14
- Invoice Increment Id – Unique Id used to identify each invoice in Magento
- ISR Reference Number - Unique id which is generated according to the Reference format given in configuration.
- Invoice Status – This represents the current invoice status after payment processing. If amount is fully paid invoice status became “paid” otherwise it remains “pending”. If merchant directly captures the payment via invoice capture feature the status also changes to paid.
- Is payment processed correctly? – This field gives an idea about whether the payment processing is done correctly or not. It analyses the payment processed through CAMT 54 file and through any manual updates via option available at the field “Update Amount Manually” in QR Bill Invoice Grid. Below are the possible value.
- Ok – Invoice is paid fully
- Not Ok – This indicates that invoice processing is not correct. The possible reasons are invoice is not yet paid or paid amount is less than original amount. If paid amount is more than actual invoice amount it is also considered as not correct even if invoice became “paid”.
NB: This column will not match with Invoice status if you capture the invoice directly.
- Is Payment processed today? – This is to easily identify transaction which are processed today. Transaction processed today are marked as “yes” otherwise “no”
- Transaction Amount – Amount processed through CAMT 54 file processing.
- Transaction From – CAMT 54 file gives the list of transaction between a particular range. From date gives the transactions from that date onwards.
- Transaction To – To date gives the date up to which transactions are processed.
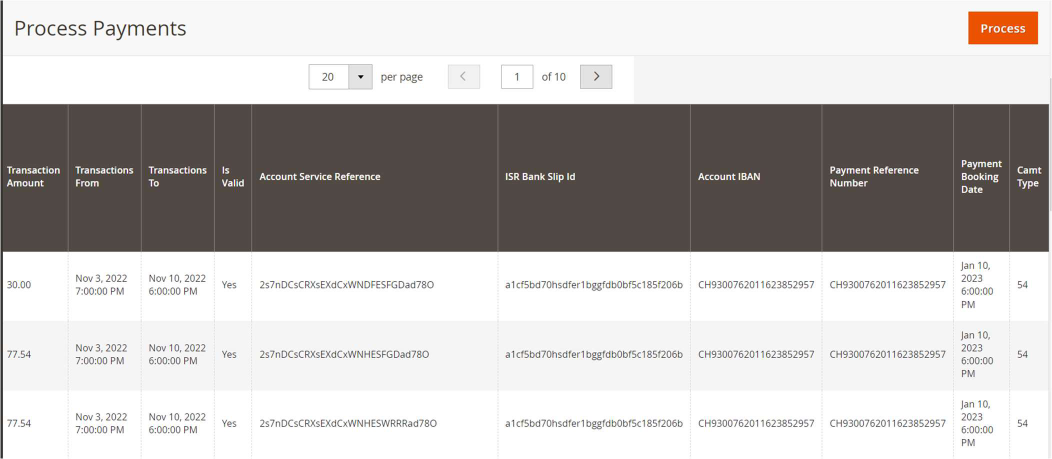
Figure 15
- Is Valid – This represent whether the CAMT 54 data for invoice is valid or not.
- Account service reference – Reference number available in CAMT 54 file against each invoice. This number will be unique, and its validation is done to provide duplicate invoice processing.
- ISR Bank Slip Id – CAMT 54 Slip Id.
- Account IBAN – IBAN number.
- Payment Reference Number – Reference ID of payment.
- Payment Booking date – Date at which payment booking done.
- CAMT type – CAMT file type.
QR BILL INVOICE GRID
QR Bill Invoice grid list all invoices that are processed through QR payment method. This grid gives detailed information regarding order, invoice status, payment details and dunning details if applicable.
Refer screenshot Figure 16 and find description for each field.
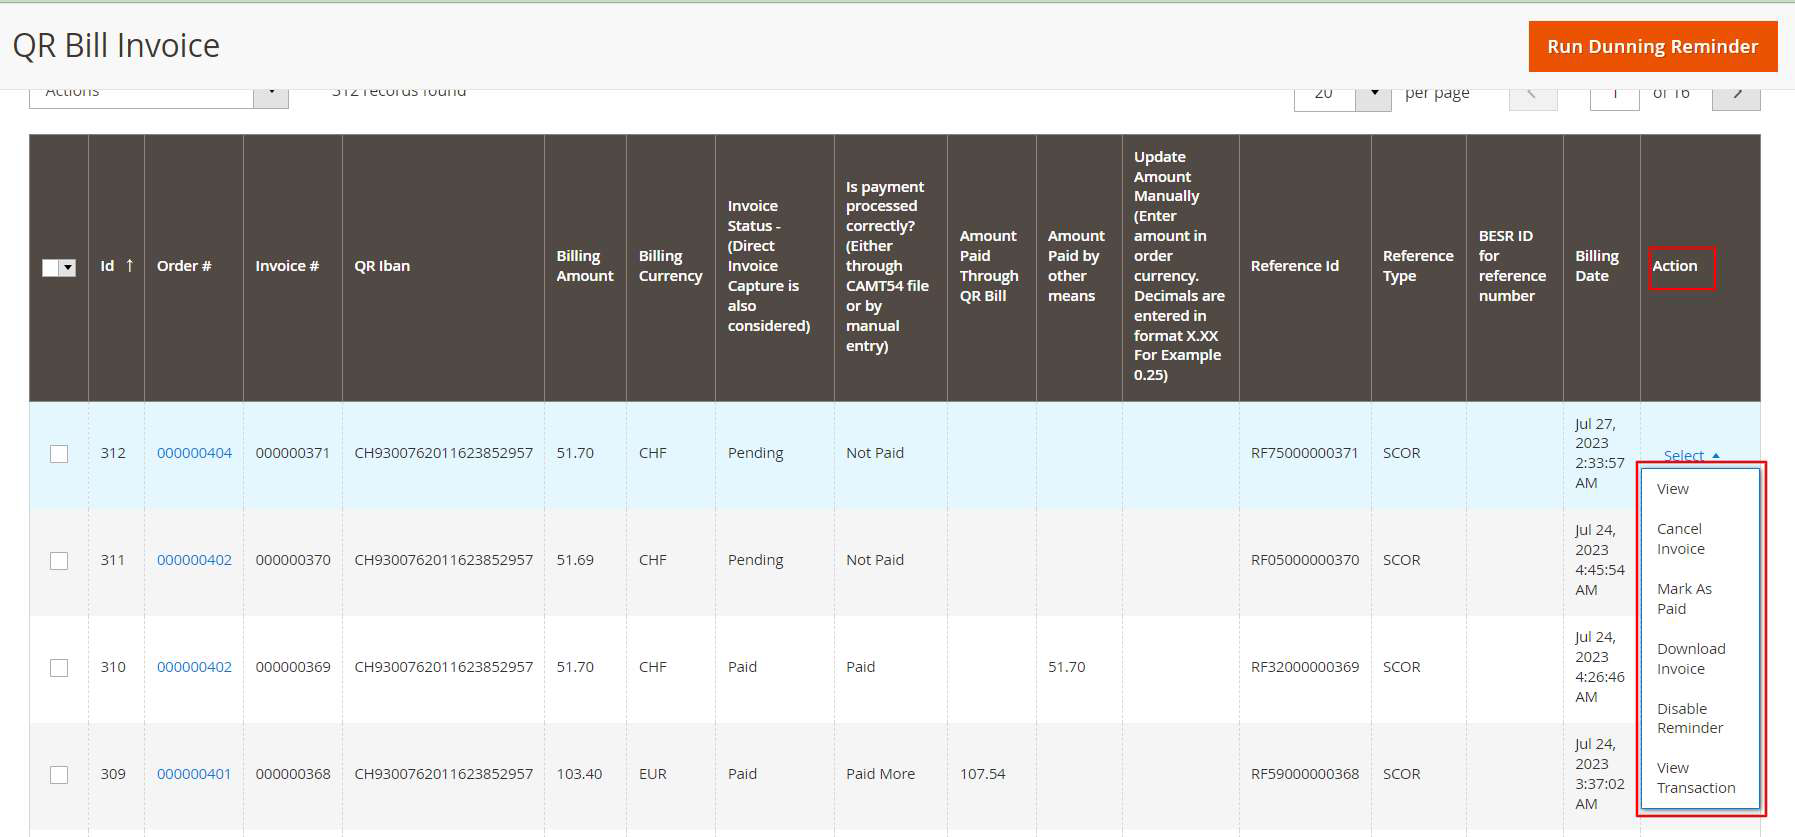
Figure 16
- Id - Serial number
- Order # - Order Id
- Invoice # - Invoice Id
- QR Iban - IBAN code given by the bank
- Billing Amount - Original invoice amount
- Billing Currency - Invoice currency, this is same as the currency used for creating order
- Invoice Status - (Direct Invoice Capture is also considered) - Paid status of invoice with respect to Magento
- Is payment processed correctly? (Either through CAMT54 file or by manual entry) - Paid status of invoice will be updated based on the amount paid via the 2 following methods.
- Camt054 xml file processed @ Admin Panel > SALES > Process Bank Payment
- Manually updated payment via option available at the field “Update Amount Manually” in QR Bill Invoice Grid. Possible values are listed below.
- Paid: Exact billing amount is paid
- Paid Less: Amount paid is less than billing amount
- Paid More: Amount paid is greater than billing amount
- Not Paid: No amount is paid
NB: This column will not match with Invoice status if you capture the invoice directly.
- Amount Paid Through QR Bill - Amount paid through Camt054 xml file @Admin Panel > SALES > Process Bank Payment.
- Amount Paid by other means – This field indicates the payment made by other means like manually updating amount.
- Update Amount Manually – In some scenarios merchant may need to update the paid amount manually. For example, If customer paid the amount directly or by some other payment modes. During such cases merchant can manually update the paid amount by entering the amount in this field. If invoice is fully paid during this update, we will change the invoice to “Paid” status.
Note: The amount should be entered in billing currency of invoice. Merchant is not allowed to update amount manually for an invoice in paid or cancelled state.
- Reference Id - unique id generating according to the Reference format given in configuration. This unique id is added on QR bill see (Figure 16) Reference Section.
- Reference Type - Two types. Either Classic Format (QRR) and SCOR format. If you choose Classic format, then the reference id is generated based on Special QR-IBAN and BESR ID for reference number (optional). For SCOR format, only Classic IBAN field is used to generate reference id.
- BESR ID for reference number - BESR ID given by the bank (for Classic format reference type).
- Billing Date - Invoice creation date.
- Actions – Actions column allows you to do following process quickly via grid.
- View – Click here to view the invoice details.
- Cancel invoice – Merchant can cancel invoice by clicking here. Then invoice paid status will become “Cancelled”.
- Mark as paid – If you want to manually change the payment status to paid you can use this option.
- Download Invoice – This option allows you to download invoice pdf from grid.
- View Transaction – View transaction option can be used to view the CAMT054 payment details. User will be redirected to “process payment grid” with respective payment details
3.DUNNING PROCESS
The ISO QR bill payment method works as a post payment method. Merchant sent the product to the customer along with the invoice to pay. If the customer has not paid the invoice, the merchant may need to send a reminder to the customer. The extension allows processing of dunning in different reminder levels as per merchant requirement.
QR bill payment module allows dunning processing in two methods.
- Email: A payment reminder email will be sent to the customer, reminding them of the payment deadline. The extension allows you to customize the title and content of the reminder email according to your business needs.
- Print: When the "Print" option is selected, the merchant must send the dunning information to the customer by post. Backend configuration allows for customization of dunning information.
Dunning Configuration
Login to the Admin and choose Stores → Configuration → Sales → ISO QR Bill. Refer below screenshots and find description for each configuration
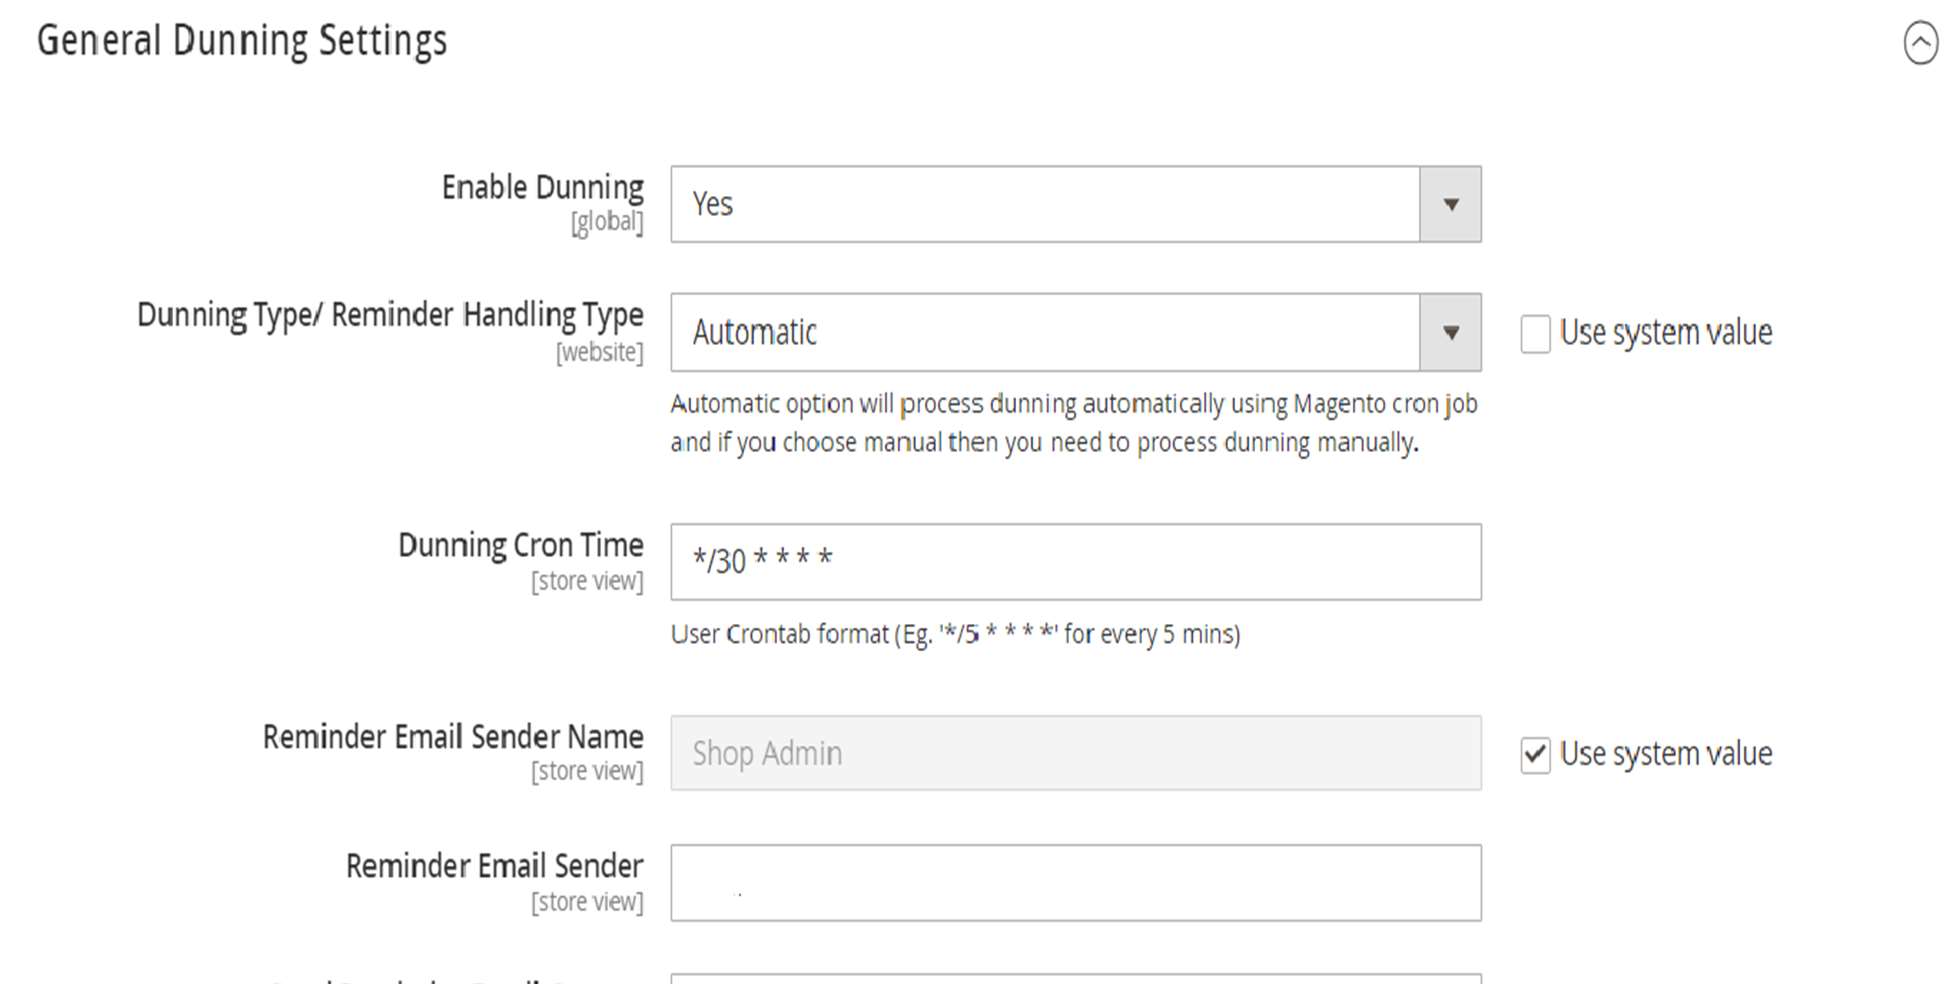
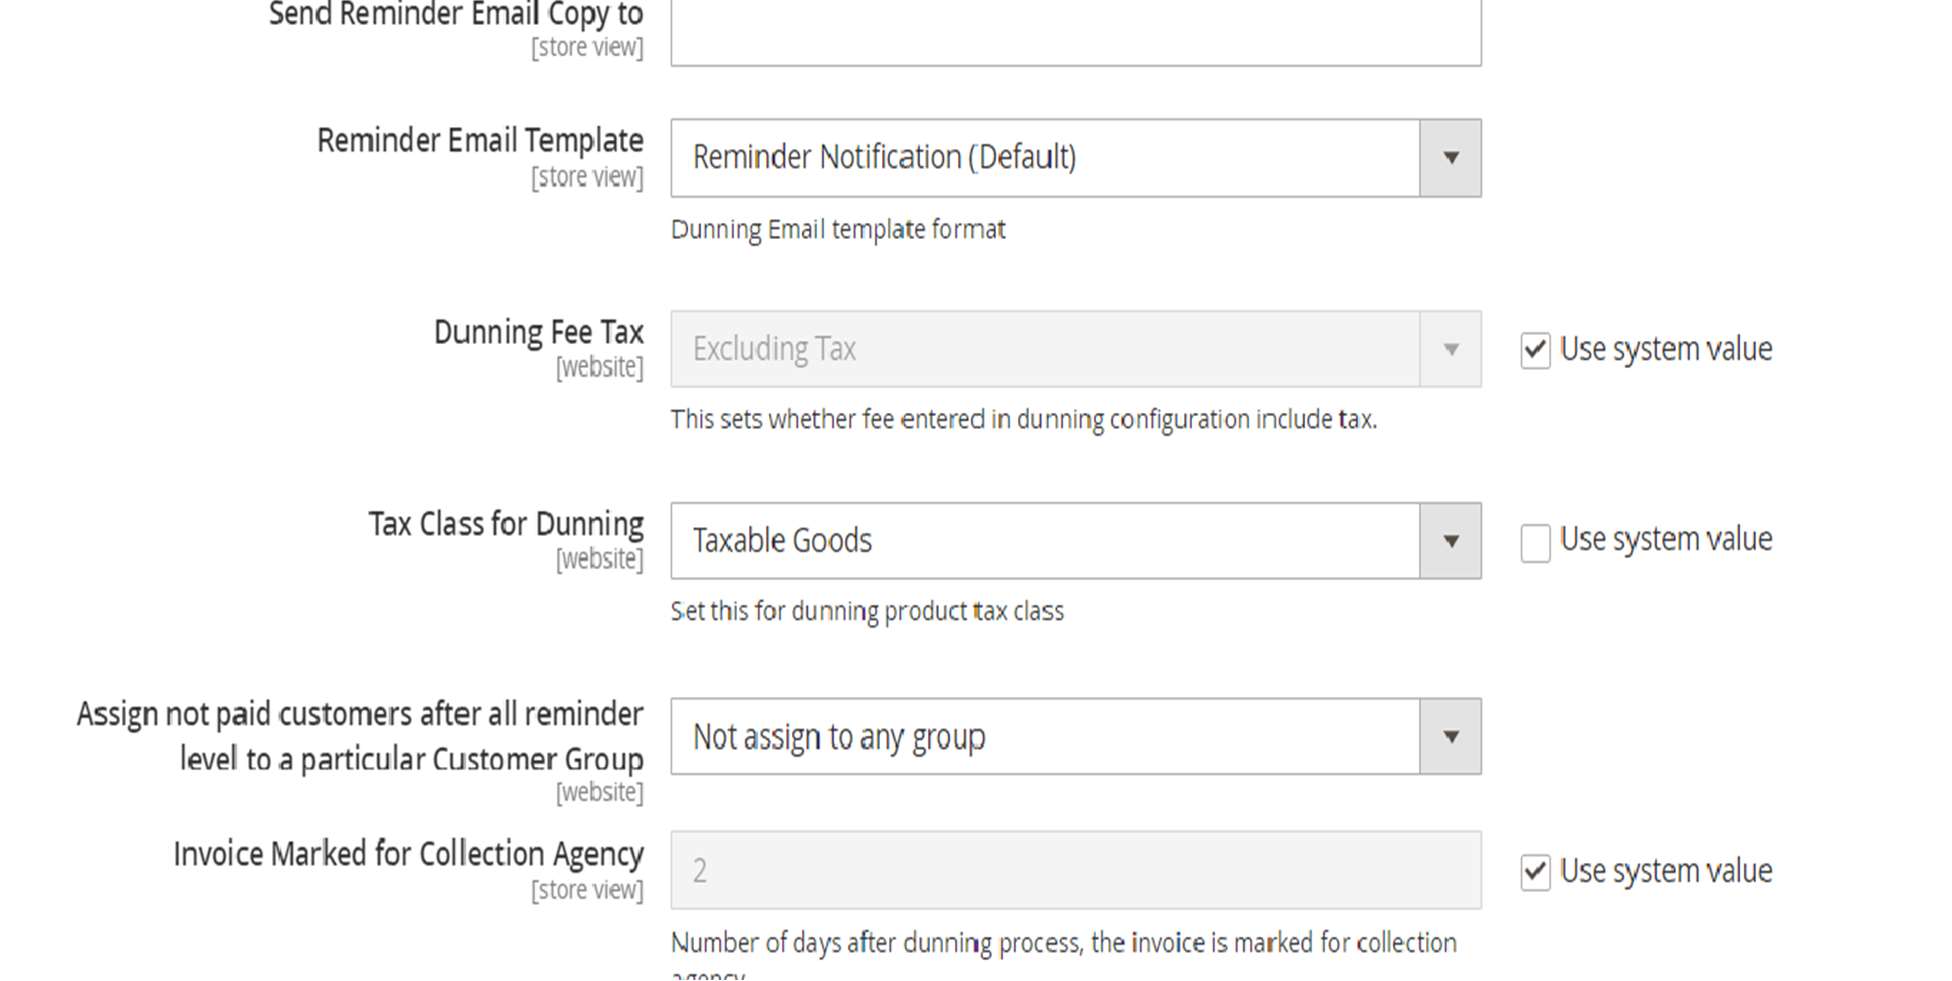
Figure 17
General Dunning settings
- Enable Dunning : Enable or disable dunning.
- Dunning Type/ Reminder Handling Type : It can be done in two methods. If you choose automatic, then dunning reminder emails send automatically using Magento cron job and if you choose manual then you need to process dunning manually.
- Dunning Cron Time - if you choose Dunning Type option ‘Automatic’ then this field will be displayed, and you can add the cron time to send reminder emails.
- Reminder Email Sender Name - Sender name for reminder emails.
- Reminder Email Sender - Sender Email address.
- Send Reminder Email Copy to - A copy of the reminder emails will be sent to this email address.
- Reminder Email Template - Choose Reminder email template here.
- Dunning Fee Tax – This sets whether fee entered in dunning configuration include tax.
- Tax Class for Dunning - This sets the tax class for dunning fee calculation.
- Assign not paid customer after all reminder level to a particular Customer Groups - This will show all customer groups in your shop, and you can choose a customer group to assign not paid customer after processing all dunning levels.
- Invoice Marked for Collection Agency - Number of days after which unpaid invoices that completes dunning process are moved to collection agency.
Dunning Level Specific Settings
Dunning Level specific settings allows merchant to configure settings like interval, fees, and email content specific for each levels. Dunning level specific settings can be given storeview wise. New dunning levels can be added by clicking on Add Button. Refer screenshot Figure 18 and find description for each configuration
Figure 18
- Dunning Level – Set dunning level number. Use 1 for the first dunning level to apply. Increase the value accordingly for the consecutive dunning levels.
- Interval - The time interval for dunning process. For example, if you give 5 for first dunning, then it counts 5 days from invoice date. If you set 3 as second dunning interval then it counts 3 days from first dunning processed date.
- Fees – Enter Dunning fee for each level in base currency.
- Email Title - Email title for the level.
- Email Content - Dunning email content which will show on dunning email.
- Pdf Title - Pdf title for the level.
- Pdf Content – Specify the content to be displayed on dunning pdf.
- Reminder Type - If you choose type “Email” then reminder is sent as an Email and if type is “print”, the dunning process will be done but it will not be sent as emails, instead merchant should take printout and send it to customer by post.
- Reminder PDF content position – This setting determines the position of reminder specific details in invoice PDF. It can be set to either top or bottom area.
EXECUTE DUNNING
QR bill payment module allows automatic and manual dunning execution. These are explained below.
- Automatic: By automated payment handling, dunning process will be executed as per defined configuration. If “Email” option is chosen for particular dunning level, reminder emails will be sent automatically once the due date is reached. Magento cron job will handle the automated dunning.
Configure cron in your server and make sure it is working properly
- Manual: By manual option merchant should manually process dunning for due payments. If “Email” option is selected for dunning process merchant should manually send the dunning email. Follow the below steps for manual dunning process.
- Run Dunning Reminder for all unpaid invoice.
- Navigate to Sales → QR Bill Invoice -> QR Bill Invoice Grid.
- Click on “Run Dunning Reminder” button in header section - This button action processes all open invoices and sends reminders to all customers with overdue payments. (Refer Figure 19).
- Run Dunning Reminder for all unpaid invoice.
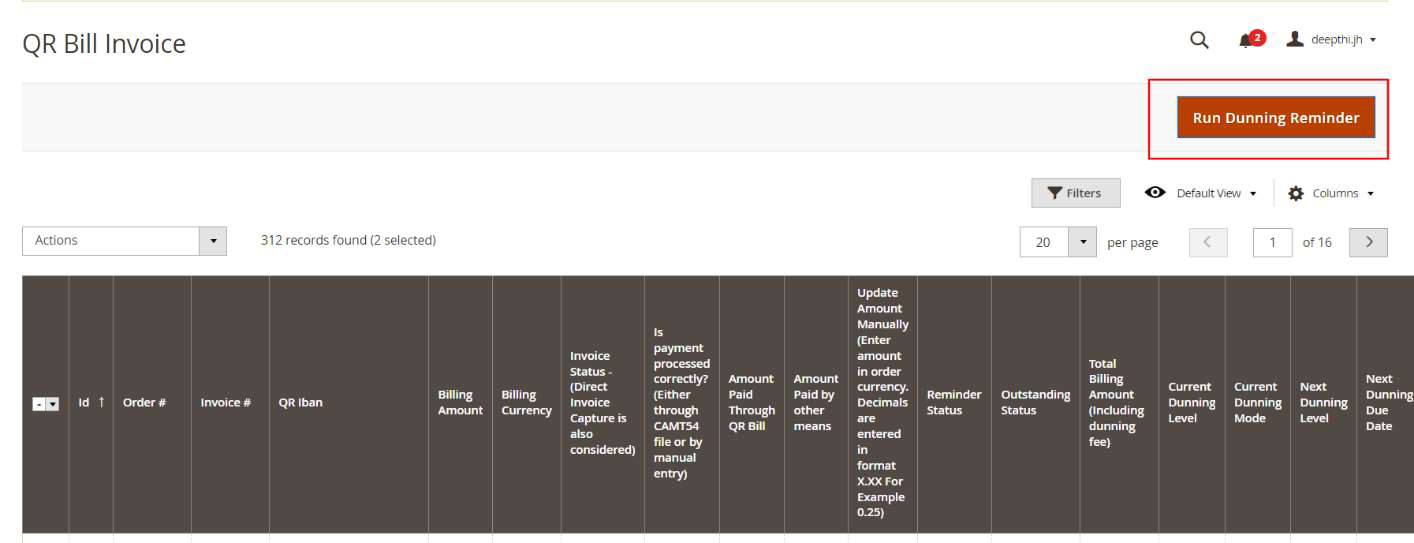
Figure 19
-
-
- Run Dunning Reminder for selected invoice through Mass Action.
- Filter the invoice by field “Outstanding status - Open" to see which invoices needed to be processed(Refer figure 20)
-
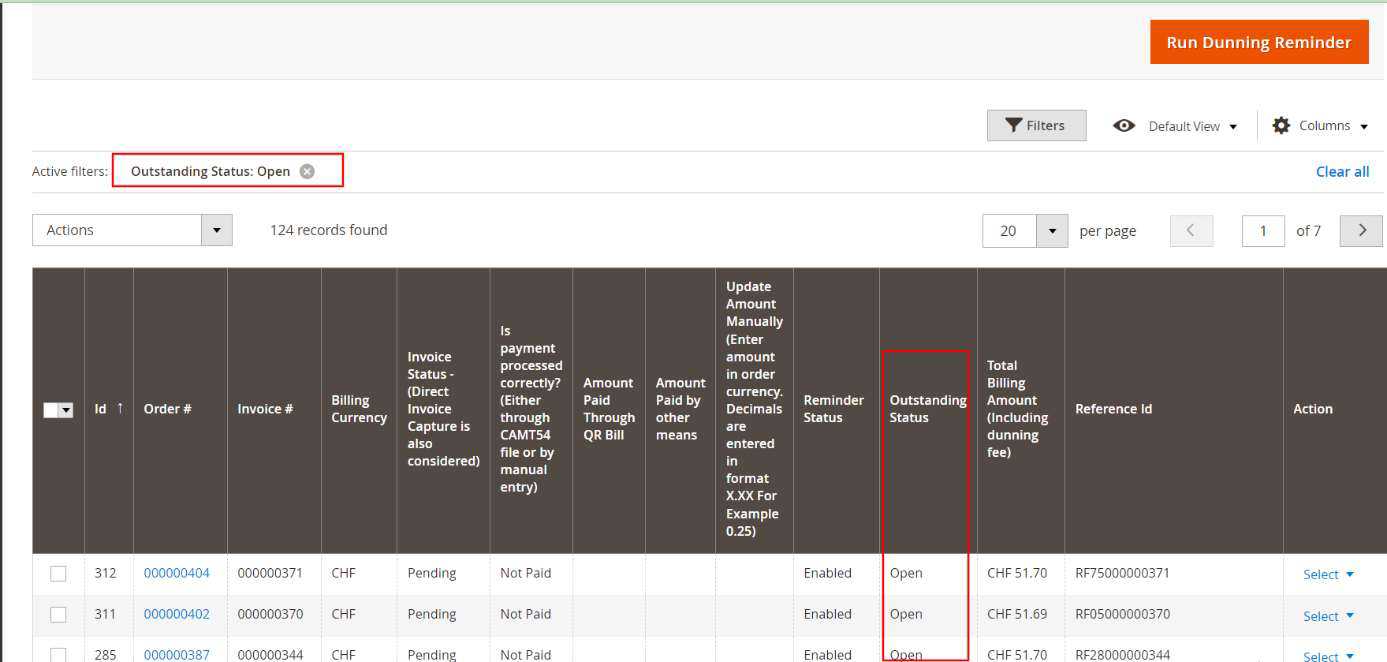
Figure 20
-
-
- Go through the list and "Disable Reminder" for invoices that may have been paid in the meantime or those you do not want to include in dunning process (Refer figure 21)
-
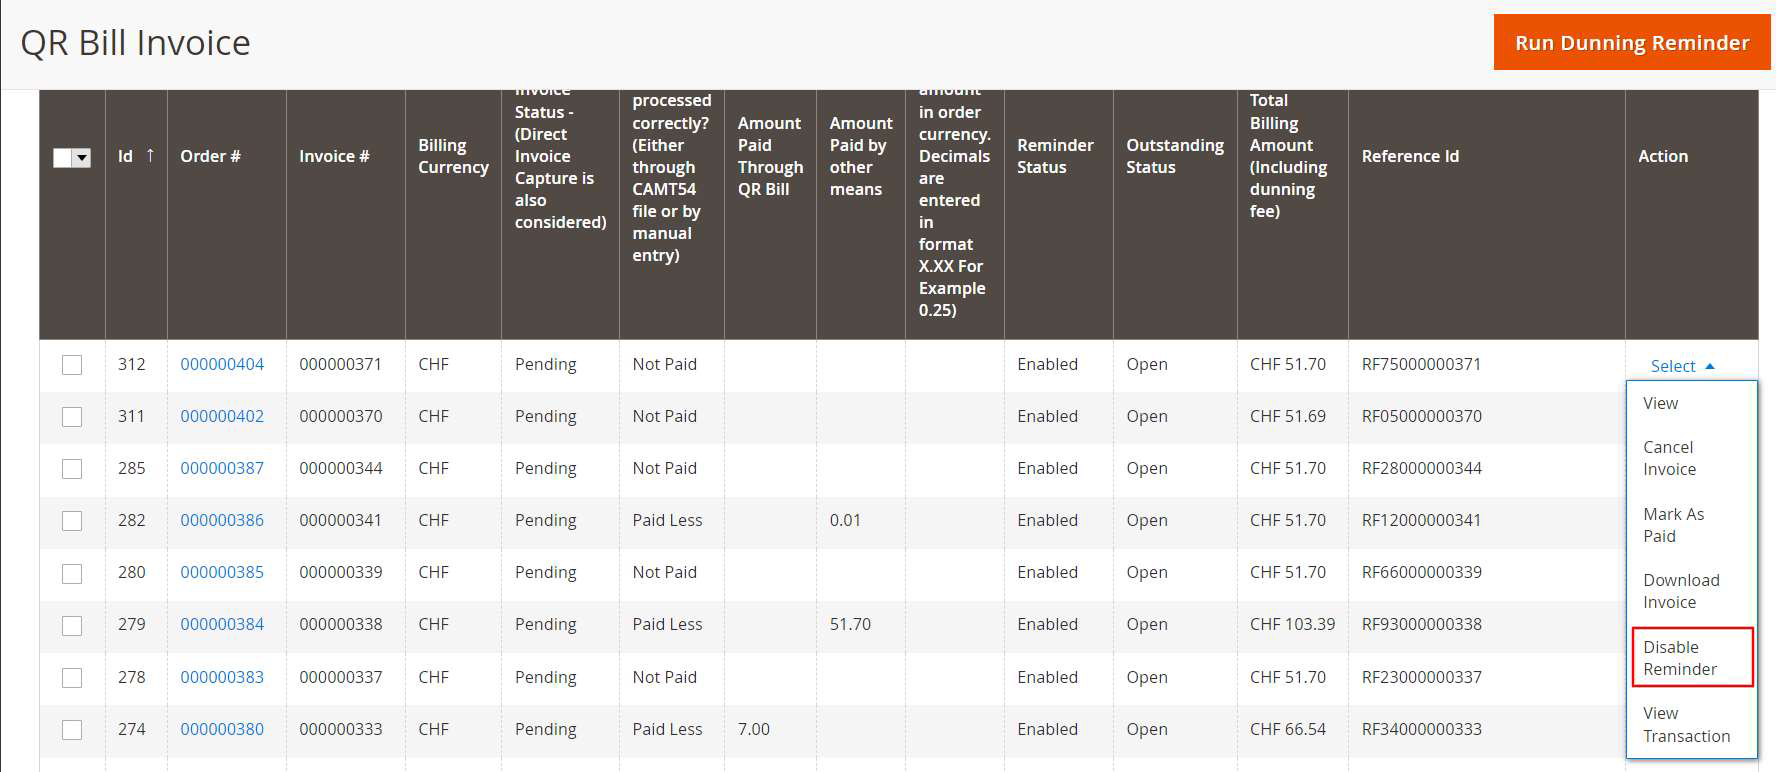
Figure 21
-
-
- Manually Select the invoices which need to be processed.
- Choose option "Run Dunning Reminder" from Mass Action dropdown. (Refer Figure 22).
- Confirm the popup message and click Ok to execute dunning . During the execution each item in the selected list will be checked and reminder mail will be sent, if dunning time has reached.
-
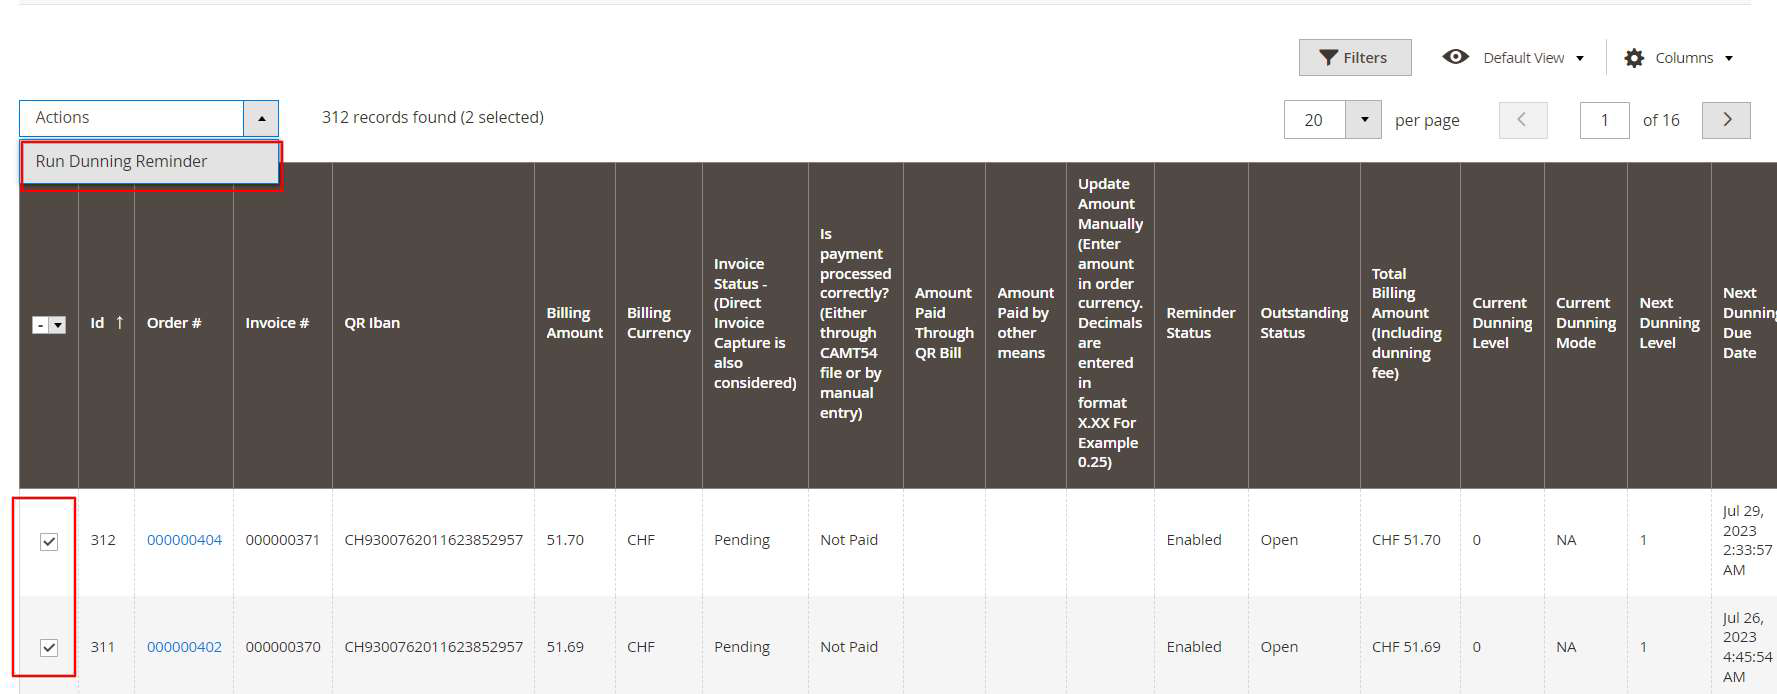
Figure 22
DUNNING GRID
Dunning grid provides details about dunning process, amount and current processing status. Grid can be accessed via Sales → QR Bill Invoice -> Dunning Grid. (Refer Figure 23)
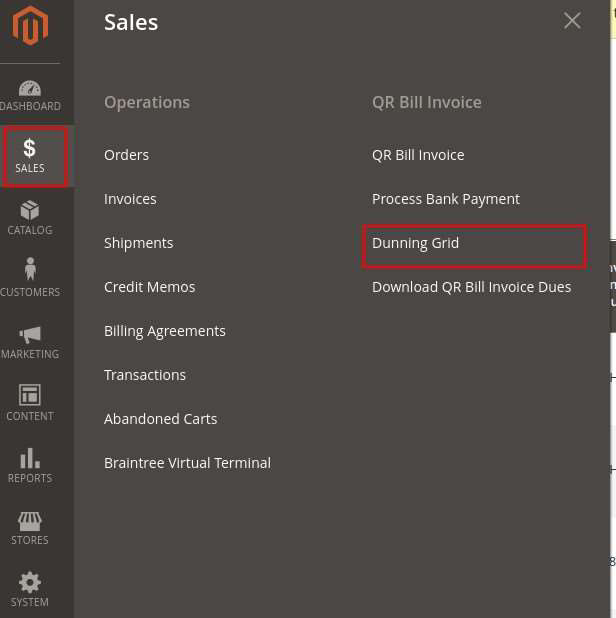
Figure 23
Refer Figure 24 and find description for each fields
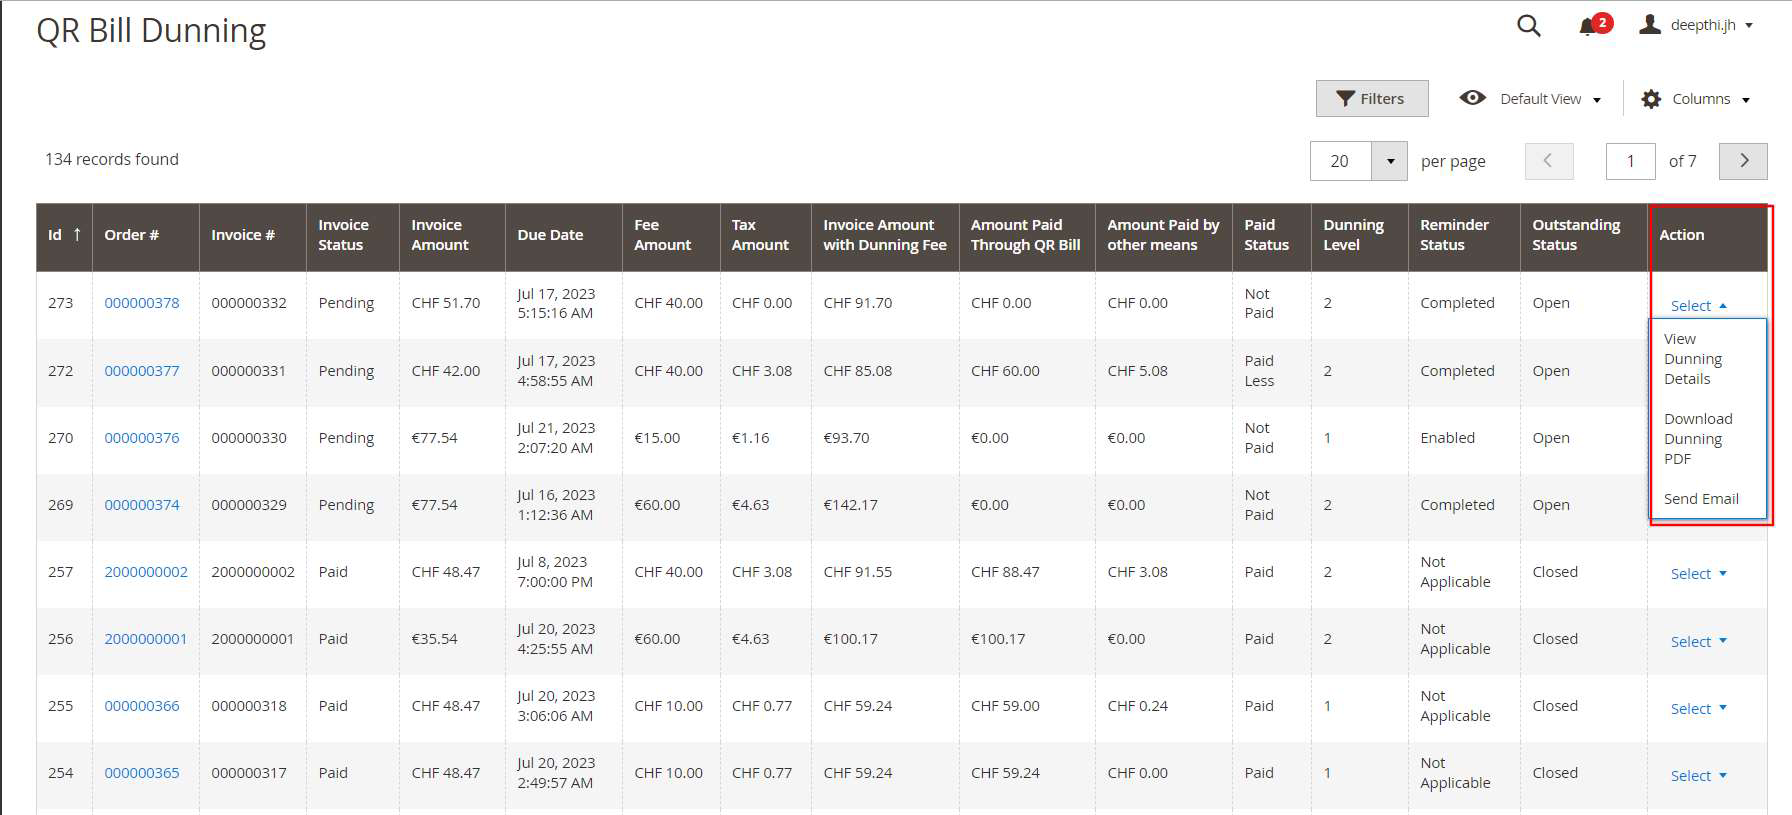
Figure 24
- Id - Serial number.
- Order # - Order Id.
- Invoice # - Invoice Id.
- Invoice Status - Paid status of invoice with respect to magneto.
- Invoice Amount - Original invoice amount.
- Due Date - Due date for payment.
- Fee Amount - Reminder Fee amount.
- Tax Amount - Tax charged for the reminder fee amount.
- Invoice Amount with Dunning Fee - Invoice amount with reminder fee and tax.
- Amount Paid Through QR Bill - Amount paid through Camt054 xml file @ Admin Panel >SALES > Process Bank Payment.
- Amount Paid by other means – The total amount paid by other means, if applicable.
- Paid Status - Paid status of invoice with respect to the amount paid through.
- Camt054 xml file @ Admin Panel > SALES > Process Bank Payment.
- Manually updated payment via option available at the field “Update Amount Manually” in QR Bill Invoice Grid.
- Dunning level - This shows the stage of dunning process.
- Reminder Status - Reminder status of the invoice.
- Outstanding Status - This shows whether the outstanding status of the invoice is open or closed. Closed represents all paid and cancelled invoice which is not considered for further processing. Open represents all unpaid invoices.
- Action - Merchant can view dunning details, download the dunning pdf, send reminder email and disable/enable dunning for invoice from this grid.
View Dunning Details from QR Bill Invoice Grid
QRBill invoice grid provides meaningful information regarding dunning execution for all unpaid invoices. Refer Figure 25 and find description for each fields.
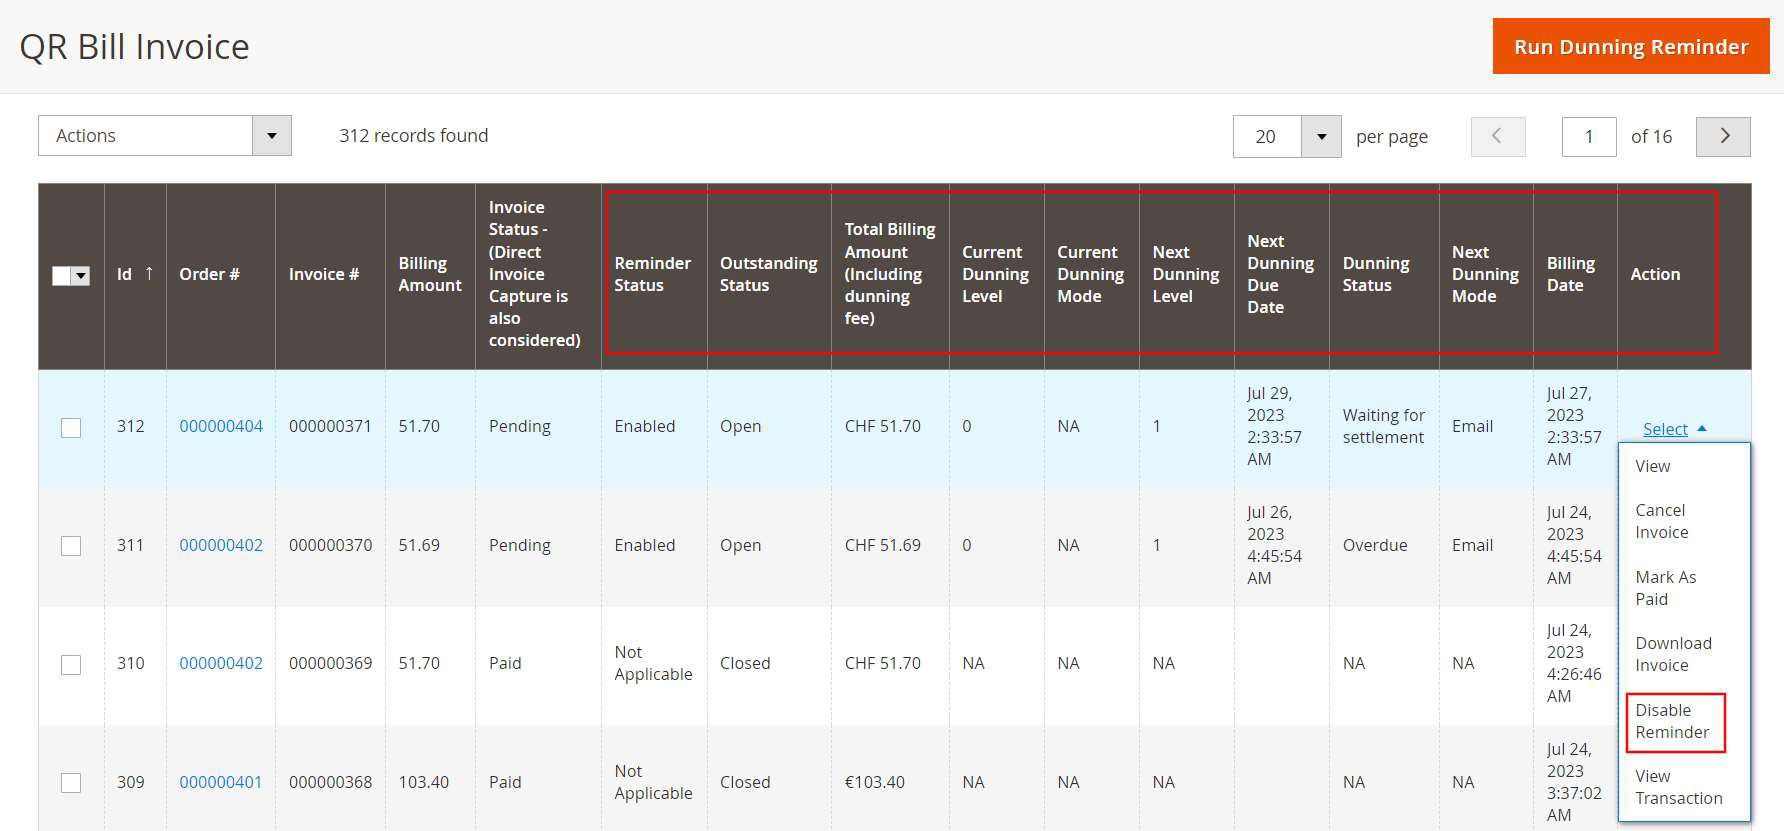
Figure 25
- Reminder Status – Current reminder status of the invoice. Possible values are listed below.
- Disabled: Dunning process is disabled for that payment.
- Enabled: Dunning process is enabled for that payment.
- Completed: Dunning process is completed for that payment.
- Not Applicable: Dunning is not applicable for the payments which are already paid or in cancelled state.
- Disabled for Customer: Dunning process is disabled for that particular customer. See section: Exclude Customer From Dunning.
- Outstanding status - This shows whether the outstanding status of the invoice. Closed represents all paid and cancelled invoice which is not considered for further processing. Open represents all unpaid invoices.
- Total Billing Amount (Including dunning fee) – If dunning is active, this field gives the final billing amount including dunning fee.
- Current Dunning Level – It indicates the current dunning level. Possible values are listed below.
- Level 0: No dunning is processed for that particular invoice.
- Leve 1, 2 etc.: Currently executed dunning level
- Current Dunning Mode – The mode through which current dunning process is executed Possible values are listed below.
- Email : Dunning is processed via sending emails to customer.
- Print : Current Dunning is processed via Print. Merchant should take printout and send it to customer by post.
- NA: Dunning not active.
- Next Dunning Level – It represents the next dunning level to be executed.
- Next Dunning Due Date – It indicates the date on which specified dunning level should be executed. It is calculated by adding dunning interval with billing date for level 1 reminders. For rest of the cases due date is obtained by adding interval with previous dunning processed date.
- Dunning Status – It indicates that status of upcoming reminder process.
- Waiting for settlement: Reminder Due date is not reached yet and waiting for the settlement to happen.
- Overdue – Payment due date is reached and reminder is not yet processed. During some scenarios merchant may opt manual reminder handling and forgot to manually process the dunning. such orders may get stuck in “overdue” status.
If “Automatic” reminder process is chosen by the merchant the process will be automated by magento cron and hence this situation can be avoided.
-
- NA: Dunning not active.
- Next Dunning Mode – Mode of execution of next dunning level. It can be configured from general dunning configuration section. Possible values are listed below.
- Email : Dunning should be processed via sending emails to customer
- Print : Next dunning is set to Print.
- NA: Dunning not active.
Merchants can also use the filter option to easily identify the dunning status. Refer Figure 26 and find comments for each filter options
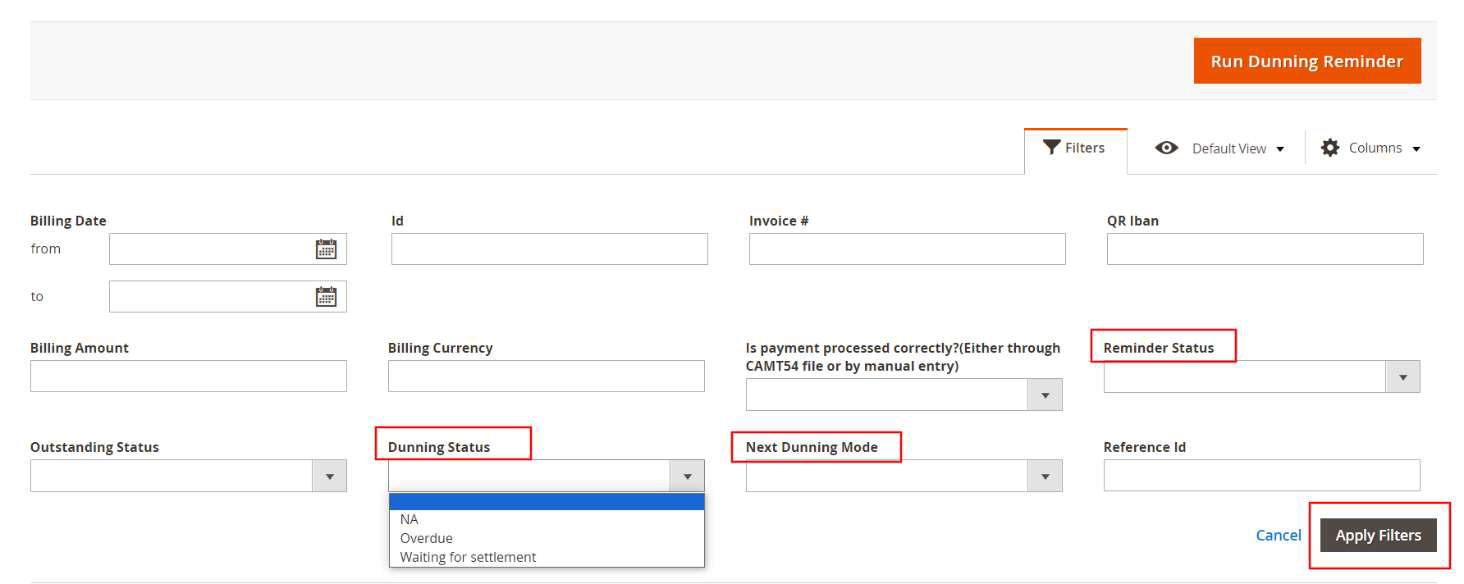
Figure 26
- Dunning Status: filter can be used to identify the overall dunning status for the particular dunning level. “Overdue” option will list all dunning which are not processed yet. ‘Waiting for settlement’ provide dunning list which are in process queue.
- Reminder Status: filter can be used to identify the reminder status for that Invoice. Possible filter option values are listed below.
- Enabled
- Disabled
- Completed
- Not Applicable
- Disabled for customer
- Next Dunning Mode: This filter list the next dunning mode. It can be either email or print
Dunning History
Merchant can view the dunning history of an invoice in Invoice view page. Refer Figure 27 and find comments for each field
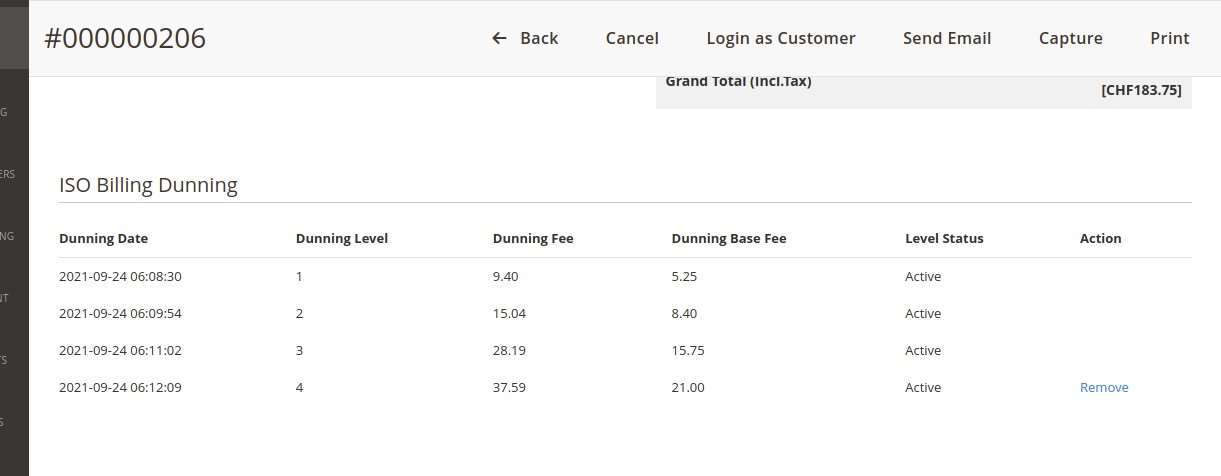
Figure 27
- Dunning Date - Date in which the dunning is processed. i.e., on this date the fee is added to the invoice and the reminder mail is send.
- Dunning level - This shows the stage of dunning process.
- Dunning Fee - The dunning fee added to invoice in order currency
- Dunning Base Fee - The dunning fee added to invoice in base currency of the shop
- Level status - Shows whether the level is active or removed.
- Action - This option is added to remove the reminder fees added to the invoice. Once the last added reminder level is removed, the option is enabled to remove next higher dunning level.
Remove Dunning Fee
In some cases, a merchant may be required to remove a dunning fee that has been added to an invoice. For instance, if a dunning process was not completed correctly due to incorrect configurations, or if the merchant wishes to remove the fee for other reasons.
It can be done from dunning history section in invoice view page. Once we remove the dunning, the system resets the dunning fee and reverts the dunning level to previous level. (Refer Figure 28)

Figure 28
Exclude Customer from Dunning
Dunning can be Exclude for selected customers based on business needs. After excluding, dunning process will not be done for those excluded customers. Go to Admin -> Customers -> All Customers -> Edit Customer -> Open Account Information Tab to see this field. (Refer Figure 29)
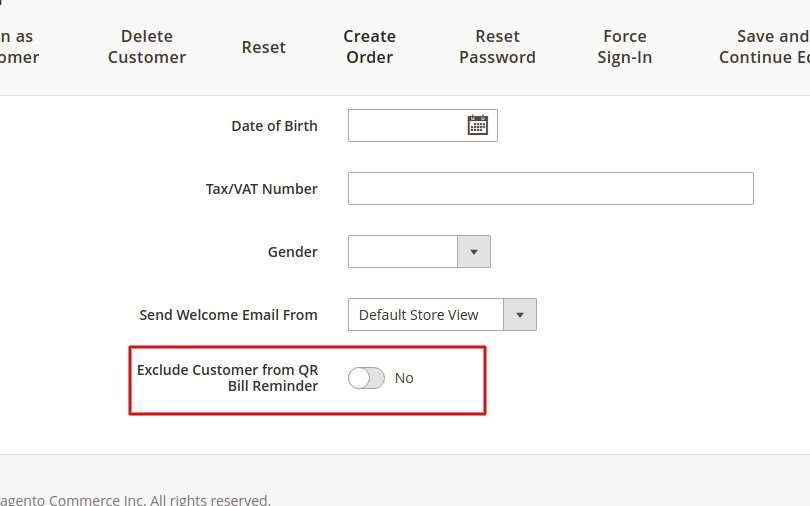
Figure 29
Download QR Bill Invoice Due Report
The report lists all the invoice details that has completed all the stages of dunning process but not paid yet. Go to Admin → Sales → QR Bill Invoice -> Download QR Bill Invoice Dues
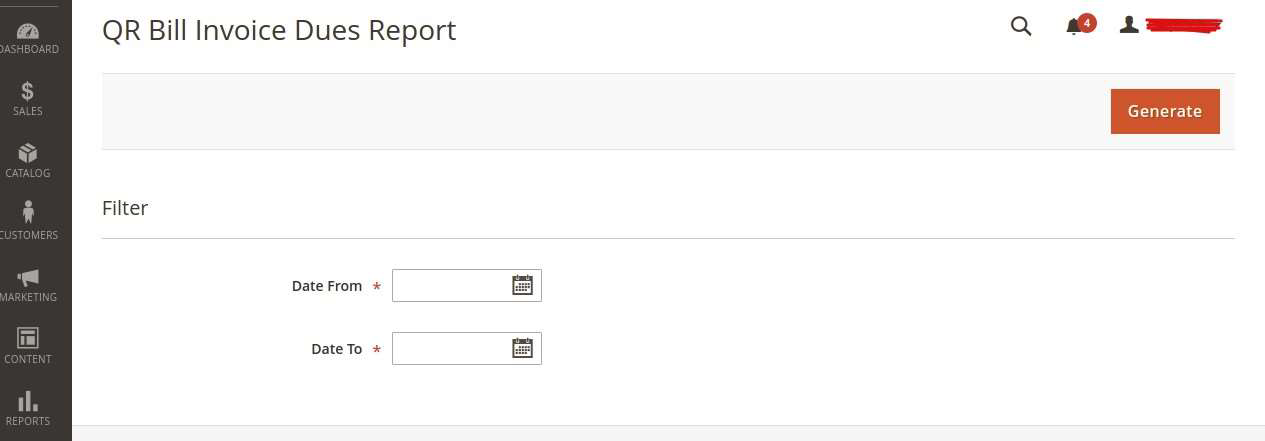
Figure 30
Merchants can generate report by giving Date from and Date to and click on generate.
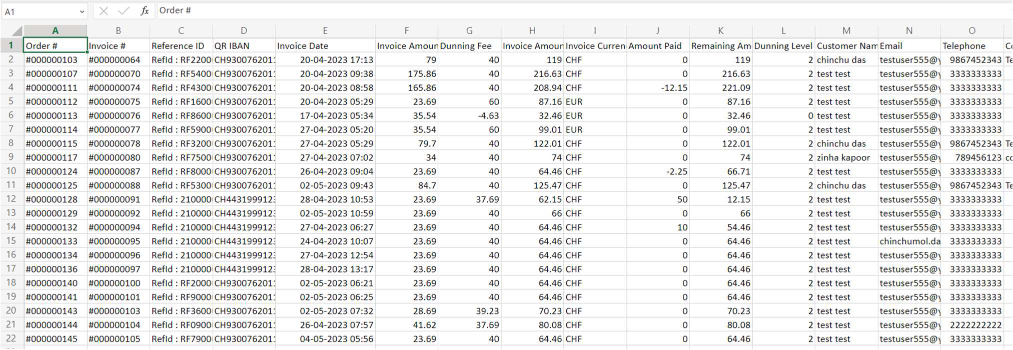
Figure 31
Dunning Reminder Log
From Magento versions 2.4.4 through 2.4.8-p3, the dunning reminder log has been added.The Dunning Reminder Log records details of all reminder emails sent to customers. It helps track when and to whom reminder emails were sent, making it easier to verify email delivery and monitor reminder activity. This log is useful for maintaining a clear history of dunning communications and for troubleshooting any issues related to reminder mail sending. You can view the Dunning Reminder Log by clicking the "Show Reminder Log" button available in both the Dunning Grid and the QR Bill Invoice Grid. This log displays all reminder email records, including the date, recipient, and status of each reminder sent.
Figure 32
Figure 33
Figure 34
Dunning reminder mail Message Queue
The Dunning Reminder Mail Message Queue can be triggered in three ways:
- Mass Action: Sends reminder emails only for the selected dunning records.
- "Run Dunning Reminder" Button: Processes and queues reminder emails for all pending dunning reminders.
- Cron Job: Automatically runs at defined intervals to queue and send reminder emails for all pending dunning records.
From Magento versions 2.4.4 through 2.4.8-p3, In all three cases the reminders are added to the message queue, and the consumers handle email sending asynchronously to ensure smooth and efficient processing.
Note: The message consumer can be run manually using the command bin/magento queue:consumers:start dunning.reminder.consumer, or it will automatically execute when the consumers_runner cron job runs.
Note : - From Magento versions 2.4.4 through 2.4.8-p3, The configuration changes are transferred from Payment method to configuration section. Ensure the configurations of the module is correct after the installing the module
In Magento version from 2.4.7-p1 to 2.4.8p3, manual capture and cancelation of invoices may not function as expected. This is Magento issue identified and the following patches address the solution:
Patch for Invoice Cancelation, https://github.com/magento/magento2/pull/39314 : Addresses issues related to cancelling invoices.
Patch for Manual Invoice Capture, https://github.com/magento/magento2/pull/39297 : Resolves manual invoice capture problems.
SUPPORT
If you have questions, use our contact form in webshopextension.com or email at support@webshopextension.com